Owner Manual
Page 6
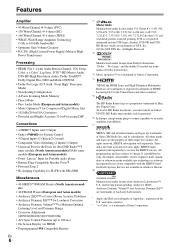
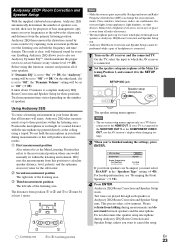
.... Service not available in " Input for Portable audio player • Banana Plug-Compatible Speaker Posts*6 • Powered Zone 2 • Bi-Amping Capability for FL/FR with SBL/SBR Miscellaneous • 40 SIRIUS*7/FM/AM Presets (North American models) • 40 FM/AM Presets ...8226; 192 kHz/24-bit D/A Converters • Powerful and Highly Accurate 32-bit Processing DSP Connections • 4 HDMI*4 Inputs and 1 Output • Onkyo Q for System Control • 4 Digital Inputs (2 Optical/2 Coaxial) • Component Video Switching (2 Inputs/1 Output) • Universal Port for the Dock ...
.... Service not available in " Input for Portable audio player • Banana Plug-Compatible Speaker Posts*6 • Powered Zone 2 • Bi-Amping Capability for FL/FR with SBL/SBR Miscellaneous • 40 SIRIUS*7/FM/AM Presets (North American models) • 40 FM/AM Presets ...8226; 192 kHz/24-bit D/A Converters • Powerful and Highly Accurate 32-bit Processing DSP Connections • 4 HDMI*4 Inputs and 1 Output • Onkyo Q for System Control • 4 Digital Inputs (2 Optical/2 Coaxial) • Component Video Switching (2 Inputs/1 Output) • Universal Port for the Dock ...
Owner Manual
Page 13
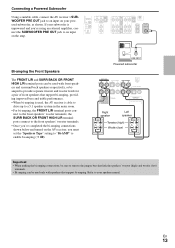
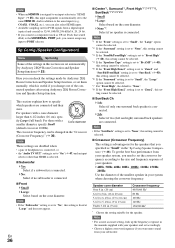
...of front speakers that support bi-amping, providing improved bass and treble performance. • When bi-amping is used only with speakers that link the speakers' tweeter (high) and woofer (low) terminals. • Bi-amping can be sure to remove the jumper bars that support bi-amping. the SURR BACK OR ...subwoofer, as shown. Refer to your subwoofer is able to drive up to a 5.1 speaker system in the main room. • For bi-amping, the FRONT L/R terminal posts con- L NE PUT LINE INPUT Powered subwoofer Right speaker Left speaker Tweeter (high) Woofer (low) Important: &#...
...of front speakers that support bi-amping, providing improved bass and treble performance. • When bi-amping is used only with speakers that link the speakers' tweeter (high) and woofer (low) terminals. • Bi-amping can be sure to remove the jumper bars that support bi-amping. the SURR BACK OR ...subwoofer, as shown. Refer to your subwoofer is able to drive up to a 5.1 speaker system in the main room. • For bi-amping, the FRONT L/R terminal posts con- L NE PUT LINE INPUT Powered subwoofer Right speaker Left speaker Tweeter (high) Woofer (low) Important: &#...
Owner Manual
Page 22
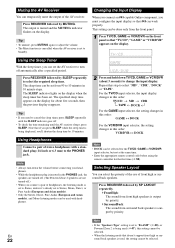
The output is set to Stereo, unless it's already set to Standby. Changing the Input Display When you connect an V-capable Onkyo component, you need to select the required sleep time. Repeat this order: VCR/DVR ↔ DOCK Note • DOCK can be selected for the TV/... to select "MD", "CDR", "DOCK" or "TAPE". Note that doesn't support front high or sur- 22 round back speakers is inserted in this step to "Bi-AMP" (➔ 40), or Powered Zone 2 is set to Stereo, Mono, Direct, or Pure Audio (European and Asian models). • Only the Stereo, Direct, Pure Audio...
The output is set to Stereo, unless it's already set to Standby. Changing the Input Display When you connect an V-capable Onkyo component, you need to select the required sleep time. Repeat this order: VCR/DVR ↔ DOCK Note • DOCK can be selected for the TV/... to select "MD", "CDR", "DOCK" or "TAPE". Note that doesn't support front high or sur- 22 round back speakers is inserted in this step to "Bi-AMP" (➔ 40), or Powered Zone 2 is set to Stereo, Mono, Direct, or Pure Audio (European and Asian models). • Only the Stereo, Direct, Pure Audio...
Owner Manual
Page 23
...side of your TV is connected. 1 Turn on the number of the listening area. If your speakers. For hookup information, see "Bi-amping the Front Speakers" (➔ 13). 4 Press ENTER. Background noise and Radio Frequency Interference (RFI) can disrupt the room measurements. ...Silence the cell phone (even if it to D must select "Bi-AMP" in the "Speakers Type" setting (➔ 40). Please refrain from this will enjoy, Audyssey 2EQ takes measurements at up test tones ...
...side of your TV is connected. 1 Turn on the number of the listening area. If your speakers. For hookup information, see "Bi-amping the Front Speakers" (➔ 13). 4 Press ENTER. Background noise and Radio Frequency Interference (RFI) can disrupt the room measurements. ...Silence the cell phone (even if it to D must select "Bi-AMP" in the "Speakers Type" setting (➔ 40). Please refrain from this will enjoy, Audyssey 2EQ takes measurements at up test tones ...
Owner Manual
Page 36
.... *3 If the "SurrBk/FrontHigh" setting is set to "Front High" (➔ 40), this setting cannot be selected. *4 If the "Speakers Type" setting is set to "Bi-AMP" (➔ 40), this setting cannot be selected. *5 If the "Front High/Zone2" setting is set to "Zone2" and "SurrBk/FrontHigh" setting is set to "SurrBack...
.... *3 If the "SurrBk/FrontHigh" setting is set to "Front High" (➔ 40), this setting cannot be selected. *4 If the "Speakers Type" setting is set to "Bi-AMP" (➔ 40), this setting cannot be selected. *5 If the "Front High/Zone2" setting is set to "Zone2" and "SurrBk/FrontHigh" setting is set to "SurrBack...
Owner Manual
Page 40
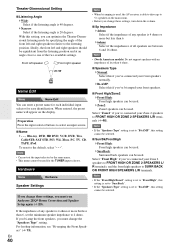
...STB, PS3, Wii, Xbox, PC, TV, CD, TAPE, iPod: To reset to one of the two available settings. For hookup information, see "Bi-amping the Front Speakers" (➔ 13). Front left and right speakers relative to FRONT HIGH OR ZONE 2 SPEAKERS L/R terminals (➔ 46). Hardware Menu ... speakers can be selected. Note • Can not set to "Front High", this setting cannot be used. Select "Zone2" if you 've bi-amped your Zone 2 speakers to the listening position. If the impedance of any speaker is 20 degrees. Theater-Dimensional Setting ■ Listening Angle ` Wide...
...STB, PS3, Wii, Xbox, PC, TV, CD, TAPE, iPod: To reset to one of the two available settings. For hookup information, see "Bi-amping the Front Speakers" (➔ 13). Front left and right speakers relative to FRONT HIGH OR ZONE 2 SPEAKERS L/R terminals (➔ 46). Hardware Menu ... speakers can be selected. Note • Can not set to "Front High", this setting cannot be used. Select "Zone2" if you 've bi-amped your Zone 2 speakers to the listening position. If the impedance of any speaker is 20 degrees. Theater-Dimensional Setting ■ Listening Angle ` Wide...
Owner Manual
Page 46
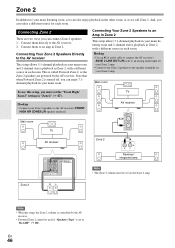
...AV receiver. • Powered Zone 2 cannot be set the "Front High/ Zone2" setting to the AV receiver. 2. Connecting Your Zone 2 Speakers to "Bi-AMP" (➔ 40). Hookup • Use an RCA audio cable to connect the AV receiver's ZONE 2 LINE OUT L/R jacks to the speaker terminals on ... your main room. Connecting Your Zone 2 Speakers Directly to the AV receiver This setup allows 5.1-channel playback in your Zone 2 speakers to an amp in each room. Connect them to the AV receiver's FRONT HIGH OR ZONE2 L/R speaker terminals. Hookup • Connect your main room and ...
...AV receiver. • Powered Zone 2 cannot be set the "Front High/ Zone2" setting to the AV receiver. 2. Connecting Your Zone 2 Speakers to "Bi-AMP" (➔ 40). Hookup • Use an RCA audio cable to connect the AV receiver's ZONE 2 LINE OUT L/R jacks to the speaker terminals on ... your main room. Connecting Your Zone 2 Speakers Directly to the AV receiver This setup allows 5.1-channel playback in your Zone 2 speakers to an amp in each room. Connect them to the AV receiver's FRONT HIGH OR ZONE2 L/R speaker terminals. Hookup • Connect your main room and ...
Owner Manual
Page 47
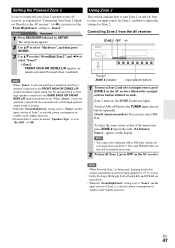
... FM press the TUNER input selector button repeatedly. (North American models) You can also select SIRIUS. Setting the Powered Zone 2 If you must set to "Bi-AMP" (➔ 40). When "Zone2" is selected and Zone 2 turned off , how to select an input source for Zone 2, and how to adjust the volume for...
... FM press the TUNER input selector button repeatedly. (North American models) You can also select SIRIUS. Setting the Powered Zone 2 If you must set to "Bi-AMP" (➔ 40). When "Zone2" is selected and Zone 2 turned off , how to select an input source for Zone 2, and how to adjust the volume for...


