
Owners Manual - English
Page 2
... 41 Connecting with the TV using an analog video cable 25 Device and Supported Format 43 Connecting Playback Devices Connecting an AV Component with HDMI Jack Mounted 26 Listening To the AM/FM Radio 26 Tuning into a Radio Station 44 44 Connecting an AV Component without HDMI Jack Presetting a Radio Station 46 Mounted 27 Using RDS (Australian models) 48 Connecting an Audio Component 28 Multi-zone 49 Connecting Antennas 29 Playing Back 49 Connecting the Power Cord 30 Convenience functions 51 2 Front Panel≫ Rear Panel≫ Remote≫...
... 41 Connecting with the TV using an analog video cable 25 Device and Supported Format 43 Connecting Playback Devices Connecting an AV Component with HDMI Jack Mounted 26 Listening To the AM/FM Radio 26 Tuning into a Radio Station 44 44 Connecting an AV Component without HDMI Jack Presetting a Radio Station 46 Mounted 27 Using RDS (Australian models) 48 Connecting an Audio Component 28 Multi-zone 49 Connecting Antennas 29 Playing Back 49 Connecting the Power Cord 30 Convenience functions 51 2 Front Panel≫ Rear Panel≫ Remote≫...
Owners Manual - English
Page 6
... mode ( p53). 4. HOME button: You can adjust the sound quality of 30° to right and left. 5. PHONES jack: Connect headphones with a standard plug (Ø1/4"/6.3 mm). 12. USB port: Connect a USB storage device to "BT" (BLUETOOTH). 3. SETUP MIC jack: Connect the supplied speaker setup microphone. ( p34) 15. BLUETOOTH button: Switches the input to play music files stored in it. ( p41) 6 Front Panel≫ Rear Panel≫ Remote≫ MULTI ZONE buttons: Used to confirm your selection. MASTER VOLUME 11. When using the TUNER, use TUNING for manual selection, and PRESET...
... mode ( p53). 4. HOME button: You can adjust the sound quality of 30° to right and left. 5. PHONES jack: Connect headphones with a standard plug (Ø1/4"/6.3 mm). 12. USB port: Connect a USB storage device to "BT" (BLUETOOTH). 3. SETUP MIC jack: Connect the supplied speaker setup microphone. ( p34) 15. BLUETOOTH button: Switches the input to play music files stored in it. ( p41) 6 Front Panel≫ Rear Panel≫ Remote≫ MULTI ZONE buttons: Used to confirm your selection. MASTER VOLUME 11. When using the TUNER, use TUNING for manual selection, and PRESET...
Owners Manual - English
Page 9
...: Connect speakers with a digital optical cable or digital coaxial cable. 6. BLUETOOTH antenna is output from the VIDEO IN jack to the TV using a USB cable. ( p26) 5. HDMI OUT jack: Transmit video signals and audio signals with an HDMI cable connected to two powered subwoofers can be connected. DIGITAL IN OPTICAL/COAXIAL jacks: Input TV or AV component digital audio signals with speaker cables. (FRONT terminals for North American models support banana plugs.) 9 Front Panel≫ Rear Panel≫ Remote≫ SUBWOOFER jacks: Connect a powered subwoofer with an analog video...
...: Connect speakers with a digital optical cable or digital coaxial cable. 6. BLUETOOTH antenna is output from the VIDEO IN jack to the TV using a USB cable. ( p26) 5. HDMI OUT jack: Transmit video signals and audio signals with an HDMI cable connected to two powered subwoofers can be connected. DIGITAL IN OPTICAL/COAXIAL jacks: Input TV or AV component digital audio signals with speaker cables. (FRONT terminals for North American models support banana plugs.) 9 Front Panel≫ Rear Panel≫ Remote≫ SUBWOOFER jacks: Connect a powered subwoofer with an analog video...

Owners Manual - English
Page 10
... to be turned off completely. bs 18. VOLUME buttons br 16. Q (QUICK MENU) button: Pressing this unit. ( p59) 7. LISTENING MODE button: Select a listening mode ( p53). 8. ZONE 2 button: Used to the previous state while setting. 17. Remote Controller 1 2 3 4 5 6 7 8 9 Contents ≫ Preparation ≫ Playback ≫ Setup ≫ 1. button: Display advanced setting items on the display. BASS and TREBLE buttons: You can make bm settings such as "M.OPT" quickly while playing. ( p66) 5. AUDIO SEL button: Used to switch among audio input signals to enter standby bk...
... to be turned off completely. bs 18. VOLUME buttons br 16. Q (QUICK MENU) button: Pressing this unit. ( p59) 7. LISTENING MODE button: Select a listening mode ( p53). 8. ZONE 2 button: Used to the previous state while setting. 17. Remote Controller 1 2 3 4 5 6 7 8 9 Contents ≫ Preparation ≫ Playback ≫ Setup ≫ 1. button: Display advanced setting items on the display. BASS and TREBLE buttons: You can make bm settings such as "M.OPT" quickly while playing. ( p66) 5. AUDIO SEL button: Used to switch among audio input signals to enter standby bk...

Owners Manual - English
Page 24
.... Input Assign" - connected to the input jack of the TV, etc. Control" is set -top box, etc. Connection to the instruction manual of this unit to "ON" on this case, refer to "TV" after all connections are completed. (*) ARC function: Transmits the audio signals of the TV via an HDMI cable, and plays the audio of the TV on the Setup menu ( p59), set "3. TV 24 Front Panel≫ Rear Panel≫ Remote≫ "a. "a. Setup • If a digital optical cable...
.... Input Assign" - connected to the input jack of the TV, etc. Control" is set -top box, etc. Connection to the instruction manual of this unit to "ON" on this case, refer to "TV" after all connections are completed. (*) ARC function: Transmits the audio signals of the TV via an HDMI cable, and plays the audio of the TV on the Setup menu ( p59), set "3. TV 24 Front Panel≫ Rear Panel≫ Remote≫ "a. "a. Setup • If a digital optical cable...
Owners Manual - English
Page 26
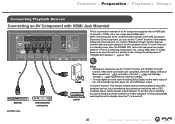
... volume using a USB cable. to the Bitstream output. (*)"Control" function: This function enables various linking operations with CECcompliant devices, such as switching input selectors interlocking with an HDMI jack. Also, the POWER OUT jack on Menu operations ( p60), and refer to "Control" ( p64) and "Standby Through" ( p65) respectively to make the settings. • To enjoy digital surround sound including Dolby Digital, set -top box GAME Streaming media player Setup • Settings are completed, check the setting method on the rear panel...
... volume using a USB cable. to the Bitstream output. (*)"Control" function: This function enables various linking operations with CECcompliant devices, such as switching input selectors interlocking with an HDMI jack. Also, the POWER OUT jack on Menu operations ( p60), and refer to "Control" ( p64) and "Standby Through" ( p65) respectively to make the settings. • To enjoy digital surround sound including Dolby Digital, set -top box GAME Streaming media player Setup • Settings are completed, check the setting method on the rear panel...
Owners Manual - English
Page 27
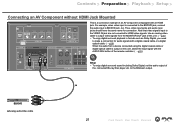
... the BD/DVD jack, connect the audio input to the Bitstream output. Note that video signals input to the VIDEO IN jack are not converted to make a connection for connection. Use an analog video cable to output video signals from a device connected using the digital coaxial cable or digital optical cable is output on this unit. ( p25) • To enjoy digital surround playback in formats such as Dolby Digital, you need to HDMI video signals. a BD/DVD a Analog audio/video cable 27 Front Panel≫ Rear Panel≫ Remote≫ Thus, video input jacks and audio input jacks should have...
... the BD/DVD jack, connect the audio input to the Bitstream output. Note that video signals input to the VIDEO IN jack are not converted to make a connection for connection. Use an analog video cable to output video signals from a device connected using the digital coaxial cable or digital optical cable is output on this unit. ( p25) • To enjoy digital surround playback in formats such as Dolby Digital, you need to HDMI video signals. a BD/DVD a Analog audio/video cable 27 Front Panel≫ Rear Panel≫ Remote≫ Thus, video input jacks and audio input jacks should have...

Owners Manual - English
Page 32
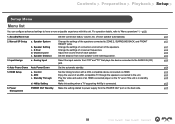
... required in the setup menu. • Make the settings before the "Automatic Speaker Setting (AccuEQ Room Calibration)" ( p34) procedure. 1. Press button. 3. To return to confirm your selection. Select "2. Setup 1.AccuEQ Room Cal. 2.Manual SP Setup 3.Input Assign 4.Auto Power Down 5.HDMI Setup 6.Power Management 32 Front Panel≫ Rear Panel≫ Remote≫ Manual SP Setup", and press ENTER button. • Select the item with the cursors of the remote controller, and press ENTER button to the previous screen, press button. Press BD/DVD button. 2.
... required in the setup menu. • Make the settings before the "Automatic Speaker Setting (AccuEQ Room Calibration)" ( p34) procedure. 1. Press button. 3. To return to confirm your selection. Select "2. Setup 1.AccuEQ Room Cal. 2.Manual SP Setup 3.Input Assign 4.Auto Power Down 5.HDMI Setup 6.Power Management 32 Front Panel≫ Rear Panel≫ Remote≫ Manual SP Setup", and press ENTER button. • Select the item with the cursors of the remote controller, and press ENTER button to the previous screen, press button. Press BD/DVD button. 2.

Owners Manual - English
Page 50
... input source you turn the unit to be played in the separate room. • Selectable input sources are, "BD/DVD", "CBL/SAT", "CD", "TV", "TUNER" and "BT" (BLUETOOTH). Setting ZONE 2 to on while the unit is in standby also switches the playback mode to playback in the separate room only. • To output audio from an externally connected AV component to ZONE 2, use an analog audio cable for connection. • If ZONE 2 is on, power consumption during multi-zone...
... input source you turn the unit to be played in the separate room. • Selectable input sources are, "BD/DVD", "CBL/SAT", "CD", "TV", "TUNER" and "BT" (BLUETOOTH). Setting ZONE 2 to on while the unit is in standby also switches the playback mode to playback in the separate room only. • To output audio from an externally connected AV component to ZONE 2, use an analog audio cable for connection. • If ZONE 2 is on, power consumption during multi-zone...

Owners Manual - English
Page 51
... subwoofer can adjust the sound quality of the front speakers. 1. buttons to adjust from "BASS" and "TRE". Press the +/- button. 51 Front Panel≫ Rear Panel≫ Remote≫ TRE: Enhances or moderates the high-tone range of the front speakers. Manual SP Setup" -"b. "c. The tone can be adjusted using the remote controller. ( p10) • It cannot be adjusted if the listening mode is set to "150Hz" or more on the main unit to select the setting...
... subwoofer can adjust the sound quality of the front speakers. 1. buttons to adjust from "BASS" and "TRE". Press the +/- button. 51 Front Panel≫ Rear Panel≫ Remote≫ TRE: Enhances or moderates the high-tone range of the front speakers. Manual SP Setup" -"b. "c. The tone can be adjusted using the remote controller. ( p10) • It cannot be adjusted if the listening mode is set to "150Hz" or more on the main unit to select the setting...
Owners Manual - English
Page 54
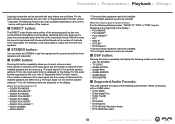
...;STEREO button: You can be installed. Selecting this mode allows you to "Supported Audio Formats" section. When the input signal is 7.1ch), the following audio formats. (When connecting with an HDMI cable) • Dolby Digital • Dolby Digital Plus • Dolby TrueHD • DTS • DTS 96/24 • DTS Express • DTS-HD High Resolution Audio • DTS-HD Master Audio 54 Front Panel≫ Rear Panel≫ Remote≫ The input signal is 5.1ch and the speaker setting is multi-channel (For the following listening modes, "DOLBY D", "DTS...
...;STEREO button: You can be installed. Selecting this mode allows you to "Supported Audio Formats" section. When the input signal is 7.1ch), the following audio formats. (When connecting with an HDMI cable) • Dolby Digital • Dolby Digital Plus • Dolby TrueHD • DTS • DTS 96/24 • DTS Express • DTS-HD High Resolution Audio • DTS-HD Master Audio 54 Front Panel≫ Rear Panel≫ Remote≫ The input signal is 5.1ch and the speaker setting is multi-channel (For the following listening modes, "DOLBY D", "DTS...
Owners Manual - English
Page 56
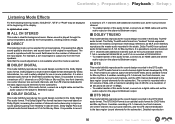
... front speakers, creating a stereo image. „„DIRECT This listening mode can be displayed at 96 kHz/24 bit, and 5.1ch is possible to record a maximum of 5.1 channels on a DVD-Video or Blu-ray Disc; It is recorded at a resolution of 24 bits and a bit rate of 1.5 Mbps. • To enable transfer of this audio format, connect via a digital cable and set the audio output on the player...
... front speakers, creating a stereo image. „„DIRECT This listening mode can be displayed at 96 kHz/24 bit, and 5.1ch is possible to record a maximum of 5.1 channels on a DVD-Video or Blu-ray Disc; It is recorded at a resolution of 24 bits and a bit rate of 1.5 Mbps. • To enable transfer of this audio format, connect via a digital cable and set the audio output on the player...
Owners Manual - English
Page 59
... Front Panel≫ Rear Panel≫ Remote≫ p61 2. p62 e. p64 c. Standby Through Play the video and audio of an ARC-compatible TV through the speakers connected to ZONE 2, SURROUND BACK, and FRONT p61 HEIGHT jacks. Power POWER OUT Standby Make the setting related to power supply from the POWER OUT port on the TV even if the unit is connected. Analog Input Select the input selector from each speaker to the listening position. HDMI Setup a. ARC Enjoy the sound of an HDMI-connected player on...
... Front Panel≫ Rear Panel≫ Remote≫ p61 2. p62 e. p64 c. Standby Through Play the video and audio of an ARC-compatible TV through the speakers connected to ZONE 2, SURROUND BACK, and FRONT p61 HEIGHT jacks. Power POWER OUT Standby Make the setting related to power supply from the POWER OUT port on the TV even if the unit is connected. Analog Input Select the input selector from each speaker to the listening position. HDMI Setup a. ARC Enjoy the sound of an HDMI-connected player on...

Owners Manual - English
Page 66
... settings, press the Q button. • Depending on the remote controller. 2. SYN (A/V SYNC) If the video is Direct or headphones are used. „„AV. "CH1": Main channel only "CH2": Sub channel only 66 Front Panel≫ Rear Panel≫ Remote≫ The setting can be set for each input. • This can delay the audio to offset the gap. • It cannot be set when the listening mode is Direct with analog signal input. „„M.OPT (Advanced Music...
... settings, press the Q button. • Depending on the remote controller. 2. SYN (A/V SYNC) If the video is Direct or headphones are used. „„AV. "CH1": Main channel only "CH2": Sub channel only 66 Front Panel≫ Rear Panel≫ Remote≫ The setting can be set for each input. • This can delay the audio to offset the gap. • It cannot be set when the listening mode is Direct with analog signal input. „„M.OPT (Advanced Music...
Owners Manual - English
Page 67
... function is switched between video and audio unnatural when selecting "ON", switch the setting to "OFF". „„C.WIDTH (Center Width) (Available only when using a center speaker) Adjust the width of the sound field of the front channel when playing in the DTS Neo:6 MUSIC/CINEMA listening mode. While pressing and holding the RETURN button of the main unit, press the ON/STANDBY button to reduce the volume while watching a movie late night. The smaller the setting...
... function is switched between video and audio unnatural when selecting "ON", switch the setting to "OFF". „„C.WIDTH (Center Width) (Available only when using a center speaker) Adjust the width of the sound field of the front channel when playing in the DTS Neo:6 MUSIC/CINEMA listening mode. While pressing and holding the RETURN button of the main unit, press the ON/STANDBY button to reduce the volume while watching a movie late night. The smaller the setting...
Owners Manual - English
Page 70
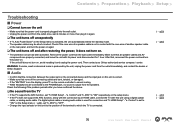
... sound is connected. ( p30) ( p64) ( p64) ( p24) 70 Front Panel≫ Rear Panel≫ Remote≫ If the unit still does not turn on, avoid resetting it does not turn on. • The protection circuit has been activated. If a digital optical cable or analog audio cable is activated, the unit automatically enters the standby mode. • The speaker cables may be short-circuited. Control" is set "5. Auto Power Down" on the Setup menu is used for 1 hour. HDMI Setup" - ARC...
... sound is connected. ( p30) ( p64) ( p64) ( p24) 70 Front Panel≫ Rear Panel≫ Remote≫ If the unit still does not turn on, avoid resetting it does not turn on. • The protection circuit has been activated. If a digital optical cable or analog audio cable is activated, the unit automatically enters the standby mode. • The speaker cables may be short-circuited. Control" is set "5. Auto Power Down" on the Setup menu is used for 1 hour. HDMI Setup" - ARC...
Owners Manual - English
Page 71
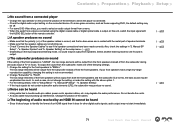
..., switch the input signal with the AUDIO SEL button of the remote controller. ❏❏A speaker produces no sound • Make sure that the polarity (+/-) of speaker terminals. • Make sure that no bare wires are not shorting out. • Check "Connect the Speaker Cables" to select an audio output format from a menu. • When the audio from a device connected using the digital coaxial cable or digital optical cable is output on this , the bass sound may be output from speakers. Do...
..., switch the input signal with the AUDIO SEL button of the remote controller. ❏❏A speaker produces no sound • Make sure that the polarity (+/-) of speaker terminals. • Make sure that no bare wires are not shorting out. • Check "Connect the Speaker Cables" to select an audio output format from a menu. • When the audio from a device connected using the digital coaxial cable or digital optical cable is output on this , the bass sound may be output from speakers. Do...
Owners Manual - English
Page 72
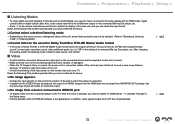
... sound, video additional audio, etc.) to "Off" in the Setup menu. • Normal operation with an HDMI cable, digital coaxial cable or digital optical cable. Refer to "Selecting a Listening mode" in "Listening Mode". ❏❏Cannot listen to the sound in Dolby TrueHD or DTS-HD Master Audio format • If the audio in Dolby TrueHD or DTS-HD Master Audio format cannot be selected. Images from the HDMI jack are not output from a PC are not guaranteed. ( p53) ( p65) 72 Front Panel≫ Rear Panel...
... sound, video additional audio, etc.) to "Off" in the Setup menu. • Normal operation with an HDMI cable, digital coaxial cable or digital optical cable. Refer to "Selecting a Listening mode" in "Listening Mode". ❏❏Cannot listen to the sound in Dolby TrueHD or DTS-HD Master Audio format • If the audio in Dolby TrueHD or DTS-HD Master Audio format cannot be selected. Images from the HDMI jack are not output from a PC are not guaranteed. ( p53) ( p65) 72 Front Panel≫ Rear Panel...

Owners Manual - English
Page 75
... the power plug of the display. „„Others ❏❏Strange noise can be heard from the outlet, use an analog audio cable for better ventilation. • Lower the volume level. ( p61) ( p18) ( p10) 75 Front Panel≫ Rear Panel≫ Remote≫ show different distances to the speakers from the actual ones • Depending on the speakers you have connected another device to ZONE 2, use different...
... the power plug of the display. „„Others ❏❏Strange noise can be heard from the outlet, use an analog audio cable for better ventilation. • Lower the volume level. ( p61) ( p18) ( p10) 75 Front Panel≫ Rear Panel≫ Remote≫ show different distances to the speakers from the actual ones • Depending on the speakers you have connected another device to ZONE 2, use different...

Owners Manual - English
Page 77
... Digital Content Protection), a copy protection system for connecting TVs, projectors, Blu-ray Disc/DVD players, digital tuners, and other video components. For linked functions to work properly, do not connect CEC-compliant devices exceeding the connectable number to the HDMI jack as switching input selectors interlocking with even more colors. With HDMI, a single cable can be transmitted to the unit must also support the HDMI output of the above audio formats. 77 Front Panel≫ Rear Panel≫ Remote...
... Digital Content Protection), a copy protection system for connecting TVs, projectors, Blu-ray Disc/DVD players, digital tuners, and other video components. For linked functions to work properly, do not connect CEC-compliant devices exceeding the connectable number to the HDMI jack as switching input selectors interlocking with even more colors. With HDMI, a single cable can be transmitted to the unit must also support the HDMI output of the above audio formats. 77 Front Panel≫ Rear Panel≫ Remote...


