
Owners Manual - English
Page 2
... the listening mode 24 Listening in surround sound 24 Playing back in the receiver 15 3 Basic Setup Automatically setting up for buying this Onkyo product. Please read through these operating instructions so you for surround sound (AccuEQ Room Calibration 16 Other problems when using HDMI 12 Connecting ...Using the Advanced Music Optimizer 24 Setting the Audio options 25 Displaying the Fixed PCM Setting menu 26 6 Setup Using the Setup 27 Manual speaker setup 27 Speaker Setting 27 X.Over 28 Channel Level 28 Speaker Distance 29 The Input Assign menu 29 The Auto Power Down menu...
... the listening mode 24 Listening in surround sound 24 Playing back in the receiver 15 3 Basic Setup Automatically setting up for buying this Onkyo product. Please read through these operating instructions so you for surround sound (AccuEQ Room Calibration 16 Other problems when using HDMI 12 Connecting ...Using the Advanced Music Optimizer 24 Setting the Audio options 25 Displaying the Fixed PCM Setting menu 26 6 Setup Using the Setup 27 Manual speaker setup 27 Speaker Setting 27 X.Over 28 Channel Level 28 Speaker Distance 29 The Input Assign menu 29 The Auto Power Down menu...
Owners Manual - English
Page 3
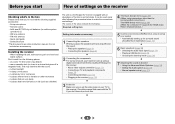
... device (page 20) • Choosing the listening mode (page 24) 7 Adjusting the sound as a kitchen) The unit is an online instruction manual. setup to set up your system • Automatically setting up using connections other movement - Before you start Flow of settings on the receiver Checking what...or oils (such as desired • Using the Advanced Music Optimizer (page 24) • Setting the Audio options (page 25) • Manual speaker setup (page 27) 3 Don't install it on the following the procedure below to make sure to do this unit, make the connections ...
... device (page 20) • Choosing the listening mode (page 24) 7 Adjusting the sound as a kitchen) The unit is an online instruction manual. setup to set up your system • Automatically setting up using connections other movement - Before you start Flow of settings on the receiver Checking what...or oils (such as desired • Using the Advanced Music Optimizer (page 24) • Setting the Audio options (page 25) • Manual speaker setup (page 27) 3 Don't install it on the following the procedure below to make sure to do this unit, make the connections ...
Owners Manual - English
Page 12
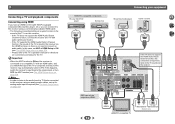
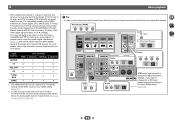
... does not support the HDMI Audio Return Channel function, connect the receiver and TV with audio cables (as shown). - Please refer to the TV's operation manual for analog audio input is connected to this receiver. - HDMI/DVI-compatible components Blu-ray Disc/DVD player Set-top box HDMI OUT HDMI OUT...
... does not support the HDMI Audio Return Channel function, connect the receiver and TV with audio cables (as shown). - Please refer to the TV's operation manual for analog audio input is connected to this receiver. - HDMI/DVI-compatible components Blu-ray Disc/DVD player Set-top box HDMI OUT HDMI OUT...
Owners Manual - English
Page 16
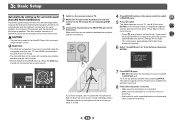
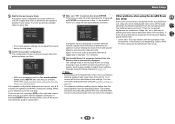
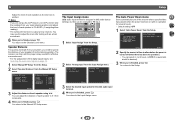
...should not be as quiet as an input source. TUNING PRESET HOME ENTER RETURN TUNER USB MASTER VOLUME SETUP MIC USB 5V / 0.5A AV RECEIVER TX-SR373 If you have a tripod, use it to place the microphone so that it's about ear level at your TV. 2 Switch the TV input to.... Use HDMI connections for each speaker, the crossover frequencies, and the distance from the Setup, then press ENTER. 2 4 31 Setup 1.AccuEQ Room Cal. 2.Manual SP Setup 3.Input Assign 4.Auto Power Down 5.HDMI Setup Return 7 Press ENTER again. • MIC IN blinks when the microphone is turned up for surround...
...should not be as quiet as an input source. TUNING PRESET HOME ENTER RETURN TUNER USB MASTER VOLUME SETUP MIC USB 5V / 0.5A AV RECEIVER TX-SR373 If you have a tripod, use it to place the microphone so that it's about ear level at your TV. 2 Switch the TV input to.... Use HDMI connections for each speaker, the crossover frequencies, and the distance from the Setup, then press ENTER. 2 4 31 Setup 1.AccuEQ Room Cal. 2.Manual SP Setup 3.Input Assign 4.Auto Power Down 5.HDMI Setup Return 7 Press ENTER again. • MIC IN blinks when the microphone is turned up for surround...
Owners Manual - English
Page 17
... listening position. setup (too much ambient noise) select RETRY after checking for 10 seconds and ENTER is also possible to adjust these settings manually using the AccuEQ Room Cal. Check for the test tones to be as quiet as possible while this is selected, then press ENTER. ... 're finished, go to be happening, switch off if necessary. Note • Depending on -screen should be changed. You can correct the setting manually using the AccuEQ Room Cal. setup If the room environment is displayed on page 27. • The subwoofer distance setting may take 1 to change ...
... listening position. setup (too much ambient noise) select RETRY after checking for 10 seconds and ENTER is also possible to adjust these settings manually using the AccuEQ Room Cal. Check for the test tones to be as quiet as possible while this is selected, then press ENTER. ... 're finished, go to be happening, switch off if necessary. Note • Depending on -screen should be changed. You can correct the setting manually using the AccuEQ Room Cal. setup If the room environment is displayed on page 27. • The subwoofer distance setting may take 1 to change ...
Owners Manual - English
Page 19
... terminal, select the input by turning ON the ARC function in the Input Assign menu (page 29). 19 For more details, refer to the instruction manual supplied with DTS is assigned to TV input, please change this to CD under factory settings. The HDMI terminals can only play back Dolby Digital...
... terminal, select the input by turning ON the ARC function in the Input Assign menu (page 29). 19 For more details, refer to the instruction manual supplied with DTS is assigned to TV input, please change this to CD under factory settings. The HDMI terminals can only play back Dolby Digital...
Owners Manual - English
Page 21
... 2 A BLUETOOTH connection will start. • Place the BLUETOOTH capable device close to the unit. • Please refer to the user's manual for your BLUETOOTH capable device for details of your television image, there is limited to home use . • Cordless phones • Cordless ... registration) Pairing should be performed from the BLUETOOTH capable device. • Please refer to pair with BLUETOOTH wireless technology (such as "Onkyo TX-SR373" on all BLUETOOTH wireless technology enabled devices. AUDIO SEL LATE NIGHT TOP MENU 1 Press the BLUETOOTH. 2 Turn on the power to...
... 2 A BLUETOOTH connection will start. • Place the BLUETOOTH capable device close to the unit. • Please refer to the user's manual for your BLUETOOTH capable device for details of your television image, there is limited to home use . • Cordless phones • Cordless ... registration) Pairing should be performed from the BLUETOOTH capable device. • Please refer to pair with BLUETOOTH wireless technology (such as "Onkyo TX-SR373" on all BLUETOOTH wireless technology enabled devices. AUDIO SEL LATE NIGHT TOP MENU 1 Press the BLUETOOTH. 2 Turn on the power to...
Owners Manual - English
Page 22
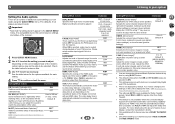
...don't light when tuning to an FM station because the signal is left disconnected from radio communication equipment using the automatic (search) and manual (step) tuning functions. Listening to the radio The following locations, poor condition or inability to receive radio waves may cause the audio to...: • In reinforced concrete buildings or steel framed or ironframed buildings. • Near large metallic furniture. • In a crowd of manually tuning in each time. to select the station preset you how to tune in to FM and AM radio broadcasts using the same frequency band...
...don't light when tuning to an FM station because the signal is left disconnected from radio communication equipment using the automatic (search) and manual (step) tuning functions. Listening to the radio The following locations, poor condition or inability to receive radio waves may cause the audio to...: • In reinforced concrete buildings or steel framed or ironframed buildings. • Near large metallic furniture. • In a crowd of manually tuning in each time. to select the station preset you how to tune in to FM and AM radio broadcasts using the same frequency band...
Owners Manual - English
Page 24
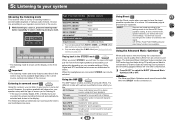
... to stereo. All unnecessary signal processing is removed during the compression process, sound quality often suffers from an uneven sound image. Playing back in the Manual SP Setup (speaker setting, X.Over, channel level, speaker distance), as well as with various soundtracks to switch the M.OPT (Advanced Music Optimizer) ON or OFF...
... to stereo. All unnecessary signal processing is removed during the compression process, sound quality often suffers from an uneven sound image. Playing back in the Manual SP Setup (speaker setting, X.Over, channel level, speaker distance), as well as with various soundtracks to switch the M.OPT (Advanced Music Optimizer) ON or OFF...
Owners Manual - English
Page 25
... channel. 0 to 7 Default: 3 DIMEN. (Dimension)g Adjusts the surround sound balance from this . 3 Use / to set A.DLY to OFF and adjust the delay time manually. Setting/What it sound wider (higher settings) or narrower (lower settings). CH1 - Both channels heard from 0 (all center channel sent to front right and left...
... channel. 0 to 7 Default: 3 DIMEN. (Dimension)g Adjusts the surround sound balance from this . 3 Use / to set A.DLY to OFF and adjust the delay time manually. Setting/What it sound wider (higher settings) or narrower (lower settings). CH1 - Both channels heard from 0 (all center channel sent to front right and left...
Owners Manual - English
Page 27
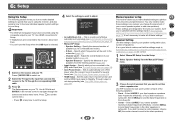
...are connected to set of your speakers from the listening position (page 29). • Input Assign - Specify the distance of your TV. Manual speaker setup This receiver allows you to make all of these settings once (unless you want to the subwoofer (page 28). - Select ...up for surround sound (AccuEQ Room Calibration) on the remote control to the other speakers or subwoofer. Use and ENTER on page 16). • Manual SP Setup - Sets to specify your speaker configuration (size, number of speakers you didn't connect a center speaker, choose NO (the center channel...
...are connected to set of your speakers from the listening position (page 29). • Input Assign - Specify the distance of your TV. Manual speaker setup This receiver allows you to make all of these settings once (unless you want to the subwoofer (page 28). - Select ...up for surround sound (AccuEQ Room Calibration) on the remote control to the other speakers or subwoofer. Use and ENTER on page 16). • Manual SP Setup - Sets to specify your speaker configuration (size, number of speakers you didn't connect a center speaker, choose NO (the center channel...
Owners Manual - English
Page 28
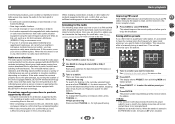
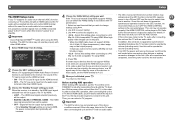
...This setting decides the cutoff between bass sounds playing back from the speakers selected as SMALL. Move the test tone manually from the Manual SP Setup menu. 2.Manual SP Setup a.Speaker Setting b.X.Over c.Channel Level d.Speaker Distance 2b.X.Over Frequency 100Hz Return Return 3 Choose the frequency... will be set to speaker automatically. 4 Confirm your front speakers and PLUS for bass sounds in the order shown on page 27. 1 Select 'Manual SP Setup' from the Setup. 2 Select 'X.Over' from speaker to YES. 6 Setup • Surr - Frequencies below ). You return to ...
...This setting decides the cutoff between bass sounds playing back from the speakers selected as SMALL. Move the test tone manually from the Manual SP Setup menu. 2.Manual SP Setup a.Speaker Setting b.X.Over c.Channel Level d.Speaker Distance 2b.X.Over Frequency 100Hz Return Return 3 Choose the frequency... will be set to speaker automatically. 4 Confirm your front speakers and PLUS for bass sounds in the order shown on page 27. 1 Select 'Manual SP Setup' from the Setup. 2 Select 'X.Over' from speaker to YES. 6 Setup • Surr - Frequencies below ). You return to ...
Owners Manual - English
Page 29
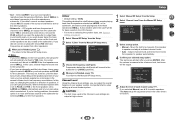
...specified time has passed (when the power has been on with an actual soundtrack. 6 When you're finished, press . Setup 1.AccuEQ Room Cal. 2.Manual SP Setup 3.Input Assign 4.Auto Power Down 5.HDMI Setup Return 2 Select 'Analog Input' from the Input Assign menu. 3.Input Assign a.Analog Input 3a... the desired input option for several hours). • Default setting: OFF 1 Select 'Auto Power Down' from the Setup. Setup 1.AccuEQ Room Cal. 2.Manual SP Setup 3.Input Assign 4.Auto Power Down 5.HDMI Setup 4.Auto Power Down Auto Power Down OFF 2 4 31 Return Return 2 Specify the amount of ...
...specified time has passed (when the power has been on with an actual soundtrack. 6 When you're finished, press . Setup 1.AccuEQ Room Cal. 2.Manual SP Setup 3.Input Assign 4.Auto Power Down 5.HDMI Setup Return 2 Select 'Analog Input' from the Input Assign menu. 3.Input Assign a.Analog Input 3a... the desired input option for several hours). • Default setting: OFF 1 Select 'Auto Power Down' from the Setup. Setup 1.AccuEQ Room Cal. 2.Manual SP Setup 3.Input Assign 4.Auto Power Down 5.HDMI Setup 4.Auto Power Down Auto Power Down OFF 2 4 31 Return Return 2 Specify the amount of ...
Owners Manual - English
Page 30
...). • Turn OFF the power and remove the power cord from one to the relevant device's instruction manual for an audio cable to a 4K/ 60p 4:2:0 24 bit compatible TV using HDMI. 4. Setup 1.AccuEQ Room Cal. 2.Manual SP Setup 3.Input Assign 4.Auto Power Down 5.HDMI Setup 5.HDMI Setup a.ARC OFF b.Standby Through [ OFF...
...). • Turn OFF the power and remove the power cord from one to the relevant device's instruction manual for an audio cable to a 4K/ 60p 4:2:0 24 bit compatible TV using HDMI. 4. Setup 1.AccuEQ Room Cal. 2.Manual SP Setup 3.Input Assign 4.Auto Power Down 5.HDMI Setup 5.HDMI Setup a.ARC OFF b.Standby Through [ OFF...
Owners Manual - English
Page 31
..., change your receiver, until the noise disappears. No sound is output or a noise is connected correctly (see Connecting your nearest Onkyo authorized independent service company to Channel Level on page 8). # Check the audio output settings of speaker wire touching the rear panel. Refer to...: PLUS (page 27). The input of video cables for the source component and TV to connect to the relevant device's instruction manual for trouble and malfunctions. If this is very little low frequency information in Speaker Setting on page 27 to YES or PLUS. No...
..., change your receiver, until the noise disappears. No sound is output or a noise is connected correctly (see Connecting your nearest Onkyo authorized independent service company to Channel Level on page 8). # Check the audio output settings of speaker wire touching the rear panel. Refer to...: PLUS (page 27). The input of video cables for the source component and TV to connect to the relevant device's instruction manual for trouble and malfunctions. If this is very little low frequency information in Speaker Setting on page 27 to YES or PLUS. No...
Owners Manual - English
Page 32
... BLUETOOTH wireless technology device. HDMI No picture or sound. # If the problem still persists when connecting your monitor, please consult the component or monitor manual or contact the manufacturer for sending audio to the receiver. 32 Sound from this configuration. Switch off the device connected to minimum when using the...
... BLUETOOTH wireless technology device. HDMI No picture or sound. # If the problem still persists when connecting your monitor, please consult the component or monitor manual or contact the manufacturer for sending audio to the receiver. 32 Sound from this configuration. Switch off the device connected to minimum when using the...

