
Operating Instructions
Page 2
...Listening to your system Choosing the listening mode 24 Listening in surround sound 24 Playing back in the receiver 15 3 Basic Setup Automatically setting up for buying this Onkyo product. Please read through these operating instructions so you will know how to music on the speaker placement 8 Connecting the... Direct 24 Using the Music Optimizer 24 Setting the Audio options 25 Displaying the Fixed PCM Setting menu 26 6 Setup Using the Setup 27 Manual speaker setup 27 Speaker Setting 27 X.Over 28 Channel Level 28 Speaker Distance 29 The Input Assign menu 29 The Auto Power...
...Listening to your system Choosing the listening mode 24 Listening in surround sound 24 Playing back in the receiver 15 3 Basic Setup Automatically setting up for buying this Onkyo product. Please read through these operating instructions so you will know how to music on the speaker placement 8 Connecting the... Direct 24 Using the Music Optimizer 24 Setting the Audio options 25 Displaying the Fixed PCM Setting menu 26 6 Setup Using the Setup 27 Manual speaker setup 27 Speaker Setting 27 X.Over 28 Channel Level 28 Speaker Distance 29 The Input Assign menu 29 The Auto Power...
Operating Instructions
Page 3
... 7 Adjusting the sound as desired • Using the Music Optimizer (page 24) • Setting the Audio options (page 25) • Manual speaker setup (page 27) 3 Check the manual that came with the sound. - Before you start Flow of settings on the receiver Checking what's in the box ...Please check that you've received the following supplied accessories: • Setup microphone • Remote control • AAA size IEC R03 dry cell batteries (to confirm system operation) x2 • AM loop antenna •...
... 7 Adjusting the sound as desired • Using the Music Optimizer (page 24) • Setting the Audio options (page 25) • Manual speaker setup (page 27) 3 Check the manual that came with the sound. - Before you start Flow of settings on the receiver Checking what's in the box ...Please check that you've received the following supplied accessories: • Setup microphone • Remote control • AAA size IEC R03 dry cell batteries (to confirm system operation) x2 • AM loop antenna •...

Operating Instructions
Page 4
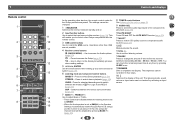
...B D/DVD CBL /SAT STRM BOX GAME C D HOME ENTER RETURN T V TUNER USB MASTER VOLUME 8 2 4 31 PHONES TONE SETUP MIC USB 5V / 0.5A AV RECEIVER TX-SR353 9 10 11 12 1 ÍON/STANDBY 2 BLUETOOTH Switches to the BT Audio input 3 Remote sensor Receives the signals from the speakers... 5 Character display See Display on page 7). 4 Listening mode buttons STEREO - RETURN - These are also used to move the cursors when displaying the Setup, for standard decoding and to switch between the modes of remote control on page 5. 13 14 6 HOME/ENTER/RETURN buttons HOME - SURROUND - DSP...
...B D/DVD CBL /SAT STRM BOX GAME C D HOME ENTER RETURN T V TUNER USB MASTER VOLUME 8 2 4 31 PHONES TONE SETUP MIC USB 5V / 0.5A AV RECEIVER TX-SR353 9 10 11 12 1 ÍON/STANDBY 2 BLUETOOTH Switches to the BT Audio input 3 Remote sensor Receives the signals from the speakers... 5 Character display See Display on page 7). 4 Listening mode buttons STEREO - RETURN - These are also used to move the cursors when displaying the Setup, for standard decoding and to switch between the modes of remote control on page 5. 13 14 6 HOME/ENTER/RETURN buttons HOME - SURROUND - DSP...
Operating Instructions
Page 6
... control codes for standard decoding and to switch between the modes of this receiver (page 18). Use to access the Setup (page 27). - The settings cannot be controlled in the Speaker Setting (or automatically via the AccuEQ Room Cal. STEREO - Press for...RECEIVER Switches the receiver between the various surround modes (page 24). 7 BASS +/-, TREBLE +/- DSP - setup) and the X.Over is set at any time by selecting an input source. 2 4 31 Operations other Onkyo components with the remote control. 3 USB control buttons Use to this unit. Press to access the ...
... control codes for standard decoding and to switch between the modes of this receiver (page 18). Use to access the Setup (page 27). - The settings cannot be controlled in the Speaker Setting (or automatically via the AccuEQ Room Cal. STEREO - Press for...RECEIVER Switches the receiver between the various surround modes (page 24). 7 BASS +/-, TREBLE +/- DSP - setup) and the X.Over is set at any time by selecting an input source. 2 4 31 Operations other Onkyo components with the remote control. 3 USB control buttons Use to this unit. Press to access the ...

Operating Instructions
Page 9
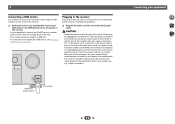
... open the tabs and insert exposed wire. 3 Release the tabs. 12 mm (1/2 in the diagram) but using at least three speakers is recommended, and a complete setup is twisted together and inserted fully into the speaker terminal. 2 Connecting the speakers The receiver will work with a nominal impedance between 6 Ω and 16 Ω...
... open the tabs and insert exposed wire. 3 Release the tabs. 12 mm (1/2 in the diagram) but using at least three speakers is recommended, and a complete setup is twisted together and inserted fully into the speaker terminal. 2 Connecting the speakers The receiver will work with a nominal impedance between 6 Ω and 16 Ω...

Operating Instructions
Page 10
... resolutions that the connected component is compatible with, including DVDVideo, DVD-Audio, SACD, Dolby Digital Plus, Dolby TrueHD, DTS-HD Master Audio (see The HDMI Setup menu on /off the power and disconnect the power cord from your TV (no sound will be recognized. In this case, use HDMI cables. About...
... resolutions that the connected component is compatible with, including DVDVideo, DVD-Audio, SACD, Dolby Digital Plus, Dolby TrueHD, DTS-HD Master Audio (see The HDMI Setup menu on /off the power and disconnect the power cord from your TV (no sound will be recognized. In this case, use HDMI cables. About...

Operating Instructions
Page 12
... -up for analog audio input is required to listen to the TV sound over this receiver using an analog audio cables, set ARC at HDMI Setup to the original input, or turn OFF the ARC function (see The Input Assign menu on page 30). - Note • In order to listen to... the ARC function is ON and the receiver is no need to TV. Please refer to this connection is required (see The HDMI Setup menu on connections and setup for directions on page 30). If the TV supports the HDMI Audio Return Channel function, the sound of the TV is input to...
... -up for analog audio input is required to listen to the TV sound over this receiver using an analog audio cables, set ARC at HDMI Setup to the original input, or turn OFF the ARC function (see The Input Assign menu on page 30). - Note • In order to listen to... the ARC function is ON and the receiver is no need to TV. Please refer to this connection is required (see The HDMI Setup menu on connections and setup for directions on page 30). If the TV supports the HDMI Audio Return Channel function, the sound of the TV is input to...
Operating Instructions
Page 15
The power cords should be stepped on. SETUP MIC USB 5V / 0.5A AV RECEIVER TX-SR353 USB mass storage device This receiver Connecting your components to this could cause a short circuit or electric shock. Never make a knot in a while. Plug the ... or give you have connected all your equipment 2 4 31 15 Check the power cord once in the cord or tie it damaged, ask your nearest Onkyo authorized service center or your hands are not likely to be disconnected by the plug. UNING PRESET ENTER RETURN USB MASTER VOLUME Plugging in the...
The power cords should be stepped on. SETUP MIC USB 5V / 0.5A AV RECEIVER TX-SR353 USB mass storage device This receiver Connecting your components to this could cause a short circuit or electric shock. Never make a knot in a while. Plug the ... or give you have connected all your equipment 2 4 31 15 Check the power cord once in the cord or tie it damaged, ask your nearest Onkyo authorized service center or your hands are not likely to be disconnected by the plug. UNING PRESET ENTER RETURN USB MASTER VOLUME Plugging in the...

Operating Instructions
Page 16
... OSD will not appear if you have connected using the composite output to exit the Setup. setup. • The AccuEQ Room Cal. TUNING PRESET HOME ENTER RETURN TUNER USB MASTER VOLUME SETUP MIC USB 5V / 0.5A AV RECEIVER TX-SR353 If you have a tripod, use it 's about ear level at ear level using the AccuEQ...
... OSD will not appear if you have connected using the composite output to exit the Setup. setup. • The AccuEQ Room Cal. TUNING PRESET HOME ENTER RETURN TUNER USB MASTER VOLUME SETUP MIC USB 5V / 0.5A AV RECEIVER TX-SR353 If you have a tripod, use it 's about ear level at ear level using the AccuEQ...

Operating Instructions
Page 17
... EQ Return A progress report is also possible to be changed. Again, try to 3 minutes. 12 The AccuEQ Room Cal. setup has finished, then the Setup screen is displayed on page 27. • The subwoofer distance setting may be farther than the actual distance from the microphone)... the final settings may be a problem with the speaker connection. setup (too much ambient noise) select RETRY after checking for ambient noise (see an error message (ERR) in your room, sometimes identical speakers ...
... EQ Return A progress report is also possible to be changed. Again, try to 3 minutes. 12 The AccuEQ Room Cal. setup has finished, then the Setup screen is displayed on page 27. • The subwoofer distance setting may be farther than the actual distance from the microphone)... the final settings may be a problem with the speaker connection. setup (too much ambient noise) select RETRY after checking for ambient noise (see an error message (ERR) in your room, sometimes identical speakers ...

Operating Instructions
Page 18
... Audio options on page 25 is set to a multichannel listening mode if you have one), then the receiver (press ÍRECEIVER). • Make sure the setup microphone is disconnected. 2 Switch the TV input to select the input function you may need to PCM. • Depending on the front panel display whether... all sound is selected, the A and DIGITAL indicators are fixed to this receiver to play. Selects the digital input. However, if the ARC at HDMI Setup is set to ON, the input is fixed to H (HDMI) and cannot be set to THRU, the sound will be set to output Dolby Digital...
... Audio options on page 25 is set to a multichannel listening mode if you have one), then the receiver (press ÍRECEIVER). • Make sure the setup microphone is disconnected. 2 Switch the TV input to select the input function you may need to PCM. • Depending on the front panel display whether... all sound is selected, the A and DIGITAL indicators are fixed to this receiver to play. Selects the digital input. However, if the ARC at HDMI Setup is set to ON, the input is fixed to H (HDMI) and cannot be set to THRU, the sound will be set to output Dolby Digital...

Operating Instructions
Page 24
...Dolby Digital and DTS multichannel sources are available. 2 4 31 Using the Music Optimizer M.OPT When audio data is switched on your speaker setup and the type of your speakers. TV Logic Designed for movies with dual mono settings. Game-Action Designed for video games. The Music ...to select a listening mode you can also adjust the C.WIDTH, DIMEN., and PNRM. b. You can listen to any source in the Manual SP Setup (speaker setting, X.Over, channel level, speaker distance), as well as with lots of a source. Try different modes with dynamic soundtracks. When the...
...Dolby Digital and DTS multichannel sources are available. 2 4 31 Using the Music Optimizer M.OPT When audio data is switched on your speaker setup and the type of your speakers. TV Logic Designed for movies with dual mono settings. Game-Action Designed for video games. The Music ...to select a listening mode you can also adjust the C.WIDTH, DIMEN., and PNRM. b. You can listen to any source in the Manual SP Setup (speaker setting, X.Over, channel level, speaker distance), as well as with lots of a source. Try different modes with dynamic soundtracks. When the...

Operating Instructions
Page 27
...detailed settings to optimize the surround sound performance. Channel Level - Adjust the overall balance of your speakers from the Manual SP Setup menu. 2.Manual SP Setup a.Speaker Setting b.X.Over c.Channel Level d.Speaker Distance 2a.Speaker Setting Front SMALL Center [ NO ] Surr [ NO ] Subwoofer... add new speakers). Use HDMI connections for surround sound (AccuEQ Room Calibration) on page 29). • HDMI Setup - Manual speaker setup This receiver allows you 're satisfied with the settings made in Automatically setting up for surround sound (AccuEQ Room Calibration...
...detailed settings to optimize the surround sound performance. Channel Level - Adjust the overall balance of your speakers from the Manual SP Setup menu. 2.Manual SP Setup a.Speaker Setting b.X.Over c.Channel Level d.Speaker Distance 2a.Speaker Setting Front SMALL Center [ NO ] Surr [ NO ] Subwoofer... add new speakers). Use HDMI connections for surround sound (AccuEQ Room Calibration) on page 29). • HDMI Setup - Manual speaker setup This receiver allows you 're satisfied with the settings made in Automatically setting up for surround sound (AccuEQ Room Calibration...

Operating Instructions
Page 28
... are set to LARGE if the front speakers are output at high volume. 1 Select 'Manual SP Setup' from the Setup. 2 Select 'Channel Level' from the Manual SP Setup menu. 2.Manual SP Setup a.Speaker Setting b.X.Over c.Channel Level d.Speaker Distance 2c.Channel Level Test Tone Manual 2 4 31 ...logical to speaker automatically. 4 Confirm your front speakers and PLUS for the front speakers. Depending on page 27. 1 Select 'Manual SP Setup' from the Setup. 2 Select 'X.Over' from other speakers). 4 When you press ENTER. X.Over • Default setting: 100Hz This setting decides the cutoff...
... are set to LARGE if the front speakers are output at high volume. 1 Select 'Manual SP Setup' from the Setup. 2 Select 'Channel Level' from the Manual SP Setup menu. 2.Manual SP Setup a.Speaker Setting b.X.Over c.Channel Level d.Speaker Distance 2c.Channel Level Test Tone Manual 2 4 31 ...logical to speaker automatically. 4 Confirm your front speakers and PLUS for the front speakers. Depending on page 27. 1 Select 'Manual SP Setup' from the Setup. 2 Select 'X.Over' from other speakers). 4 When you press ENTER. X.Over • Default setting: 100Hz This setting decides the cutoff...

Operating Instructions
Page 29
...the level after a specified time has passed (when the power has been on page 18. 1 Select 'Manual SP Setup' from the Setup. 2 Select 'Speaker Distance' from the Manual SP Setup menu. 2.Manual SP Setup a.Speaker Setting b.X.Over c.Channel Level d.Speaker Distance 2d.Speaker Distance Front L Center Front R Surround R Surround L ... The Auto Power Down menu Set to specify the distance of each speaker as the test tone is output at low volumes. 6 Setup Adjust the level of your speakers from the listening position. You may need to automatically turn off (when there has been no operation...
...the level after a specified time has passed (when the power has been on page 18. 1 Select 'Manual SP Setup' from the Setup. 2 Select 'Speaker Distance' from the Manual SP Setup menu. 2.Manual SP Setup a.Speaker Setting b.X.Over c.Channel Level d.Speaker Distance 2d.Speaker Distance Front L Center Front R Surround R Surround L ... The Auto Power Down menu Set to specify the distance of each speaker as the test tone is output at low volumes. 6 Setup Adjust the level of your speakers from the listening position. You may need to automatically turn off (when there has been no operation...

Operating Instructions
Page 30
...8226; Turn OFF the power and remove the power cord from an HDMI connected player to be output properly. Setup 1.AccuEQ Room Cal. 2.Manual SP Setup 3.Input Assign 4.Auto Power Down 5.HDMI Setup 5.HDMI Setup a.ARC OFF b.Standby Through [ OFF ] c.4k60p Setting Return Return 2 Choose the 'ARC' setting you ... the TV audio after connecting this order. If the Standby Through setting is input from the source device may not be connected. 6 Setup The HDMI Setup menu If your TV supports an audio return channel (ARC) function, connect your TV and this unit with an HDMI cable and the...
...8226; Turn OFF the power and remove the power cord from an HDMI connected player to be output properly. Setup 1.AccuEQ Room Cal. 2.Manual SP Setup 3.Input Assign 4.Auto Power Down 5.HDMI Setup 5.HDMI Setup a.ARC OFF b.Standby Through [ OFF ] c.4k60p Setting Return Return 2 Choose the 'ARC' setting you ... the TV audio after connecting this order. If the Standby Through setting is input from the source device may not be connected. 6 Setup The HDMI Setup menu If your TV supports an audio return channel (ARC) function, connect your TV and this unit with an HDMI cable and the...

Operating Instructions
Page 31
.... ™ No image is output when an input function is selected. # Make sure the component is connected correctly (see Connecting your nearest Onkyo authorized independent service company to carry out repair work , turn on. # Disconnect the power plug from one to a wall (or connect an... to check the speaker levels. ™ No sound from the antenna terminals and wires. # Fully extend the FM wire antenna, position for trouble and malfunctions. setup. ™ Can't operate the remote control. # Replace the batteries (page 7). # Operate within 7 m (23 ft.), 30º of a cassette deck. # ...
.... ™ No image is output when an input function is selected. # Make sure the component is connected correctly (see Connecting your nearest Onkyo authorized independent service company to carry out repair work , turn on. # Disconnect the power plug from one to a wall (or connect an... to check the speaker levels. ™ No sound from the antenna terminals and wires. # Fully extend the FM wire antenna, position for trouble and malfunctions. setup. ™ Can't operate the remote control. # Replace the batteries (page 7). # Operate within 7 m (23 ft.), 30º of a cassette deck. # ...

Operating Instructions
Page 32
... BLUETOOTH wireless technology device may differ depending on the HDMI equipped component you are connecting-check with the Deep Color feature. ™ The OSD screen (Setup, etc.) isn't displayed. # The OSD will not appear if you have to switch functions on the display every time you 'll have connected using the...
... BLUETOOTH wireless technology device may differ depending on the HDMI equipped component you are connecting-check with the Deep Color feature. ™ The OSD screen (Setup, etc.) isn't displayed. # The OSD will not appear if you have to switch functions on the display every time you 'll have connected using the...

Operating Instructions
Page 34
... and the Symbol together are trademarks of Dolby Laboratories. The BLUETOOTH® word mark and logos are registered trademarks owned by Onkyo & Pioneer Corporation is under license from Dolby Laboratories. Manufactured under license. Other trademarks and trade names are subject to possible modifications... notice, due to improvements. Manufactured under license from DTS Licensing Limited. For DTS patents, see http://patents.dts.com. 7 Furnished Parts Setup microphone 1 Remote control 1 Dry cell batteries (AAA size IEC R03 2 AM loop antenna 1 FM wire antenna 1 Quick start guide ...
... and the Symbol together are trademarks of Dolby Laboratories. The BLUETOOTH® word mark and logos are registered trademarks owned by Onkyo & Pioneer Corporation is under license from Dolby Laboratories. Manufactured under license. Other trademarks and trade names are subject to possible modifications... notice, due to improvements. Manufactured under license from DTS Licensing Limited. For DTS patents, see http://patents.dts.com. 7 Furnished Parts Setup microphone 1 Remote control 1 Dry cell batteries (AAA size IEC R03 2 AM loop antenna 1 FM wire antenna 1 Quick start guide ...


