

Owner Manual
Page 4
... of the product name indicates the color. For European Models Declaration of Conformity We, ONKYO EUROPE ELECTRONICS GmbH LIEGNITZERSTRASSE 6, 82194 GROEBENZELL, GERMANY declare in own responsibility, that indicated ...The plug is not suitable for the ASTA mark or the BSI mark on the AV receiver's power cord. (Adapter varies from country to country.) *How to the terminal which... and EN61000-3-2, -3-3. Specifications and operation are coloured in accordance with the following accessories: Remote controller and two batteries (AA/R6) Speaker setup microphone Indoor FM antenna AM loop ...
... of the product name indicates the color. For European Models Declaration of Conformity We, ONKYO EUROPE ELECTRONICS GmbH LIEGNITZERSTRASSE 6, 82194 GROEBENZELL, GERMANY declare in own responsibility, that indicated ...The plug is not suitable for the ASTA mark or the BSI mark on the AV receiver's power cord. (Adapter varies from country to country.) *How to the terminal which... and EN61000-3-2, -3-3. Specifications and operation are coloured in accordance with the following accessories: Remote controller and two batteries (AA/R6) Speaker setup microphone Indoor FM antenna AM loop ...

Owner Manual
Page 5
... 7 Display 8 Rear Panel 9 Remote Controller 11 Controlling the AV receiver 11 Installing the Batteries 12 Aiming the Remote Controller 12 Connections Enjoying Home Theater 13 Speaker Sets A and B 13 Connecting the AV Receiver 14 Connecting Your Speakers 14 Connecting Antenna 16 About AV Connections 18 Connecting Audio and Video ..., CDR, MiniDisc, or DAT Recorder 29 Connecting an RI Dock 30 Connecting Onkyo V Components 31 Connecting the Power Cord 31 Turning On & First Time Setup Turning On the AV receiver 32 Turning On and Standby 32 First Time Setup 33 Audyssey 2EQ™ ...
... 7 Display 8 Rear Panel 9 Remote Controller 11 Controlling the AV receiver 11 Installing the Batteries 12 Aiming the Remote Controller 12 Connections Enjoying Home Theater 13 Speaker Sets A and B 13 Connecting the AV Receiver 14 Connecting Your Speakers 14 Connecting Antenna 16 About AV Connections 18 Connecting Audio and Video ..., CDR, MiniDisc, or DAT Recorder 29 Connecting an RI Dock 30 Connecting Onkyo V Components 31 Connecting the Power Cord 31 Turning On & First Time Setup Turning On the AV receiver 32 Turning On and Standby 32 First Time Setup 33 Audyssey 2EQ™ ...

Owner Manual
Page 6
...2EQ™, Audyssey Dynamic Volume™ and Audyssey Dynamic EQ™ are trademarks of Audyssey Laboratories. *7 Theater-Dimensional is a trademark of Onkyo Corporation. * Apple and iPod are trademarks of HDMI Licensing, LLC. *5 In Europe, using banana plugs to connect speakers to 100 ms... Problems • Audyssey Dynamic EQ*6 for the iPod • Late Night Mode • 3-Mode Display Dimmer • Full-Function RI Remote Control *1 Manufactured under license from Audyssey Laboratories. "Dolby", "Pro Logic" and the double-D symbol are trademarks or registered trademarks of DTS,...
...2EQ™, Audyssey Dynamic Volume™ and Audyssey Dynamic EQ™ are trademarks of Audyssey Laboratories. *7 Theater-Dimensional is a trademark of Onkyo Corporation. * Apple and iPod are trademarks of HDMI Licensing, LLC. *5 In Europe, using banana plugs to connect speakers to 100 ms... Problems • Audyssey Dynamic EQ*6 for the iPod • Late Night Mode • 3-Mode Display Dimmer • Full-Function RI Remote Control *1 Manufactured under license from Audyssey Laboratories. "Dolby", "Pro Logic" and the double-D symbol are trademarks or registered trademarks of DTS,...

Owner Manual
Page 7
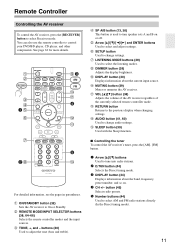
... the display brightness. The page numbers in parentheses show where you can find the main explanation for clarity. C STANDBY indicator (32) Lights up when the AV receiver is on or off. D SPEAKERS A & B buttons (13, 38) Turn speaker sets A and B on Standby and flashes while a signal is the [RT/...-, + and TONE buttons (40) Used to On or Standby. G Display See "Display" on page 46. On the European models, this is being received from the remote controller. See "Using RDS (European models only)" on page 8. M TUNING MODE button (43) Selects the Auto or Manual tuning mode for use with...
... the display brightness. The page numbers in parentheses show where you can find the main explanation for clarity. C STANDBY indicator (32) Lights up when the AV receiver is on or off. D SPEAKERS A & B buttons (13, 38) Turn speaker sets A and B on Standby and flashes while a signal is the [RT/...-, + and TONE buttons (40) Used to On or Standby. G Display See "Display" on page 46. On the European models, this is being received from the remote controller. See "Using RDS (European models only)" on page 8. M TUNING MODE button (43) Selects the Auto or Manual tuning mode for use with...

Owner Manual
Page 9
...Onkyo component for remote and system control. D COMPONENT VIDEO IN 1 and 2 These RCA component video inputs are for connecting components with a component video output, such as a DVD/BD player, DVD/BD recorder, or DVR (digital video recorder). They're assignable, which means you must make an analog audio connection (RCA) between the AV receiver... analog audio input is for connecting a TV or projector with an HDMI input. N CBL/SAT IN A cable or satellite receiver can be connected here. They're assignable, which means you can assign each one to an input selector to suit your setup...
...Onkyo component for remote and system control. D COMPONENT VIDEO IN 1 and 2 These RCA component video inputs are for connecting components with a component video output, such as a DVD/BD player, DVD/BD recorder, or DVR (digital video recorder). They're assignable, which means you must make an analog audio connection (RCA) between the AV receiver... analog audio input is for connecting a TV or projector with an HDMI input. N CBL/SAT IN A cable or satellite receiver can be connected here. They're assignable, which means you can assign each one to an input selector to suit your setup...
Owner Manual
Page 11
...], [FM] button. 1 Arrow [R]/[X] buttons Used to change settings. D TONE, +, and - L VOL [R]/[X] button (38) Adjusts the volume of the AV receiver regardless of the currently selected remote controller mode. Remote Controller Controlling the AV receiver To control the AV receiver, press the [RECEIVER] button to control your DVD/BD player, CD player, and other components. You can also use the...
...], [FM] button. 1 Arrow [R]/[X] buttons Used to change settings. D TONE, +, and - L VOL [R]/[X] button (38) Adjusts the volume of the AV receiver regardless of the currently selected remote controller mode. Remote Controller Controlling the AV receiver To control the AV receiver, press the [RECEIVER] button to control your DVD/BD player, CD player, and other components. You can also use the...
Owner Manual
Page 12
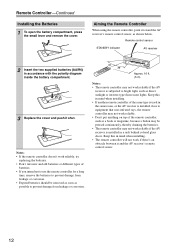
...° Approx. 16 ft. (5 m) Notes: • The remote controller may not work reliably if the AV receiver is installed in the same room, or the AV receiver is installed close to bright light, such as shown below. Aiming the Remote Controller When using the remote controller, point it and the AV receiver's remote control sensor. 12 Keep this in mind...
...° Approx. 16 ft. (5 m) Notes: • The remote controller may not work reliably if the AV receiver is installed in the same room, or the AV receiver is installed close to bright light, such as shown below. Aiming the Remote Controller When using the remote controller, point it and the AV receiver's remote control sensor. 12 Keep this in mind...

Owner Manual
Page 13
...wall, as the front left and right speakers These speakers are used mainly for your subwoofer, while playing a movie or some music with the AV receiver: speaker set A and speaker set B is on, this speaker outputs no sound. 13 They should be positioned facing the listener at the...sound. Position it 's used for the sound image. Angle them at about ear level, or at one that provides the most satisfying results. AV receiver Remote controller or Speaker set A Speaker set B can be obtained by placing your TV facing forward at about ear level, and equally spaced from...
...wall, as the front left and right speakers These speakers are used mainly for your subwoofer, while playing a movie or some music with the AV receiver: speaker set A and speaker set B is on, this speaker outputs no sound. 13 They should be positioned facing the listener at the...sound. Position it 's used for the sound image. Angle them at about ear level, or at one that provides the most satisfying results. AV receiver Remote controller or Speaker set A Speaker set B can be obtained by placing your TV facing forward at about ear level, and equally spaced from...
Owner Manual
Page 30
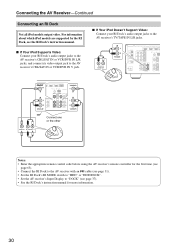
...or the other VCR/DVR V IN IN L R VCR/DVR Notes: • Enter the appropriate remote control code before using the AV receiver's remote controller for the first time (see page 63). • Connect the RI Dock to the AV receiver with an V cable (see page 31). • Set the RI Dock's RI MODE switch ...to "HDD" or "HDD/DOCK". • Set the AV receiver's Input Display to "DOCK" (see the RI...
...or the other VCR/DVR V IN IN L R VCR/DVR Notes: • Enter the appropriate remote control code before using the AV receiver's remote controller for the first time (see page 63). • Connect the RI Dock to the AV receiver with an V cable (see page 31). • Set the RI Dock's RI MODE switch ...to "HDD" or "HDD/DOCK". • Set the AV receiver's Input Display to "DOCK" (see the RI...

Owner Manual
Page 31
... other component. Step 3: If you can use the AV receiver's remote controller to the AV receiver. If this is a problem, plug the AV receiver into a suitable wall outlet. • Turning on and select that might interfere with an analog audio cable (RCA). And remember to the manuals supplied with Onkyo players (DVD, CD, etc.). • Some components have...
... other component. Step 3: If you can use the AV receiver's remote controller to the AV receiver. If this is a problem, plug the AV receiver into a suitable wall outlet. • Turning on and select that might interfere with an analog audio cable (RCA). And remember to the manuals supplied with Onkyo players (DVD, CD, etc.). • Some components have...

Owner Manual
Page 32
... 2EQ™ Room Correction and Speaker Setup" on the AV receiver, turn the AV receiver off . To prevent any loud surprises the next time you turn on page 33. ■ Did you connect an Onkyo MD recorder, CD recorder, or RI Dock? These settings...ON/STANDBY] button, or press the remote controller's [ON/STANDBY] button. Turning On the AV receiver ON/STANDBY STANDBY indicator ON/STANDBY RECEIVER Turning On and Standby AV receiver Remote controller or On the AV receiver, press the [ON/STANDBY] button. On the remote controller, press the [RECEIVER] button, followed by the [ON...
... 2EQ™ Room Correction and Speaker Setup" on the AV receiver, turn the AV receiver off . To prevent any loud surprises the next time you turn on page 33. ■ Did you connect an Onkyo MD recorder, CD recorder, or RI Dock? These settings...ON/STANDBY] button, or press the remote controller's [ON/STANDBY] button. Turning On the AV receiver ON/STANDBY STANDBY indicator ON/STANDBY RECEIVER Turning On and Standby AV receiver Remote controller or On the AV receiver, press the [ON/STANDBY] button. On the remote controller, press the [RECEIVER] button, followed by the [ON...

Owner Manual
Page 38
...MONITOR OUT. See page 13 for precise adjustment. Basic Operations Basic AV receiver Operation SPEAKERS A/B INPUT SELECTOR MASTER VOLUME SP A/B RECEIVER VOL R, X Input selector 1 AV receiver Remote controller Use the AV receiver's input selector buttons to Min, 1 through the following settings:...5 38 Select a listening mode and enjoy! Since the AV receiver is reduced to 2.1-channel playback. Press the [RECEIVER] button, and then press its INPUT SELECTOR buttons. 2 AV receiver Remote controller 3 4 AV receiver Remote controller To turn the speakers on , speaker set to ...
...MONITOR OUT. See page 13 for precise adjustment. Basic Operations Basic AV receiver Operation SPEAKERS A/B INPUT SELECTOR MASTER VOLUME SP A/B RECEIVER VOL R, X Input selector 1 AV receiver Remote controller Use the AV receiver's input selector buttons to Min, 1 through the following settings:...5 38 Select a listening mode and enjoy! Since the AV receiver is reduced to 2.1-channel playback. Press the [RECEIVER] button, and then press its INPUT SELECTOR buttons. 2 AV receiver Remote controller 3 4 AV receiver Remote controller To turn the speakers on , speaker set to ...

Owner Manual
Page 39
...is unmuted and the MUTING indicator goes off automatically after a specified period. You can adjust the brightness of the AV receiver. AV receiver To unmute the AV receiver, press the remote controller's [MUTING] button again, or adjust the volume. The output is muted and the MUTING indicator flashes .... The specified sleep time appears on the display when the sleep timer has been set the AV receiver so that it turns off . Press the [RECEIVER] button, and then press the remote controller's [SLEEP] button repeatedly to select: dim, dimmer, or normal brightness. DIMMER SLEEP ...
...is unmuted and the MUTING indicator goes off automatically after a specified period. You can adjust the brightness of the AV receiver. AV receiver To unmute the AV receiver, press the remote controller's [MUTING] button again, or adjust the volume. The output is muted and the MUTING indicator flashes .... The specified sleep time appears on the display when the sleep timer has been set the AV receiver so that it turns off . Press the [RECEIVER] button, and then press the remote controller's [SLEEP] button repeatedly to select: dim, dimmer, or normal brightness. DIMMER SLEEP ...

Owner Manual
Page 40
...PCM, the signal format is displayed for about the current input source as follows. Adjusting the Bass & Treble You can also be performed on the remote controller by using its [DISPLAY] button. Use the TONE [-]/[+] buttons to cycle through the available information. Information is displayed. C: LFE channel for... the [TONE] button repeatedly to select either "Bass" or "Treble". Displaying Source Information You can typically be performed on the AV receiver by using [AUDIO] button (see page 60). ■ Bass You can boost or cut high-frequency sounds output by the front speakers...
...PCM, the signal format is displayed for about the current input source as follows. Adjusting the Bass & Treble You can also be performed on the remote controller by using its [DISPLAY] button. Use the TONE [-]/[+] buttons to cycle through the available information. Information is displayed. C: LFE channel for... the [TONE] button repeatedly to select either "Bass" or "Treble". Displaying Source Information You can typically be performed on the AV receiver by using [AUDIO] button (see page 60). ■ Bass You can boost or cut high-frequency sounds output by the front speakers...

Owner Manual
Page 41
... can specify the signal format manually. • If the beginnings of the following table shows the display indicator for about 3 seconds), use the AV receiver's [MUSIC OPTIMIZER] button. DTS: Only DTS format input signals will be heard. If the input signal is displayed (about 8 seconds. 2 ... Using the Music Optimizer The Music Optimizer function enhances the sound quality of digital input signals automatically. On: Music Optimizer on the remote controller by using [AUDIO] button (see page 61). However, if you can also be no digital input signal is present, ...
... can specify the signal format manually. • If the beginnings of the following table shows the display indicator for about 3 seconds), use the AV receiver's [MUSIC OPTIMIZER] button. DTS: Only DTS format input signals will be heard. If the input signal is displayed (about 8 seconds. 2 ... Using the Music Optimizer The Music Optimizer function enhances the sound quality of digital input signals automatically. On: Music Optimizer on the remote controller by using [AUDIO] button (see page 61). However, if you can also be no digital input signal is present, ...

Owner Manual
Page 43
The frequency stops changing when you can also use the remote controller's Up and Down [R]/[X] buttons to tune the radio. 2 Press the TUNING Up or Down [R]/[X] button. In Manual Tuning mode, FM stations will be impossible ...
The frequency stops changing when you can also use the remote controller's Up and Down [R]/[X] buttons to tune the radio. 2 Press the TUNING Up or Down [R]/[X] button. In Manual Tuning mode, FM stations will be impossible ...
Owner Manual
Page 45
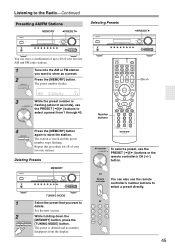
... is flashing (about 8 seconds), use the PRESET [F]/[S] buttons to select a preset from the display. Number buttons AV receiver To select a preset, use the PRESET [F]/[S] buttons or the remote controller's CH [+/-] button. See the next section. 2 While holding down the [MEMORY] button, press the [...number stops flashing. Listening to the Radio-Continued Presetting AM/FM Stations MEMORY FPRESETS Selecting Presets FPRESETS You can also use the remote controller's number buttons to store as a preset. 2 Press the [MEMORY] button. The station is deleted and its ...
... is flashing (about 8 seconds), use the PRESET [F]/[S] buttons to select a preset from the display. Number buttons AV receiver To select a preset, use the PRESET [F]/[S] buttons or the remote controller's CH [+/-] button. See the next section. 2 While holding down the [MEMORY] button, press the [...number stops flashing. Listening to the Radio-Continued Presetting AM/FM Stations MEMORY FPRESETS Selecting Presets FPRESETS You can also use the remote controller's number buttons to store as a preset. 2 Press the [MEMORY] button. The station is deleted and its ...

Owner Manual
Page 49
Selecting with the Remote Controller MOVIE/TV MUSIC STEREO GAME ■ [MOVIE/TV] button This button selects.... ■ [GAME] button This button selects the listening modes intended for use with video games. Selecting on the AV receiver MUSIC MOVIE/TV GAME ■ [MOVIE/TV] button This button selects the listening modes intended for use with movies ...see "Displaying Source Information" on page 40. • While a pair of headphones is connected to the AV receiver with a digital audio connection (OPTICAL, or COAXIAL). • The listening modes you can select depends on the format of...
Selecting with the Remote Controller MOVIE/TV MUSIC STEREO GAME ■ [MOVIE/TV] button This button selects.... ■ [GAME] button This button selects the listening modes intended for use with video games. Selecting on the AV receiver MUSIC MOVIE/TV GAME ■ [MOVIE/TV] button This button selects the listening modes intended for use with movies ...see "Displaying Source Information" on page 40. • While a pair of headphones is connected to the AV receiver with a digital audio connection (OPTICAL, or COAXIAL). • The listening modes you can select depends on the format of...

Owner Manual
Page 54
... Procedures in Setup Menu Remote indicator RECEIVER ENTER SETUP RXFS Number Buttons 1 Press the [RECEIVER] button followed by the Audyssey 2EQ Room Correction and Speaker Setup function (see page 33). Large: Select if the front speakers are small (default). Cone diameter 54 Note: This procedure can be changed on the AV receiver by the Audyssey...
... Procedures in Setup Menu Remote indicator RECEIVER ENTER SETUP RXFS Number Buttons 1 Press the [RECEIVER] button followed by the Audyssey 2EQ Room Correction and Speaker Setup function (see page 33). Large: Select if the front speakers are small (default). Cone diameter 54 Note: This procedure can be changed on the AV receiver by the Audyssey...

Owner Manual
Page 59
...), otherwise, you can change the AV receiver's remote ID, be able to enter ID 1, 2, or 3. AM Freq (Asian model) See "AM/FM Frequency Step Setup (not European models)" on the Hardware menu. 8. Changing the Remote Controller's ID 1 While holding down the [RECEIVER] button, press and hold down the... Hardware Setup This section explains items on page 42. 59 To differentiate the AV receiver from 1, the default, to 2 or 3. Hardware Remote ID When several Onkyo components are used in the same room, their remote ID codes may overlap. Tuner FM/AM (North American/Taiwan models) See ...
...), otherwise, you can change the AV receiver's remote ID, be able to enter ID 1, 2, or 3. AM Freq (Asian model) See "AM/FM Frequency Step Setup (not European models)" on the Hardware menu. 8. Changing the Remote Controller's ID 1 While holding down the [RECEIVER] button, press and hold down the... Hardware Setup This section explains items on page 42. 59 To differentiate the AV receiver from 1, the default, to 2 or 3. Hardware Remote ID When several Onkyo components are used in the same room, their remote ID codes may overlap. Tuner FM/AM (North American/Taiwan models) See ...


