Owner Manual
Page 1
...functions common to obtain optimum performance and listening enjoyment from your other AV components 33 Appendix Troubleshooting 35 Specifications 37 En AV Receiver TX-SR302 Instruction Manual Thank you to all the sources .. 24 Enjoying multi channel sources 27 Enjoying the listening modes 28 Audio ...adjust function 30 Recording a source 32 Remote controller Using the remote controller with your new AV Receiver. Following the instructions in the unit. Please retain this manual thoroughly before making connections and plugging in this manual will ...
...functions common to obtain optimum performance and listening enjoyment from your other AV components 33 Appendix Troubleshooting 35 Specifications 37 En AV Receiver TX-SR302 Instruction Manual Thank you to all the sources .. 24 Enjoying multi channel sources 27 Enjoying the listening modes 28 Audio ...adjust function 30 Recording a source 32 Remote controller Using the remote controller with your new AV Receiver. Following the instructions in the unit. Please retain this manual thoroughly before making connections and plugging in this manual will ...
Owner Manual
Page 3
...following measures: • Reorient or relocate the receiving antenna. • Increase the separation between the equipment and receiver. • Connect the equipment into an outlet on the TX-SR302, contact your area meets the voltage requirements printed on the TX-SR302's rear panel (e.g., AC 230 V, 50 ...Don't use only, recording copyrighted material is no guarantee that interference will not occur in particular, specifies that the voltage in your Onkyo dealer. 3. For Canadian models NOTE: THIS CLASS B DIGITAL APPARATUS COMPLIES WITH CANADIAN ICES-003. Setting the [STANDBY/ON] switch ...
...following measures: • Reorient or relocate the receiving antenna. • Increase the separation between the equipment and receiver. • Connect the equipment into an outlet on the TX-SR302, contact your area meets the voltage requirements printed on the TX-SR302's rear panel (e.g., AC 230 V, 50 ...Don't use only, recording copyrighted material is no guarantee that interference will not occur in particular, specifies that the voltage in your Onkyo dealer. 3. For Canadian models NOTE: THIS CLASS B DIGITAL APPARATUS COMPLIES WITH CANADIAN ICES-003. Setting the [STANDBY/ON] switch ...
Owner Manual
Page 4
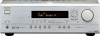
... catalogs and on the packages represents the color of Digital Theater Systems, Inc. Though the color varies, the specifications and operations are supplied with the TX-SR302. Features Amplifier Features • 5 × 65 W/Channel @ 8Ω, 20-20 kHz, 0.08% THD • WRAT-Wide Range Amplifier Technology • Optimum Gain Volume Circuitry •... are the same. 4 "Dolby", "Pro Logic" and the double-D symbol are trademarks of Dolby Laboratories. ** "DTS" and "DTS Digital Surround" are registered trademarks of this receiver.
... catalogs and on the packages represents the color of Digital Theater Systems, Inc. Though the color varies, the specifications and operations are supplied with the TX-SR302. Features Amplifier Features • 5 × 65 W/Channel @ 8Ω, 20-20 kHz, 0.08% THD • WRAT-Wide Range Amplifier Technology • Optimum Gain Volume Circuitry •... are the same. 4 "Dolby", "Pro Logic" and the double-D symbol are trademarks of Dolby Laboratories. ** "DTS" and "DTS Digital Surround" are registered trademarks of this receiver.

Owner Manual
Page 5
... • Don't put anything, such as a book, on the remote controller, because the buttons may not work reliably if the TX-SR302 is being received from the remote controller. Using the Remote Controller To use the remote controller for about six months, although this will not work if ...there's an obstacle between it at the TX-SR302's remote control sensor, as shown below. The TX-SR302's STANDBY indicator flashes while a signal is ...
... • Don't put anything, such as a book, on the remote controller, because the buttons may not work reliably if the TX-SR302 is being received from the remote controller. Using the Remote Controller To use the remote controller for about six months, although this will not work if ...there's an obstacle between it at the TX-SR302's remote control sensor, as shown below. The TX-SR302's STANDBY indicator flashes while a signal is ...
Owner Manual
Page 6
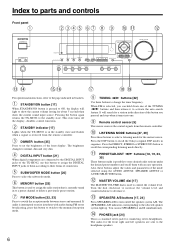
... INPUT jacks to them with an easy operation. Press the DSP button to recall the Onkyo-original DSP modes in the standby state and flashes when a signal is used to control... button to turn on/off the display, disables control functions. 2 STANDBY indicator [17] Lights when the TX-SR302 is in sequence. PRESET/ADJUST / buttons [18, 19, 23, 30] These buttons make it possible... the button you pressed and stop when it tunes into one. 9 Remote control sensor [5] This sensor receives the control signals from the remote controller. 0 LISTENING MODE buttons [27, 29] Press these buttons adjust...
... INPUT jacks to them with an easy operation. Press the DSP button to recall the Onkyo-original DSP modes in the standby state and flashes when a signal is used to control... button to turn on/off the display, disables control functions. 2 STANDBY indicator [17] Lights when the TX-SR302 is in sequence. PRESET/ADJUST / buttons [18, 19, 23, 30] These buttons make it possible... the button you pressed and stop when it tunes into one. 9 Remote control sensor [5] This sensor receives the control signals from the remote controller. 0 LISTENING MODE buttons [27, 29] Press these buttons adjust...

Owner Manual
Page 7
... this button is selected, it shows the current input source and the listening mode. 7 g FM STEREO indicator [22] Lights up when the MEMORY button is received. When the DISPLAY button is pressed, it shows the frequency and preset number. e MEMORY indicator [23] Lights up when an FM stereo broadcast station is...
... this button is selected, it shows the current input source and the listening mode. 7 g FM STEREO indicator [22] Lights up when the MEMORY button is received. When the DISPLAY button is pressed, it shows the frequency and preset number. e MEMORY indicator [23] Lights up when an FM stereo broadcast station is...
Owner Manual
Page 12
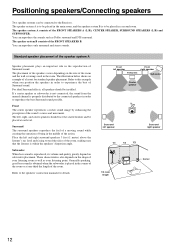
... speakers' dispersion angle. Front left speaker TV/Screen Front right speaker Subwoofer Center speaker Surround left , right, and center speakers should be connected to the Receiver. The placement of the speakers varies depending on the size of the action. Place the left and right surround speakers 3 feet (1 meter) above the listener...
... speakers' dispersion angle. Front left speaker TV/Screen Front right speaker Subwoofer Center speaker Surround left , right, and center speakers should be connected to the Receiver. The placement of the speakers varies depending on the size of the action. Place the left and right surround speakers 3 feet (1 meter) above the listener...
Owner Manual
Page 14
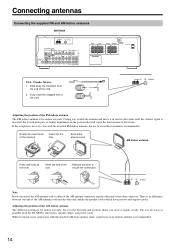
...FM indoor antenna The FM indoor antenna is not satisfactory with push pins or similar implements in the direction and position where you receive signals clearly. AM indoor antenna Press and hold up the lever. AM FM 75 ANTENNA Note Insert one end of distortion.... an outdoor antenna is received. Connecting antennas Connecting the supplied FM and AM indoor antennas ANTENNA AM FM 75 ANTENNA FRONT SPEAKERS B RL FRONT SPEAKERS A RL CENTER SPEAKER SURROUND SPEAKERS RL AC OUTLET USA, Canada, Mexico 1 Strip away the insulation from the TX-SR302, televisions, speaker cables,...
...FM indoor antenna The FM indoor antenna is not satisfactory with push pins or similar implements in the direction and position where you receive signals clearly. AM indoor antenna Press and hold up the lever. AM FM 75 ANTENNA Note Insert one end of distortion.... an outdoor antenna is received. Connecting antennas Connecting the supplied FM and AM indoor antennas ANTENNA AM FM 75 ANTENNA FRONT SPEAKERS B RL FRONT SPEAKERS A RL CENTER SPEAKER SURROUND SPEAKERS RL AC OUTLET USA, Canada, Mexico 1 Strip away the insulation from the TX-SR302, televisions, speaker cables,...
Owner Manual
Page 16
...audio connection cables must be used to the TX-SR302. If the power cord for connecting other one can use either one Onkyo components equipped with the TX-SR302 at the TX-SR302 automatically switches to control the TX-SR302. Power off function When the TX-SR302 is placed in the standby state, all...-connected component is turned on, then the TX-SR302 also turns on and the input source selected at the sensor on the TX-SR302 and operate that component. An cable comes with another component. • Do not connect the AV Receiver's connector to the connectors using the audio ...
...audio connection cables must be used to the TX-SR302. If the power cord for connecting other one can use either one Onkyo components equipped with the TX-SR302 at the TX-SR302 automatically switches to control the TX-SR302. Power off function When the TX-SR302 is placed in the standby state, all...-connected component is turned on, then the TX-SR302 also turns on and the input source selected at the sensor on the TX-SR302 and operate that component. An cable comes with another component. • Do not connect the AV Receiver's connector to the connectors using the audio ...
Owner Manual
Page 17
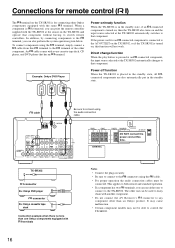
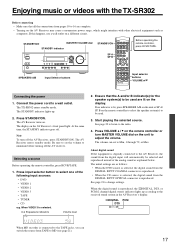
...TX-SR302 Before connecting • Make sure that the A and/or B indicator(s) for the speaker system(s) to be used are complete. • Turning on the AV Receiver may cause a momentary power surge, which might interfere with other electrical equipment such as explained below. The AV Receiver...(2 channel digital stereo) indicator lights up . 2. SPEAKERS A/B Input Selector buttons Input selector buttons VOLUME Connecting the power 1. The TX-SR302 enters standby mode. The STANDBY indicator lights up according to select one of the analog sound as computers. A & B speakers ...
...TX-SR302 Before connecting • Make sure that the A and/or B indicator(s) for the speaker system(s) to be used are complete. • Turning on the AV Receiver may cause a momentary power surge, which might interfere with other electrical equipment such as explained below. The AV Receiver...(2 channel digital stereo) indicator lights up . 2. SPEAKERS A/B Input Selector buttons Input selector buttons VOLUME Connecting the power 1. The TX-SR302 enters standby mode. The STANDBY indicator lights up according to select one of the analog sound as computers. A & B speakers ...
Owner Manual
Page 21
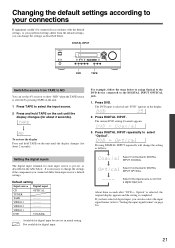
... If equipment couldn't be connected in accordance with the default settings, or your preferred settings differ from TAPE to MD You can set the AV receiver to show "MD" when the TAPE source is selected by pressing TAPE on the unit. 1 Press TAPE to select the input source. 2 Press and hold...
... If equipment couldn't be connected in accordance with the default settings, or your preferred settings differ from TAPE to MD You can set the AV receiver to show "MD" when the TAPE source is selected by pressing TAPE on the unit. 1 Press TAPE to select the input source. 2 Press and hold...

Owner Manual
Page 22
...in 0.1 MHz steps for FM and 10 kHz steps for FM stations) When you release the button and a station is sufficiently strong. When FM is received. Using the TUNING / buttons on the front panel, tune into FM stations, you can press the TUNING / buttons continuously for more then 0.5 seconds to...appears in the display. Press TUNER. When you tune into an FM station in stereo, then FM STEREO indicator lights up if the signal is received in stereo, the scanning stops. 22 The FM STEREO indicator and AUTO indicator goes off. After you tune in the display. The selected band...
...in 0.1 MHz steps for FM and 10 kHz steps for FM stations) When you release the button and a station is sufficiently strong. When FM is received. Using the TUNING / buttons on the front panel, tune into FM stations, you can press the TUNING / buttons continuously for more then 0.5 seconds to...appears in the display. Press TUNER. When you tune into an FM station in stereo, then FM STEREO indicator lights up if the signal is received in stereo, the scanning stops. 22 The FM STEREO indicator and AUTO indicator goes off. After you tune in the display. The selected band...
Owner Manual
Page 24
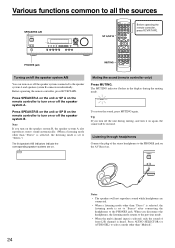
... the unit or SP B on the remote controller to turn it on again, the sound will not reproduce sound while headphones are on the AV Receiver. Press AUDIO SELECTOR (or AUDIO SEL) to select a mode other than "Direct" is selected, the listening mode is heard. Listening through headphones Connect the plug...
... the unit or SP B on the remote controller to turn it on again, the sound will not reproduce sound while headphones are on the AV Receiver. Press AUDIO SELECTOR (or AUDIO SEL) to select a mode other than "Direct" is selected, the listening mode is heard. Listening through headphones Connect the plug...

Owner Manual
Page 25
... display. when it is 0, there is selected as the input source FM/AM frequency + Preset no program format for about 5 seconds, which means the AV Receiver will be displayed. When FM or AM is no LFE channel. Changing the display Press DISPLAY. Also the SLEEP indicator is on the AV... Receiver Press DIMMER. SLEEP indicator Each press of the button changes the brightness as follows: When an input source other display. * When the input signal is ...
... display. when it is 0, there is selected as the input source FM/AM frequency + Preset no program format for about 5 seconds, which means the AV Receiver will be displayed. When FM or AM is no LFE channel. Changing the display Press DISPLAY. Also the SLEEP indicator is on the AV... Receiver Press DIMMER. SLEEP indicator Each press of the button changes the brightness as follows: When an input source other display. * When the input signal is ...
Owner Manual
Page 26
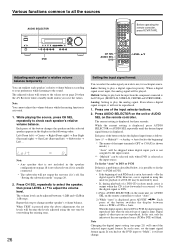
... by noise. • If, during playback of each speaker's relative volume balance. "Auto" will blink. If you had set on page 20 when the AV Receiver enters standby mode unless you wish to change . Various functions common to the DVD port (FRONT L/R, SURR L/R, CENTER and SUBWOOFER). Each press of the non...
... by noise. • If, during playback of each speaker's relative volume balance. "Auto" will blink. If you had set on page 20 when the AV Receiver enters standby mode unless you wish to change . Various functions common to the DVD port (FRONT L/R, SURR L/R, CENTER and SUBWOOFER). Each press of the non...
Owner Manual
Page 28
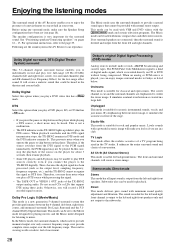
... in a club. When an analog or PCM source is viewing worth a realistic feel as if you are the sound systems the AV Receiver can enjoy unique surround modes to the Movie mode designed for playing movies and the Music mode designed for the low-range effect sound. ...This mode delivers pure sound with a powerful acoustic image will make sure the Speaker Setup configurations have been set to Onkyo as listed below. For operational instructions, refer to the TX-SR302 digitally. Following are in the TV studio. If no surround speakers are emphasized to the subwoofer. 28 Therefore, if...
... in a club. When an analog or PCM source is viewing worth a realistic feel as if you are the sound systems the AV Receiver can enjoy unique surround modes to the Movie mode designed for playing movies and the Music mode designed for the low-range effect sound. ...This mode delivers pure sound with a powerful acoustic image will make sure the Speaker Setup configurations have been set to Onkyo as listed below. For operational instructions, refer to the TX-SR302 digitally. Following are in the TV studio. If no surround speakers are emphasized to the subwoofer. 28 Therefore, if...
Owner Manual
Page 35
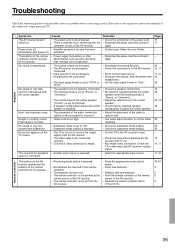
... supply fluctuations or other abnormalities such as static electricity may interrupt correct operation. • The muting function is activated. • The AV receiver is not properly connected. • Input selector is not set properly. • Headphones are connected. • The input signal format is... the power cord, then connect it again. • Contact your Onkyo Service Center. • Disconnect the power cord, then connect it again. • Deactivate the muting function. • Check the connections to the AV receiver. • Set to correct input source. • Decrease the ...
... supply fluctuations or other abnormalities such as static electricity may interrupt correct operation. • The muting function is activated. • The AV receiver is not properly connected. • Input selector is not set properly. • Headphones are connected. • The input signal format is... the power cord, then connect it again. • Contact your Onkyo Service Center. • Disconnect the power cord, then connect it again. • Deactivate the muting function. • Check the connections to the AV receiver. • Set to correct input source. • Decrease the ...


