
User Manual
Page 1
...HDMI cable connection 9 ・・Connecting Components without HDMI 10 3 Other connections 11 Step 2: Initial Setup 12 1 AccuEQ Room Calibration 12 2 Source Connection 13 3 Remote Mode Setup 14 4 Network Connection 14 Step 3: Playing Back 16 1 Basic operations 16 ・・Remote controller... Multi-zone Playback 20 7 Quick Setup menu 21 8 Other useful functions 22 Troubleshooting 23 Specifications 24 Table of display resolutions 25 Resolutions supported by HDMI 25 Supplied Accessories Back cover En TX-RZ900/TX-RZ800 The Basic Manual includes information needed ...
...HDMI cable connection 9 ・・Connecting Components without HDMI 10 3 Other connections 11 Step 2: Initial Setup 12 1 AccuEQ Room Calibration 12 2 Source Connection 13 3 Remote Mode Setup 14 4 Network Connection 14 Step 3: Playing Back 16 1 Basic operations 16 ・・Remote controller... Multi-zone Playback 20 7 Quick Setup menu 21 8 Other useful functions 22 Troubleshooting 23 Specifications 24 Table of display resolutions 25 Resolutions supported by HDMI 25 Supplied Accessories Back cover En TX-RZ900/TX-RZ800 The Basic Manual includes information needed ...

User Manual
Page 2
Features TX-RZ900/TX-RZ800: ・ Equipped with 7 ch amplifier ・ Supports playback... ・ Music Optimizer™ for compressed digital music files ・ Phase Matching Bass System ・ Automatic speaker setup available using supplied calibrated microphone (AccuEQ Room Calibration) ・ Supports playback of MP3, WMA, WMA Lossless, FLAC,...Dolby TrueHD via network and USB storage device (the supported formats will differ depending on the use environment) TX-RZ900: ・ The two front channels have parallel push-pull circuits for reproducing powerful bass ・ Equipped...
Features TX-RZ900/TX-RZ800: ・ Equipped with 7 ch amplifier ・ Supports playback... ・ Music Optimizer™ for compressed digital music files ・ Phase Matching Bass System ・ Automatic speaker setup available using supplied calibrated microphone (AccuEQ Room Calibration) ・ Supports playback of MP3, WMA, WMA Lossless, FLAC,...Dolby TrueHD via network and USB storage device (the supported formats will differ depending on the use environment) TX-RZ900: ・ The two front channels have parallel push-pull circuits for reproducing powerful bass ・ Equipped...

User Manual
Page 3
... Standby Through, USB Power Out at Standby, Network Standby or BLUETOOTH Wakeup function is assigned to change the mode. Input/Output Assign" in "Advanced Settings (Setup Menu)" in the Advanced Manual. 9 ZONE2/3 button: Controls the multi-zone function. Each button is enabled. 4 DTS:X indicator: Lights when playing DTS:X. 5 DOLBY ATMOS indicator...
... Standby Through, USB Power Out at Standby, Network Standby or BLUETOOTH Wakeup function is assigned to change the mode. Input/Output Assign" in "Advanced Settings (Setup Menu)" in the Advanced Manual. 9 ZONE2/3 button: Controls the multi-zone function. Each button is enabled. 4 DTS:X indicator: Lights when playing DTS:X. 5 DOLBY ATMOS indicator...

User Manual
Page 4
... signal inputs are input and the HDMI input is connected. F Displays various information of input digital signals and the listening mode. O SETUP button: Used when making settings. U AUX INPUT HDMI jack: A HD camera or such other device is selected. "HDMI": Lights ... T MEMORY button: Registers a radio station. W TUNING MODE button: Switches the tuning mode. G Shows the volume level. P QUICK SETUP button: Displays the Quick Setup menu that improves the quality of the display. S DIMMER button (North American models): Switches the brightness of the compressed audio. Q Cursor...
... signal inputs are input and the HDMI input is connected. F Displays various information of input digital signals and the listening mode. O SETUP button: Used when making settings. U AUX INPUT HDMI jack: A HD camera or such other device is selected. "HDMI": Lights ... T MEMORY button: Registers a radio station. W TUNING MODE button: Switches the tuning mode. G Shows the volume level. P QUICK SETUP button: Displays the Quick Setup menu that improves the quality of the display. S DIMMER button (North American models): Switches the brightness of the compressed audio. Q Cursor...

User Manual
Page 6
..."Configuration" "Speaker Impedance" and change it manually or by using automatic speaker setting. ・ To use the multi-zone function, see "7 Quick Setup menu" of the remote controller and press ENTER to confirm your selection. To return to prioritize in "Step 3: Playing Back". When connected at the... same time, you can switch speakers to the previous screen, press RETURN. For details, see "6 Multi-zone" in the Quick Setup menu that this type. Connecting 78, 9F, or GH speakers enables playback in failure. Using a speaker with the cursor buttons of "Step 3: ...
..."Configuration" "Speaker Impedance" and change it manually or by using automatic speaker setting. ・ To use the multi-zone function, see "7 Quick Setup menu" of the remote controller and press ENTER to confirm your selection. To return to prioritize in "Step 3: Playing Back". When connected at the... same time, you can switch speakers to the previous screen, press RETURN. For details, see "6 Multi-zone" in the Quick Setup menu that this type. Connecting 78, 9F, or GH speakers enables playback in failure. Using a speaker with the cursor buttons of "Step 3: ...

User Manual
Page 8
... you can put kl on this unit. When playing Dolby Atmos, the speakers required depend on top of these at the same time, you have setup your subwoofer does not have a cut-off frequency adjusting dial, turn it to the terminal. The following shows speaker combinations. Make correct connection between the...
... you can put kl on this unit. When playing Dolby Atmos, the speakers required depend on top of these at the same time, you have setup your subwoofer does not have a cut-off frequency adjusting dial, turn it to the terminal. The following shows speaker combinations. Make correct connection between the...

User Manual
Page 9
..., etc. To connect the TV and the unit, connect the HDMI OUT MAIN jack of the unit and the HDMI IN jack of "Step 2: Initial Setup". If your TV supports ARC (Audio Return Channel), it becomes possible to display the setting screen of the unit on the unit. If your TV...
..., etc. To connect the TV and the unit, connect the HDMI OUT MAIN jack of the unit and the HDMI IN jack of "Step 2: Initial Setup". If your TV supports ARC (Audio Return Channel), it becomes possible to display the setting screen of the unit on the unit. If your TV...
User Manual
Page 10
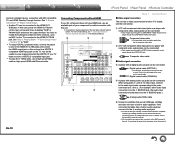
...Control) compliant device, connection with component video output jacks can be connected. * Only images input through the COMPONENT VIDEO OUT jacks. "7 Quick Setup menu" - When using jacks 1 and 2 for the TV connected to the jacks connected at 1 and 2. (For example, when video input connection... is turned inside. Digital optical cable (OPTICAL) * The DIGITAL IN OPTICAL jack of "Step 2: Initial Setup". ・ Another TV can be to the 4 BD/DVD jacks.) Analog audio (RCA) cable 5 Connect a turntable that of the input jacks and...
...Control) compliant device, connection with component video output jacks can be connected. * Only images input through the COMPONENT VIDEO OUT jacks. "7 Quick Setup menu" - When using jacks 1 and 2 for the TV connected to the jacks connected at 1 and 2. (For example, when video input connection... is turned inside. Digital optical cable (OPTICAL) * The DIGITAL IN OPTICAL jack of "Step 2: Initial Setup". ・ Another TV can be to the 4 BD/DVD jacks.) Analog audio (RCA) cable 5 Connect a turntable that of the input jacks and...

User Manual
Page 11
... jack on the front panel. Router NAS Headphones connection Connect stereo headphones with a tack on , a large instantaneous current may flow affecting functionality of "Step 2: Initial Setup" for the first time, adjust the antenna position and orientation to the ETHERNET port. Connect the power cord to AC INLET of wired connection, connect...
... jack on the front panel. Router NAS Headphones connection Connect stereo headphones with a tack on , a large instantaneous current may flow affecting functionality of "Step 2: Initial Setup" for the first time, adjust the antenna position and orientation to the ETHERNET port. Connect the power cord to AC INLET of wired connection, connect...

User Manual
Page 12
...the unit into standby mode after about 3 minutes even if you press RETURN. 1. Before starting the procedure, place the supplied speaker setup microphone at the measurement position ★ by referring to enable setting of the number of speakers, volume level, each speaker's optimum crossover... frequencies, and distance from the primary listening position, and also enable correction of the remote controller and press ENTER. "Initial Setup", and press ENTER. 1 AccuEQ Room Calibration The test tone coming from each input source is connected correctly ・ HDMI link function settings...
...the unit into standby mode after about 3 minutes even if you press RETURN. 1. Before starting the procedure, place the supplied speaker setup microphone at the measurement position ★ by referring to enable setting of the number of speakers, volume level, each speaker's optimum crossover... frequencies, and distance from the primary listening position, and also enable correction of the remote controller and press ENTER. "Initial Setup", and press ENTER. 1 AccuEQ Room Calibration The test tone coming from each input source is connected correctly ・ HDMI link function settings...

User Manual
Page 13
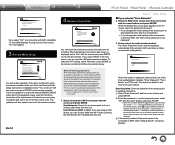
... If this occurs, close the window and turn the volume of sound leak that came in the next screen. When "Please unplug setup microphone." Step 2: Initial Setup 2 Source Connection You can check the connections for the CEC link function. When the Source Connection start to check if the ɹ... on the TV screen. ・ When the cursor is correct, video/audio of step 2. Press ENTER with the cursors and press ENTER. Initial Setup Source Connection ɹThis step will start screen is held by hand. Yes. Select the desired input to frighten young children. 6. Select "Yes"...
... If this occurs, close the window and turn the volume of sound leak that came in the next screen. When "Please unplug setup microphone." Step 2: Initial Setup 2 Source Connection You can check the connections for the CEC link function. When the Source Connection start to check if the ɹ... on the TV screen. ・ When the cursor is correct, video/audio of step 2. Press ENTER with the cursors and press ENTER. Initial Setup Source Connection ɹThis step will start screen is held by hand. Yes. Select the desired input to frighten young children. 6. Select "Yes"...
User Manual
Page 14
... select "Wired" in plain text, press D on the remote controller and follow the sections below for details of and how to remote ɹsetup from AV receiver remote. ɹWould you changed the initial setting of the three authentication methods: "Enter Password", "Push Button" and "PIN ...press ENTER. When the SSID of the access point appears on the remote controller to "On" and enabled. 3 Remote Mode Setup Initial Setup Remote Mode Setup ɹPreprograming remote will also explain how to be displayed automatically if the wireless LAN router does not have ɹconnected. ...
... select "Wired" in plain text, press D on the remote controller and follow the sections below for details of and how to remote ɹsetup from AV receiver remote. ɹWould you changed the initial setting of the three authentication methods: "Enter Password", "Push Button" and "PIN ...press ENTER. When the SSID of the access point appears on the remote controller to "On" and enabled. 3 Remote Mode Setup Initial Setup Remote Mode Setup ɹPreprograming remote will also explain how to be displayed automatically if the wireless LAN router does not have ɹconnected. ...

User Manual
Page 15
...of information we collect and how we use it please review Onkyo's Privacy Policy at http://www.onkyo.com/privacy/ I have read Onkyo's Privacy Policy and agree to its instruction manual. 4. Make the following settings according to Check" in "SETUP NEW AIRPLAY SPEAKER". 3. Select "Yes, Start to the ...products and services of Onkyo Corporation, Onkyo may be set to display the 8-digit PIN code. with the wireless LAN router does not work, try setting "BD video supplementary sound" (or secondary sound) to the format of the source. Step 2: Initial Setup Audio output of connected...
...of information we collect and how we use it please review Onkyo's Privacy Policy at http://www.onkyo.com/privacy/ I have read Onkyo's Privacy Policy and agree to its instruction manual. 4. Make the following settings according to Check" in "SETUP NEW AIRPLAY SPEAKER". 3. Select "Yes, Start to the ...products and services of Onkyo Corporation, Onkyo may be set to display the 8-digit PIN code. with the wireless LAN router does not work, try setting "BD video supplementary sound" (or secondary sound) to the format of the source. Step 2: Initial Setup Audio output of connected...

User Manual
Page 16
... starting operation. 5 6 1. H 4 ZONE2, ZONE3 buttons: For use when the unit is played there. 5 Cursor buttons and ENTER button: Moves the cursor and confirms the selection. 6 SETUP button: Displays the screen for making various settings for controlling this unit). Select the desired listening mode. En-16 1 RCV button: Switches the remote controller...
... starting operation. 5 6 1. H 4 ZONE2, ZONE3 buttons: For use when the unit is played there. 5 Cursor buttons and ENTER button: Moves the cursor and confirms the selection. 6 SETUP button: Displays the screen for making various settings for controlling this unit). Select the desired listening mode. En-16 1 RCV button: Switches the remote controller...

User Manual
Page 17
... screen on the remote controller. 2. Press NET on a USB storage device. USB Play music files on the remote controller. 2. En-17 H Q button: Displays the Quick Setup menu that this unit. 1. Operate by connecting the unit to the network. DLNA You can play . ・ Network services or contents may become unavailable if...
... screen on the remote controller. 2. Press NET on a USB storage device. USB Play music files on the remote controller. 2. En-17 H Q button: Displays the Quick Setup menu that this unit. 1. Operate by connecting the unit to the network. DLNA You can play . ・ Network services or contents may become unavailable if...

User Manual
Page 18
... enabled device. TUNED AUTO FM STEREO Actual display varies depending on the display lights. 3. The automatic tuning to BLUETOOTH. Click the AirPlay icon in the Setup menu, then once AirPlay starts, this setting is "Off", if the unit is already on then the "NET" input source can be behind the sound...
... enabled device. TUNED AUTO FM STEREO Actual display varies depending on the display lights. 3. The automatic tuning to BLUETOOTH. Click the AirPlay icon in the Setup menu, then once AirPlay starts, this setting is "Off", if the unit is already on then the "NET" input source can be behind the sound...

User Manual
Page 19
... to adjust audio in your area. ˙ a. Audio Adjust" - If you to change the frequency step to a TV in Zone 2: Press RCV and then SETUP on the remote controller, select "3. En-19 You can playback ・ External players (Ú1) ・ NET (Ú2) ・ BLUETOOTH ・ AM/FM Radio...with an integrated amplifier or power amplifier in a separate room It is possible to play equipment connected to make this unit: Press RCV and then SETUP on the remote controller, select "1. Main room Zone 2 Zone 3 Zone 2 audio can play 2 ch source in the separate room. Note ...
... to adjust audio in your area. ˙ a. Audio Adjust" - If you to change the frequency step to a TV in Zone 2: Press RCV and then SETUP on the remote controller, select "3. En-19 You can playback ・ External players (Ú1) ・ NET (Ú2) ・ BLUETOOTH ・ AM/FM Radio...with an integrated amplifier or power amplifier in a separate room It is possible to play equipment connected to make this unit: Press RCV and then SETUP on the remote controller, select "1. Main room Zone 2 Zone 3 Zone 2 audio can play 2 ch source in the separate room. Note ...

User Manual
Page 20
...room will automatically switch to the Direct listening mode. ・ While using the multi-zone function, the RI linked system function (link between Onkyo components) is now on the remote controller, select "1. For example, if "NET" has been selected in the main room and then ... Speaker" "Configuration" and set the "Zone 2 HDMI" setting to "BLUETOOTH" accordingly. Settings are required: After connecting the speakers, press RCV and then SETUP on the main unit: press ZONE2 or ZONE3 and within 8 seconds, adjust with the "NET" input. ・ When listening to display "Bass", "Treble...
...room will automatically switch to the Direct listening mode. ・ While using the multi-zone function, the RI linked system function (link between Onkyo components) is now on the remote controller, select "1. For example, if "NET" has been selected in the main room and then ... Speaker" "Configuration" and set the "Zone 2 HDMI" setting to "BLUETOOTH" accordingly. Settings are required: After connecting the speakers, press RCV and then SETUP on the main unit: press ZONE2 or ZONE3 and within 8 seconds, adjust with the "NET" input. ・ When listening to display "Bass", "Treble...

User Manual
Page 21
...and DTS Express. ・ In Re-EQ(THX), the following cases. - "Equalizer Settings" in the midrange to enhance bass sound. The Quick Setup menu is displayed on the remote controller. After selecting, press ENTER button to confirm. ・ It cannot be set if headphones are connected or ...; This setting is not possible during MUTING or when using headphones. Speaker" - Music Optimizer: Improve the quality of the TV. 7 Quick Setup menu You can be possible depending on the speaker settings. Playback sound of lossy compressed files such as MP3 will be reset to the previous...
...and DTS Express. ・ In Re-EQ(THX), the following cases. - "Equalizer Settings" in the midrange to enhance bass sound. The Quick Setup menu is displayed on the remote controller. After selecting, press ENTER button to confirm. ・ It cannot be set if headphones are connected or ...; This setting is not possible during MUTING or when using headphones. Speaker" - Music Optimizer: Improve the quality of the TV. 7 Quick Setup menu You can be possible depending on the speaker settings. Playback sound of lossy compressed files such as MP3 will be reset to the previous...

User Manual
Page 23
...the CEC link function of the unit, then turn off . It is displayed, immediately unplug the power cord from the wall outlet and contact your Onkyo dealer. See the TV's instruction manual for the player. This will be performed with this has occurred, "AMP Diag Mode" appears on the display... the diagnosis is that the video or audio is not output or the HDMI linked operation does not work well in "Step 3: Playing Back", "7 Quick Setup menu", "A/V Sync". After reconnecting, turn the unit on . ・ Not all listening modes use the unit normally again. In that case, keep distance ...
...the CEC link function of the unit, then turn off . It is displayed, immediately unplug the power cord from the wall outlet and contact your Onkyo dealer. See the TV's instruction manual for the player. This will be performed with this has occurred, "AMP Diag Mode" appears on the display... the diagnosis is that the video or audio is not output or the HDMI linked operation does not work well in "Step 3: Playing Back", "7 Quick Setup menu", "A/V Sync". After reconnecting, turn the unit on . ・ Not all listening modes use the unit normally again. In that case, keep distance ...


