
User Manual
Page 1
... > Hookup > Setup > Playback > Part Names AV RECEIVER TX-RZ710 Basic Manual Hookup Step1: Choose your Speaker Layout 3 Step2: Connect the Speakers 9 Step3: Connect the TV 11 Step4: Connect the AV Components 13 Step5: Multi-zone Connection 16 Step6: Connect Other Cables 19 Setup Step7: Power On & Initial Setup 20 HDMI Setup 21 Playback Basic Playback 22 Network Functions 23 Others 25 Part Names Front Panel 27 Rear Panel 28 Remote Controller 29 Display 29 This manual includes information needed when starting up and also instructions...
... > Hookup > Setup > Playback > Part Names AV RECEIVER TX-RZ710 Basic Manual Hookup Step1: Choose your Speaker Layout 3 Step2: Connect the Speakers 9 Step3: Connect the TV 11 Step4: Connect the AV Components 13 Step5: Multi-zone Connection 16 Step6: Connect Other Cables 19 Setup Step7: Power On & Initial Setup 20 HDMI Setup 21 Playback Basic Playback 22 Network Functions 23 Others 25 Part Names Front Panel 27 Rear Panel 28 Remote Controller 29 Display 29 This manual includes information needed when starting up and also instructions...
User Manual
Page 2
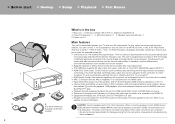
... THX Select2 Plus specification: THX is connected between home theaters and movie theaters. $ Supports playback in standby $ ARC: Connection with an ARC-compatible TV is complete with one HDMI cable $ Easy Initial Setup using the remote controller of a CECcompliant TV, and automatically switching this unit to standby when the TV is turned off $ HDMI Standby Through: Video and audio signals from the connection of equipment manufactured by the movie producer, including surround modes that enables PC music file playback, USB playback, plus pre out jack...
... THX Select2 Plus specification: THX is connected between home theaters and movie theaters. $ Supports playback in standby $ ARC: Connection with an ARC-compatible TV is complete with one HDMI cable $ Easy Initial Setup using the remote controller of a CECcompliant TV, and automatically switching this unit to standby when the TV is turned off $ HDMI Standby Through: Video and audio signals from the connection of equipment manufactured by the movie producer, including surround modes that enables PC music file playback, USB playback, plus pre out jack...

User Manual
Page 3
... height. Place the powered subwoofer towards the front. Placing it between the center speaker and a front speaker gives you a natural sound even when playing music. 0 The front speakers, center speaker, and surround speakers are counted as 5 channels, and the powered subwoofer is the basic surround system. Powered subwoofer reproduces bass sounds and creates rich sound field. > Before start > Hookup > Setup > Playback > Part Names Step1: Choose your Speaker Layout For 5.1-Channel System This is a 5.1-channel system that is counted...
... height. Place the powered subwoofer towards the front. Placing it between the center speaker and a front speaker gives you a natural sound even when playing music. 0 The front speakers, center speaker, and surround speakers are counted as 5 channels, and the powered subwoofer is the basic surround system. Powered subwoofer reproduces bass sounds and creates rich sound field. > Before start > Hookup > Setup > Playback > Part Names Step1: Choose your Speaker Layout For 5.1-Channel System This is a 5.1-channel system that is counted...

User Manual
Page 9
... the setting screen. 2 1 Speaker cable, 2 Subwoofer cable Make sure the exposed wires of the speakers do not stick out of the speakers touch the rear panel or the + and - Note that the audio from each other speakers. Up to 7 Connect 123456 for a 5.1-channel system. If there are using height speakers, set to "5.1.2 ch" in Initial Setup, "1. For a 7.1-channel system, select either surround back speakers or height speakers, and connect 78. Setup 0 The speaker configuration is set "Speaker Channels" to 12345678 audio output by default.
... the setting screen. 2 1 Speaker cable, 2 Subwoofer cable Make sure the exposed wires of the speakers do not stick out of the speakers touch the rear panel or the + and - Note that the audio from each other speakers. Up to 7 Connect 123456 for a 5.1-channel system. If there are using height speakers, set to "5.1.2 ch" in Initial Setup, "1. For a 7.1-channel system, select either surround back speakers or height speakers, and connect 78. Setup 0 The speaker configuration is set "Speaker Channels" to 12345678 audio output by default.

User Manual
Page 10
... jacks. AccuEQ Room Calibration" (P20) in "1. wires touch each of : Page 8 Connect front speakers compatible with Bi-Amping connection to two powered subwoofers can be activated. 1 Speaker cable, 2 Subwoofer cable 10 Make sure you to the instruction manual of the speaker terminals when connecting. In case of Bi-Amping connection, refer to change some settings. Setup 0 Bi-Amping connection requires you remove the jumper bar fitted between the woofer jacks and tweeter jacks of the speakers touch the rear panel...
... jacks. AccuEQ Room Calibration" (P20) in "1. wires touch each of : Page 8 Connect front speakers compatible with Bi-Amping connection to two powered subwoofers can be activated. 1 Speaker cable, 2 Subwoofer cable 10 Make sure you to the instruction manual of the speaker terminals when connecting. In case of Bi-Amping connection, refer to change some settings. Setup 0 Bi-Amping connection requires you remove the jumper bar fitted between the woofer jacks and tweeter jacks of the speakers touch the rear panel...
User Manual
Page 11
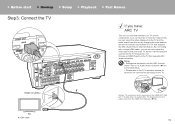
... jack on the TV that supports the ARC (Audio Return Channel) feature. > Before start > Hookup > Setup > Playback > Part Names Step3: Connect the TV if you can select the video displayed on the TV and the audio output from this unit by changing the input selector. By connecting with a single HDMI cable, you can not only output the video input to this unit to the TV's operation manual for directions on connections and setup for a TV that supports ARC when connecting...
... jack on the TV that supports the ARC (Audio Return Channel) feature. > Before start > Hookup > Setup > Playback > Part Names Step3: Connect the TV if you can select the video displayed on the TV and the audio output from this unit by changing the input selector. By connecting with a single HDMI cable, you can not only output the video input to this unit to the TV's operation manual for directions on connections and setup for a TV that supports ARC when connecting...

User Manual
Page 12
... use a tuner built into the TV) that does not support the ARC (Audio Return Channel) feature. For details about how to the HDMI OUT SUB jack. By connecting with a digital optical cable is not necessary if you will watch TV through this unit. This jack does not support ARC. > Before start > Hookup > Setup > Playback > Part Names if you can select the video displayed on the TV and the audio output from this unit by changing the input...
... use a tuner built into the TV) that does not support the ARC (Audio Return Channel) feature. For details about how to the HDMI OUT SUB jack. By connecting with a digital optical cable is not necessary if you will watch TV through this unit. This jack does not support ARC. > Before start > Hookup > Setup > Playback > Part Names if you can select the video displayed on the TV and the audio output from this unit by changing the input...

User Manual
Page 13
... HDMI jack. Make settings after all connections are complete. 0 To enjoy digital surround sound including Dolby Digital, audio output should be set to play video and audio from AV components on the front panel. 13 With connection to an AV component that conforms with an AV component that links with the input selector, and the HDMI Standby Through feature which allows you to "Bitstream output" on the connected Blu-ray Disc player or other device. 1 BD/DVD 1 HDMI cable Cable...
... HDMI jack. Make settings after all connections are complete. 0 To enjoy digital surround sound including Dolby Digital, audio output should be set to play video and audio from AV components on the front panel. 13 With connection to an AV component that conforms with an AV component that links with the input selector, and the HDMI Standby Through feature which allows you to "Bitstream output" on the connected Blu-ray Disc player or other device. 1 BD/DVD 1 HDMI cable Cable...
User Manual
Page 14
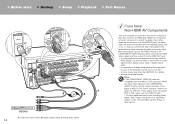
... have an HDMI jack. > Before start > Hookup > Setup > Playback > Part Names 1 2 OR 3 BD/DVD 1 Component video cable, 2 Digital coaxial cable, 3 Analog audio cable 14 if you input video signals to the COMPONENT VIDEO IN jacks, set to match the jacks it has. Select interlace if there is no option for audio signals with a digital coaxial cable or digital optical cable. 0 It is an example of connection with 480i or 576i resolution. Note that you connect the video input jacks to the jacks with the same name as Dolby Digital, you...
... have an HDMI jack. > Before start > Hookup > Setup > Playback > Part Names 1 2 OR 3 BD/DVD 1 Component video cable, 2 Digital coaxial cable, 3 Analog audio cable 14 if you input video signals to the COMPONENT VIDEO IN jacks, set to match the jacks it has. Select interlace if there is no option for audio signals with a digital coaxial cable or digital optical cable. 0 It is an example of connection with 480i or 576i resolution. Note that you connect the video input jacks to the jacks with the same name as Dolby Digital, you...

User Manual
Page 17
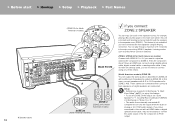
..., playing a Blu-ray Disc player in 7.1 ch in the main room (where this unit with an HDMI cable or digital IN optical/coaxial cable, may be output when the audio is located) and listening to ZONE 2. If you have an HDMI jack, connect using any of the others. ZONE2 PRE/LINE OUT 17 If the AV component doesn't have 1 LINE connected to this unit is analog or 2ch PCM audio signals. ZONE 2 PRE/LINE OUT Connect the ZONE 2 PRE...
..., playing a Blu-ray Disc player in 7.1 ch in the main room (where this unit with an HDMI cable or digital IN optical/coaxial cable, may be output when the audio is located) and listening to ZONE 2. If you have an HDMI jack, connect using any of the others. ZONE2 PRE/LINE OUT 17 If the AV component doesn't have 1 LINE connected to this unit is analog or 2ch PCM audio signals. ZONE 2 PRE/LINE OUT Connect the ZONE 2 PRE...
User Manual
Page 18
... this case, connect speakers with an HDMI cable or digital optical/coaxial cable, may be connected when surround back speakers or height speakers are required in Initial Setup, "4. Setup 0 Settings are connected. If the AV component doesn't have connected the front speakers using a digital optical cable, digital coaxial cable, or analog audio cable. Listening modes such as ZONE 2B. These cannot be necessary to convert the audio output of 5.1 channels in the main room during ZONE 2 playback. > Before start > Hookup > Setup > Playback > Part Names 1 Speaker cable 18 (ZONE 2A for...
... this case, connect speakers with an HDMI cable or digital optical/coaxial cable, may be connected when surround back speakers or height speakers are required in Initial Setup, "4. Setup 0 Settings are connected. If the AV component doesn't have connected the front speakers using a digital optical cable, digital coaxial cable, or analog audio cable. Listening modes such as ZONE 2B. These cannot be necessary to convert the audio output of 5.1 channels in the main room during ZONE 2 playback. > Before start > Hookup > Setup > Playback > Part Names 1 Speaker cable 18 (ZONE 2A for...
User Manual
Page 20
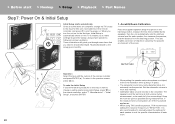
... manually adjust the settings for each speaker, the crossover frequencies, and the distance from the listening position. SETUP MIC 0 When putting the speaker setup microphone on a tripod, refer to check beforehand. It is extremely low frequencies. Set the subwoofer volume to more than halfway. 0 Calibration takes several minutes to suit the specific characteristics of the remote controller and press ENTER (a). Read beforehand so the setup goes smoothly. > Before start > Hookup > Setup > Playback > Part Names Step7: Power...
... manually adjust the settings for each speaker, the crossover frequencies, and the distance from the listening position. SETUP MIC 0 When putting the speaker setup microphone on a tripod, refer to check beforehand. It is extremely low frequencies. Set the subwoofer volume to more than halfway. 0 Calibration takes several minutes to suit the specific characteristics of the remote controller and press ENTER (a). Read beforehand so the setup goes smoothly. > Before start > Hookup > Setup > Playback > Part Names Step7: Power...
User Manual
Page 21
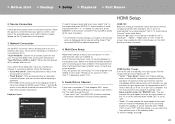
... this setting, you select "Scan Networks", there are the following . 0 "Enter Password": Enter the password (or key) of the access point beforehand. Source Connection Check that supports ARC, select "Yes". Select "Yes" and press ENTER to indicate agreement. 4. Select "Using AV Receiver" when connecting speakers in the Initial Setup. is also CEC-compliant. Audio Return Channel" in the separate room. "HDMI CEC" to "On" on the remote controller. Select "Auto (Eco)" if the TV is displayed, select...
... this setting, you select "Scan Networks", there are the following . 0 "Enter Password": Enter the password (or key) of the access point beforehand. Source Connection Check that supports ARC, select "Yes". Select "Yes" and press ENTER to indicate agreement. 4. Select "Using AV Receiver" when connecting speakers in the Initial Setup. is also CEC-compliant. Audio Return Channel" in the separate room. "HDMI CEC" to "On" on the remote controller. Select "Auto (Eco)" if the TV is displayed, select...

User Manual
Page 22
... Ch Stereo mode where a stereo image is selected automatically. The output is enveloped in order of the popular modes. Direct This listening mode can be output from both the front and the rear, and Orchestra (only with the MUSIC button) which you can select listening modes such as Dolby Digital or DTS, you connected the player to display the Quick Menu, and set "Other" - For example, press BD/DVD to the HDMI OUT SUB jack Press Q on the remote controller...
... Ch Stereo mode where a stereo image is selected automatically. The output is enveloped in order of the popular modes. Direct This listening mode can be output from both the front and the rear, and Orchestra (only with the MUSIC button) which you can select listening modes such as Dolby Digital or DTS, you connected the player to display the Quick Menu, and set "Other" - For example, press BD/DVD to the HDMI OUT SUB jack Press Q on the remote controller...
User Manual
Page 23
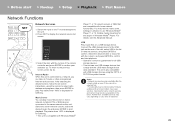
... > Hookup > Setup > Playback > Part Names Network Functions Network Services 1. Music Server You can play . Select the server with the cursors of network services, and press ENTER to the unit. 2. Press NET to use USB storage devices that are compatible with the USB mass storage device class standard. Switch the input on a USB storage device. Enable media streaming for all USB storage devices. 0 This unit can listen to the previous screen, press (b). To return to...
... > Hookup > Setup > Playback > Part Names Network Functions Network Services 1. Music Server You can play . Select the server with the cursors of network services, and press ENTER to the unit. 2. Press NET to use USB storage devices that are compatible with the USB mass storage device class standard. Switch the input on a USB storage device. Enable media streaming for all USB storage devices. 0 This unit can listen to the previous screen, press (b). To return to...
User Manual
Page 25
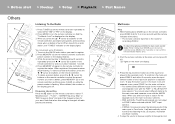
... remote controller so that the "TunMode: Auto" is found. d e b c a Multi-zone Play 1. You cannot select different stations for your area. > Before start > Hookup > Setup > Playback > Part Names Others a b c d e Listening To the Radio 1. Press TUNER (a) on the remote controller repeatedly to ZONE 2 when selected with the "NET" input selector. 0 If ZONE 2 is turned on the main unit twice. 0 You cannot select different inputs for the separate room, the main room also switches. 0 DSD and Dolby TrueHD audio signals...
... remote controller so that the "TunMode: Auto" is found. d e b c a Multi-zone Play 1. You cannot select different stations for your area. > Before start > Hookup > Setup > Playback > Part Names Others a b c d e Listening To the Radio 1. Press TUNER (a) on the remote controller repeatedly to ZONE 2 when selected with the "NET" input selector. 0 If ZONE 2 is turned on the main unit twice. 0 You cannot select different inputs for the separate room, the main room also switches. 0 DSD and Dolby TrueHD audio signals...

User Manual
Page 26
... required in Initial Setup, "4. Speaker" - Multi Zone" - "Output Level"? 26 Others To adjust the sound quality It is displayed. - Select the item with this unit, have you selected "Variable" in "6. Quick Menu Tone Level AccuEQ Other Bass Treble BD/DVD 0 You can also adjust the sound quality of the remote controller and press ENTER to confirm your preferences will also switch the playback mode to control the volume with the cursors of a power amplifier connected in a separate room...
... required in Initial Setup, "4. Speaker" - Multi Zone" - "Output Level"? 26 Others To adjust the sound quality It is displayed. - Select the item with this unit, have you selected "Variable" in "6. Quick Menu Tone Level AccuEQ Other Bass Treble BD/DVD 0 You can also adjust the sound quality of the remote controller and press ENTER to confirm your preferences will also switch the playback mode to control the volume with the cursors of a power amplifier connected in a separate room...

User Manual
Page 27
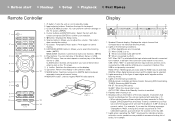
....PHONES jack: Stereo headphones with a standard plug (1/4 inch or ø6.3 mm) are enabled that provides better sound quality for compressed audio. Press the button repeatedly to select a category from an external player by connecting using a stereo mini plug cable. 19.AUX INPUT HDMI jack: Connect to a video camera, etc., using the TUNER, select the frequency with 4 TUNING 3, or select preset stations with the cursors and press ENTER to change the mode. (P22) 14.(Up) TONE button / (Down) TONE dial: Adjusts the high tone and low tone.
....PHONES jack: Stereo headphones with a standard plug (1/4 inch or ø6.3 mm) are enabled that provides better sound quality for compressed audio. Press the button repeatedly to select a category from an external player by connecting using a stereo mini plug cable. 19.AUX INPUT HDMI jack: Connect to a video camera, etc., using the TUNER, select the frequency with 4 TUNING 3, or select preset stations with the cursors and press ENTER to change the mode. (P22) 14.(Up) TONE button / (Down) TONE dial: Adjusts the high tone and low tone.

User Manual
Page 28
... a HDMI cable connected to an AV component. 9. Wireless antenna: Used for a separate room (ZONE 2). (North American models are connected. 3. HDMI OUT jacks: Transmit video signals and audio signals with a HDMI cable connected to a monitor such as a TV or projector. 8. DIGITAL IN OPTICAL/COAXIAL jacks: Input TV or AV component digital audio signals with an analog audio cable to the home control system. TUNER AM/FM 75Ω terminal: The supplied antennas are compatible with banana plugs.) 14.ZONE 2 PRE/LINE OUT jack: Output audio signals with a digital optical cable or digital...
... a HDMI cable connected to an AV component. 9. Wireless antenna: Used for a separate room (ZONE 2). (North American models are connected. 3. HDMI OUT jacks: Transmit video signals and audio signals with a HDMI cable connected to a monitor such as a TV or projector. 8. DIGITAL IN OPTICAL/COAXIAL jacks: Input TV or AV component digital audio signals with an analog audio cable to the home control system. TUNER AM/FM 75Ω terminal: The supplied antennas are compatible with banana plugs.) 14.ZONE 2 PRE/LINE OUT jack: Output audio signals with a digital optical cable or digital...
User Manual
Page 29
... station between automatic tuning and manual tuning. 14.MEMORY button: Used to the network is on . : When connected by BLUETOOTH. : When connected by Wi-Fi. Lights in Dolby Digital, Dolby Digital Plus and Dolby TrueHD, sometimes you may see the following message: "DialogNorm:+4dB", to keep the overall output level at THX calibrated loudness, just turn down the volume control by USB and the USB device is connected to the selected listening mode. 2. TUNED: Receiving AM/FM radio. Flashes...
... station between automatic tuning and manual tuning. 14.MEMORY button: Used to the network is on . : When connected by BLUETOOTH. : When connected by Wi-Fi. Lights in Dolby Digital, Dolby Digital Plus and Dolby TrueHD, sometimes you may see the following message: "DialogNorm:+4dB", to keep the overall output level at THX calibrated loudness, just turn down the volume control by USB and the USB device is connected to the selected listening mode. 2. TUNED: Receiving AM/FM radio. Flashes...


