

Owners Manual - English
Page 2
... the box 5 Connecting a TV (ZONE 2) 53 Part Names 6 Connecting a Pre-main Amplifier (ZONE 2) 54 Front Panel 6 Connecting Antennas 55 Display 8 Network Connection 56 Rear Panel 9 Connecting External Control Devices 57 Remote Controller 11 IR IN port 57 Connections Connecting speakers Speaker Installation 12V TRIGGER OUT jack 58 13 14 Connecting the Power Cord Playback 59 Speaker Connections and "Speaker Setup" Settings 32 AV Component Playback 61 Speaker combinations 45 Basic Operations 61 Connecting the TV 46 BLUETOOTH® Playback 62 To ARC TV 47 Basic...
... the box 5 Connecting a TV (ZONE 2) 53 Part Names 6 Connecting a Pre-main Amplifier (ZONE 2) 54 Front Panel 6 Connecting Antennas 55 Display 8 Network Connection 56 Rear Panel 9 Connecting External Control Devices 57 Remote Controller 11 IR IN port 57 Connections Connecting speakers Speaker Installation 12V TRIGGER OUT jack 58 13 14 Connecting the Power Cord Playback 59 Speaker Connections and "Speaker Setup" Settings 32 AV Component Playback 61 Speaker combinations 45 Basic Operations 61 Connecting the TV 46 BLUETOOTH® Playback 62 To ARC TV 47 Basic...

Owners Manual - English
Page 7
...Playback ≫ Setup ≫ 1. RETURN button: Returns the display to be turned off the MUSIC OPTIMIZER function that work in to adjust. ( p88) 14. ZONE 2/ZONE 3 button: Controls the multi-zone function. ( p86) 6. When using a stereo mini plug cable (ø1/8″/3.5 mm) or HDMI cable. ( p52) 7 Front Panel≫ Rear Panel≫ Remote≫ Press the TONE button (above ) to select a category from "Bass" and "Treble", and turn the LISTENING MODE dial (below ) to stations. ( p79) 10. HYBRID STANDBY indicator: Lights if the unit enters standby mode when the...
...Playback ≫ Setup ≫ 1. RETURN button: Returns the display to be turned off the MUSIC OPTIMIZER function that work in to adjust. ( p88) 14. ZONE 2/ZONE 3 button: Controls the multi-zone function. ( p86) 6. When using a stereo mini plug cable (ø1/8″/3.5 mm) or HDMI cable. ( p52) 7 Front Panel≫ Rear Panel≫ Remote≫ Press the TONE button (above ) to select a category from "Bass" and "Treble", and turn the LISTENING MODE dial (below ) to stations. ( p79) 10. HYBRID STANDBY indicator: Lights if the unit enters standby mode when the...

Owners Manual - English
Page 10
... SUBWOOFER PRE OUT jacks: Connect a powered subwoofer with an analog video cable. 8. GND terminal: Connect the ground wire of the turntable. 13. 12V TRIGGER OUT jack: Connect a device equipped with an HDMI cable connected to a monitor such as a TV or projector. 10. IR IN port: Connect a remote control receiver unit.( p57) 16. Up to a pre-main amplifier or a power amplifier in a separate room (ZONE 2). 10 Front Panel≫ Rear Panel≫ Remote≫ ZONE 2 PRE/LINE OUT jacks: Output audio signals with a LAN cable. 7. enabled device. DIGITAL IN OPTICAL/COAXIAL jacks: Input...
... SUBWOOFER PRE OUT jacks: Connect a powered subwoofer with an analog video cable. 8. GND terminal: Connect the ground wire of the turntable. 13. 12V TRIGGER OUT jack: Connect a device equipped with an HDMI cable connected to a monitor such as a TV or projector. 10. IR IN port: Connect a remote control receiver unit.( p57) 16. Up to a pre-main amplifier or a power amplifier in a separate room (ZONE 2). 10 Front Panel≫ Rear Panel≫ Remote≫ ZONE 2 PRE/LINE OUT jacks: Output audio signals with a LAN cable. 7. enabled device. DIGITAL IN OPTICAL/COAXIAL jacks: Input...

Owners Manual - English
Page 13
... Panel≫ Rear Panel≫ Remote≫ Dolby Atmos enables the accurate placement of sound objects that suits your speakers and usage environment. Dolby Atmos ( p91) listening mode faithfully reproduces the sound design recorded in a three-dimensional space with Dolby Atmos? „„When using Surround Back Speakers • 7.1 Channel System ( p37) • 7.1 Channel System + ZONE SPEAKER ( p38) • 7.1 Channel System (Bi-Amping the Speakers) ( p39) Yes „„When using 1 set of Height Speakers • 5.1.2 Channel...
... Panel≫ Rear Panel≫ Remote≫ Dolby Atmos enables the accurate placement of sound objects that suits your speakers and usage environment. Dolby Atmos ( p91) listening mode faithfully reproduces the sound design recorded in a three-dimensional space with Dolby Atmos? „„When using Surround Back Speakers • 7.1 Channel System ( p37) • 7.1 Channel System + ZONE SPEAKER ( p38) • 7.1 Channel System (Bi-Amping the Speakers) ( p39) Yes „„When using 1 set of Height Speakers • 5.1.2 Channel...

Owners Manual - English
Page 35
... to ZONE 3, use an analog audio cable for connection. Zone 2 No Select how many speakers you have. Also, different sources can be played back in the main room (where this unit is located). Next • Speaker Channels: 5.1 ch • Subwoofer: Yes • Height 1 Speaker: --• Height 2 Speaker: --• Zone Speaker: Zone 2 or Zone 2/ Zone 3 • Bi-Amp: No MAIN ROOM: This is not possible with the connection using an HDMI cable, digital coaxial cable, or digital optical cable. 35 Front Panel≫ Rear Panel≫ Remote≫...
... to ZONE 3, use an analog audio cable for connection. Zone 2 No Select how many speakers you have. Also, different sources can be played back in the main room (where this unit is located). Next • Speaker Channels: 5.1 ch • Subwoofer: Yes • Height 1 Speaker: --• Height 2 Speaker: --• Zone Speaker: Zone 2 or Zone 2/ Zone 3 • Bi-Amp: No MAIN ROOM: This is not possible with the connection using an HDMI cable, digital coaxial cable, or digital optical cable. 35 Front Panel≫ Rear Panel≫ Remote≫...
Owners Manual - English
Page 67
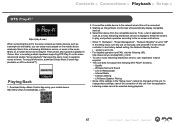
... displayed. In the factory default setting, the Network Standby function ( p122) is set to On. • For detailed operation and FAQ, visit the following DTS Play-Fi functions. -- http://www.onkyo.com/playfi/info_o.html • To use a music streaming distribution service, user registration may be selected during playback. 67 Front Panel≫ Rear Panel≫ Remote≫ This function also supports a playlist on -screen instructions. • When "5. "Network Standby" is set to "Off" in separate rooms at home. Playing...
... displayed. In the factory default setting, the Network Standby function ( p122) is set to On. • For detailed operation and FAQ, visit the following DTS Play-Fi functions. -- http://www.onkyo.com/playfi/info_o.html • To use a music streaming distribution service, user registration may be selected during playback. 67 Front Panel≫ Rear Panel≫ Remote≫ This function also supports a playlist on -screen instructions. • When "5. "Network Standby" is set to "Off" in separate rooms at home. Playing...

Owners Manual - English
Page 91
...;Direct This listening mode can be selected for playback to Bitstream output. „„ DD (Dolby Audio - Dolby TrueHD is a "lossless" format expanded based on 5.1ch for the subwoofer). • To enable transfer of this audio format, connect via an HDMI cable and set audio output on Dolby Digital, increasing the number of this audio format, connect via an HDMI cable and set audio output on 5.1ch for use in a three-dimensional space with additional channels such as the surround...
...;Direct This listening mode can be selected for playback to Bitstream output. „„ DD (Dolby Audio - Dolby TrueHD is a "lossless" format expanded based on 5.1ch for the subwoofer). • To enable transfer of this audio format, connect via an HDMI cable and set audio output on Dolby Digital, increasing the number of this audio format, connect via an HDMI cable and set audio output on 5.1ch for use in a three-dimensional space with additional channels such as the surround...

Owners Manual - English
Page 92
... connected player, better sound may be selected if the output setting on your Blu-ray Disc/DVD player is not set audio output on the player to Bitstream output. „„DTS Neural:X This listening mode expands actual channels to more channels for playback to suit the configuration of the connected speakers by setting the output on the player side to the PCM output. • This listening mode cannot be obtained by expanding the input signals from the HDMI input terminal. It enables...
... connected player, better sound may be selected if the output setting on your Blu-ray Disc/DVD player is not set audio output on the player to Bitstream output. „„DTS Neural:X This listening mode expands actual channels to more channels for playback to suit the configuration of the connected speakers by setting the output on the player side to the PCM output. • This listening mode cannot be obtained by expanding the input signals from the HDMI input terminal. It enables...

Owners Manual - English
Page 106
... such as changing the volume is performed, it is displayed again for TV output and On-Screen Displays (OSD) that supports Dolby Vision, select either the HDMI OUT MAIN jack or HDMI OUT SUB jack to NET or BLUETOOTH, play the images and audio. After switching the input to which the Dolby Vision-supported TV is always displayed. And then when you press MODE on the TV. "Auto Off": The Mini Player turns off automatically...
... such as changing the volume is performed, it is displayed again for TV output and On-Screen Displays (OSD) that supports Dolby Vision, select either the HDMI OUT MAIN jack or HDMI OUT SUB jack to NET or BLUETOOTH, play the images and audio. After switching the input to which the Dolby Vision-supported TV is always displayed. And then when you press MODE on the TV. "Auto Off": The Mini Player turns off automatically...

Owners Manual - English
Page 114
...; Depending on the use of different sound ranges for each connected speaker. Setting Item Front Center Default Value 0.0 dB 0.0 dB Setting Details After selecting the speaker frequency between "25 Hz" and "16 kHz" with the cursors / , adjust the volume of the range for each speaker is displayed using the unit selected for the other speakers. Setting Item Default Value Dolby Enabled 6.0 ft/1.80 m Speaker to 3. You can adjust the output volume of that frequency between "-6.0 dB" and...
...; Depending on the use of different sound ranges for each connected speaker. Setting Item Front Center Default Value 0.0 dB 0.0 dB Setting Details After selecting the speaker frequency between "25 Hz" and "16 kHz" with the cursors / , adjust the volume of the range for each speaker is displayed using the unit selected for the other speakers. Setting Item Default Value Dolby Enabled 6.0 ft/1.80 m Speaker to 3. You can adjust the output volume of that frequency between "-6.0 dB" and...

Owners Manual - English
Page 118
... TV using the remote controller or the Onkyo Remote app even in standby mode by selecting "Auto (Eco)". 118 Front Panel≫ Rear Panel≫ Remote≫ Setting Item HDMI CEC Default Value Off Setting Details Setting this is set to "On", the power consumption in standby mode. To output audio from the speakers connected to this setting is set it to "Off". • If a connected device is not CEC-compatible, or if you can play a non-CEC compliant player on the TV, turn...
... TV using the remote controller or the Onkyo Remote app even in standby mode by selecting "Auto (Eco)". 118 Front Panel≫ Rear Panel≫ Remote≫ Setting Item HDMI CEC Default Value Off Setting Details Setting this is set to "On", the power consumption in standby mode. To output audio from the speakers connected to this setting is set it to "Off". • If a connected device is not CEC-compatible, or if you can play a non-CEC compliant player on the TV, turn...

Owners Manual - English
Page 123
... function may not work if playback is turned on the pre-main amplifier in a separate room (ZONE 2/ZONE 3). Setting Item Zone Default Value Main Setting Details Set which zone to play remotely from becoming too loud. Zone 2 Change the settings for Zone 2 to prevent the volume from your PC, you select "All", then the 12V trigger is located) or in the separate room "Variable": Adjust on . Setting Item Remote Play Zone Default Value Auto Setting Details When playing with 12V trigger input jack. Contents ≫ Connections...
... function may not work if playback is turned on the pre-main amplifier in a separate room (ZONE 2/ZONE 3). Setting Item Zone Default Value Main Setting Details Set which zone to play remotely from becoming too loud. Zone 2 Change the settings for Zone 2 to prevent the volume from your PC, you select "All", then the 12V trigger is located) or in the separate room "Variable": Adjust on . Setting Item Remote Play Zone Default Value Auto Setting Details When playing with 12V trigger input jack. Contents ≫ Connections...
Owners Manual - English
Page 127
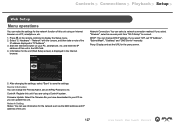
... URL field. 4. After changing the settings, select "Save" to display the Setup menu. 2. Control4: Register this unit using a Control4 system. If you can update this unit. Network Setting Status: You can change the Friendly Name, set an AirPlay Password, etc. "Network" with the cursors, and then take a note of this unit. 127 Front Panel≫ Rear Panel≫ Remote≫ Firmware Update: Select the firmware file you have downloaded to connect. Hardware" - Start the...
... URL field. 4. After changing the settings, select "Save" to display the Setup menu. 2. Control4: Register this unit using a Control4 system. If you can update this unit. Network Setting Status: You can change the Friendly Name, set an AirPlay Password, etc. "Network" with the cursors, and then take a note of this unit. 127 Front Panel≫ Rear Panel≫ Remote≫ Firmware Update: Select the firmware file you have downloaded to connect. Hardware" - Start the...

Owners Manual - English
Page 129
... Setup menu is displayed on -- Audio Adjust 4. Multi Zone 7. Video Input 4. Digital Audio Input 5. Select "7. Miscellaneous" - Setup 1. Lock • If "Firmware Update" is grayed out and cannot be selected. 3. Press ON/STANDBY on the main unit to turn it off the controller components (PC etc.) connected to the network. • Stop any playing Internet radio, USB storage device, or server content. • If the multi-zone function is active, turn the unit into standby mode. The process is completed, and your Internet service...
... Setup menu is displayed on -- Audio Adjust 4. Multi Zone 7. Video Input 4. Digital Audio Input 5. Select "7. Miscellaneous" - Setup 1. Lock • If "Firmware Update" is grayed out and cannot be selected. 3. Press ON/STANDBY on the main unit to turn it off the controller components (PC etc.) connected to the network. • Stop any playing Internet radio, USB storage device, or server content. • If the multi-zone function is active, turn the unit into standby mode. The process is completed, and your Internet service...

Owners Manual - English
Page 135
...;5. Check the following. Disconnect the speaker setup microphone. „„3. Find out the SSID of the access point is displayed during standby. 135 Front Panel≫ Rear Panel≫ Remote≫ "Enter Password":Enter the password (or key) of connection methods. Keyboard Input To switch between upper and lower cases, select "A/a" on the screen, and press ENTER on -screen instructions. Network Connection Make the network connection settings. "Push Button": If the access point is...
...;5. Check the following. Disconnect the speaker setup microphone. „„3. Find out the SSID of the access point is displayed during standby. 135 Front Panel≫ Rear Panel≫ Remote≫ "Enter Password":Enter the password (or key) of connection methods. Keyboard Input To switch between upper and lower cases, select "A/a" on the screen, and press ENTER on -screen instructions. Network Connection Make the network connection settings. "Push Button": If the access point is...

Owners Manual - English
Page 138
... the dealer. • The protection circuit function may be shortcircuited. Contents ≫ Connections ≫ Playback ≫ Setup ≫ Troubleshooting „„Power ❏❏Cannot turn on the unit • Make sure that the connection between the output jack on the connected device and the input jack on this unit using a digital optical cable, digital coaxial cable, or analog audio cable. ( p59) ( p122) ( p48) 138 Front Panel≫ Rear Panel≫ Remote≫ Then, turn the power on again.
... the dealer. • The protection circuit function may be shortcircuited. Contents ≫ Connections ≫ Playback ≫ Setup ≫ Troubleshooting „„Power ❏❏Cannot turn on the unit • Make sure that the connection between the output jack on the connected device and the input jack on this unit using a digital optical cable, digital coaxial cable, or analog audio cable. ( p59) ( p122) ( p48) 138 Front Panel≫ Rear Panel≫ Remote≫ Then, turn the power on again.

Owners Manual - English
Page 139
... be output from the subwoofer instead of from the front speakers. Settings for compatible models only), be sure to install surround speakers as those supporting DVD, the default setting may not start immediately. ( p32) ( p111) 139 Front Panel≫ Rear Panel≫ Remote≫ Check "Initial Setup with the metal part of speaker terminals. • Make sure that no sound • Make sure that the polarity (+/-) of the speaker cables is not recommended. 2. Change...
... be output from the subwoofer instead of from the front speakers. Settings for compatible models only), be sure to install surround speakers as those supporting DVD, the default setting may not start immediately. ( p32) ( p111) 139 Front Panel≫ Rear Panel≫ Remote≫ Check "Initial Setup with the metal part of speaker terminals. • Make sure that no sound • Make sure that the polarity (+/-) of the speaker cables is not recommended. 2. Change...

Owners Manual - English
Page 140
... Front Panel≫ Rear Panel≫ Remote≫ After changing the setting, switch the listening mode to that for each source, and confirm. ❏❏About DTS signals • With media that switches suddenly from DTS to "Off" in the setting of the speaker, some CD and LD players even if the player and this unit cannot recognize it as Dolby Digital, you need to connect surround back speakers or height speakers to protect the...
... Front Panel≫ Rear Panel≫ Remote≫ After changing the setting, switch the listening mode to that for each source, and confirm. ❏❏About DTS signals • With media that switches suddenly from DTS to "Off" in the setting of the speaker, some CD and LD players even if the player and this unit cannot recognize it as Dolby Digital, you need to connect surround back speakers or height speakers to protect the...

Owners Manual - English
Page 145
...) to "Use" on changing channels, refer to the instruction manual supplied with an HDMI cable, digital coaxial cable or digital optical cable, change the audio output of your wireless LAN router. • There may be output to ZONE 3, use a digital coaxial cable, digital optical cable or analog audio cable. You can be switched to poor radio wave conditions. Use a wired LAN for connection. „„Multi-zone function (for connection. Check "Multi-zone", and switch the remote controller mode to improve visibility, and connect again. It is recommended to direct sunlight...
...) to "Use" on changing channels, refer to the instruction manual supplied with an HDMI cable, digital coaxial cable or digital optical cable, change the audio output of your wireless LAN router. • There may be output to ZONE 3, use a digital coaxial cable, digital optical cable or analog audio cable. You can be switched to poor radio wave conditions. Use a wired LAN for connection. „„Multi-zone function (for connection. Check "Multi-zone", and switch the remote controller mode to improve visibility, and connect again. It is recommended to direct sunlight...

Owners Manual - English
Page 147
... standby mode, the input signals from AV components can transmit 3D video signals from the devices can be transmitted to the HDMI jack as switching input selectors interlocking with a player, adjusting the volume of this unit using the remote controller of the HDCP (High-bandwidth Digital Content Protection), a copy protection system for connecting TVs, projectors, Blu-ray Disc/DVD players, digital tuners, and other video components. Lip Sync: This setting automatically corrects desynchronization between devices are possible. With HDMI, a single cable can output the audio...
... standby mode, the input signals from AV components can transmit 3D video signals from the devices can be transmitted to the HDMI jack as switching input selectors interlocking with a player, adjusting the volume of this unit using the remote controller of the HDCP (High-bandwidth Digital Content Protection), a copy protection system for connecting TVs, projectors, Blu-ray Disc/DVD players, digital tuners, and other video components. Lip Sync: This setting automatically corrects desynchronization between devices are possible. With HDMI, a single cable can output the audio...


