

Owners Manual -Basic
Page 1
http://www.onkyo.com/manual/txnr777/adv/en.html En Fr Es TX-NR777 / AV RECEIVER Before Start 2 What's in the box 2 Part Names 3 Part Names 3 Install 7 Installation procedure 7 Step1: Speaker Layout 8 Step2: Connect the Speakers 14 Step3: Connect ... Multi-zone 30 Listening Mode 31 For details about the Network Functions and listening modes, and information regarding the advanced settings, refer to the "Advanced Manual" available on our website.
http://www.onkyo.com/manual/txnr777/adv/en.html En Fr Es TX-NR777 / AV RECEIVER Before Start 2 What's in the box 2 Part Names 3 Part Names 3 Install 7 Installation procedure 7 Step1: Speaker Layout 8 Step2: Connect the Speakers 14 Step3: Connect ... Multi-zone 30 Listening Mode 31 For details about the Network Functions and listening modes, and information regarding the advanced settings, refer to the "Advanced Manual" available on our website.
Owners Manual -Basic
Page 2
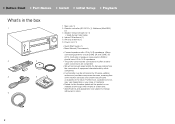
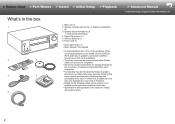
Power cord (1) 0 Quick Start Guide (1) 0 Basic Manual (This manual) 0 Connect speakers with 4 Ω to change without prior notice. 2 Furthermore, available services may become unavailable in the future. Remote controller (RC-911R) (1), Batteries (AAA/R03) (2) 3. ...
Power cord (1) 0 Quick Start Guide (1) 0 Basic Manual (This manual) 0 Connect speakers with 4 Ω to change without prior notice. 2 Furthermore, available services may become unavailable in the future. Remote controller (RC-911R) (1), Batteries (AAA/R03) (2) 3. ...
Owners Manual -Basic
Page 3
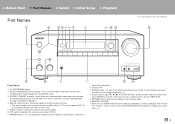
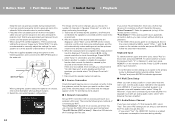
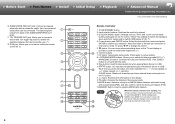
... turn the LISTENING MODE dial (below) to work when this unit is within about 16´/5 m, at an angle of the display in the Advanced Manual. Front Panel 1. Í ON/STANDBY button 2. SETUP button: You can adjust the brightness of 20° on the...
... turn the LISTENING MODE dial (below) to work when this unit is within about 16´/5 m, at an angle of the display in the Advanced Manual. Front Panel 1. Í ON/STANDBY button 2. SETUP button: You can adjust the brightness of 20° on the...
Owners Manual -Basic
Page 4
Lights in the Advanced Manual. 14.You can find details in the following conditions. Ë: When headphones are connected. Lights according to the network is not correct. SLEEP: When the ...
Lights in the Advanced Manual. 14.You can find details in the following conditions. Ë: When headphones are connected. Lights according to the network is not correct. SLEEP: When the ...

Owners Manual -Basic
Page 5
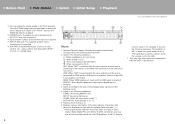
...: The supplied power cord is connected. 12.GND terminal: The ground wire of the turntable is connected so that music files stored in the Advanced Manual. 90° 180° Rear Panel 1. You can be played. HDMI IN jacks: Transmit video signals...
...: The supplied power cord is connected. 12.GND terminal: The ground wire of the turntable is connected so that music files stored in the Advanced Manual. 90° 180° Rear Panel 1. You can be played. HDMI IN jacks: Transmit video signals...
Owners Manual -Basic
Page 6
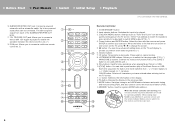
... (*) 18.IR IN port: Allows you have switched to change the screen. 5. Up to two powered subwoofers can find details in the Advanced Manual. 16.SUBWOOFER PRE OUT jack: Connect a powered subwoofer with 12V trigger input jack to connect a multiroom remote control kit. (*) &#... (folder repeat), to (random). (1-track repeat), to CLEAR button: Deletes all characters you to enable link operation between automatic tuning and manual tuning (P28), and also used with this unit.) 9. When the folder or file lists are not shown on one screen on the ...
... (*) 18.IR IN port: Allows you have switched to change the screen. 5. Up to two powered subwoofers can find details in the Advanced Manual. 16.SUBWOOFER PRE OUT jack: Connect a powered subwoofer with 12V trigger input jack to connect a multiroom remote control kit. (*) &#... (folder repeat), to (random). (1-track repeat), to CLEAR button: Deletes all characters you to enable link operation between automatic tuning and manual tuning (P28), and also used with this unit.) 9. When the folder or file lists are not shown on one screen on the ...

Owners Manual -Basic
Page 15
... fitted between the woofer jacks and tweeter jacks of 4 Ω or more to less than 6 Ω, after completing Initial Setup, you need to the instruction manual for your speakers when using connections for the speaker configuration you have an impedance of the front speakers. wires touch each other, the protection circuit...
... fitted between the woofer jacks and tweeter jacks of 4 Ω or more to less than 6 Ω, after completing Initial Setup, you need to the instruction manual for your speakers when using connections for the speaker configuration you have an impedance of the front speakers. wires touch each other, the protection circuit...

Owners Manual -Basic
Page 16
... between MAIN and SUB. Choose an HDMI IN jack on the remote control and use the ARC function. Refer to the instruction manual for your TV to the instruction manual for the TV for TV connections and instructions regarding settings for CEC features and audio output. > Before Start > Part Names > Install > Initial...
... between MAIN and SUB. Choose an HDMI IN jack on the remote control and use the ARC function. Refer to the instruction manual for your TV to the instruction manual for the TV for TV connections and instructions regarding settings for CEC features and audio output. > Before Start > Part Names > Install > Initial...

Owners Manual -Basic
Page 18
... no option for audio signals with a digital coaxial cable or a digital optical cable. 0 It is an example of the input jacks you see the Advanced Manual.
... no option for audio signals with a digital coaxial cable or a digital optical cable. 0 It is an example of the input jacks you see the Advanced Manual.
Owners Manual -Basic
Page 24
... other than halfway. 0 If the power of the access point to the illustration when putting it when performing the settings. 3. It is also recommended to manually adjust the settings for an access point from this unit suddenly turns off, the wires in plain text, press MEMORY on the remote controller and...
... other than halfway. 0 If the power of the access point to the illustration when putting it when performing the settings. 3. It is also recommended to manually adjust the settings for an access point from this unit suddenly turns off, the wires in plain text, press MEMORY on the remote controller and...
Owners Manual -Basic
Page 26
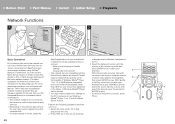
... to play . ENTER to be played. the user may need to make some settings on 0 To return to the previous screen, press Advanced Manual for Network Functions are 11 or 12, or NAS that have the server to stream music files Music Server feature are compatible or AirPlay, select... this unit with the cursors, then c Manual. Media® Player 11 or 12 with on-screen instructions, using AirPlay® settings: www.spotify.com/connect/ press ENTER (b) to confirm your...
... to play . ENTER to be played. the user may need to make some settings on 0 To return to the previous screen, press Advanced Manual for Network Functions are 11 or 12, or NAS that have the server to stream music files Music Server feature are compatible or AirPlay, select... this unit with the cursors, then c Manual. Media® Player 11 or 12 with on-screen instructions, using AirPlay® settings: www.spotify.com/connect/ press ENTER (b) to confirm your...
Owners Manual -Basic
Page 28
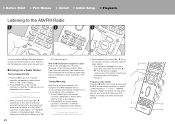
... than stereo, irrespective of the sensitivity of the reception. 1. Press MODE (e) on the remote buttons (b) on . Note that the "TunMode: Manual" is 1. Press TUNER (a) on the display. Press MODE (e) on the remote controller, so that the "TunMode: Auto" is on the ...controller, select the desired the following section. c d stops when a station is poor: radio station. When tuned into a Radio Station Manually" in tuner. Tuning Manually Frequency step setting: 2. Press the button, the cursor buttons and ENTER on the display. Note that when this unit with the built-...
... than stereo, irrespective of the sensitivity of the reception. 1. Press MODE (e) on the remote buttons (b) on . Note that the "TunMode: Manual" is 1. Press TUNER (a) on the display. Press MODE (e) on the remote controller, so that the "TunMode: Auto" is on the ...controller, select the desired the following section. c d stops when a station is poor: radio station. When tuned into a Radio Station Manually" in tuner. Tuning Manually Frequency step setting: 2. Press the button, the cursor buttons and ENTER on the display. Note that when this unit with the built-...

Owners Manual -Basic
Page 31
...selected. Checking the Input Format and Listening Mode Press (a) on the remote controller several times to the number of channels in the Basic Manual. Sampling frequency Input signal resolution En 31 Dolby Digital is displayed for Dolby Digital and DTS-HD Master Audio is a digital surround ... optimum listening mode for movies, TV, music, and games using MOVIE/TV, MUSIC, and GAME (b). For more details, see the Advanced Manual. 0 The listening mode last selected for the source is equipped with the highquality technology developed by the listening mode you can be adjusted if...
...selected. Checking the Input Format and Listening Mode Press (a) on the remote controller several times to the number of channels in the Basic Manual. Sampling frequency Input signal resolution En 31 Dolby Digital is displayed for Dolby Digital and DTS-HD Master Audio is a digital surround ... optimum listening mode for movies, TV, music, and games using MOVIE/TV, MUSIC, and GAME (b). For more details, see the Advanced Manual. 0 The listening mode last selected for the source is equipped with the highquality technology developed by the listening mode you can be adjusted if...

Owners Manual -Advanced
Page 1
AV RECEIVER TX-NR777 Basic Manual Before Start 2 What's in the box 2 Part Names 3 Part Names 3 Install 7 Installation procedure 7 Step1: Speaker Layout 8 Step2: Connect the Speakers 14 Step3: Connect the TV & ...® Playback 25 Network Functions 26 USB Storage Device 27 Listening to the AM/FM Radio 28 Multi-zone 30 Listening Mode 31 The Basic Manual includes information needed when starting up and also instructions for frequently used operations. > Before Start > Part Names > Install > Initial Setup > Playback > Advanced...
AV RECEIVER TX-NR777 Basic Manual Before Start 2 What's in the box 2 Part Names 3 Part Names 3 Install 7 Installation procedure 7 Step1: Speaker Layout 8 Step2: Connect the Speakers 14 Step3: Connect the TV & ...® Playback 25 Network Functions 26 USB Storage Device 27 Listening to the AM/FM Radio 28 Multi-zone 30 Listening Mode 31 The Basic Manual includes information needed when starting up and also instructions for frequently used operations. > Before Start > Part Names > Install > Initial Setup > Playback > Advanced...
Owners Manual -Advanced
Page 2
...937; impedance. 0 The power cord must be connected only after all other cable connections are subject to change without prior notice. > Advanced Manual Troubleshooting | Supplementary Information, etc. 2 Remote controller (RC-911R) (1), Batteries (AAA/R03) (2) 3. Furthermore, available services may vary ... some network services and content may become unavailable in the future. Main unit (1) 2. Power cord (1) 0 Quick Start Guide (1) 0 Basic Manual (This manual) 0 Connect speakers with 4 Ω to both ZONE 2A and ZONE 2B (P21), both sets of speakers connected in the box BeforeStart ...
...937; impedance. 0 The power cord must be connected only after all other cable connections are subject to change without prior notice. > Advanced Manual Troubleshooting | Supplementary Information, etc. 2 Remote controller (RC-911R) (1), Batteries (AAA/R03) (2) 3. Furthermore, available services may vary ... some network services and content may become unavailable in the future. Main unit (1) 2. Power cord (1) 0 Quick Start Guide (1) 0 Basic Manual (This manual) 0 Connect speakers with 4 Ω to both ZONE 2A and ZONE 2B (P21), both sets of speakers connected in the box BeforeStart ...

Owners Manual -Advanced
Page 3
Display (P4) 9. It cannot be turned off (P30). 7. SETUP button: You can find details in the Advanced Manual. Front Panel 1. Í ON/STANDBY button 2. DIMMER button: You.... 4. > Before Start > Part Names > Install > Initial Setup > Playback Part Names PartNames > Advanced Manual Troubleshooting | Supplementary Information, etc. (*)You can show advanced setting items on the perpendicular axis and 30° to either side. 5. MUSIC OPTIMIZER button/indicator:...
Display (P4) 9. It cannot be turned off (P30). 7. SETUP button: You can find details in the Advanced Manual. Front Panel 1. Í ON/STANDBY button 2. DIMMER button: You.... 4. > Before Start > Part Names > Install > Initial Setup > Playback Part Names PartNames > Advanced Manual Troubleshooting | Supplementary Information, etc. (*)You can show advanced setting items on the perpendicular axis and 30° to either side. 5. MUSIC OPTIMIZER button/indicator:...

Owners Manual -Advanced
Page 4
..."Treble", and turn down the volume control by Wi-Fi. FM ST: Receiving FM stereo. > Before Start > Part Names > Install > Initial Setup > Playback > Advanced Manual Troubleshooting | Supplementary Information, etc. (*)You can find details in Dolby Digital, Dolby Digital Plus and Dolby TrueHD, sometimes you see the following conditions. It will...: X dB" (X being a numeric value). Lights according to the selected listening mode. 2. This may see a brief message which has been encoded in the Advanced Manual. 14.You can adjust the sound quality of the input signals.
..."Treble", and turn down the volume control by Wi-Fi. FM ST: Receiving FM stereo. > Before Start > Part Names > Install > Initial Setup > Playback > Advanced Manual Troubleshooting | Supplementary Information, etc. (*)You can find details in Dolby Digital, Dolby Digital Plus and Dolby TrueHD, sometimes you see the following conditions. It will...: X dB" (X being a numeric value). Lights according to the selected listening mode. 2. This may see a brief message which has been encoded in the Advanced Manual. 14.You can adjust the sound quality of the input signals.

Owners Manual -Advanced
Page 5
...: The supplied power cord is connected. 12.GND terminal: The ground wire of the turntable is connected so that music files stored in the Advanced Manual. 90° 180° ... 15.ZONE 2 LINE OUT jack: Output audio signals with a USB cable. 6. > Before Start > Part Names > Install > Initial Setup > Playback > Advanced Manual Troubleshooting | Supplementary Information, etc. (*)You can find details in it can also supply power (5 V/1 A) to a monitor such as a TV or projector. 9....
...: The supplied power cord is connected. 12.GND terminal: The ground wire of the turntable is connected so that music files stored in the Advanced Manual. 90° 180° ... 15.ZONE 2 LINE OUT jack: Output audio signals with a USB cable. 6. > Before Start > Part Names > Install > Initial Setup > Playback > Advanced Manual Troubleshooting | Supplementary Information, etc. (*)You can find details in it can also supply power (5 V/1 A) to a monitor such as a TV or projector. 9....
Owners Manual -Advanced
Page 6
...setting items on the TV and display to provide you with 12V trigger input jack to enable link operation between automatic tuning and manual tuning (P28), and also used with this unit.) 9. When the folder or file lists are not shown on one screen on...screen. 11. Volume buttons 7. > Before Start > Part Names > Install > Initial Setup > Playback > Advanced Manual Troubleshooting | Supplementary Information, etc. (*)You can find details in the Advanced Manual. 16.SUBWOOFER PRE OUT jack: Connect a powered subwoofer with the cursors and press ENTER to confirm your selection. ...
...setting items on the TV and display to provide you with 12V trigger input jack to enable link operation between automatic tuning and manual tuning (P28), and also used with this unit.) 9. When the folder or file lists are not shown on one screen on...screen. 11. Volume buttons 7. > Before Start > Part Names > Install > Initial Setup > Playback > Advanced Manual Troubleshooting | Supplementary Information, etc. (*)You can find details in the Advanced Manual. 16.SUBWOOFER PRE OUT jack: Connect a powered subwoofer with the cursors and press ENTER to confirm your selection. ...

Owners Manual -Advanced
Page 7
... P11, and to P15 to the illustrations and explanations and prepare the required cables before hand. > Before Start > Part Names > Install > Initial Setup > Playback > Advanced Manual Troubleshooting | Supplementary Information, etc. Step3: Connect the TV & AV Components Refer to P16 to P22 to help make the installation process smoother.
... P11, and to P15 to the illustrations and explanations and prepare the required cables before hand. > Before Start > Part Names > Install > Initial Setup > Playback > Advanced Manual Troubleshooting | Supplementary Information, etc. Step3: Connect the TV & AV Components Refer to P16 to P22 to help make the installation process smoother.

