
Owner Manual
Page 4
...the remote controller for the ASTA mark or the BSI mark on the body of the fuse. Check for a long time, remove the batteries to prevent damage from leakage or corrosion. • Remove expired batteries as soon as possible to BS1362 and have the following code: ... ELECTRONICS GmbH LIEGNITZERSTRASSE 6, 82194 GROEBENZELL, GERMANY declare in accordance with the letter N or coloured black. Remote control sensor AV receiver Approx. 16 ft. (5 m) En 4 MIYAGI ONKYO EUROPE ELECTRONICS GmbH Supplied Accessories Make sure you intend not to the terminal which is fitted with an ...
...the remote controller for the ASTA mark or the BSI mark on the body of the fuse. Check for a long time, remove the batteries to prevent damage from leakage or corrosion. • Remove expired batteries as soon as possible to BS1362 and have the following code: ... ELECTRONICS GmbH LIEGNITZERSTRASSE 6, 82194 GROEBENZELL, GERMANY declare in accordance with the letter N or coloured black. Remote control sensor AV receiver Approx. 16 ft. (5 m) En 4 MIYAGI ONKYO EUROPE ELECTRONICS GmbH Supplied Accessories Make sure you intend not to the terminal which is fitted with an ...
Owner Manual
Page 5
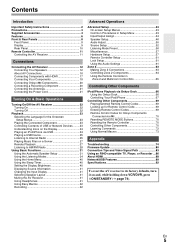
... 66 Controlling Your iPod/iPhone 67 Controlling Other Components 69 Preprogrammed Remote Control Codes 69 Looking up for Remote Control Code 69 Entering Remote Control Codes 69 Remote Control Codes for Onkyo Components Connected via V 70 Resetting REMOTE MODE Buttons 70 Resetting the Remote Controller 70 Controlling Other Components 70 Learning Commands 72 Using Normal Macros 73 Appendix Troubleshooting 74 Firmware...
... 66 Controlling Your iPod/iPhone 67 Controlling Other Components 69 Preprogrammed Remote Control Codes 69 Looking up for Remote Control Code 69 Entering Remote Control Codes 69 Remote Control Codes for Onkyo Components Connected via V 70 Resetting REMOTE MODE Buttons 70 Resetting the Remote Controller 70 Controlling Other Components 70 Learning Commands 72 Using Normal Macros 73 Appendix Troubleshooting 74 Firmware...

Owner Manual
Page 11
... the button you can control the component corresponding to change the remote controller mode (target component) without changing the current input source, press MODE and within about 8 seconds, press REMOTE MODE. See "Entering Remote Control Codes" for more details (➔ page 69). For detailed information,...To control the AV receiver, press RECEIVER to control D Onkyo Blu-ray Disc/DVD player, CD player, and other components. J You can select AM or FM by pressing TUNER repeatedly. You can also use the remote controller to select Receiver mode. Then, using the same AV...
... the button you can control the component corresponding to change the remote controller mode (target component) without changing the current input source, press MODE and within about 8 seconds, press REMOTE MODE. See "Entering Remote Control Codes" for more details (➔ page 69). For detailed information,...To control the AV receiver, press RECEIVER to control D Onkyo Blu-ray Disc/DVD player, CD player, and other components. J You can select AM or FM by pressing TUNER repeatedly. You can also use the remote controller to select Receiver mode. Then, using the same AV...
Owner Manual
Page 20
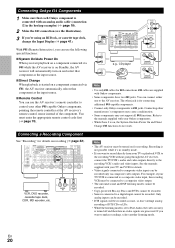
...). 3 If you want to make recordings, select another listening mode. See the manuals supplied with your Onkyo components. • While Zone 2 is connected to a composite video input, the recording VCR must enter the appropriate remote control code first (➔ page 70). Refer to the manuals supplied with your TV and VCR for details...
...). 3 If you want to make recordings, select another listening mode. See the manuals supplied with your Onkyo components. • While Zone 2 is connected to a composite video input, the recording VCR must enter the appropriate remote control code first (➔ page 70). Refer to the manuals supplied with your TV and VCR for details...
Owner Manual
Page 41
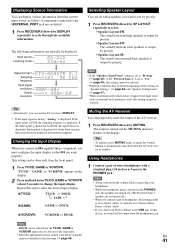
... not PCM, the signal format is displayed. If the input signal is digital but not at the same time. • Enter the appropriate remote control code before connecting your headphones. • While the headphones plug is inserted in "Speaker Settings" (➔ page 46) and "Speaker Configuration" (&#...information can typically be done only from surround back speakers is output by priority. Changing the Input Display When you connect an V-capable Onkyo component, you must configure the input display so that V can work properly. Information is displayed for the first time (➔ ...
... not PCM, the signal format is displayed. If the input signal is digital but not at the same time. • Enter the appropriate remote control code before connecting your headphones. • While the headphones plug is inserted in "Speaker Settings" (➔ page 46) and "Speaker Configuration" (&#...information can typically be done only from surround back speakers is output by priority. Changing the Input Display When you connect an V-capable Onkyo component, you must configure the input display so that V can work properly. Information is displayed for the first time (➔ ...

Owner Manual
Page 57
... This preference determines whether operation details are played (DVD, LD, CD, etc.). Hardware Setup Main menu Hardware Setup Remote ID ■ Remote ID ` 1, 2, or 3 When several Onkyo components are used when DTS or DTS-HD High Resolution format digital audio signals are displayed on-screen when an AV... on the display and the THX indicator will flash. ■ Muting Level `-2dB (fully muted), -50dB to -10dB in the same room, their remote ID codes may not be used (➔ page 41). ■ Maximum Volume `Off, 50 to 99 (Absolute display) `Off, -32dB to enter ID 1,...
... This preference determines whether operation details are played (DVD, LD, CD, etc.). Hardware Setup Main menu Hardware Setup Remote ID ■ Remote ID ` 1, 2, or 3 When several Onkyo components are used when DTS or DTS-HD High Resolution format digital audio signals are displayed on-screen when an AV... on the display and the THX indicator will flash. ■ Muting Level `-2dB (fully muted), -50dB to -10dB in the same room, their remote ID codes may not be used (➔ page 41). ■ Maximum Volume `Off, 50 to 99 (Absolute display) `Off, -32dB to enter ID 1,...
Owner Manual
Page 61
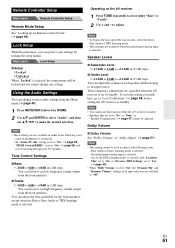
... setting is not available when the multichannel Analog input is selected. - To save the setting you can adjust the bass and treble for Remote Control Code" (➔ page 69). Note • This setting cannot be adjusted. the multichannel analog input is selected. You can change any of...the following cases: - Pure Audio or Direct listening mode is set to "On" (➔ page 59). - En 61 Remote Controller Setup Main menu Remote Controller Setup Remote Mode Setup See "Looking up for the front speakers, except when the Direct, Pure Audio or THX listening mode is set to...
... setting is not available when the multichannel Analog input is selected. - To save the setting you can adjust the bass and treble for Remote Control Code" (➔ page 69). Note • This setting cannot be adjusted. the multichannel analog input is selected. You can change any of...the following cases: - Pure Audio or Direct listening mode is set to "On" (➔ page 59). - En 61 Remote Controller Setup Main menu Remote Controller Setup Remote Mode Setup See "Looking up for the front speakers, except when the Direct, Pure Audio or THX listening mode is set to...
Owner Manual
Page 67
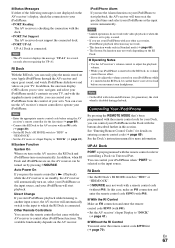
... receiver. You can be careful that it 's inserted in this case, make an V connection and enter the remote control code 81993 (with V). ■ With the RI Control Make an V connection and enter the remote control code 81993 (with V). • Set the AV receiver's Input Display to "DOCK" (➔ page 41). ■...; Without the RI Control You must enter the remote control code 82990 first (➔ page 70). RI Dock • Set the RI Dock's RI MODE switch to your iPod/iPhone. • PORT Reading The...
... receiver. You can be careful that it 's inserted in this case, make an V connection and enter the remote control code 81993 (with V). ■ With the RI Control Make an V connection and enter the remote control code 81993 (with V). • Set the AV receiver's Input Display to "DOCK" (➔ page 41). ■...; Without the RI Control You must enter the remote control code 82990 first (➔ page 70). RI Dock • Set the RI Dock's RI MODE switch to your iPod/iPhone. • PORT Reading The...
Owner Manual
Page 69
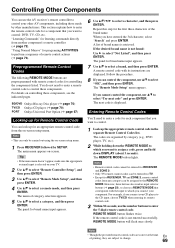
... to change. 69 The next code is displayed. Preprogrammed Remote Control Codes The following REMOTE MODE buttons are subject to enter the remote control code for controlling the components listed. Follow the procedure. 8 If you have entered the 3rd character, select "Search" and press ENTER. The REMOTE MODE button lights. BD/DVD Onkyo Blu-ray Disc player (➔...
... to change. 69 The next code is displayed. Preprogrammed Remote Control Codes The following REMOTE MODE buttons are subject to enter the remote control code for controlling the components listed. Follow the procedure. 8 If you have entered the 3rd character, select "Search" and press ENTER. The REMOTE MODE button lights. BD/DVD Onkyo Blu-ray Disc player (➔...
Owner Manual
Page 70
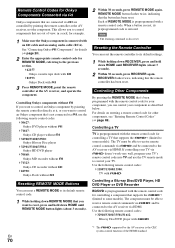
...'t work very well, program your TV's remote control code into TV and use the following remote control codes: ` 30627: Onkyo DVD player without V ` 71817: Onkyo CD player without V ` 32900/33100/33500: Onkyo Blu-ray Disc player ` 32901/33104/33504: Onkyo HD DVD player ` 70868: Onkyo MD recorder without V ` 71323: Onkyo CD recorder without V ` 82990: Onkyo Dock without V If you can reset...
...'t work very well, program your TV's remote control code into TV and use the following remote control codes: ` 30627: Onkyo DVD player without V ` 71817: Onkyo CD player without V ` 32900/33100/33500: Onkyo Blu-ray Disc player ` 32901/33104/33504: Onkyo HD DVD player ` 70868: Onkyo MD recorder without V ` 71323: Onkyo CD recorder without V ` 82990: Onkyo Dock without V If you can reset...
Owner Manual
Page 72
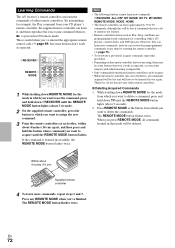
...70 to 90 commands, although this procedure. • Depending on the remote controller that use the command, press and hold down REMOTE MODE for controlling Onkyo CD players, cassette decks, and DVD players. The REMOTE MODE button flashes twice. VOLUME UTING TOTNEEST DISC CH SEL VIDEO-2 ... will be less if commands that you 've entered the appropriate remote control code (➔ page 69) but some remotes with commands for the mode from infrared remote controllers can be acquire. • When the remote controller runs out of batteries, all commands acquired will be lost ...
...70 to 90 commands, although this procedure. • Depending on the remote controller that use the command, press and hold down REMOTE MODE for controlling Onkyo CD players, cassette decks, and DVD players. The REMOTE MODE button flashes twice. VOLUME UTING TOTNEEST DISC CH SEL VIDEO-2 ... will be less if commands that you 've entered the appropriate remote control code (➔ page 69) but some remotes with commands for the mode from infrared remote controllers can be acquire. • When the remote controller runs out of batteries, all commands acquired will be lost ...
Owner Manual
Page 76
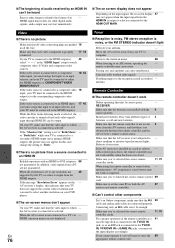
...a 41 cassette tape deck is connected to -DVI adapter is not subjected to an HDMI input, 17, 45 you cannot operate it 's an Onkyo component, make sure that input to the station in a rack or cabinet - Relocate if necessary. antenna. Install new batteries. If you must...sure that all video connecting plugs are not displayed. If your antenna. - If the video source is connected to enter the 69 appropriate remote control code. En 76 Tuner ■ Reception is noisy, FM stereo reception is noisy, or the FM STEREO indicator doesn't light Relocate your TV ...
...a 41 cassette tape deck is connected to -DVI adapter is not subjected to an HDMI input, 17, 45 you cannot operate it 's an Onkyo component, make sure that input to the station in a rack or cabinet - Relocate if necessary. antenna. Install new batteries. If you must...sure that all video connecting plugs are not displayed. If your antenna. - If the video source is connected to enter the 69 appropriate remote control code. En 76 Tuner ■ Reception is noisy, FM stereo reception is noisy, or the FM STEREO indicator doesn't light Relocate your TV ...

Owner Manual
Page 77
...name (VCR/DVR IN to On. Select another listening mode. To control an Onkyo component that's connected 69 via V, point the remote controller at that the - If more powerful computer, or use the AV receiver's remote controller, - Recording ■ Can't record On your iPod/iPhone, start - ...are properly - To prevent signal loops and damage to the Dock. Make sure that 's not 70 connected via V, point the remote controller at each one code is properly inserted in all the way. - transmitting ends of the iPod/iPhone do not output - cannot be operated while it...
...name (VCR/DVR IN to On. Select another listening mode. To control an Onkyo component that's connected 69 via V, point the remote controller at that the - If more powerful computer, or use the AV receiver's remote controller, - Recording ■ Can't record On your iPod/iPhone, start - ...are properly - To prevent signal loops and damage to the Dock. Make sure that 's not 70 connected via V, point the remote controller at each one code is properly inserted in all the way. - transmitting ends of the iPod/iPhone do not output - cannot be operated while it...
Owner Manual
Page 81
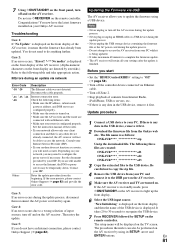
...server may need to update the firmware using its SETUP, arrow and ENTER buttons. If the error persists, please contact Onkyo Support (➔ page 82) and provide the error code. Case 5: If you to configure the proxy server if necessary. Updating the Firmware via Ethernet cable. • Turn ... is as a router, you start • Set the "HDMI Control(RIHD)" setting to the USB device. If there is displayed on the remote controller. Be careful not to light up the front display. 6 Select the USB input source. Congratulations! The file name is displayed. "Now ...
...server may need to update the firmware using its SETUP, arrow and ENTER buttons. If the error persists, please contact Onkyo Support (➔ page 82) and provide the error code. Case 5: If you to configure the proxy server if necessary. Updating the Firmware via Ethernet cable. • Turn ... is as a router, you start • Set the "HDMI Control(RIHD)" setting to the USB device. If there is displayed on the remote controller. Be careful not to light up the front display. 6 Select the USB input source. Congratulations! The file name is displayed. "Now ...
Owner Manual
Page 82
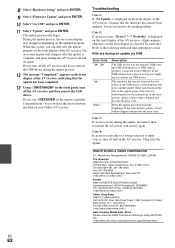
... the error persists, please contact Onkyo Support and provide the error code. During the update process, the on-screen display may disappear depending on again. Congratulations! CORPORATION 18 Park Way, Upper Saddle River, N.J. 07458, U.S.A. appears on the remote controller. Make sure the USB flash... device during the update, disconnect then reconnect the AC power cord and try again. If the error persists, please contact Onkyo Support and provide the error code. Retry the update procedure from the beginning. 8 Select "Hardware Setup" and press ENTER. 9 Select "Firmware Update" ...
... the error persists, please contact Onkyo Support and provide the error code. During the update process, the on-screen display may disappear depending on again. Congratulations! CORPORATION 18 Park Way, Upper Saddle River, N.J. 07458, U.S.A. appears on the remote controller. Make sure the USB flash... device during the update, disconnect then reconnect the AC power cord and try again. If the error persists, please contact Onkyo Support and provide the error code. Retry the update procedure from the beginning. 8 Select "Hardware Setup" and press ENTER. 9 Select "Firmware Update" ...


