
Owner Manual
Page 5
... Connecting the AV Receiver 13 Connecting Your Speakers 13 About AV Connections 17 Connecting Your Components with HDMI 18 Connecting Your Components 19 Connecting Onkyo V Components 20 Connecting Antenna 21 Connecting the Power Cord (European, Australian and Asian models 21 Which Connections Should I Use 22 Turning ...82 Using Normal Macros 82 Others Troubleshooting 84 Specifications 89 About HDMI 91 Using an RIHD-compatible TV, Player, or Recorder ... 92 Video Resolution Chart 94 To reset the AV receiver to its factory defaults, turn it on and, while holding down VCR/DVR, press ON...
... Connecting the AV Receiver 13 Connecting Your Speakers 13 About AV Connections 17 Connecting Your Components with HDMI 18 Connecting Your Components 19 Connecting Onkyo V Components 20 Connecting Antenna 21 Connecting the Power Cord (European, Australian and Asian models 21 Which Connections Should I Use 22 Turning ...82 Using Normal Macros 82 Others Troubleshooting 84 Specifications 89 About HDMI 91 Using an RIHD-compatible TV, Player, or Recorder ... 92 Video Resolution Chart 94 To reset the AV receiver to its factory defaults, turn it on and, while holding down VCR/DVR, press ON...

Owner Manual
Page 6
...Cleaning Circuit Technology Connections • 7 HDMI*6 Inputs (1 on front panel) and 1 Output • Onkyo Q for System Control • 5 Digital Inputs (2 Optical/3 Coaxial) • Component Video Switching (2 Inputs/1 Output) • Universal Port for the Optional Dock for iPod*/HD Radio™*7 ...Volume Circuitry • H.C.P.S. (High Current Power Supply) Massive High Power Transformer Processing • THX Select2 Plus*1 Certified • HDMI Video Upscaling (to 250 ms) • Auto Power-down Function • On-Screen Display via HDMI • Preprogrammed (with onscreen display...
...Cleaning Circuit Technology Connections • 7 HDMI*6 Inputs (1 on front panel) and 1 Output • Onkyo Q for System Control • 5 Digital Inputs (2 Optical/3 Coaxial) • Component Video Switching (2 Inputs/1 Output) • Universal Port for the Optional Dock for iPod*/HD Radio™*7 ...Volume Circuitry • H.C.P.S. (High Current Power Supply) Massive High Power Transformer Processing • THX Select2 Plus*1 Certified • HDMI Video Upscaling (to 250 ms) • Auto Power-down Function • On-Screen Display via HDMI • Preprogrammed (with onscreen display...

Owner Manual
Page 8
..., PC, AUX, TUNER, TV/CD, PHONO, PORT and NET/USB) (➔ 25) V USB port (➔ 67) W AUX INPUT LINE IN jack (➔ 19) X AUX INPUT VIDEO jack (➔ 19) Y AUX INPUT AUDIO jacks (➔ 19) Z SETUP MIC jack (➔ 29) [ RT/PTY/TP button (European, Australian and Asian models) (➔ 33)
..., PC, AUX, TUNER, TV/CD, PHONO, PORT and NET/USB) (➔ 25) V USB port (➔ 67) W AUX INPUT LINE IN jack (➔ 19) X AUX INPUT VIDEO jack (➔ 19) Y AUX INPUT AUDIO jacks (➔ 19) Z SETUP MIC jack (➔ 29) [ RT/PTY/TP button (European, Australian and Asian models) (➔ 33)

Owner Manual
Page 10
... L ZONE 2 12V TRIGGER OUT jack M FM ANTENNA jack and AM ANTENNA terminal N PC IN port O Power cord (North American and Taiwan models) P GND screw Q Composite, S-Video and analog audio jacks (BD/DVD IN , VCR/DVR IN and OUT, CBL/SAT IN, GAME IN, PC IN, TV/CD IN and PHONO IN...
... L ZONE 2 12V TRIGGER OUT jack M FM ANTENNA jack and AM ANTENNA terminal N PC IN port O Power cord (North American and Taiwan models) P GND screw Q Composite, S-Video and analog audio jacks (BD/DVD IN , VCR/DVR IN and OUT, CBL/SAT IN, GAME IN, PC IN, TV/CD IN and PHONO IN...

Owner Manual
Page 11
Then, with the AV receiver's remote controller, you pressed. *2 VIDEO functions as a short cut of HOME. You can also use the remote controller to select Receiver mode. button (➔ 33) E Number buttons (&#.../USB) (➔ 25) F SP LAYOUT button (➔ 26) G Arrow R/X/F/S and ENTER buttons H SETUP button (➔ 42) I E J C P To control the AV receiver, press RECEIVER to control Onkyo Blu-ray Disc/DVD player, CD player and other components. En 11 Remote Controller Controlling the AV Receiver B C K D E *1 L M D F *2 G B H N O I LISTENING MODE buttons (...
Then, with the AV receiver's remote controller, you pressed. *2 VIDEO functions as a short cut of HOME. You can also use the remote controller to select Receiver mode. button (➔ 33) E Number buttons (&#.../USB) (➔ 25) F SP LAYOUT button (➔ 26) G Arrow R/X/F/S and ENTER buttons H SETUP button (➔ 42) I E J C P To control the AV receiver, press RECEIVER to control Onkyo Blu-ray Disc/DVD player, CD player and other components. En 11 Remote Controller Controlling the AV Receiver B C K D E *1 L M D F *2 G B H N O I LISTENING MODE buttons (...
Owner Manual
Page 17
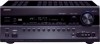
.../ DVD player Game console • Before making any AV connections, read the manuals supplied with a 7.1-channel analog audio output. Composite video is 32/44.1/48/88.2/96 kHz. Optical digital connections allow you 've completed and double-checked all AV connections. • Push... to enjoy digital sound such as PCM*, Dolby Digital or DTS. AV Cables and Jacks Signal Video and Audio Video Cable HDMI Component video Y PB/CB PR/CR Analog RGB Audio S-Video Composite video Optical digital audio Coaxial digital audio Analog audio (RCA) 1/8" (3.5 mm) Stereo mini plug Multichannel...
.../ DVD player Game console • Before making any AV connections, read the manuals supplied with a 7.1-channel analog audio output. Composite video is 32/44.1/48/88.2/96 kHz. Optical digital connections allow you 've completed and double-checked all AV connections. • Push... to enjoy digital sound such as PCM*, Dolby Digital or DTS. AV Cables and Jacks Signal Video and Audio Video Cable HDMI Component video Y PB/CB PR/CR Analog RGB Audio S-Video Composite video Optical digital audio Coaxial digital audio Analog audio (RCA) 1/8" (3.5 mm) Stereo mini plug Multichannel...

Owner Manual
Page 18
... HDMI IN 1 HDMI IN 2 HDMI IN 3 HDMI IN 4 HDMI IN 5 HDMI IN 6 AUX INPUT HDMI HDMI OUT Signal Audio/Video Components Blu-ray Disc/DVD player VCR or DVD recorder/Digital Video Recorder Satellite, cable, set -top box, etc. Tip • To listen to audio received by controlling the AV receiver's volume..., change your TV's speakers: - Set the "Audio TV Out" setting to "On" (➔ 55) when the TV is set the HDMI component so that its video can be changed (➔ 43). If the TV power is off or the TV is set to another input source, this function, you must select...
... HDMI IN 1 HDMI IN 2 HDMI IN 3 HDMI IN 4 HDMI IN 5 HDMI IN 6 AUX INPUT HDMI HDMI OUT Signal Audio/Video Components Blu-ray Disc/DVD player VCR or DVD recorder/Digital Video Recorder Satellite, cable, set -top box, etc. Tip • To listen to audio received by controlling the AV receiver's volume..., change your TV's speakers: - Set the "Audio TV Out" setting to "On" (➔ 55) when the TV is set the HDMI component so that its video can be changed (➔ 43). If the TV power is off or the TV is set to another input source, this function, you must select...

Owner Manual
Page 19
...$ DIGITAL COAXIAL IN 1 (BD/DVD) Digital audio IN 2 (VCR/DVR) Blu-ray Disc/DVD player ✔ VCR or DVD recorder/digital ✔ video recorder IN 3 (CBL/SAT) Satellite, cable, set -top box, etc. Connecting Your Components The on-screen setup menus appear only on a TV that is...Analog audio Personal computer TV/CD IN TV, CD player, cassette tape deck, MD, CD-R, Turntable*1 PHONO IN Turntable*1 & UNIVERSAL PORT Analog audio/ video Universal port optional dock (UP-A1 etc.) ' PC IN ( Multichannel input Analog RGB Personal computer *2 Analog audio DVD player, DVD-Audio or *3...
...$ DIGITAL COAXIAL IN 1 (BD/DVD) Digital audio IN 2 (VCR/DVR) Blu-ray Disc/DVD player ✔ VCR or DVD recorder/digital ✔ video recorder IN 3 (CBL/SAT) Satellite, cable, set -top box, etc. Connecting Your Components The on-screen setup menus appear only on a TV that is...Analog audio Personal computer TV/CD IN TV, CD player, cassette tape deck, MD, CD-R, Turntable*1 PHONO IN Turntable*1 & UNIVERSAL PORT Analog audio/ video Universal port optional dock (UP-A1 etc.) ' PC IN ( Multichannel input Analog RGB Personal computer *2 Analog audio DVD player, DVD-Audio or *3...

Owner Manual
Page 20
...transformer to connect to V jacks. With some turntables, connecting the ground wire may not support all V functions. The other V-capable Onkyo components, pointing the remote controller at the AV receiver's remote control sensor instead of HDMI > component > analog RGB, if you ...deck, change the Input Display (➔ 27). you can output audio and video signals from the external components in the hookup examples) (➔ 19). Connecting other Onkyo components. • While Zone 2 is connected with Onkyo players (DVD, CD, etc.). • Some components have a phono ...
...transformer to connect to V jacks. With some turntables, connecting the ground wire may not support all V functions. The other V-capable Onkyo components, pointing the remote controller at the AV receiver's remote control sensor instead of HDMI > component > analog RGB, if you ...deck, change the Input Display (➔ 27). you can output audio and video signals from the external components in the hookup examples) (➔ 19). Connecting other Onkyo components. • While Zone 2 is connected with Onkyo players (DVD, CD, etc.). • Some components have a phono ...

Owner Manual
Page 22
... as shown, with a wide range of priority: HDMI, component video, PC IN (Analog RGB), S-Video and composite video. The composite video, S-Video and component video outputs pass through their respective input signals as a guide. And if no component video signal being upconverted for the HDMI output. Composite S-Video PC IN (Analog RGB) Component IN HDMI AV receiver MONITOR...
... as shown, with a wide range of priority: HDMI, component video, PC IN (Analog RGB), S-Video and composite video. The composite video, S-Video and component video outputs pass through their respective input signals as a guide. And if no component video signal being upconverted for the HDMI output. Composite S-Video PC IN (Analog RGB) Component IN HDMI AV receiver MONITOR...

Owner Manual
Page 25
... component. See also: • "Controlling Other Components" (➔ 78) • "Controlling iPod" (➔ 73) • "Listening to the MONITOR OUT V, MONITOR OUT S or the COMPONENT VIDEO MONITOR OUT, use VOL R/X . 4 Select a listening mode and enjoy! Tip • Alternatively, you can use the AV receiver's DISPLAY. Input source Listening mode*1 Signal format...
... component. See also: • "Controlling Other Components" (➔ 78) • "Controlling iPod" (➔ 73) • "Listening to the MONITOR OUT V, MONITOR OUT S or the COMPONENT VIDEO MONITOR OUT, use VOL R/X . 4 Select a listening mode and enjoy! Tip • Alternatively, you can use the AV receiver's DISPLAY. Input source Listening mode*1 Signal format...

Owner Manual
Page 26
... timer has been set to "Bi-Amp" (➔ 45), or Powered Zone 2 is used menus without having to change the following items: "Audio", "Video", and "Tuner". ■ Input*4*5 `You can prioritize which speakers you can change the following settings: "Wide Mode", "Picture Mode", "Brightness", "Contrast",... by SP LAYOUT repeatedly. `Speaker Layout:FH: The sound from front high speakers is output by 10 minutes. BD/DVD Audio Bass Video Treble 0dB Info Subwoofer Level Input Center Level Listening Mode Dynamic EQ Dynamic Volume 2 Use R/X/F/S to make the desired selection. ■...
... timer has been set to "Bi-Amp" (➔ 45), or Powered Zone 2 is used menus without having to change the following items: "Audio", "Video", and "Tuner". ■ Input*4*5 `You can prioritize which speakers you can change the following settings: "Wide Mode", "Picture Mode", "Brightness", "Contrast",... by SP LAYOUT repeatedly. `Speaker Layout:FH: The sound from front high speakers is output by 10 minutes. BD/DVD Audio Bass Video Treble 0dB Info Subwoofer Level Input Center Level Listening Mode Dynamic EQ Dynamic Volume 2 Use R/X/F/S to make the desired selection. ■...

Owner Manual
Page 29
... it to "Off" (➔ 50). MultEQ uses the measurements from all of your TV is connected to the MONITOR OUT V, MONITOR OUT S or the COMPONENT VIDEO MONITOR OUT, use Audyssey Dynamic EQ®, which played through each speaker as Audyssey MultEQ® Room Correction and Speaker Setup run. • Audyssey MultEQ...
... it to "Off" (➔ 50). MultEQ uses the measurements from all of your TV is connected to the MONITOR OUT V, MONITOR OUT S or the COMPONENT VIDEO MONITOR OUT, use Audyssey Dynamic EQ®, which played through each speaker as Audyssey MultEQ® Room Correction and Speaker Setup run. • Audyssey MultEQ...
Owner Manual
Page 35
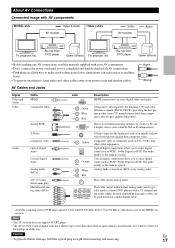
...CDR, MD) connected to the VCR/DVR OUT jacks. See the manuals supplied with recording capability, and how to record audio and video from different sources. If you want to make recordings, select other listening mode. Recording This section explains how to record the selected ... start recording. Connecting a Recording Component 3 On the source component, start playback. Note • The AV receiver must be connected to a composite video output. • The surround sound and DSP listening modes cannot be recorded. • Copy-protected Blu-ray Disc/DVDs cannot be recorded. •...
...CDR, MD) connected to the VCR/DVR OUT jacks. See the manuals supplied with recording capability, and how to record audio and video from different sources. If you want to make recordings, select other listening mode. Recording This section explains how to record the selected ... start recording. Connecting a Recording Component 3 On the source component, start playback. Note • The AV receiver must be connected to a composite video output. • The surround sound and DSP listening modes cannot be recorded. • Copy-protected Blu-ray Disc/DVDs cannot be recorded. •...

Owner Manual
Page 36
... and TV. GAME button This button selects the listening modes intended for use with music. When this mode is selected, the AV receiver's display and video circuitry are listening to the AV receiver ("TV Sp On" appears on the format of headphones is selected. Pressing this mode is connected, you are..., see "Displaying Source Information" (➔ 25). • While a pair of the input signal. MUSIC button This button selects the listening modes intended for use with video games. Only video signals input through your TV speakers coming from HDMI OUT.
... and TV. GAME button This button selects the listening modes intended for use with music. When this mode is selected, the AV receiver's display and video circuitry are listening to the AV receiver ("TV Sp On" appears on the format of headphones is selected. Pressing this mode is connected, you are..., see "Displaying Source Information" (➔ 25). • While a pair of the input signal. MUSIC button This button selects the listening modes intended for use with video games. Only video signals input through your TV speakers coming from HDMI OUT.

Owner Manual
Page 38
...i E X P P rotating and fly-by the front left and right chan- ' M o n o e o d i o P P o P P nels of the processing set via HOME are turned off , only video signals input through HDMI IN can P L b M o v i e P P P P also benefit from the dramatic spatial effects and vivid imaging. P L x GM o v i e P P • Dolby PLIIx... "A/V Sync" and much of Dolby Pro Logic IIx. • Dolby PLIIx Movie P L b G a m e c P P c P P Use this mode with video games, especially those that bear the Dolby Pro Logic II logo. • Dolby PLIIx Movie and Dolby PLIIx Music These modes use with any stereo...
...i E X P P rotating and fly-by the front left and right chan- ' M o n o e o d i o P P o P P nels of the processing set via HOME are turned off , only video signals input through HDMI IN can P L b M o v i e P P P P also benefit from the dramatic spatial effects and vivid imaging. P L x GM o v i e P P • Dolby PLIIx... "A/V Sync" and much of Dolby Pro Logic IIx. • Dolby PLIIx Movie P L b G a m e c P P c P P Use this mode with video games, especially those that bear the Dolby Pro Logic II logo. • Dolby PLIIx Movie and Dolby PLIIx Music These modes use with any stereo...

Owner Manual
Page 40
..., which is often mixed similarly to movies but in movie theaters and home theaters just as Dolby Digital Surround EX, is configured for use with video games. put. • THX Select2 Music This mode is designed for game audio levels, with 2-channel matrixed and multichannel sources. It expands 5.1-channel sources for...
..., which is often mixed similarly to movies but in movie theaters and home theaters just as Dolby Digital Surround EX, is configured for use with video games. put. • THX Select2 Music This mode is designed for game audio levels, with 2-channel matrixed and multichannel sources. It expands 5.1-channel sources for...

Owner Manual
Page 42
... MultEQ® Room Correction and Speaker Setup, messages, etc., that is connected to the MONITOR OUT V, MONITOR OUT S or the COMPONENT VIDEO MONITOR OUT, use F/S to select option and use the AV receiver's display when changing settings. Audio Adjust E 4. Miscellaneous H 7. Remote...by SETUP. Multiplex/Mono 2. CBL/SAT 4. Advanced Operations Advanced Setup On-screen Setup Menus Common Procedures in the Display. Speaker Setup D 3. Component Video Input 4. Speaker Setup 1. Picture Adjust F Listening Mode Preset (➔ 53) 9. If your TV. 2 Use R/X to select a menu,...
... MultEQ® Room Correction and Speaker Setup, messages, etc., that is connected to the MONITOR OUT V, MONITOR OUT S or the COMPONENT VIDEO MONITOR OUT, use F/S to select option and use the AV receiver's display when changing settings. Audio Adjust E 4. Miscellaneous H 7. Remote...by SETUP. Multiplex/Mono 2. CBL/SAT 4. Advanced Operations Advanced Setup On-screen Setup Menus Common Procedures in the Display. Speaker Setup D 3. Component Video Input 4. Speaker Setup 1. Picture Adjust F Listening Mode Preset (➔ 53) 9. If your TV. 2 Use R/X to select a menu,...
Owner Manual
Page 43
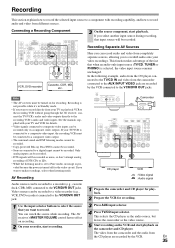
...HDMI3, HDMI4, HDMI5, HDMI6: Select the HDMI IN to have already been assigned, you must set this to which the video component has been connected Output composite video, S-Video, and component video sources from the front panel. • Each HDMI input cannot be assigned to the "BD/DVD" input selector. HDMI6 ...have the AV receiver automatically convert video at resolutions not supported by your Blu-ray Disc/DVD player to HDMI IN 2, you must assign "HDMI2" to two input selectors or ...
...HDMI3, HDMI4, HDMI5, HDMI6: Select the HDMI IN to have already been assigned, you must set this to which the video component has been connected Output composite video, S-Video, and component video sources from the front panel. • Each HDMI input cannot be assigned to the "BD/DVD" input selector. HDMI6 ...have the AV receiver automatically convert video at resolutions not supported by your Blu-ray Disc/DVD player to HDMI IN 2, you must assign "HDMI2" to two input selectors or ...
Owner Manual
Page 44
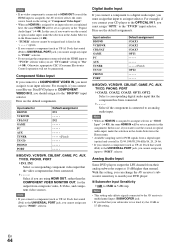
... connected Select if you are using HDMI OUT, rather than normal. Analog Audio Input Some DVD players output the LFE channel from composite video, S-Video, and component video sources. With this case, if you connect a component (such as UP-A1 Dock that the component has been connected Select if the... IN1 ----IN2 Fixed ■ BD/DVD, VCR/DVR, CBL/SAT, GAME, PC, AUX, TV/CD, PHONO, PORT ` IN1, IN2: Select a corresponding component video input that seated iPod) to the UNIVERSAL PORT jack, you can change the AV receiver's subwoofer sensitivity to match your subwoofer is too loud, try...
... connected Select if you are using HDMI OUT, rather than normal. Analog Audio Input Some DVD players output the LFE channel from composite video, S-Video, and component video sources. With this case, if you connect a component (such as UP-A1 Dock that the component has been connected Select if the... IN1 ----IN2 Fixed ■ BD/DVD, VCR/DVR, CBL/SAT, GAME, PC, AUX, TV/CD, PHONO, PORT ` IN1, IN2: Select a corresponding component video input that seated iPod) to the UNIVERSAL PORT jack, you can change the AV receiver's subwoofer sensitivity to match your subwoofer is too loud, try...


