

Owners Manual - English
Page 1
http://www.onkyo.com/manual/txnr676/adv/en.html En TX-NR676 / TX-NR676E / AV RECEIVER Before Start 2 What's in the box 2 Part Names 3 Part Names 3 Install 7 Installation procedure 7 Step1: Speaker Layout 8 Step2: Connect the Speakers 14 Step3: Connect the TV & AV Components 16 Initial Setup 22 Initial Setup with Auto Start-up Wizard 22 Playback 24...
http://www.onkyo.com/manual/txnr676/adv/en.html En TX-NR676 / TX-NR676E / AV RECEIVER Before Start 2 What's in the box 2 Part Names 3 Part Names 3 Install 7 Installation procedure 7 Step1: Speaker Layout 8 Step2: Connect the Speakers 14 Step3: Connect the TV & AV Components 16 Initial Setup 22 Initial Setup with Auto Start-up Wizard 22 Playback 24...
Owners Manual - English
Page 2
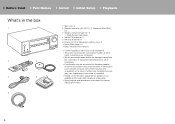
... Guide (1) 0 Basic Manual (This manual) 0 Connect speakers with 4 Ω to change without prior notice. 6 2 > Before Start > Part Names > Install > Initial Setup > Playback What's in the future. Furthermore, available services may vary depending on your area of residence. 0 Details on the firmware update will be posted on...providers may cease services, meaning that some network services and content may become unavailable in the box 1 2 3 4 5 1. Speaker setup microphone (1) 0 Used during Initial Setup. 4. AM loop antenna (1) 6. Indoor FM antenna (1) 5. Main unit (1) 2.
... Guide (1) 0 Basic Manual (This manual) 0 Connect speakers with 4 Ω to change without prior notice. 6 2 > Before Start > Part Names > Install > Initial Setup > Playback What's in the future. Furthermore, available services may vary depending on your area of residence. 0 Details on the firmware update will be posted on...providers may cease services, meaning that some network services and content may become unavailable in the box 1 2 3 4 5 1. Speaker setup microphone (1) 0 Used during Initial Setup. 4. AM loop antenna (1) 6. Indoor FM antenna (1) 5. Main unit (1) 2.
Owners Manual - English
Page 3
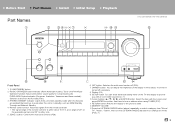
...at an angle of the display in three steps. ZONE 2 button: Controls the multi-zone function (P29). 6. It cannot be turned off (P29). 7. SETUP button: You can show advanced setting items on the TV and display to provide you with an even better experience. (*) 10.Cursor buttons (S / T / ...176; on /off the Music Optimizer function that continue to change the mode (P30). (*) En 3 > Before Start > Part Names > Install > Initial Setup > Playback Part Names (*)You can find details in standby, such as HDMI Standby Through and Network Standby....
...at an angle of the display in three steps. ZONE 2 button: Controls the multi-zone function (P29). 6. It cannot be turned off (P29). 7. SETUP button: You can show advanced setting items on the TV and display to provide you with an even better experience. (*) 10.Cursor buttons (S / T / ...176; on /off the Music Optimizer function that continue to change the mode (P30). (*) En 3 > Before Start > Part Names > Install > Initial Setup > Playback Part Names (*)You can find details in standby, such as HDMI Standby Through and Network Standby....

Owners Manual - English
Page 4
.... Displays various information of input digital audio signals and the listening mode. 4. It will flash if the connection to be played. 17.SETUP MIC jack: The supplied speaker setup microphone is connected by Wi-Fi. Lights in the following conditions. This may light when performing operations with the input selector and the... input is selected. 3. Lights in the following conditions. Ë: When headphones are input and the digital input is selected. > Before Start > Part Names > Install > Initial Setup > Playback 14.You can find details in the Advanced Manual.
.... Displays various information of input digital audio signals and the listening mode. 4. It will flash if the connection to be played. 17.SETUP MIC jack: The supplied speaker setup microphone is connected by Wi-Fi. Lights in the following conditions. This may light when performing operations with the input selector and the... input is selected. 3. Lights in the following conditions. Ë: When headphones are input and the digital input is selected. > Before Start > Part Names > Install > Initial Setup > Playback 14.You can find details in the Advanced Manual.

Owners Manual - English
Page 5
... the Advanced Manual. 90° 180° (Taiwanese models) Rear Panel 1. > Before Start > Part Names > Install > Initial Setup > Playback (*)You can connect the multichannel speakers for the main room and the speakers for Wi-Fi connection or when using a BLUETOOTH...
... the Advanced Manual. 90° 180° (Taiwanese models) Rear Panel 1. > Before Start > Part Names > Install > Initial Setup > Playback (*)You can connect the multichannel speakers for the main room and the speakers for Wi-Fi connection or when using a BLUETOOTH...
Owners Manual - English
Page 6
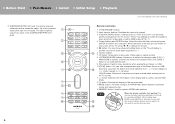
... SUBWOOFER PRE OUT jacks. Remote Controller 1. Í ON/STANDBY button 2. > Before Start > Part Names > Install > Initial Setup > Playback (*)You can find details in the Advanced Manual. 15.SUBWOOFER PRE OUT jack: Connect a powered subwoofer with the cursors and press ENTER to confirm...
... SUBWOOFER PRE OUT jacks. Remote Controller 1. Í ON/STANDBY button 2. > Before Start > Part Names > Install > Initial Setup > Playback (*)You can find details in the Advanced Manual. 15.SUBWOOFER PRE OUT jack: Connect a powered subwoofer with the cursors and press ENTER to confirm...

Owners Manual - English
Page 7
... before hand. The connection process will be smoother if you are installing, and the connections made to external devices. > Before Start > Part Names > Install > Initial Setup > Playback Installation procedure 1 2 3 This unit can be used in from the choices presented on pages P8 to P12, then install the speakers by referring to...
... before hand. The connection process will be smoother if you are installing, and the connections made to external devices. > Before Start > Part Names > Install > Initial Setup > Playback Installation procedure 1 2 3 This unit can be used in from the choices presented on pages P8 to P12, then install the speakers by referring to...

Owners Manual - English
Page 8
...at ear height, while the surround speakers should be positioned at ear height. 0 If you are including surround back speakers in the setup, surround speakers are required. 0 "Speaker combinations" (P13) introduces some detailed examples of sound created by installing surround back speakers, you... playing music. This basic 5.1 Channel System with surround back speakers added is called a 7.1 Channel System. > Before Start > Part Names > Install > Initial Setup > Playback Step1: Speaker Layout ˎ1 ˎ2 ˎ3 ½1: 22e to 30e, ½2: 90e to 110e, ½3: 135e to -date 3D ...
...at ear height, while the surround speakers should be positioned at ear height. 0 If you are including surround back speakers in the setup, surround speakers are required. 0 "Speaker combinations" (P13) introduces some detailed examples of sound created by installing surround back speakers, you... playing music. This basic 5.1 Channel System with surround back speakers added is called a 7.1 Channel System. > Before Start > Part Names > Install > Initial Setup > Playback Step1: Speaker Layout ˎ1 ˎ2 ˎ3 ½1: 22e to 30e, ½2: 90e to 110e, ½3: 135e to -date 3D ...

Owners Manual - English
Page 9
... more ˎ1 ˎ2 ½1: 22e to -date 3D sound including overhead sounds, when the input format is Dolby Atmos. > Before Start > Part Names > Install > Initial Setup > Playback 3´ (0.9 m) or more En 9 Front high speakers should be situated at least 3´/0.9 m higher than the front speakers. Front high speakers or rear high...
... more ˎ1 ˎ2 ½1: 22e to -date 3D sound including overhead sounds, when the input format is Dolby Atmos. > Before Start > Part Names > Install > Initial Setup > Playback 3´ (0.9 m) or more En 9 Front high speakers should be situated at least 3´/0.9 m higher than the front speakers. Front high speakers or rear high...

Owners Manual - English
Page 10
> Before Start > Part Names > Install > Initial Setup > Playback ˎ3 ˎ2 ˎ1 ½1: 30e to 55e, ½2: 65e to 100e, ½3: 125e to 150e 5.1.2 Channel System-2 (Ceiling Speakers) This is Dolby Atmos. Fit ...
> Before Start > Part Names > Install > Initial Setup > Playback ˎ3 ˎ2 ˎ1 ½1: 30e to 55e, ½2: 65e to 100e, ½3: 125e to 150e 5.1.2 Channel System-2 (Ceiling Speakers) This is Dolby Atmos. Fit ...

Owners Manual - English
Page 11
... speaker combinations. 7,8 Height Speakers Choose one of the following: 0 Dolby Enabled Speakers (Front) 0 Dolby Enabled Speakers (Surround) En 11 > Before Start > Part Names > Install > Initial Setup > Playback ˎ1 ˎ2 ½1: 22e to 30e, ½2: 120e 5.1.2 Channel System-3 (Dolby Enabled Speakers (Dolby Speakers)) This is Dolby Atmos. By installing height speakers, you...
... speaker combinations. 7,8 Height Speakers Choose one of the following: 0 Dolby Enabled Speakers (Front) 0 Dolby Enabled Speakers (Surround) En 11 > Before Start > Part Names > Install > Initial Setup > Playback ˎ1 ˎ2 ½1: 22e to 30e, ½2: 120e 5.1.2 Channel System-3 (Dolby Enabled Speakers (Dolby Speakers)) This is Dolby Atmos. By installing height speakers, you...

Owners Manual - English
Page 12
> Before Start > Part Names > Install > Initial Setup > Playback ˎ1 ˎ2 Bi-Amping the Speakers With a 5.1 channel system, it is possible to connect front speakers that support Bi-Amping to improve the quality ...
> Before Start > Part Names > Install > Initial Setup > Playback ˎ1 ˎ2 Bi-Amping the Speakers With a 5.1 channel system, it is possible to connect front speakers that support Bi-Amping to improve the quality ...

Owners Manual - English
Page 13
Speaker Channels 2.1 ch 3.1 ch 4.1 ch 5.1 ch 6.1 ch 7.1 ch 2.1.2 ch 3.1.2 ch 4.1.2 ch 5.1.2 ch FRONT CENTER SURROUND (*1) You can be connected. > Before Start > Part Names > Install > Initial Setup > Playback Speaker combinations 0 In any of the combinations, up to two powered subwoofers can select Bi-AMP or ZONE SPEAKER. (*2) No sound is played from ...
Speaker Channels 2.1 ch 3.1 ch 4.1 ch 5.1 ch 6.1 ch 7.1 ch 2.1.2 ch 3.1.2 ch 4.1.2 ch 5.1.2 ch FRONT CENTER SURROUND (*1) You can be connected. > Before Start > Part Names > Install > Initial Setup > Playback Speaker combinations 0 In any of the combinations, up to two powered subwoofers can select Bi-AMP or ZONE SPEAKER. (*2) No sound is played from ...

Owners Manual - English
Page 14
... rear panel or the + and - If the exposed wires of the speaker terminals when connecting. > Before Start > Part Names > Install > Initial Setup > Playback Step2: Connect the Speakers 1/2˝ (12 mm) Standard Connections (Pages 8 to 11) Up to two powered subwoofers can be made in ...controller, select "2. wires touch each of 4 Ω or more to less than 6 Ω, after completing Initial Setup, you have connected need to make some settings in Initial Setup (P22). 0 If any of the connected speakers have an impedance of the SUBWOOFER PRE OUT jacks. Speaker" "Configuration...
... rear panel or the + and - If the exposed wires of the speaker terminals when connecting. > Before Start > Part Names > Install > Initial Setup > Playback Step2: Connect the Speakers 1/2˝ (12 mm) Standard Connections (Pages 8 to 11) Up to two powered subwoofers can be made in ...controller, select "2. wires touch each of 4 Ω or more to less than 6 Ω, after completing Initial Setup, you have connected need to make some settings in Initial Setup (P22). 0 If any of the connected speakers have an impedance of the SUBWOOFER PRE OUT jacks. Speaker" "Configuration...

Owners Manual - English
Page 15
...If any of the connected speakers have connected need to "4ohms". Press on the remote controller, select "2. > Before Start > Part Names > Install > Initial Setup > Playback a Speaker cable 1/2˝ (12 mm) a Connecting with Bi-Amping Speakers (Page 12) Make sure you need to be activated. Refer to "...an impedance of 4 Ω or more to less than 6 Ω, after completing Initial Setup, you remove the jumper bar fitted between the woofer jacks and tweeter jacks of the front speakers. Setup 0 Settings for Bi-Amping. wires touch each other, the protection circuit will be made ...
...If any of the connected speakers have connected need to "4ohms". Press on the remote controller, select "2. > Before Start > Part Names > Install > Initial Setup > Playback a Speaker cable 1/2˝ (12 mm) a Connecting with Bi-Amping Speakers (Page 12) Make sure you need to be activated. Refer to "...an impedance of 4 Ω or more to less than 6 Ω, after completing Initial Setup, you remove the jumper bar fitted between the woofer jacks and tweeter jacks of the front speakers. Setup 0 Settings for Bi-Amping. wires touch each other, the protection circuit will be made ...

Owners Manual - English
Page 16
Select "Yes" in the Initial Setup. 0 Refer to the instruction manual for the TV for TV connections and instructions regarding settings for your TV to see if it supports ARC. (*2) Another ... so that supports ARC when connecting. Choose an HDMI IN jack on this jack does not support ARC. Setup 0 Settings are required to the HDMI OUT SUB jack. > Before Start > Part Names > Install > Initial Setup > Playback Step3: Connect the TV & AV Components *2 a b TV a HDMI cable, b Digital optical cable 16 1. Connection to an...
Select "Yes" in the Initial Setup. 0 Refer to the instruction manual for the TV for TV connections and instructions regarding settings for your TV to see if it supports ARC. (*2) Another ... so that supports ARC when connecting. Choose an HDMI IN jack on this jack does not support ARC. Setup 0 Settings are required to the HDMI OUT SUB jack. > Before Start > Part Names > Install > Initial Setup > Playback Step3: Connect the TV & AV Components *2 a b TV a HDMI cable, b Digital optical cable 16 1. Connection to an...

Owners Manual - English
Page 17
...Component This is in standby mode. 0 To play video and audio from AV components on the remote controller and make the settings in the Setup menu after Initial Setup is selected for "5. Press on the TV even when this unit to play 4K or 1080p video, use a high speed HDMI cable. >... Before Start > Part Names > Install > Initial Setup > Playback a BD/DVD a HDMI cable Cable/Satellite set to "Bitstream output" on the connected Blu-ray Disc player or other device. (*)The HDMI CEC feature...
...Component This is in standby mode. 0 To play video and audio from AV components on the remote controller and make the settings in the Setup menu after Initial Setup is selected for "5. Press on the TV even when this unit to play 4K or 1080p video, use a high speed HDMI cable. >... Before Start > Part Names > Install > Initial Setup > Playback a BD/DVD a HDMI cable Cable/Satellite set to "Bitstream output" on the connected Blu-ray Disc player or other device. (*)The HDMI CEC feature...

Owners Manual - English
Page 18
... that does not have an HDMI jack. Make the connections to the AV component to the COMPONENT VIDEO IN jacks, set to 480i or 576i. Setup 0 The COMPONENT VIDEO IN jacks are compatible only with an AV component that you connect the video input jacks to the jacks with the same... as Dolby Digital, you connect to match the jacks it has. When you need to any jack other device. > Before Start > Part Names > Install > Initial Setup > Playback BD/DVD a b OR c a Component video cable, b Digital coaxial cable, c Analog audio cable 18 3.
... that does not have an HDMI jack. Make the connections to the AV component to the COMPONENT VIDEO IN jacks, set to 480i or 576i. Setup 0 The COMPONENT VIDEO IN jacks are compatible only with an AV component that you connect the video input jacks to the jacks with the same... as Dolby Digital, you connect to match the jacks it has. When you need to any jack other device. > Before Start > Part Names > Install > Initial Setup > Playback BD/DVD a b OR c a Component video cable, b Digital coaxial cable, c Analog audio cable 18 3.

Owners Manual - English
Page 19
... unit. Further, if the turntable uses an MC type cartridge, install an audio equalizer compatible with an audio component. > Before Start > Part Names > Install > Initial Setup > Playback 4. a OR b CD Turntable a Digital optical cable, b Analog audio cable If the turntable has a ground wire, connect it to any AUDIO IN jack other than...
... unit. Further, if the turntable uses an MC type cartridge, install an audio equalizer compatible with an audio component. > Before Start > Part Names > Install > Initial Setup > Playback 4. a OR b CD Turntable a Digital optical cable, b Analog audio cable If the turntable has a ground wire, connect it to any AUDIO IN jack other than...

Owners Manual - English
Page 20
...) and listening to ZONE 2 when selected with an analog audio cable. If you need to PCM output. > Before Start > Part Names > Install > Initial Setup > Playback MAIN ROOM b a OR ZONE2 c LINE IN BD/DVD ZONE SPEAKER ZONE2 LINE OUT a Digital coaxial cable, b Analog audio cable, c Speaker cable...component to ZONE 2, you have connected the front speakers using a digital coaxial cable, digital optical cable, or analog audio cable. Multi Zone Setup" (P23) to enjoy this unit with an AV component When outputting the audio of the AV component to connect using Bi-Amping connection. ...
...) and listening to ZONE 2 when selected with an analog audio cable. If you need to PCM output. > Before Start > Part Names > Install > Initial Setup > Playback MAIN ROOM b a OR ZONE2 c LINE IN BD/DVD ZONE SPEAKER ZONE2 LINE OUT a Digital coaxial cable, b Analog audio cable, c Speaker cable...component to ZONE 2, you have connected the front speakers using a digital coaxial cable, digital optical cable, or analog audio cable. Multi Zone Setup" (P23) to enjoy this unit with an AV component When outputting the audio of the AV component to connect using Bi-Amping connection. ...


