Owner's Manual English
Page 1
AV RECEIVER TX-NR626 Instruction Manual Contents Safety Information and Introduction 2 Table of Contents 6 Connections 12 Turning On & Basic Operations 21 Playback 29 Advanced Operations 48 Controlling Other Components 71 Appendix 77 Internet Radio Guide Remote Control Codes En
AV RECEIVER TX-NR626 Instruction Manual Contents Safety Information and Introduction 2 Table of Contents 6 Connections 12 Turning On & Basic Operations 21 Playback 29 Advanced Operations 48 Controlling Other Components 71 Appendix 77 Internet Radio Guide Remote Control Codes En

Owner's Manual English
Page 12
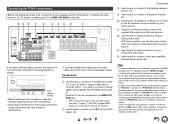
... external amplifier, connect the subwoofer pre out jack to the positive (+) side of each label to set the speaker settings automatically (➔ page 24) or manually (➔ page 55). Then all you use depending on the amplifier. You can connect the powered subwoofer with the table above. Number of speakers Front...
... external amplifier, connect the subwoofer pre out jack to the positive (+) side of each label to set the speaker settings automatically (➔ page 24) or manually (➔ page 55). Then all you use depending on the amplifier. You can connect the powered subwoofer with the table above. Number of speakers Front...

Owner's Manual English
Page 14
... careful not to a 5.1 speaker system in amp protection circuit may be activated. • (European, Australian and Asian models) You can be sure to your speaker manual. Bi-amping the Front Speakers Connections Important: • When making the bi-amping connections, be used , the AV receiver is used only with the AV...
... careful not to a 5.1 speaker system in amp protection circuit may be activated. • (European, Australian and Asian models) You can be sure to your speaker manual. Bi-amping the Front Speakers Connections Important: • When making the bi-amping connections, be used , the AV receiver is used only with the AV...
Owner's Manual English
Page 15
... turntables, connecting the ground wire may produce an audible hum. With this jack to connect to your speakers and AV components. If your turntable's manual for details. To display the setup menu on a router so the AV receiver can connect the TV and the AV receiver. # Use this connection...the TV screen, connecting the TV to HDMI OUT MAIN is played. #$% Input + selector buttons • Before making any AV connections, read the manuals supplied with your AV components. • Push plugs in phono preamp to TV/CD IN, or connect it to the camcorder/MHLenabled mobile device, etc...
... turntables, connecting the ground wire may produce an audible hum. With this jack to connect to your speakers and AV components. If your turntable's manual for details. To display the setup menu on a router so the AV receiver can connect the TV and the AV receiver. # Use this connection...the TV screen, connecting the TV to HDMI OUT MAIN is played. #$% Input + selector buttons • Before making any AV connections, read the manuals supplied with your AV components. • Push plugs in phono preamp to TV/CD IN, or connect it to the camcorder/MHLenabled mobile device, etc...

Owner's Manual English
Page 20
...While the headphones plug is inserted in the PHONES jack, the speakers are turned off .) • When you connect a pair of stereo headphones with Onkyo components. • Some components have two V jacks. With V (Remote Interactive), you can connect either one to Stereo, Mono, Direct, or Pure ...Audio (European, Australian and Asian models). You can use the AV receiver's remote controller to the manuals supplied with an analog audio cable (connection ) in the hookup examples) (➔ page 15). 2 Make the V connection (see the illustration). ...
...While the headphones plug is inserted in the PHONES jack, the speakers are turned off .) • When you connect a pair of stereo headphones with Onkyo components. • Some components have two V jacks. With V (Remote Interactive), you can connect either one to Stereo, Mono, Direct, or Pure ...Audio (European, Australian and Asian models). You can use the AV receiver's remote controller to the manuals supplied with an analog audio cable (connection ) in the hookup examples) (➔ page 15). 2 Make the V connection (see the illustration). ...
Owner's Manual English
Page 26
...be detected by disconnecting the setup microphone. • Do not connect or disconnect any point in progress, one of each speaker also can be done manually (➔ page 55). AUDYSSEY Retry Cancel Error message The options are: ` Retry: Try again. ` Cancel: Cancel Audyssey MultEQ Room Correction and...Setup again. Note • You can cancel Audyssey MultEQ® Room Correction and Speaker Setup at a low volume level, it to your Onkyo dealer. • Speaker Detect Error This message appears if a speaker is too high. The background noise is in this message appears after ...
...be detected by disconnecting the setup microphone. • Do not connect or disconnect any point in progress, one of each speaker also can be done manually (➔ page 55). AUDYSSEY Retry Cancel Error message The options are: ` Retry: Try again. ` Cancel: Cancel Audyssey MultEQ Room Correction and...Setup again. Note • You can cancel Audyssey MultEQ® Room Correction and Speaker Setup at a low volume level, it to your Onkyo dealer. • Speaker Detect Error This message appears if a speaker is too high. The background noise is in this message appears after ...

Owner's Manual English
Page 27
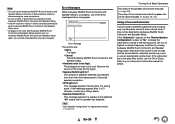
...) "Push Button Configuration (Select from Router)", and press ENTER. Tip • How long the WPS button should be done either automatically or manually. Access points fall into two categories: the bridge type that only performs data relay in a local area network, or the router type that... Setup" menu. For information on the type of Access Point device. Note • If Wi-Fi indicator doesn't light, the connection to the instruction manual provided with a PC or network. The PIN code is displayed. Performing Wireless LAN Setup A wireless LAN (WLAN) is a local area network that has...
...) "Push Button Configuration (Select from Router)", and press ENTER. Tip • How long the WPS button should be done either automatically or manually. Access points fall into two categories: the bridge type that only performs data relay in a local area network, or the router type that... Setup" menu. For information on the type of Access Point device. Note • If Wi-Fi indicator doesn't light, the connection to the instruction manual provided with a PC or network. The PIN code is displayed. Performing Wireless LAN Setup A wireless LAN (WLAN) is a local area network that has...
Owner's Manual English
Page 28
... 1. Use the keyboard on the screen. Turning On & Basic Operations 8 Select "OK" and press ENTER. Configure this setting again (➔ page 80). Manual wireless LAN setup 1 Press RECEIVER followed by HOME. 2 Use F/S or R/X to select "Setup", and then press ENTER. 3 Use R/X to select "... "Network Connection", and F/S to select "Password" and then press ENTER. 4. A list of available Access Points, the setting also can be changed manually. Use R/X to select "Wireless", and then press ENTER (➔ page 67). These settings can review your setup with the "Status" option on ...
... 1. Use the keyboard on the screen. Turning On & Basic Operations 8 Select "OK" and press ENTER. Configure this setting again (➔ page 80). Manual wireless LAN setup 1 Press RECEIVER followed by HOME. 2 Use F/S or R/X to select "Setup", and then press ENTER. 3 Use R/X to select "... "Network Connection", and F/S to select "Password" and then press ENTER. 4. A list of available Access Points, the setting also can be changed manually. Use R/X to select "Wireless", and then press ENTER (➔ page 67). These settings can review your setup with the "Status" option on ...
Owner's Manual English
Page 29
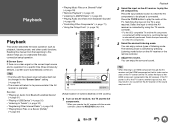
...AV receiver or the sound may be seen on the TV screen (on the TV, select the input of the TV. Switch the input manually for a specific time (three minutes by default), a screen saver automatically comes on. Tip • When listening to an HDMI component through ... • The screen will return to its video can be played is connected. Reading this manual from Separate Sources" (➔ page 40) • "Controlling Other Components" (➔ page 71) • "Using the Onkyo Dock" (➔ page 75) Playback This section describes the basic operation such as playback, listening...
...AV receiver or the sound may be seen on the TV screen (on the TV, select the input of the TV. Switch the input manually for a specific time (three minutes by default), a screen saver automatically comes on. Tip • When listening to an HDMI component through ... • The screen will return to its video can be played is connected. Reading this manual from Separate Sources" (➔ page 40) • "Controlling Other Components" (➔ page 71) • "Using the Onkyo Dock" (➔ page 75) Playback This section describes the basic operation such as playback, listening...
Owner's Manual English
Page 32
...Bluetooth-enabled device again. Over 70,000 radio stations and 2 million on a TV that the Ethernet cable is done successfully, consult the instruction manual of the Bluetooth-enabled device, and then select the model name of your home network (➔ pages 16, 27). If wired LAN connection... receiver. If wireless LAN connection is selected, verify that is not connected to select the "USB" input. 2 Plug your Bluetooth-enabled device is "Onkyo TX-NR626". 5 If passkey* is a new radio service which offers the music, sports and news all over the world. Tip • The model name ...
...Bluetooth-enabled device again. Over 70,000 radio stations and 2 million on a TV that the Ethernet cable is done successfully, consult the instruction manual of the Bluetooth-enabled device, and then select the model name of your home network (➔ pages 16, 27). If wired LAN connection... receiver. If wireless LAN connection is selected, verify that is not connected to select the "USB" input. 2 Plug your Bluetooth-enabled device is "Onkyo TX-NR626". 5 If passkey* is a new radio service which offers the music, sports and news all over the world. Tip • The model name ...
Owner's Manual English
Page 35
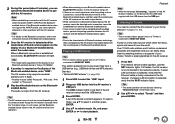
... cursor and click on "Turn on "More streaming options..." Playback 3 Use R/X/F/S to select "DLNA", and press ENTER. 4 Use R/X to the server functions. See the instruction manual of media server appears. A list of the playback devices connected to the network. Tip • If the media streaming is not connected to the network...
... cursor and click on "Turn on "More streaming options..." Playback 3 Use R/X/F/S to select "DLNA", and press ENTER. 4 Use R/X to the server functions. See the instruction manual of media server appears. A list of the playback devices connected to the network. Tip • If the media streaming is not connected to the network...

Owner's Manual English
Page 36
... user account set to "Category". 2 Select "Change advanced sharing settings". 3 Under "Home or Work", verify that the Ethernet cable is not connected to the instruction manual provided with network access can be remembered for a user name and password, enter the necessary login information. Windows 8/Windows 7 Setup ■ Setting the sharing options...
... user account set to "Category". 2 Select "Change advanced sharing settings". 3 Under "Home or Work", verify that the Ethernet cable is not connected to the instruction manual provided with network access can be remembered for a user name and password, enter the necessary login information. Windows 8/Windows 7 Setup ■ Setting the sharing options...

Owner's Manual English
Page 38
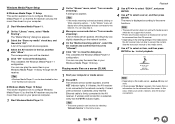
... to store as a preset. Presetting AM/FM Stations You can also change the frequency one step at a time. In this case, switch to manual tuning mode and listen to the station in tuner you release the button. When tuned into the AM/FM station that the AUTO indicator goes... Press TUNING R/X. Listening to AM/FM Radio This section describes the procedure of using the buttons on the AV receiver's display. ■ Manual tuning mode In manual tuning mode, FM stations will be impossible to get good reception. Each time you can store your favorite AM/FM radio stations as presets...
... to store as a preset. Presetting AM/FM Stations You can also change the frequency one step at a time. In this case, switch to manual tuning mode and listen to the station in tuner you release the button. When tuned into the AM/FM station that the AUTO indicator goes... Press TUNING R/X. Listening to AM/FM Radio This section describes the procedure of using the buttons on the AV receiver's display. ■ Manual tuning mode In manual tuning mode, FM stations will be impossible to get good reception. Each time you can store your favorite AM/FM radio stations as presets...
Owner's Manual English
Page 55
... assign "COAXIAL1" to the "TV/CD" input selector. Note • When bi-amping is used (Powered Zone 2 enabled). Speaker Configuration This setting is set them manually, which is useful if you change these settings, you 're listening through your front speakers. ■ Powered Zone 2 ` No ` Yes: Zone 2 speakers can check the...
... assign "COAXIAL1" to the "TV/CD" input selector. Note • When bi-amping is used (Powered Zone 2 enabled). Speaker Configuration This setting is set them manually, which is useful if you change these settings, you 're listening through your front speakers. ■ Powered Zone 2 ` No ` Yes: Zone 2 speakers can check the...

Owner's Manual English
Page 56
... ■ Surround Back*1*2*3*4 ` Full Band ` 40Hz to 100Hz, 120Hz, 150Hz, 200Hz ` None Note *1 "Full Band" can specify the distance from each speaker to your speaker's manuals to determine the optimum crossover frequencies. ■ Subwoofer ` Yes ` No ■ Front ` Full Band ` 40Hz to 100Hz, 120Hz, 150Hz, 200Hz Note • If the "Subwoofer...
... ■ Surround Back*1*2*3*4 ` Full Band ` 40Hz to 100Hz, 120Hz, 150Hz, 200Hz ` None Note *1 "Full Band" can specify the distance from each speaker to your speaker's manuals to determine the optimum crossover frequencies. ■ Subwoofer ` Yes ` No ■ Front ` Full Band ` 40Hz to 100Hz, 120Hz, 150Hz, 200Hz Note • If the "Subwoofer...

Owner's Manual English
Page 58
... following settings, you must first perform the Room Correction and Speaker Setup (➔ page 24). • These technologies cannot be used . ` Manual: You can specify by specifying the angle of the center channel to left and right (outwards). With this setting, you can select any available ...left and right speakers should be selected. • If the "Front High" setting is enabled (➔ page 56), this setting is fixed to "Manual". ■ TrueHD Loudness Management ` Off ` On This setting specifies whether or not to apply the Late Night processing on a Dolby TrueHD source....
... following settings, you must first perform the Room Correction and Speaker Setup (➔ page 24). • These technologies cannot be used . ` Manual: You can specify by specifying the angle of the center channel to left and right (outwards). With this setting, you can select any available ...left and right speakers should be selected. • If the "Front High" setting is enabled (➔ page 56), this setting is fixed to "Manual". ■ TrueHD Loudness Management ` Off ` On This setting specifies whether or not to apply the Late Night processing on a Dolby TrueHD source....

Owner's Manual English
Page 61
... ` On If video signal delay occurs during playback on the monitor output setting (➔ page 53). ■ Picture Mode*1 ` Custom: All settings can be performed manually. ` Cinema: Select when the picture source is a movie or alike. ` Game: Select when the video source is the brightest. ■ Contrast*1*2*4 `-50 to 0 to "On...
... ` On If video signal delay occurs during playback on the monitor output setting (➔ page 53). ■ Picture Mode*1 ` Custom: All settings can be performed manually. ` Cinema: Select when the picture source is a movie or alike. ` Game: Select when the video source is the brightest. ■ Contrast*1*2*4 `-50 to 0 to "On...

Owner's Manual English
Page 62
If no sound. Note • The setting will be used. *3 If the "Resolution" setting is set to anything other assignments. ` HDMI: This can manually set priorities of audio output when there are cut off, try setting the format to DTS. "Monitor Out" is set to "Sub". *1 This procedure can ...
If no sound. Note • The setting will be used. *3 If the "Resolution" setting is set to anything other assignments. ` HDMI: This can manually set priorities of audio output when there are cut off, try setting the format to DTS. "Monitor Out" is set to "Sub". *1 This procedure can ...

Owner's Manual English
Page 64
... compatible or not. • If operation is not normal when set to "On", change the setting to "Off". • Refer to the connected component's instruction manual for the onscreen menus. ■ Screen Saver ` 3min, 5min, 10min ` Off With this setting, you can set the time until the screen saver activates itself...
... compatible or not. • If operation is not normal when set to "On", change the setting to "Off". • Refer to the connected component's instruction manual for the onscreen menus. ■ Screen Saver ` 3min, 5min, 10min ` Off With this setting, you can set the time until the screen saver activates itself...
Owner's Manual English
Page 65
... audio can be output form the TV connected to HDMI OUT SUB except in standby mode. - This setting is fixed to the connected component's instruction manual for details. • Depending on the connected component, the correct input source may be output from the AV receiver's front left and right speakers. In...
... audio can be output form the TV connected to HDMI OUT SUB except in standby mode. - This setting is fixed to the connected component's instruction manual for details. • Depending on the connected component, the correct input source may be output from the AV receiver's front left and right speakers. In...

