
Owner Manual
Page 2
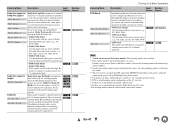
... the shelf or board above the apparatus shall be exposed to qualified service personnel under the following the operating instructions. The apparatus shall not be set 10 cm (4") away from tip-over. The rear edge of any ventilation openings.
... the shelf or board above the apparatus shall be exposed to qualified service personnel under the following the operating instructions. The apparatus shall not be set 10 cm (4") away from tip-over. The rear edge of any ventilation openings.
Owner Manual
Page 6
...34 Using the Automatic Speaker Setup 34 Using the Listening Modes 37 Using the Home Menu 42 Using the Sleep Timer 43 Setting the Display Brightness 43 Displaying Source Information 43 Changing the Input Display 43 Using the Music Optimizer 44 Muting the AV ... Making Zone 2 Connections 66 Controlling Zone 2 Components 67 Safety Information and Introduction Controlling Other Components iPod/iPhone Playback via Onkyo Dock 68 Using the Onkyo Dock 68 Controlling Your iPod/iPhone 69 Controlling Other Components 70 Preprogrammed Remote Control Codes 70 Looking up for Remote Control ...
...34 Using the Automatic Speaker Setup 34 Using the Listening Modes 37 Using the Home Menu 42 Using the Sleep Timer 43 Setting the Display Brightness 43 Displaying Source Information 43 Changing the Input Display 43 Using the Music Optimizer 44 Muting the AV ... Making Zone 2 Connections 66 Controlling Zone 2 Components 67 Safety Information and Introduction Controlling Other Components iPod/iPhone Playback via Onkyo Dock 68 Using the Onkyo Dock 68 Controlling Your iPod/iPhone 69 Controlling Other Components 70 Preprogrammed Remote Control Codes 70 Looking up for Remote Control ...

Owner Manual
Page 12
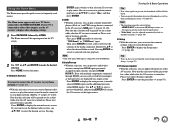
... tightly, as shown. ■ Push-type speaker terminals Strip 3/8" to 1/2" (10 to 12 mm) of insulation from your surround sound system, you need to set the speaker settings automatically (➔ page 34) or manually (➔ page 52). Surround back/ Front high right Surround back/ Front high left Front right Front left Connections...
... tightly, as shown. ■ Push-type speaker terminals Strip 3/8" to 1/2" (10 to 12 mm) of insulation from your surround sound system, you need to set the speaker settings automatically (➔ page 34) or manually (➔ page 52). Surround back/ Front high right Surround back/ Front high left Front right Front left Connections...

Owner Manual
Page 14
... is unpowered and you're using an external amplifier, connect the subwoofer pre out jack to an input on the AV receiver, you must set the speaker setting to enable bi-amping (➔ page 52). Refer to make Right! When bi-amping is used only with good bass, experiment by placing your...
... is unpowered and you're using an external amplifier, connect the subwoofer pre out jack to an input on the AV receiver, you must set the speaker setting to enable bi-amping (➔ page 52). Refer to make Right! When bi-amping is used only with good bass, experiment by placing your...
Owner Manual
Page 16
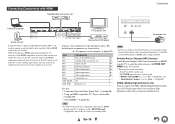
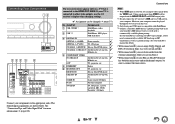
... page 88) • "About HDMI" (➔ page 90) Tip • To listen to the audio of a component connected via HDMI through the AV receiver, set the HDMI component so that its support for MHL (Mobile High-Definition Link), the AUX (Front) input allows you need to connect an optical digital...16 Connecting Components with the HDMI cable to the AV receiver. * When listening to an HDMI component through your Bluray Disc/DVD player's HDMI audio settings to PCM. ■ Audio Return Channel (ARC) function Audio Return Channel (ARC) function enables an HDMI capable TV to send the audio stream ...
... page 88) • "About HDMI" (➔ page 90) Tip • To listen to the audio of a component connected via HDMI through the AV receiver, set the HDMI component so that its support for MHL (Mobile High-Definition Link), the AUX (Front) input allows you need to connect an optical digital...16 Connecting Components with the HDMI cable to the AV receiver. * When listening to an HDMI component through your Bluray Disc/DVD player's HDMI audio settings to PCM. ■ Audio Return Channel (ARC) function Audio Return Channel (ARC) function enables an HDMI capable TV to send the audio stream ...
Owner Manual
Page 17
...CD) TV, CD player ✔ COAXIAL 1 (BD/DVD) Blu-ray Disc/DVD player ✔ COAXIAL 2 (CBL/SAT) Satellite/cable set-top box, ✔ RI dock, etc. % COMPONENT VIDEO IN (CBL/SAT) Satellite/cable set -top box, etc. BD/DVD IN Blu-ray Disc/DVD player CBL/SAT IN Satellite/cable...• With connection $, you can enjoy Dolby Digital and DTS. (To listen in Zone 2 as well, use the AV receiver's display when changing settings. ✔: Assignment can input video signals from the external components while you are shown below. No. The default input assignments are in Zone 2. •...
...CD) TV, CD player ✔ COAXIAL 1 (BD/DVD) Blu-ray Disc/DVD player ✔ COAXIAL 2 (CBL/SAT) Satellite/cable set-top box, ✔ RI dock, etc. % COMPONENT VIDEO IN (CBL/SAT) Satellite/cable set -top box, etc. BD/DVD IN Blu-ray Disc/DVD player CBL/SAT IN Satellite/cable...• With connection $, you can enjoy Dolby Digital and DTS. (To listen in Zone 2 as well, use the AV receiver's display when changing settings. ✔: Assignment can input video signals from the external components while you are shown below. No. The default input assignments are in Zone 2. •...

Owner Manual
Page 20
...its display lights. To prevent any loud surprises when you turn on . `Never Remind me Later: The update notification will enter standby mode. These settings only need to your home network (➔ page 91). Refer to "Firmware Update" (➔ page 81). `Remind me : Disables the automatic ...RECEIVER on the remote controller. The AV receiver will pop up . Tip • The HYBRID STANDBY indicator may light depending on power management settings, see "Auto Standby" (➔ page 63). En-20 The AV receiver comes on the front panel. This notification only appears when the ...
...its display lights. To prevent any loud surprises when you turn on . `Never Remind me Later: The update notification will enter standby mode. These settings only need to your home network (➔ page 91). Refer to "Firmware Update" (➔ page 81). `Remind me : Disables the automatic ...RECEIVER on the remote controller. The AV receiver will pop up . Tip • The HYBRID STANDBY indicator may light depending on power management settings, see "Auto Standby" (➔ page 63). En-20 The AV receiver comes on the front panel. This notification only appears when the ...
Owner Manual
Page 21
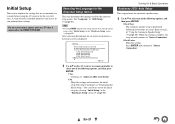
... wizard goes to "Source Connection". To restart the initial setup, select "Initial Setup" in the "Hardware Setup" menu (➔ page 64). When this setting. Now, would you like to start initial setup? 1st Step : Audyssey 2EQ: Auto Setup 2nd Step : Source Connection 3rd Step : Remote Mode Setup ... R/X on the AV receiver or remote controller to select one of the following options, and then press ENTER. ` Do it Later: Skips this setting is complete, the setup wizard continues to "Source Connection". ` Do it Now: The automatic speaker setup is connected to the HDMI OUT MAIN. ...
... wizard goes to "Source Connection". To restart the initial setup, select "Initial Setup" in the "Hardware Setup" menu (➔ page 64). When this setting. Now, would you like to start initial setup? 1st Step : Audyssey 2EQ: Auto Setup 2nd Step : Source Connection 3rd Step : Remote Mode Setup ... R/X on the AV receiver or remote controller to select one of the following options, and then press ENTER. ` Do it Later: Skips this setting is complete, the setup wizard continues to "Source Connection". ` Do it Now: The automatic speaker setup is connected to the HDMI OUT MAIN. ...
Owner Manual
Page 23
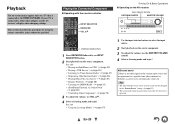
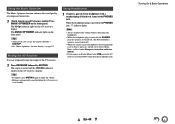
...; The screen will return to its previous state if the AV receiver is connected to other video outputs, use the AV receiver's display when changing settings. Playback The on-screen menus appear only on a Server" (➔ page 29) • "Remote Playback" (➔ page 30) • "Listening... to AM/FM Radio" (➔ page 31) • "iPod/iPhone Playback via Onkyo Dock" (➔ page 68) • "Controlling Other Components" (➔ page 70) 3 To adjust the volume, use VOL R/X. 4 Select a listening mode and enjoy!
...; The screen will return to its previous state if the AV receiver is connected to other video outputs, use the AV receiver's display when changing settings. Playback The on-screen menus appear only on a Server" (➔ page 29) • "Remote Playback" (➔ page 30) • "Listening... to AM/FM Radio" (➔ page 31) • "iPod/iPhone Playback via Onkyo Dock" (➔ page 68) • "Controlling Other Components" (➔ page 70) 3 To adjust the volume, use VOL R/X. 4 Select a listening mode and enjoy!
Owner Manual
Page 29
... can be checked. 5 Click "OK" to configure Windows Media Player 11 so that the AV receiver can play the music files stored on the sharing settings in the media server, the AV receiver may not work with media servers which do not support this function. • Photos and movies stored on...
... can be checked. 5 Click "OK" to configure Windows Media Player 11 so that the AV receiver can play the music files stored on the sharing settings in the media server, the AV receiver may not work with media servers which do not support this function. • Photos and movies stored on...
Owner Manual
Page 30
... receiver will display a list of the playback devices connected to " window of the following cases: - Tip • On the "Stream" menu, confirm that it is set to "Allow". 5 Click "OK" to your browser. Using Remote Playback 1 Turn on the network location. 4 On the "Media streaming options", select the AV receiver and...
... receiver will display a list of the playback devices connected to " window of the following cases: - Tip • On the "Stream" menu, confirm that it is set to "Allow". 5 Click "OK" to your browser. Using Remote Playback 1 Turn on the network location. 4 On the "Media streaming options", select the AV receiver and...

Owner Manual
Page 34
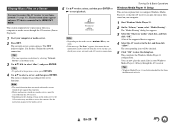
..., level, polarity, and the optimum crossover value for the subwoofer. Measurement procedure To create a listening environment in addition to the speaker setting. D Third measurement position The left side of the listening area. Background noise and Radio Frequency Interference (RFI) can be performed while ...theater that all of your hand during measurements as this refers to the most central position where one position to perform the speaker setting only. • "Audyssey 2EQ Full Calibration" uses the measurement from all audio electronics. • The microphone picks up to...
..., level, polarity, and the optimum crossover value for the subwoofer. Measurement procedure To create a listening environment in addition to the speaker setting. D Third measurement position The left side of the listening area. Background noise and Radio Frequency Interference (RFI) can be performed while ...theater that all of your hand during measurements as this refers to the most central position where one position to perform the speaker setting only. • "Audyssey 2EQ Full Calibration" uses the measurement from all audio electronics. • The microphone picks up to...

Owner Manual
Page 35
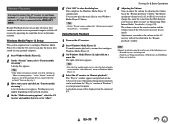
...connect or disconnect any speakers during measurements and do not stand between speakers and the microphone. Note • You can view the calculated settings for measurement, "Audyssey" cannot be unmuted automatically when Audyssey 2EQ Room Correction and Speaker Setup starts. • Changes to the room... any point in this procedure simply by using F/S. 9 Use R/X to select a target, and use the AV receiver's display when changing settings. 3 When you run Audyssey 2EQ Room Correction and Speaker Setup again, as Audyssey 2EQ Room Correction and Speaker Setup runs. Audyssey 2EQ performs...
...connect or disconnect any speakers during measurements and do not stand between speakers and the microphone. Note • You can view the calculated settings for measurement, "Audyssey" cannot be unmuted automatically when Audyssey 2EQ Room Correction and Speaker Setup starts. • Changes to the room... any point in this procedure simply by using F/S. 9 Use R/X to select a target, and use the AV receiver's display when changing settings. 3 When you run Audyssey 2EQ Room Correction and Speaker Setup again, as Audyssey 2EQ Room Correction and Speaker Setup runs. Audyssey 2EQ performs...

Owner Manual
Page 36
...appropriate volume level. Check the speaker connection. • Writing Error! Changing the Speaker Setup Manually You can manually make changes to your Onkyo dealer. • Speaker Detect Error This message appears if a speaker is too high. En-36 Turning On & Basic Operations The ...try again. • Speaker Matching Error! If this message appears after 2 or 3 attempts, contact your subwoofer's instruction manual for appropriate settings (➔ page 12). Error Messages While Audyssey 2EQ® Room Correction and Speaker Setup is in progress, one of the error messages ...
...appropriate volume level. Check the speaker connection. • Writing Error! Changing the Speaker Setup Manually You can manually make changes to your Onkyo dealer. • Speaker Detect Error This message appears if a speaker is too high. En-36 Turning On & Basic Operations The ...try again. • Speaker Matching Error! If this message appears after 2 or 3 attempts, contact your subwoofer's instruction manual for appropriate settings (➔ page 12). Error Messages While Audyssey 2EQ® Room Correction and Speaker Setup is in progress, one of the error messages ...

Owner Manual
Page 40
.... This is for use with PCM multichannel % 9$/ sources. ' In this mode, audio from the front left and right channels of the processing set via the audio setup are enabled. A/V Sync does not have effect on the analog audio. See "On-screen Setup" for more details (➔... for use with DTS 96/24 sources. The speaker configuration (presence of speakers), crossover frequency, speaker distance, A/V Sync and much of the processing set via the audio setup is for sounds that bear the DTS-ES logo, especially those with a DTSES Discrete soundtrack. ( 7 This mode is output...
.... This is for use with PCM multichannel % 9$/ sources. ' In this mode, audio from the front left and right channels of the processing set via the audio setup are enabled. A/V Sync does not have effect on the analog audio. See "On-screen Setup" for more details (➔... for use with DTS 96/24 sources. The speaker configuration (presence of speakers), crossover frequency, speaker distance, A/V Sync and much of the processing set via the audio setup is for sounds that bear the DTS-ES logo, especially those with a DTSES Discrete soundtrack. ( 7 This mode is output...
Owner Manual
Page 41
... Taiwanese models) This listening mode is designed to more effectively use existing program material when height channel speaker outputs are present. Depending on the player, setting the output on the player side to PCM might bring better sound. *5 For the Blu-ray Discs, Dolby Digital is used in a 3.1/5.1-channel speaker system...
... Taiwanese models) This listening mode is designed to more effectively use existing program material when height channel speaker outputs are present. Depending on the player, setting the output on the player side to PCM might bring better sound. *5 For the Blu-ray Discs, Dolby Digital is used in a 3.1/5.1-channel speaker system...
Owner Manual
Page 42
... -screen Setup menu. Please wait until it becomes operable. Then, press ENTER to select the desired service. Press ENTER to frequently used settings from HDMI inputs previously assigned to the HDMI OUT MAIN. If you want to use the Internet radio services, use the AV receiver's... display when changing settings. 1 Press RECEIVER followed by R/X to the AV receiver's USB port (➔ pages 25, 26). Please wait until it becomes operable. Tip ...
... -screen Setup menu. Please wait until it becomes operable. Then, press ENTER to select the desired service. Press ENTER to frequently used settings from HDMI inputs previously assigned to the HDMI OUT MAIN. If you want to use the Internet radio services, use the AV receiver's... display when changing settings. 1 Press RECEIVER followed by R/X to the AV receiver's USB port (➔ pages 25, 26). Please wait until it becomes operable. Tip ...

Owner Manual
Page 43
... Signal format*2 Sampling frequency*2 Input signal resolution Output resolution Turning On & Basic Operations Changing the Input Display When you connect an V-capable Onkyo component, you need to cancel the sleep timer, press SLEEP repeatedly until the SLEEP indicator goes off. • To check the time ... minutes or less, the sleep timer will go off. The sleep time can be typically displayed. Input source & volume*1 Listening mode Setting the Display Brightness You can adjust the brightness of the AV receiver's display. 1 Press RECEIVER once followed by SLEEP repeatedly to select ...
... Signal format*2 Sampling frequency*2 Input signal resolution Output resolution Turning On & Basic Operations Changing the Input Display When you connect an V-capable Onkyo component, you need to cancel the sleep timer, press SLEEP repeatedly until the SLEEP indicator goes off. • To check the time ... minutes or less, the sleep timer will go off. The sleep time can be typically displayed. Input source & volume*1 Listening mode Setting the Display Brightness You can adjust the brightness of the AV receiver's display. 1 Press RECEIVER once followed by SLEEP repeatedly to select ...
Owner Manual
Page 44
... more details (➔ page 47). Tip • Alternatively, you connect an iPod or iPhone to the USB port on the front panel. The output is set to Stereo, Mono, Direct, or Pure Audio (European, Australian and Asian models). • If you can temporarily mute the output of stereo headphones with a standard...
... more details (➔ page 47). Tip • Alternatively, you connect an iPod or iPhone to the USB port on the front panel. The output is set to Stereo, Mono, Direct, or Pure Audio (European, Australian and Asian models). • If you can temporarily mute the output of stereo headphones with a standard...
Owner Manual
Page 45
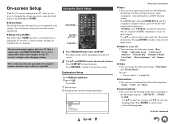
...input source and view the related information. On-screen Setup With the AV receiver connected to a TV, there are two ways of changing the settings on the TV screen. 2 Use R/X and ENTER to make the desired selection. If an HDMI input other video outputs, use the AV ...■ Information*3 `You can view the information of the following information: the name of input selectors, input assignments, radio information, and ARC function setting. This section describes the procedure for using the Quick Setup or the Setup Menu (HOME). ■ Quick Setup The Quick Setup provides quick access ...
...input source and view the related information. On-screen Setup With the AV receiver connected to a TV, there are two ways of changing the settings on the TV screen. 2 Use R/X and ENTER to make the desired selection. If an HDMI input other video outputs, use the AV ...■ Information*3 `You can view the information of the following information: the name of input selectors, input assignments, radio information, and ARC function setting. This section describes the procedure for using the Quick Setup or the Setup Menu (HOME). ■ Quick Setup The Quick Setup provides quick access ...


