
Owner Manual
Page 1
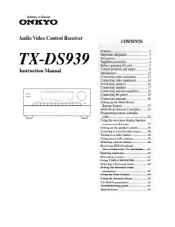
... Video Control Receiver TX-DS939 Instruction Manual I T 0 CONTENTS Features 2 Important safeguards 3 Precautions 4 Supplied accessories 4 Before operating this unit 5 Control positions and names 6 Introduction 12 Connecting audio equipment 13 Connecting video equipment 14 Positioning speakers 16 Connecting speakers 17 Connecting optional amplifiers 18 Connecting the power 19 Connecting antennas 20 Setting up the Multi-Room Remote...
... Video Control Receiver TX-DS939 Instruction Manual I T 0 CONTENTS Features 2 Important safeguards 3 Precautions 4 Supplied accessories 4 Before operating this unit 5 Control positions and names 6 Introduction 12 Connecting audio equipment 13 Connecting video equipment 14 Positioning speakers 16 Connecting speakers 17 Connecting optional amplifiers 18 Connecting the power 19 Connecting antennas 20 Setting up the Multi-Room Remote...

Owner Manual
Page 4
... double-D symbol are sold. Do not use only with a clean cloth. U.S./Canadian model: AC 120 V, 60 Hz European/Australian model: AC 230 V, 50 Hz if Remote controller (1) AM loop antenna (1) Batteries (2) (size AA, R6, or UM-3) FM antenna (1) ATTENTION FOR BRITISH MODEL Replacement and mounting ,-f an Ar plug .n the p.w.r supply cord of... Manufactured under license from Dolby Laboratories Licensing Corporation. LUCAS FILM and THX are coloured in accordance with the coloured markings identifying the terminals in your Onkyo authorized service station. 4.
... double-D symbol are sold. Do not use only with a clean cloth. U.S./Canadian model: AC 120 V, 60 Hz European/Australian model: AC 230 V, 50 Hz if Remote controller (1) AM loop antenna (1) Batteries (2) (size AA, R6, or UM-3) FM antenna (1) ATTENTION FOR BRITISH MODEL Replacement and mounting ,-f an Ar plug .n the p.w.r supply cord of... Manufactured under license from Dolby Laboratories Licensing Corporation. LUCAS FILM and THX are coloured in accordance with the coloured markings identifying the terminals in your Onkyo authorized service station. 4.

Owner Manual
Page 5
.... Placing this unit away from direct bright light which can pre- Load two AA- (R6- They may prevent proper remote controller operation. Using the remote controller The following information will flash each time a button is not completed within one hour. or UM-3) size batteries into the...8226; When the batteries lose their power, the indicator on the frequency of approximately six months, depending on the remote controller will help you get optimal use . • The TX-DS939 comes equipped with two AA (R6 or UM-3) manganese batteries, but we recommend that long-life AA (LR6 ...
.... Placing this unit away from direct bright light which can pre- Load two AA- (R6- They may prevent proper remote controller operation. Using the remote controller The following information will flash each time a button is not completed within one hour. or UM-3) size batteries into the...8226; When the batteries lose their power, the indicator on the frequency of approximately six months, depending on the remote controller will help you get optimal use . • The TX-DS939 comes equipped with two AA (R6 or UM-3) manganese batteries, but we recommend that long-life AA (LR6 ...

Owner Manual
Page 7
...be selected at the same time. The volume can not be adjusted using the remote controller 's VOL A/V buttons. Even if the knob is set the MASTER VOLUME level to +18dB. Use the remote controller to open the front panel. The indicator in four steps (bright, medium, dim...go off ) button [24] © SPEAKERS A/B selector buttons [36] Used to its highest possible setting. Depending on the European/Australian model) [19] C) Remote controller sensor C) Dolby Digital (AC-3) indicator [49] © Upper display ® Input selector buttons [36, 44-48] Video: VIDEO-1, VIDEO-2, VIDEO-3, VIDEO...
...be selected at the same time. The volume can not be adjusted using the remote controller 's VOL A/V buttons. Even if the knob is set the MASTER VOLUME level to +18dB. Use the remote controller to open the front panel. The indicator in four steps (bright, medium, dim...go off ) button [24] © SPEAKERS A/B selector buttons [36] Used to its highest possible setting. Depending on the European/Australian model) [19] C) Remote controller sensor C) Dolby Digital (AC-3) indicator [49] © Upper display ® Input selector buttons [36, 44-48] Video: VIDEO-1, VIDEO-2, VIDEO-3, VIDEO...
Owner Manual
Page 9
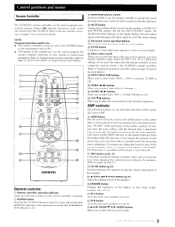
... move the cursor in the on-screen display. © ENTER button Confirms or cancels the cursor operation in the TX-DS939's remote controller. (Refer to Programming remote controller codes on pages 25 and 26 for more details on the front panel is set to AMP. ® SLEEP...or off. 3 SP-B button Turns the sub-room speakers on page 25-26 for connection details. Control positions and names Remote Controller The TX-DS939's remote controller can be used to operate components bearing Onkyo's RI (Remote Interactive) mark which turns off the power to select from VIDEO-1 through -7. 0 AUDIO -411 /...
... move the cursor in the on-screen display. © ENTER button Confirms or cancels the cursor operation in the TX-DS939's remote controller. (Refer to Programming remote controller codes on pages 25 and 26 for more details on the front panel is set to AMP. ® SLEEP...or off. 3 SP-B button Turns the sub-room speakers on page 25-26 for connection details. Control positions and names Remote Controller The TX-DS939's remote controller can be used to operate components bearing Onkyo's RI (Remote Interactive) mark which turns off the power to select from VIDEO-1 through -7. 0 AUDIO -411 /...

Owner Manual
Page 10
I TAPE DCK-A j 0 I 0 0 i I ., SGLIE:E)P . 0 0 i i -=( > DIME. 0 1\ I I e \i : : © O 13 O © I I a - MAIVS. Control positions and names - illR.NIC;! \ 1 0 i I 9 :47:472)7 I I TRACK 4' CH SEL LEVEL Il.
I TAPE DCK-A j 0 I 0 0 i I ., SGLIE:E)P . 0 0 i i -=( > DIME. 0 1\ I I e \i : : © O 13 O © I I a - MAIVS. Control positions and names - illR.NIC;! \ 1 0 i I 9 :47:472)7 I I TRACK 4' CH SEL LEVEL Il.
Owner Manual
Page 12
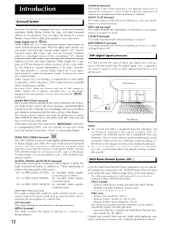
...the other Surround effects can operate all movies on disc, tape or broadcast. By using the Onkyo Multi-Room System: USA & Canada: * Onkyo's Multi-Room System kits HKT-600, HKT-700 (IR Remote Controller Extension System) and * Xantech's Multi-Room System Other area: * Sensor Unit: Model No... the music CONCERT HALL Surround This mode is especially suited for production of a top-quality theater. Introduction Surround System Since the TX-DS939 is equipped with front, center and Surround amplifiers, Dolby Digital, Dolby Pro Logic and other channels. The motion picture masters are...
...the other Surround effects can operate all movies on disc, tape or broadcast. By using the Onkyo Multi-Room System: USA & Canada: * Onkyo's Multi-Room System kits HKT-600, HKT-700 (IR Remote Controller Extension System) and * Xantech's Multi-Room System Other area: * Sensor Unit: Model No... the music CONCERT HALL Surround This mode is especially suited for production of a top-quality theater. Introduction Surround System Since the TX-DS939 is equipped with front, center and Surround amplifiers, Dolby Digital, Dolby Pro Logic and other channels. The motion picture masters are...
Owner Manual
Page 13
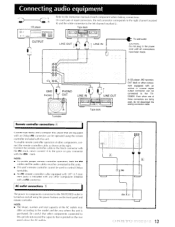
...rI RI The power to components connected to the SWITCHED outlet is printed on the front panel and remote controller . Even when one of these connectors are equipped with an Onkyo RI connector can be connected to the green or gray connector with the RI mark, never connect ...model and the area where the unit is included with any other components connected to this unit. To enable remote controller operation of each pair of the AC outlets may differ according to control Onkyo turntables. • An RI remote controller cable equipped with 1/8" (3.5 mm) mini jacks is purchased.
...rI RI The power to components connected to the SWITCHED outlet is printed on the front panel and remote controller . Even when one of these connectors are equipped with an Onkyo RI connector can be connected to the green or gray connector with the RI mark, never connect ...model and the area where the unit is included with any other components connected to this unit. To enable remote controller operation of each pair of the AC outlets may differ according to control Onkyo turntables. • An RI remote controller cable equipped with 1/8" (3.5 mm) mini jacks is purchased.

Owner Manual
Page 19
... AC outlet, press the SYSTEM switch to ON. Pressing the POWER switch turns on a different circuit. The POWER button on the remote controller is used to operate the TX-DS939 if the SYS- 0 TEM switch is not set to put the unit in stand-by status (the STAND-BY/RECEIVED indicator is... an AC outlet puts the unit in power-on status (the unit can be operated and its SYSTEM indicator is lit). ton on the remote controller switches the TX-DS939 between stand-by status (the STAND-BY/RECEIVED indicator is lit). If this unit's power may cause a momentary power surge, which might ...
... AC outlet, press the SYSTEM switch to ON. Pressing the POWER switch turns on a different circuit. The POWER button on the remote controller is used to operate the TX-DS939 if the SYS- 0 TEM switch is not set to put the unit in stand-by status (the STAND-BY/RECEIVED indicator is... an AC outlet puts the unit in power-on status (the unit can be operated and its SYSTEM indicator is lit). ton on the remote controller switches the TX-DS939 between stand-by status (the STAND-BY/RECEIVED indicator is lit). If this unit's power may cause a momentary power surge, which might ...

Owner Manual
Page 22
... is directed toward these components, then connect it to the speaker terminals on the power amplifier. (, )) 4. fl C SPEAKERS .4..t..*4... Onkyo components (a) Speaker (Main room) N \ N TX-DS939 \, Speaker (Main room) N SUB ROOM Remote control 5. Set up the Multi-Room Remote System Using the optional Multi-Room System equipment as wel l as a power amplifier and connecting a components as shown...
... is directed toward these components, then connect it to the speaker terminals on the power amplifier. (, )) 4. fl C SPEAKERS .4..t..*4... Onkyo components (a) Speaker (Main room) N \ N TX-DS939 \, Speaker (Main room) N SUB ROOM Remote control 5. Set up the Multi-Room Remote System Using the optional Multi-Room System equipment as wel l as a power amplifier and connecting a components as shown...

Owner Manual
Page 23
... components (d) to the Connecting Block. (1,) Connection diagram Power Amplifier Main IN O -OO- Onkyo components (a) Speaker (Main room) TX-DS939 \ Speaker (Main room) 5. Connecting block Remote --control 6. Power amplifier 3. Connect the TX-DS939 to the Connecting Block in the subroom, then connect it to the TX-DS939. 5. ote control Remote Sensor Speaker (Sub room) 1TV Speaker (Sub room) 1. Connect these components, then...
... components (d) to the Connecting Block. (1,) Connection diagram Power Amplifier Main IN O -OO- Onkyo components (a) Speaker (Main room) TX-DS939 \ Speaker (Main room) 5. Connecting block Remote --control 6. Power amplifier 3. Connect the TX-DS939 to the Connecting Block in the subroom, then connect it to the TX-DS939. 5. ote control Remote Sensor Speaker (Sub room) 1TV Speaker (Sub room) 1. Connect these components, then...

Owner Manual
Page 24
... speakers in the main room to check whether it is working properly. If it . The MULTI SOURCE level appears on the TX-DS939 to make the indi- If the remote controller is used .) 2. cator go off. (If the MR OFF indicator is lit, the multi-room system cannot be heard ... desired source and start operating it is not, refer to page 5. • When operating a component not bearing Onkyo's RI mark, check that the MR OFF indicator on the TX-DS939 is not lit. 24 Multi-Room Remote Controller Refer to pages 22 and 23 for connection details. 0 MAIN/SUB O 0 0 5 0 000 , 0 t MR OFF MULTI...
... speakers in the main room to check whether it is working properly. If it . The MULTI SOURCE level appears on the TX-DS939 to make the indi- If the remote controller is used .) 2. cator go off. (If the MR OFF indicator is lit, the multi-room system cannot be heard ... desired source and start operating it is not, refer to page 5. • When operating a component not bearing Onkyo's RI mark, check that the MR OFF indicator on the TX-DS939 is not lit. 24 Multi-Room Remote Controller Refer to pages 22 and 23 for connection details. 0 MAIN/SUB O 0 0 5 0 000 , 0 t MR OFF MULTI...
Owner Manual
Page 25
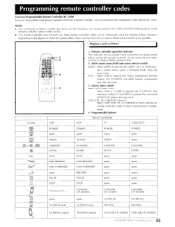
...AMP, CD/TUNER, TAPE: Select AMP or TUNER to operate the connected ONKYO CD player and tape deck. Remote controller operation indicator This indicator acts as when play- Select CD and TAPE to operate the TX-DS939's amp and tuner. MAIN (main room)/SUB (sub-room) selector switch... MAIN: Select MAIN to operate the Onkyo Multi-Room Remote System, the TX-D5939 and other manufacturer's components. 4. Most remote controller codes can memorize that component's codes into ...
...AMP, CD/TUNER, TAPE: Select AMP or TUNER to operate the connected ONKYO CD player and tape deck. Remote controller operation indicator This indicator acts as when play- Select CD and TAPE to operate the TX-DS939's amp and tuner. MAIN (main room)/SUB (sub-room) selector switch... MAIN: Select MAIN to operate the Onkyo Multi-Room Remote System, the TX-D5939 and other manufacturer's components. 4. Most remote controller codes can memorize that component's codes into ...

Owner Manual
Page 26
... buttons. • Refer to program. 3. Follow the procedure outlined in a safe place. o O0 MAIN SUB ) 7s, oo 4 04 4 04 40 2 3, 4 Your existing remote control 2.4 inches (5-10 cm) 4-> SET 5 Your existing remote control r -.0,. 0 ,70000 1,0000 M a °. \,, '-'0 0004 0 0 OO0 0, 0 0 0O o 0Q :0 17 0 MAIN or SUB SET Co 0 0 o 0 co 45 U C*: 0 OO• 0. 0 0 AUDIO ► 26 Programming new...
... buttons. • Refer to program. 3. Follow the procedure outlined in a safe place. o O0 MAIN SUB ) 7s, oo 4 04 4 04 40 2 3, 4 Your existing remote control 2.4 inches (5-10 cm) 4-> SET 5 Your existing remote control r -.0,. 0 ,70000 1,0000 M a °. \,, '-'0 0004 0 0 OO0 0, 0 0 0O o 0Q :0 17 0 MAIN or SUB SET Co 0 0 o 0 co 45 U C*: 0 OO• 0. 0 0 AUDIO ► 26 Programming new...

Owner Manual
Page 27
... MEMORY button held down the MEMORY button and press the VIDEO1 button once. 2. Select the desired parameter using the A or V cursor button on ONKYO Screen SeLap ** Background Color A = BLUE 1 Elia Color B = GREEN -1 PS Superimpose Mode 22 NORMAL Immediate Display = ON RP Character Position...system type for three seconds, hold down and continue pressing the VIDEO-1 button until the desired system appears. Using the on-screen display function (remote controller only) VIDEO -1 0 0 000 t=== o = o GOAD- , MEMORY Selecting the NTSC or PAL system (Not available on the TV/...
... MEMORY button held down the MEMORY button and press the VIDEO1 button once. 2. Select the desired parameter using the A or V cursor button on ONKYO Screen SeLap ** Background Color A = BLUE 1 Elia Color B = GREEN -1 PS Superimpose Mode 22 NORMAL Immediate Display = ON RP Character Position...system type for three seconds, hold down and continue pressing the VIDEO-1 button until the desired system appears. Using the on-screen display function (remote controller only) VIDEO -1 0 0 000 t=== o = o GOAD- , MEMORY Selecting the NTSC or PAL system (Not available on the TV/...

Owner Manual
Page 28
Using the on-screen display function (remote controller only) Screens Refer to select whether the on-screen displays will appear in other parameters either disappearing or being skipped over by the cursor. EM ...
Using the on-screen display function (remote controller only) Screens Refer to select whether the on-screen displays will appear in other parameters either disappearing or being skipped over by the cursor. EM ...

Owner Manual
Page 29
... - This paramPtPr can move the position of a black background. If BLACK is performed. Character Position You can be displayed. Using the on-screen display function (remote controller only) Screen Setup screen When Screen Setup is possible to set to OFF, NORMAL or BLACK. Select ON if you wish the immediate display to...
... - This paramPtPr can move the position of a black background. If BLACK is performed. Character Position You can be displayed. Using the on-screen display function (remote controller only) Screen Setup screen When Screen Setup is possible to set to OFF, NORMAL or BLACK. Select ON if you wish the immediate display to...

Owner Manual
Page 30
... display the Menu screen. 2. Move the cursor to select either System Setup A or System Setup B, and then press the ► cursor button on the remote controller to display the appropriate System Setup screen. To manually set the speaker parameters for the parameters in the System Setup A instructions to steps 4., 5. Perform the ...
... display the Menu screen. 2. Move the cursor to select either System Setup A or System Setup B, and then press the ► cursor button on the remote controller to display the appropriate System Setup screen. To manually set the speaker parameters for the parameters in the System Setup A instructions to steps 4., 5. Perform the ...
Owner Manual
Page 32
... and turn its level to reach the microphone, the measured speaker distances may differ from the actual ones depending on the remote controller to Analyzer Setup in the speaker distances, the TX-DS939 will automatically adjust them. While the Analyzer Setup is being performed, a screen appears showing the amount of the room is set...
... and turn its level to reach the microphone, the measured speaker distances may differ from the actual ones depending on the remote controller to Analyzer Setup in the speaker distances, the TX-DS939 will automatically adjust them. While the Analyzer Setup is being performed, a screen appears showing the amount of the room is set...

Owner Manual
Page 33
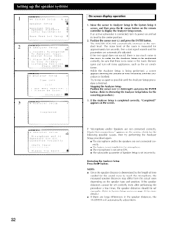
...D. When the subwoofer sound begins to select Bass Peak Lvl Setup. 2. The test signal sounds. 3. Starting The Test Sign ONKYO * Bass Peak L t)- 3, Setup* ESC 1 Turn Volume Up. 2 . Turn the MASTER VOLUME control knob to the right to select ON. however, this operation carefully. 01,1C"IIC. ,* System Setup A ** On-screen... Setup and correct the setting. * Refer to the operations below when using just the main unit to carry out the on the remote controller to Bass Peak Lvl Setup, and then press the ► cursor button on -screen display operation described above. / IIL 3.
...D. When the subwoofer sound begins to select Bass Peak Lvl Setup. 2. The test signal sounds. 3. Starting The Test Sign ONKYO * Bass Peak L t)- 3, Setup* ESC 1 Turn Volume Up. 2 . Turn the MASTER VOLUME control knob to the right to select ON. however, this operation carefully. 01,1C"IIC. ,* System Setup A ** On-screen... Setup and correct the setting. * Refer to the operations below when using just the main unit to carry out the on the remote controller to Bass Peak Lvl Setup, and then press the ► cursor button on -screen display operation described above. / IIL 3.


