
Owner Manual
Page 1
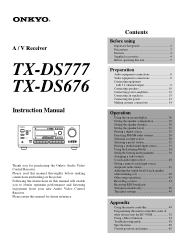
... VOLUME UP VIDEO 4/VIDEO CAM INPUT S VIDEO VIDEO L AUDIO R(MONO) AV RECEIVER TX-DS777 Thank you to it 42 Other setup operations 43 Recording a source 44 Receiving RDS broadcasts (European models only 46 The initial settings 48 Appendix Using the remote ...Supplied accessories 4 Before operating this manual will enable you for future reference. Please read this manual for purchasing the Onkyo Audio Video Control Receiver. Following the instructions in this unit 5 Preparation Audio equipment connections 6 Video equipment connections 8 Connecting equipment with 5.1-...
... VOLUME UP VIDEO 4/VIDEO CAM INPUT S VIDEO VIDEO L AUDIO R(MONO) AV RECEIVER TX-DS777 Thank you to it 42 Other setup operations 43 Recording a source 44 Receiving RDS broadcasts (European models only 46 The initial settings 48 Appendix Using the remote ...Supplied accessories 4 Before operating this manual will enable you for future reference. Please read this manual for purchasing the Onkyo Audio Video Control Receiver. Following the instructions in this unit 5 Preparation Audio equipment connections 6 Video equipment connections 8 Connecting equipment with 5.1-...

Owner Manual
Page 2
... Requiring Service - The appliance has been dropped, or the enclosure damaged. 18. REFER SERVICING TO QUALIFIED SERVICE PERSONNEL. The appliance should be connected to the receiver, be used near plugs, conve- The appliance should be sure the antenna system is still trouble, the user should be read the following information: The...
... Requiring Service - The appliance has been dropped, or the enclosure damaged. 18. REFER SERVICING TO QUALIFIED SERVICE PERSONNEL. The appliance should be connected to the receiver, be used near plugs, conve- The appliance should be sure the antenna system is still trouble, the user should be read the following information: The...
Owner Manual
Page 3
... your area before plugging in your Onkyo authorized service station. 4. For heavier dirt, dampen a soft cloth in accordance with the following measures: • Reorient or relocate the receiving antenna. • Increase the separation between the equipment and receiver. • Connect the equipment into...READ THE FOLLOWING SECTION CAREFULLY. Be sure that the cable ground shall be connected to radio or television reception, which the receiver is not user-serviceable. The wire which is in a residential installation. For Canadian model CAUTION: THIS DIGITAL APPARATUS DOES NOT...
... your area before plugging in your Onkyo authorized service station. 4. For heavier dirt, dampen a soft cloth in accordance with the following measures: • Reorient or relocate the receiving antenna. • Increase the separation between the equipment and receiver. • Connect the equipment into...READ THE FOLLOWING SECTION CAREFULLY. Be sure that the cable ground shall be connected to radio or television reception, which the receiver is not user-serviceable. The wire which is in a residential installation. For Canadian model CAUTION: THIS DIGITAL APPARATUS DOES NOT...
Owner Manual
Page 4
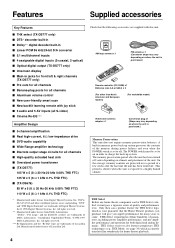
...contents are trademarks of quality and performance tests. A built-in memory power back-up system. Features Supplied accessories Key Features s THX select (TX-DS777 only) s DTS* decorder built-in s Dolby** digital decoder built-in s Linear PCM 96 kHz/24-bit D/A converter s 5.1 multichannel... (2-coaxial, 2-optical) s Optical digital output (TX-DS777 only) s Onscreen display s Main-in order to come. The POWER switch must be THX Select certified, it must pass a rigorous series of Dolby Laboratories. THX Select receivers also features proprietary THX technologies (e.g. No.5,451,942...
...contents are trademarks of quality and performance tests. A built-in memory power back-up system. Features Supplied accessories Key Features s THX select (TX-DS777 only) s DTS* decorder built-in s Dolby** digital decoder built-in s Linear PCM 96 kHz/24-bit D/A converter s 5.1 multichannel... (2-coaxial, 2-optical) s Optical digital output (TX-DS777 only) s Onscreen display s Main-in order to come. The POWER switch must be THX Select certified, it must pass a rigorous series of Dolby Laboratories. THX Select receivers also features proprietary THX technologies (e.g. No.5,451,942...
Owner Manual
Page 5
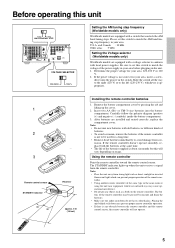
...• To avoid corrosion, remove the batteries if the remote controller is appropriate. 1 2 3 Remote control sensor STANDBY indicator 30˚ 30˚ Receiver approx. 5 m (16 feet) Installing the remote controller batteries 1. The but this unit 9 kHz 10 kHz AM FREQUENCY STEP DIGITAL INPUT R AMP IN... the tab and lifting up when the unit receives a signal from strong light such as a book on usage. Remove the battery compartment cover by mistake and drain the batteries. • Make sure the audio rack doors do not have colored glass. TX-DS777 TAPE V S IN (PLAY) R L ...
...• To avoid corrosion, remove the batteries if the remote controller is appropriate. 1 2 3 Remote control sensor STANDBY indicator 30˚ 30˚ Receiver approx. 5 m (16 feet) Installing the remote controller batteries 1. The but this unit 9 kHz 10 kHz AM FREQUENCY STEP DIGITAL INPUT R AMP IN... the tab and lifting up when the unit receives a signal from strong light such as a book on usage. Remove the battery compartment cover by mistake and drain the batteries. • Make sure the audio rack doors do not have colored glass. TX-DS777 TAPE V S IN (PLAY) R L ...

Owner Manual
Page 7
... SWITCHED TOTAL 120W 1A MAX. and Canadian models Capacity is total 100 watts. AC outlet connection You can use either of Onkyo turntables. • If the connecting device has two z connectors lined-up vertically or horizontally, you can record are a SWITCHED...CD GMD PHONO R L L L R L V S VIDEO-1 OUT IN VIDEO-2 VIDEO-3 OUT IN IN ANTENNA AM FM 75 DVD IN (REC) OUT MONITOR OUT AV RECEIVER MODEL NO. TX-DS777 IN (PLAY) R L VIDEO S VIDEO OSD SELECTOR SURROUND SPEAKERS FRONT SPEAKERS A R L R L CENTER SPEAKER CAUTION: SPEAKER IMPEDANCE 6 OHMS MIN. / SPEAKER R L ...
... SWITCHED TOTAL 120W 1A MAX. and Canadian models Capacity is total 100 watts. AC outlet connection You can use either of Onkyo turntables. • If the connecting device has two z connectors lined-up vertically or horizontally, you can record are a SWITCHED...CD GMD PHONO R L L L R L V S VIDEO-1 OUT IN VIDEO-2 VIDEO-3 OUT IN IN ANTENNA AM FM 75 DVD IN (REC) OUT MONITOR OUT AV RECEIVER MODEL NO. TX-DS777 IN (PLAY) R L VIDEO S VIDEO OSD SELECTOR SURROUND SPEAKERS FRONT SPEAKERS A R L R L CENTER SPEAKER CAUTION: SPEAKER IMPEDANCE 6 OHMS MIN. / SPEAKER R L ...
Owner Manual
Page 8
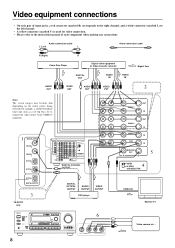
... OUTLETS AC 120V 60Hz SWITCHED TOTAL 120W 1A MAX. R L 1 DIGITAL INPUT COAXIAL 1 COAXIAL 2 OPTICAL 1 OPTICAL 2 OPTICAL DIGITAL OUTPUT 3 TX-DS777 only DIGITAL INPUT R AMP IN COAXIAL 1 COAXIAL 2 OPTICAL 1 FRONT PRE OUT FRONT SUB WOOFER CENTER OPTICAL 2 SURROUND FRONT OPTICAL DIGITAL OUTPUT SUB...VIDEO-1 VIDEO-2 VIDEO-3 VIDEO-4 TAPE FM AM PHONO C D DOWN MASTER VOLUME UP VIDEO 4/VIDEO CAM INPUT S VIDEO VIDEO L AUDIO R(MONO) AV RECEIVER TX-DS777 8 6 VIDEO 4/VIDEO CAM INPUT S VIDEO VIDEO L AUDIO R(MONO) V S OUT VIDEO-1 IN VIDEO-2 VIDEO-3 DVD OUT IN IN IN MONITOR ...
... OUTLETS AC 120V 60Hz SWITCHED TOTAL 120W 1A MAX. R L 1 DIGITAL INPUT COAXIAL 1 COAXIAL 2 OPTICAL 1 OPTICAL 2 OPTICAL DIGITAL OUTPUT 3 TX-DS777 only DIGITAL INPUT R AMP IN COAXIAL 1 COAXIAL 2 OPTICAL 1 FRONT PRE OUT FRONT SUB WOOFER CENTER OPTICAL 2 SURROUND FRONT OPTICAL DIGITAL OUTPUT SUB...VIDEO-1 VIDEO-2 VIDEO-3 VIDEO-4 TAPE FM AM PHONO C D DOWN MASTER VOLUME UP VIDEO 4/VIDEO CAM INPUT S VIDEO VIDEO L AUDIO R(MONO) AV RECEIVER TX-DS777 8 6 VIDEO 4/VIDEO CAM INPUT S VIDEO VIDEO L AUDIO R(MONO) V S OUT VIDEO-1 IN VIDEO-2 VIDEO-3 DVD OUT IN IN IN MONITOR ...
Owner Manual
Page 9
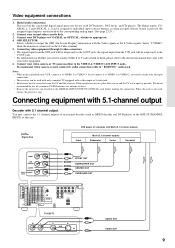
...video cassette deck. 3. When this unit. :Signal flow DVD player or a decoder with 5.1 channel output You may be used , replace the protective cap. TX-DS777 IN (PLAY) R L VIDEO S VIDEO OSD SELECTOR SURROUND SPEAKERS FRONT SPEAKERS A R L R L CENTER SPEAKER CAUTION: SPEAKER IMPEDANCE 6 OHMS MIN. /...60Hz SWITCHED TOTAL 120W 1A MAX. REMOTE CONTROL TX-DS777 R L V S DVD IN AUDIO OUT VIDEO OUT 9 The digital inputs, COAXIAL 1, 2 and OPTICAL 1, 2can be output only to make only the input connections. • This receiver can be caused between the TV and this ...
...video cassette deck. 3. When this unit. :Signal flow DVD player or a decoder with 5.1 channel output You may be used , replace the protective cap. TX-DS777 IN (PLAY) R L VIDEO S VIDEO OSD SELECTOR SURROUND SPEAKERS FRONT SPEAKERS A R L R L CENTER SPEAKER CAUTION: SPEAKER IMPEDANCE 6 OHMS MIN. /...60Hz SWITCHED TOTAL 120W 1A MAX. REMOTE CONTROL TX-DS777 R L V S DVD IN AUDIO OUT VIDEO OUT 9 The digital inputs, COAXIAL 1, 2 and OPTICAL 1, 2can be output only to make only the input connections. • This receiver can be caused between the TV and this ...

Owner Manual
Page 11
... MONITOR OUT V S AV RECEIVER MODEL NO. Connecting the speaker cable 1. Note: To prevent damage to both the right and left channel terminals simultaneously. 2. Center Speaker Surround Speaker R ch. REMOTE CONTROL TX-DS777/TX-DS676 Front SpeakerA L ch. TX-DS777 IN (PLAY) R L ... and choose speakers with impedances within the specified ranges are connected. Unscrew 3. Screw No! Connecting speakers • This receiver is designed to produce optimum sound quality when speakers with appropriate impedances for the connections. Twist wire ends very tight. 15mm...
... MONITOR OUT V S AV RECEIVER MODEL NO. Connecting the speaker cable 1. Note: To prevent damage to both the right and left channel terminals simultaneously. 2. Center Speaker Surround Speaker R ch. REMOTE CONTROL TX-DS777/TX-DS676 Front SpeakerA L ch. TX-DS777 IN (PLAY) R L ... and choose speakers with impedances within the specified ranges are connected. Unscrew 3. Screw No! Connecting speakers • This receiver is designed to produce optimum sound quality when speakers with appropriate impedances for the connections. Twist wire ends very tight. 15mm...
Owner Manual
Page 12
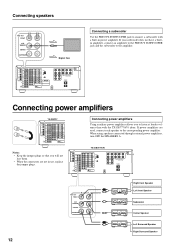
... CENTER SURROUND Right front Speaker Left front Speaker Subwoofer Center Speaker 12 Left Surround Speaker Right Surround Speaker Connecting power amplifiers TX-DS777 DIGITAL INPUT R AMP IN COAXIAL 1 COAXIAL 2 OPTICAL 1 FRONT PRE OUT FRONT SUB WOOFER CENTER OPTICAL 2 SURROUND... VIDEO-3 OUT IN IN ANTENNA AM FM 75 DVD IN (REC) OUT TAPE MONITOR OUT V S AV RECEIVER MODEL NO. When using speakers connected through external power amplifiers, turn OFF the SPEAKERS A. TX-DS777 IN (PLAY) R L VIDEO S VIDEO OSD SELECTOR SURROUND SPEAKERS FRONT SPEAKERS A R L R L CENTER...
... CENTER SURROUND Right front Speaker Left front Speaker Subwoofer Center Speaker 12 Left Surround Speaker Right Surround Speaker Connecting power amplifiers TX-DS777 DIGITAL INPUT R AMP IN COAXIAL 1 COAXIAL 2 OPTICAL 1 FRONT PRE OUT FRONT SUB WOOFER CENTER OPTICAL 2 SURROUND... VIDEO-3 OUT IN IN ANTENNA AM FM 75 DVD IN (REC) OUT TAPE MONITOR OUT V S AV RECEIVER MODEL NO. When using speakers connected through external power amplifiers, turn OFF the SPEAKERS A. TX-DS777 IN (PLAY) R L VIDEO S VIDEO OSD SELECTOR SURROUND SPEAKERS FRONT SPEAKERS A R L R L CENTER...
Owner Manual
Page 13
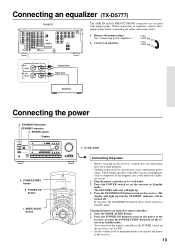
... from the remote controller: 1. Turning the power on a different circuit. 1. If this receiver's power may cause a momentary power surge, which might interfere with jumper plugs. Connecting an equalizer (TX-DS777) TX-DS777 DIGITAL INPUT R AMP IN COAXIAL 1 COAXIAL 2 OPTICAL 1 FRONT PRE OUT FRONT SUB WOOFER... VIDEO-4 TAPE FM AM PHONO C D DOWN MASTER VOLUME UP VIDEO 4/VIDEO CAM INPUT S VIDEO VIDEO L AUDIO R(MONO) AV RECEIVER TX-DS777 2. MODE AUDIO button 1. The display will light up and the STANDBY indicator will light up. 3. Press the STANDBY/ON button to...
... from the remote controller: 1. Turning the power on a different circuit. 1. If this receiver's power may cause a momentary power surge, which might interfere with jumper plugs. Connecting an equalizer (TX-DS777) TX-DS777 DIGITAL INPUT R AMP IN COAXIAL 1 COAXIAL 2 OPTICAL 1 FRONT PRE OUT FRONT SUB WOOFER... VIDEO-4 TAPE FM AM PHONO C D DOWN MASTER VOLUME UP VIDEO 4/VIDEO CAM INPUT S VIDEO VIDEO L AUDIO R(MONO) AV RECEIVER TX-DS777 2. MODE AUDIO button 1. The display will light up and the STANDBY indicator will light up. 3. Press the STANDBY/ON button to...

Owner Manual
Page 14
... as shown in the diagram. With your fingernail or a small screwdriver, press the stoppers outward and remove the cover. 1 2 3 2. Slit C Directional linkage type splitter To receiver To TV (or VCR) Directional Iinkage Do not use a directional linkage type splitter. Insert into the hole. 3. Insert the wire into the hole. Prepare the...
... as shown in the diagram. With your fingernail or a small screwdriver, press the stoppers outward and remove the cover. 1 2 3 2. Slit C Directional linkage type splitter To receiver To TV (or VCR) Directional Iinkage Do not use a directional linkage type splitter. Insert into the hole. 3. Insert the wire into the hole. Prepare the...
Owner Manual
Page 15
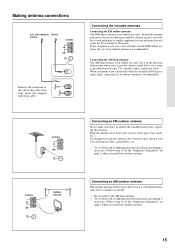
..., grounding is for indoor use only. Connecting the included antennas Connecting the FM indoor antenna: The FM indoor antenna is necessary. Set it is received. ANTENNA AM FM 75 ANTENNA AM FM 75 Outdoor antenna Connecting an FM outdoor antenna Please make sure that will be more effective if it... satisfactory with the attached FM indoor antenna, the use of distortion. Keep it with push pins or similar implements in the position that you receive the clearest sound. If the reception is dangerous to put the antenna close to power lines. Put it in the direction and position where ...
..., grounding is for indoor use only. Connecting the included antennas Connecting the FM indoor antenna: The FM indoor antenna is necessary. Set it is received. ANTENNA AM FM 75 ANTENNA AM FM 75 Outdoor antenna Connecting an FM outdoor antenna Please make sure that will be more effective if it... satisfactory with the attached FM indoor antenna, the use of distortion. Keep it with push pins or similar implements in the position that you receive the clearest sound. If the reception is dangerous to put the antenna close to power lines. Put it in the direction and position where ...
Owner Manual
Page 18
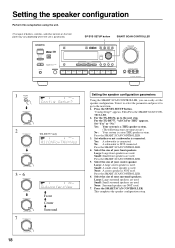
... CH LEVEL MODE DVD VIDEO-1 VIDEO-2 VIDEO-3 VIDEO-4 TAPE FM AM PHONO C D DOWN MASTER VOLUME UP VIDEO 4/VIDEO CAM INPUT S VIDEO VIDEO L AUDIO R(MONO) AV RECEIVER TX-DS777 1 SP/SYS SETUP SPEAKERS A TUNED AUTO PRESET/MODE ADJ 2 PUSH TO ENTER PRESET/MODE ADJ PUSH TO ENTER PRESET/MODE ADJ... TX-DS777 only SPEAKERS A TUNED AUTO PUSH TO ENTER 3 ~ 6 PRESET/MODE ADJ PUSH TO ENTER PRESET/MODE ADJ 7 PUSH TO ENTER PRESET/MODE ADJ SPEAKERS A Front Center ...
... CH LEVEL MODE DVD VIDEO-1 VIDEO-2 VIDEO-3 VIDEO-4 TAPE FM AM PHONO C D DOWN MASTER VOLUME UP VIDEO 4/VIDEO CAM INPUT S VIDEO VIDEO L AUDIO R(MONO) AV RECEIVER TX-DS777 1 SP/SYS SETUP SPEAKERS A TUNED AUTO PRESET/MODE ADJ 2 PUSH TO ENTER PRESET/MODE ADJ PUSH TO ENTER PRESET/MODE ADJ... TX-DS777 only SPEAKERS A TUNED AUTO PUSH TO ENTER 3 ~ 6 PRESET/MODE ADJ PUSH TO ENTER PRESET/MODE ADJ 7 PUSH TO ENTER PRESET/MODE ADJ SPEAKERS A Front Center ...

Owner Manual
Page 24
... radio station (FM mode) When you press the TUNING UP/DOWN button. • In FM, if this button is sufficiently strong. If the signal is received, scanning stops. • The European model allows you want to change the indication as follows. Use the TUNING UP/DOWN buttons to listen. When a broadcast..., the station will be in mono and interstation noise will change the fre- DISPLAY button Pressing the DISPLAY button each time you tune in to receive RDS broadcasts. Select the station to which you to the desired station. At this case, tune in a radio station 1.
... radio station (FM mode) When you press the TUNING UP/DOWN button. • In FM, if this button is sufficiently strong. If the signal is received, scanning stops. • The European model allows you want to change the indication as follows. Use the TUNING UP/DOWN buttons to listen. When a broadcast..., the station will be in mono and interstation noise will change the fre- DISPLAY button Pressing the DISPLAY button each time you tune in to receive RDS broadcasts. Select the station to which you to the desired station. At this case, tune in a radio station 1.

Owner Manual
Page 25
.../MODE ADJ PUSH TO ENTER 4 PRESET/MODE ADJ PUSH TO ENTER 5 PRESET/MODE ADJ MEMORY SPEAKERS A DSP TUNED AUTO ch Programming radio stations 1. " appears. 3. The received station will be stored in the specified preset number. • A total of 40 stations can be stored in the memory. Press the CHARACTER/MEMORY button...
.../MODE ADJ PUSH TO ENTER 4 PRESET/MODE ADJ PUSH TO ENTER 5 PRESET/MODE ADJ MEMORY SPEAKERS A DSP TUNED AUTO ch Programming radio stations 1. " appears. 3. The received station will be stored in the specified preset number. • A total of 40 stations can be stored in the memory. Press the CHARACTER/MEMORY button...
Owner Manual
Page 26
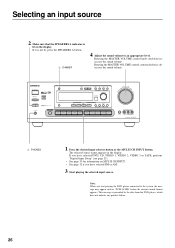
... CH LEVEL MODE DVD VIDEO-1 VIDEO-2 VIDEO-3 VIDEO-4 TAPE FM AM PHONO C D DOWN MASTER VOLUME UP VIDEO 4/VIDEO CAM INPUT S VIDEO VIDEO L AUDIO R(MONO) AV RECEIVER TX-DS777 4 PHONES 1. Selecting an input source 2. Make sure that the SPEAKERS A indicator is lit on the display.
... CH LEVEL MODE DVD VIDEO-1 VIDEO-2 VIDEO-3 VIDEO-4 TAPE FM AM PHONO C D DOWN MASTER VOLUME UP VIDEO 4/VIDEO CAM INPUT S VIDEO VIDEO L AUDIO R(MONO) AV RECEIVER TX-DS777 4 PHONES 1. Selecting an input source 2. Make sure that the SPEAKERS A indicator is lit on the display.
Owner Manual
Page 27
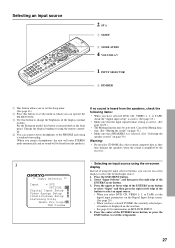
... parameters on the Digital Input Setup screen. (See page 29.) • When you can operate the TX-DS777/676. 3 Use this button to set the sleep timer. (See page 31.) 2 Press this button is amplified by the receiver. 3 ** Input Selector ** Input = DVD OPTICAL 1 Digital Input Setup Video Assign Setup IntelliVolume Setup Listening Dolby...
... parameters on the Digital Input Setup screen. (See page 29.) • When you can operate the TX-DS777/676. 3 Use this button to set the sleep timer. (See page 31.) 2 Press this button is amplified by the receiver. 3 ** Input Selector ** Input = DVD OPTICAL 1 Digital Input Setup Video Assign Setup IntelliVolume Setup Listening Dolby...
Owner Manual
Page 30
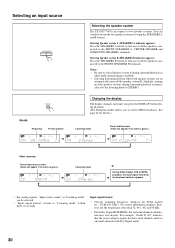
... for three front channels and two surround channels in Dolby Digital mode. 30 Selecting an input source A SPEAKERS B Selecting the speaker system The TX-DS777/676 can connect to two speaker systems. You can be selected. • "Input signal format" returns to "Listening mode" within three (3)... 44.1 kHz"). Selecting Speaker system A (SPEAKERS A indicator appears.) Press the SPEAKERS A button to turn on or off the speakers connected to receive RDS broadcasts. Notes: • Be sure to select Speaker system A during playback. (The European model allows you to the FRONT SPEAKERS B ...
... for three front channels and two surround channels in Dolby Digital mode. 30 Selecting an input source A SPEAKERS B Selecting the speaker system The TX-DS777/676 can connect to two speaker systems. You can be selected. • "Input signal format" returns to "Listening mode" within three (3)... 44.1 kHz"). Selecting Speaker system A (SPEAKERS A indicator appears.) Press the SPEAKERS A button to turn on or off the speakers connected to receive RDS broadcasts. Notes: • Be sure to select Speaker system A during playback. (The European model allows you to the FRONT SPEAKERS B ...
Owner Manual
Page 31
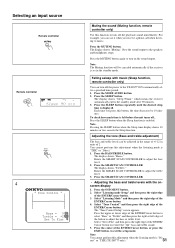
...the ENTER/Cursor button. The "Tone Control Setup" screen appears. Press the center of the button to adjust the treble level. 3. rect" or "THX (TX-DS777 only)." The display shows "Muting." Adjusting the tone (Bass and treble adjustment) The bass and treble levels can use it when you press this button...Treble=." Select "Set to Flat" and then press the right edge of the ENTER/Cursor button 4. For example, you can be canceled automatically if the receiver is left edge of the ENTER/Cursor button, or press the EXIT button, to the TX-DS777/676 automatically after 90 minutes. 3.
...the ENTER/Cursor button. The "Tone Control Setup" screen appears. Press the center of the button to adjust the treble level. 3. rect" or "THX (TX-DS777 only)." The display shows "Muting." Adjusting the tone (Bass and treble adjustment) The bass and treble levels can use it when you press this button...Treble=." Select "Set to Flat" and then press the right edge of the ENTER/Cursor button 4. For example, you can be canceled automatically if the receiver is left edge of the ENTER/Cursor button, or press the EXIT button, to the TX-DS777/676 automatically after 90 minutes. 3.


