

Owner Manual
Page 1
...TX-DS575X Instruction Manual Contents Before using Important Safeguards 2 Precautions 3 Features 4 Supplied accessories 4 Before operating this unit 5 Preparation Audio equipment connections .......... 6 Video equipment connections .......... 7 Connecting other devices into the RC-392M 34 Using a Macro function 36 Appendix Troubleshooting guide 40 Specifications 41 Control guide Control positions and names .......... 42 Please retain this manual...Tuning in this manual will enable you for future reference. Please read this manual for purchasing the Onkyo AV Receiver. ...
...TX-DS575X Instruction Manual Contents Before using Important Safeguards 2 Precautions 3 Features 4 Supplied accessories 4 Before operating this unit 5 Preparation Audio equipment connections .......... 6 Video equipment connections .......... 7 Connecting other devices into the RC-392M 34 Using a Macro function 36 Appendix Troubleshooting guide 40 Specifications 41 Control guide Control positions and names .......... 42 Please retain this manual...Tuning in this manual will enable you for future reference. Please read this manual for purchasing the Onkyo AV Receiver. ...
Owner Manual
Page 3
...to BS1362. AC Fuse The fuse is located inside the chassis and is approved by turning the equipment off the dirt. Following this instruction manual is fitted in particular, specifies that the cable ground shall be replaced, please ensure that it out dry, and wipe...should wipe the front and rear panels and the cabinet with a voltage selector to conform to Article 820-40 of the power supply in your Onkyo authorized service station. 4. These limits are coloured in accordance with the following measures: • Reorient or relocate the receiving antenna. • ...
...to BS1362. AC Fuse The fuse is located inside the chassis and is approved by turning the equipment off the dirt. Following this instruction manual is fitted in particular, specifies that the cable ground shall be replaced, please ensure that it out dry, and wipe...should wipe the front and rear panels and the cabinet with a voltage selector to conform to Article 820-40 of the power supply in your Onkyo authorized service station. 4. These limits are coloured in accordance with the following measures: • Reorient or relocate the receiving antenna. • ...
Owner Manual
Page 6
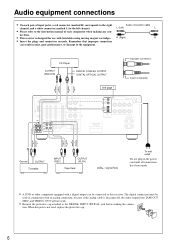
Remember that improper connection can be used , replace the protective cap. 6 The digital connection must be connected to the instruction manual of each pair of input jacks, a red connector (marked R) corresponds to the right Audio connection cable channel, and a white...8226; A DVD or other component equipped with turntables using moving magnet cartridges. R (Right) R • Insert the plugs and connectors securely. TX-DS575X Ground OUTPUT Turntable INPUT (REC) OUTPUT (PLAY) Tape Deck : signal flow To wall outlet Do not plug in noise, poor performance, or damage...
Remember that improper connection can be used , replace the protective cap. 6 The digital connection must be connected to the instruction manual of each pair of input jacks, a red connector (marked R) corresponds to the right Audio connection cable channel, and a white...8226; A DVD or other component equipped with turntables using moving magnet cartridges. R (Right) R • Insert the plugs and connectors securely. TX-DS575X Ground OUTPUT Turntable INPUT (REC) OUTPUT (PLAY) Tape Deck : signal flow To wall outlet Do not plug in noise, poor performance, or damage...
Owner Manual
Page 7
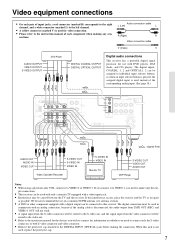
... you need to connect only the S-video connector, or both S-video connector and video connector. • Remove the protective cap attached to the instruction manual of each pair of input jacks, a red connector (marked R) corresponds to the right channel, and a white connector (marked L) to the left ...do not recommend the use with a video input jack. • Interference may be used , replace the protective cap. 7 When this receiver. TX-DS575X : signal flow AUDIO OUT AUDIO IN VIDEO OUT S-VIDEO OUT S-VIDEO IN VIDEO IN Video Cassette Recorder S-VIDEO IN VIDEO IN Monitor TV S-...
... you need to connect only the S-video connector, or both S-video connector and video connector. • Remove the protective cap attached to the instruction manual of each pair of input jacks, a red connector (marked R) corresponds to the right channel, and a white connector (marked L) to the left ...do not recommend the use with a video input jack. • Interference may be used , replace the protective cap. 7 When this receiver. TX-DS575X : signal flow AUDIO OUT AUDIO IN VIDEO OUT S-VIDEO OUT S-VIDEO IN VIDEO IN Video Cassette Recorder S-VIDEO IN VIDEO IN Monitor TV S-...
Owner Manual
Page 8
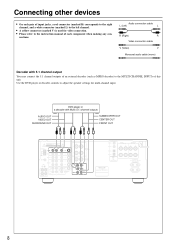
...) to adjust the speaker settings for video connection. • Please refer to the instruction manual of this unit. Use the DVD player or decoder controls to the MULTI CHANNEL INPUTs of each component when making any con- TX-DS575X 8 nections. AV RECEIVER MODEL NO. Audio connection cable L (Left) L R (Right) R Video connection cable V (Video...
...) to adjust the speaker settings for video connection. • Please refer to the instruction manual of this unit. Use the DVD player or decoder controls to the MULTI CHANNEL INPUTs of each component when making any con- TX-DS575X 8 nections. AV RECEIVER MODEL NO. Audio connection cable L (Left) L R (Right) R Video connection cable V (Video...
Owner Manual
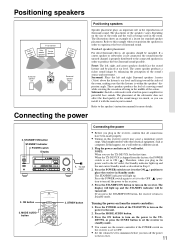
Page 11
...switch is set to OFF. • Set the volume level to minimum before you position the speakers in order to the speaker's instruction manual for standard speaker placement. Standard speaker placement For ideal Surround effects, all connections have been made properly. • Turning on this receiver...EQ CONTROL MULTI CH INPUT DVD VIDEO 1 VIDEO 2 VIDEO 3 TAPE FM AM PHONO C D DOWN MASTER VOLUME UP BASS TREBLE AV RECEIVER TX-DS575X 1. Refer to the receiver. 3. The display will light up and the STANDBY indicator will light up and the unit enters Standby mode as ...
...switch is set to OFF. • Set the volume level to minimum before you position the speakers in order to the speaker's instruction manual for standard speaker placement. Standard speaker placement For ideal Surround effects, all connections have been made properly. • Turning on this receiver...EQ CONTROL MULTI CH INPUT DVD VIDEO 1 VIDEO 2 VIDEO 3 TAPE FM AM PHONO C D DOWN MASTER VOLUME UP BASS TREBLE AV RECEIVER TX-DS575X 1. Refer to the receiver. 3. The display will light up and the STANDBY indicator will light up and the unit enters Standby mode as ...
Owner Manual
Page 24
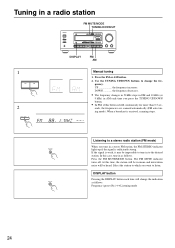
... EFFECT Re-EQ LFE LEVEL CONTROL MULTI CH INPUT DVD VIDEO 1 VIDEO 2 VIDEO 3 TAPE FM AM PHONO C D DOWN MASTER VOLUME UP BASS TREBLE AV RECEIVER TX-DS575X DISPLAY FM AM 1 FM AM 2 DOWN TUNING UP Manual tuning 1.
... EFFECT Re-EQ LFE LEVEL CONTROL MULTI CH INPUT DVD VIDEO 1 VIDEO 2 VIDEO 3 TAPE FM AM PHONO C D DOWN MASTER VOLUME UP BASS TREBLE AV RECEIVER TX-DS575X DISPLAY FM AM 1 FM AM 2 DOWN TUNING UP Manual tuning 1.
Owner Manual
Page 29
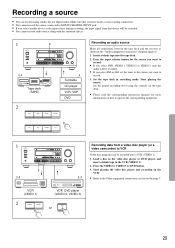
... tape into the tape deck. 2. Set the proper recording level using the controls on the tape deck. • Please read the corresponding instruction manuals for the source you want to record. • If you select DVD, VIDEO 1, VIDEO 2 or VIDEO 3, only the audio will be ...EQ LFE LEVEL CONTROL MULTI CH INPUT DVD VIDEO 1 VIDEO 2 VIDEO 3 TAPE FM AM PHONO C D DOWN MASTER VOLUME BASS TREBLE AV RECEIVER TX-DS575X 2 1·3 Recording data from that you have made a correct analog connection. • You cannot record the source connected to MULTI CHANNEL INPUT jack...
... tape into the tape deck. 2. Set the proper recording level using the controls on the tape deck. • Please read the corresponding instruction manuals for the source you want to record. • If you select DVD, VIDEO 1, VIDEO 2 or VIDEO 3, only the audio will be ...EQ LFE LEVEL CONTROL MULTI CH INPUT DVD VIDEO 1 VIDEO 2 VIDEO 3 TAPE FM AM PHONO C D DOWN MASTER VOLUME BASS TREBLE AV RECEIVER TX-DS575X 2 1·3 Recording data from that you have made a correct analog connection. • You cannot record the source connected to MULTI CHANNEL INPUT jack...
Owner Manual
Page 30
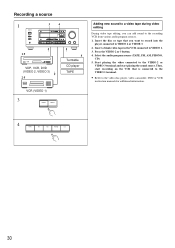
...Then, start playing the sound source. Insert a blank video tape in the VCR connected to the video disc player, video camcorder, DVD or VCR instruction manuals for additional information. 4 TAPE FM AM PHONO C D 30 Recording a source 1 STANDBY/ON STANDBY POWER ON OFF A SPEAKERS B PHONES 3 4...Re-EQ LFE LEVEL CONTROL MULTI CH INPUT DVD VIDEO 1 VIDEO 2 VIDEO 3 TAPE FM AM PHONO C D DOWN MASTER VOLUME UP BASS TREBLE AV RECEIVER TX-DS575X 1·5 VDP, VCR, DVD (VIDEO 2, VIDEO 3) 2·5 5 Turntable CD player TAPE VCR (VIDEO 1) 3 VIDEO 2 VIDEO 3 Adding new ...
...Then, start playing the sound source. Insert a blank video tape in the VCR connected to the video disc player, video camcorder, DVD or VCR instruction manuals for additional information. 4 TAPE FM AM PHONO C D 30 Recording a source 1 STANDBY/ON STANDBY POWER ON OFF A SPEAKERS B PHONES 3 4...Re-EQ LFE LEVEL CONTROL MULTI CH INPUT DVD VIDEO 1 VIDEO 2 VIDEO 3 TAPE FM AM PHONO C D DOWN MASTER VOLUME UP BASS TREBLE AV RECEIVER TX-DS575X 1·5 VDP, VCR, DVD (VIDEO 2, VIDEO 3) 2·5 5 Turntable CD player TAPE VCR (VIDEO 1) 3 VIDEO 2 VIDEO 3 Adding new ...

Owner Manual
Page 34
... off . You may be impossible to store the remote controller codes into the RC-392M or the product may select any button for the Onkyo CD player, tape deck, DVD player, and MD recorder have priority for programming. • If you release the buttons, the SEND/LEARN..., the indicator lights up . Press and hold down , it will be memorized using the infrared system; Operate the programmed button to the instruction manual for which button functions have already been programmed into the buttons on the RC-392M. • For instructions regarding the operation of "learned" units...
... off . You may be impossible to store the remote controller codes into the RC-392M or the product may select any button for the Onkyo CD player, tape deck, DVD player, and MD recorder have priority for programming. • If you release the buttons, the SEND/LEARN..., the indicator lights up . Press and hold down , it will be memorized using the infrared system; Operate the programmed button to the instruction manual for which button functions have already been programmed into the buttons on the RC-392M. • For instructions regarding the operation of "learned" units...
Owner Manual
Page 40
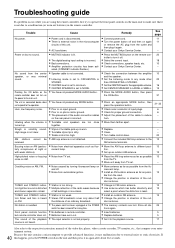
...10 - 10 22 16 15 31 31~33 6 6 - - - - 20 12 13 13 13 - 13 12 13 13 25 5 5 17 Also refer to the respective instruction manuals of turntable pick-up is worn. • Turntable stylus tip is dirty. • Treble control too high. • AM loop antenna is incorrect. • Bad...and stereo separation is recalled. door antenna. • The memory contents are using the remote controller, first try to make sure that compose your Onkyo Service Center. • Check the connection between the amplifier and the speaker. • Set the Listening mode to any mode other than ...
...10 - 10 22 16 15 31 31~33 6 6 - - - - 20 12 13 13 13 - 13 12 13 13 25 5 5 17 Also refer to the respective instruction manuals of turntable pick-up is worn. • Turntable stylus tip is dirty. • Treble control too high. • AM loop antenna is incorrect. • Bad...and stereo separation is recalled. door antenna. • The memory contents are using the remote controller, first try to make sure that compose your Onkyo Service Center. • Check the connection between the amplifier and the speaker. • Set the Listening mode to any mode other than ...

