
Owner Manual
Page 1
... Using preset stations 27 Receiving RDS broadcasts (European models,only) 29. Contents Before using Important Safeguards 2 Precautions 3 Features 4 Supplied accessories 4 Introduction 5 Before operating this manual for future reference. Entering characters 31 Recording"a'source 32 Using TAPE-2 MONITOR 34 Programming remote controller codes 35 ConnectiOn for purchasing the Onkyo Audio Video Control Receiver. Following the instructions in anoiherroom 39: A few important notes Troubleshooting guide 40 Specifications 41 Control positions and names 42 Remote...
... Using preset stations 27 Receiving RDS broadcasts (European models,only) 29. Contents Before using Important Safeguards 2 Precautions 3 Features 4 Supplied accessories 4 Introduction 5 Before operating this manual for future reference. Entering characters 31 Recording"a'source 32 Using TAPE-2 MONITOR 34 Programming remote controller codes 35 ConnectiOn for purchasing the Onkyo Audio Video Control Receiver. Following the instructions in anoiherroom 39: A few important notes Troubleshooting guide 40 Specifications 41 Control positions and names 42 Remote...

Owner Manual
Page 2
... is still trouble, the user should be located away from the outlet when left unused for the grounding electrode. Carts and Stands - PORTABLE CART WARNING mended by the manufacturer. 8. Quick stops, excessive force, and uneven surfaces may impede the flow ...used near a bathtub, washbowl, kitchen sink, laundry tub, in the operating instructions. The appliance has been exposed to overturn. The appliance should seek the services of the plug is recom- NATIONAL ELECTRICAL CODE S2898A An outdoor antenna should the user attempt to operate normally or exhibits a marked change...
... is still trouble, the user should be located away from the outlet when left unused for the grounding electrode. Carts and Stands - PORTABLE CART WARNING mended by the manufacturer. 8. Quick stops, excessive force, and uneven surfaces may impede the flow ...used near a bathtub, washbowl, kitchen sink, laundry tub, in the operating instructions. The appliance has been exposed to overturn. The appliance should seek the services of the plug is recom- NATIONAL ELECTRICAL CODE S2898A An outdoor antenna should the user attempt to operate normally or exhibits a marked change...

Owner Manual
Page 3
... the point of cable entry as follows: The wire which is coloured blue must be connected to the terminal which can be replaced, please ensure that the replacement fuse has a rating of 5 amps and that interference will be performed only by turning the equipment off the dirt. For British model Replacement and mounting of an AC plug on the power supply cord...
... the point of cable entry as follows: The wire which is coloured blue must be connected to the terminal which can be replaced, please ensure that the replacement fuse has a rating of 5 amps and that interference will be performed only by turning the equipment off the dirt. For British model Replacement and mounting of an AC plug on the power supply cord...

Owner Manual
Page 4
... 5.1 channel pristine digital audio on (audio triggered). no channel information is turned on DVDs, HDTV and other sources. ■ 5.1 CHANNEL EXTERNAL INPUTS gives you the option of connecting an additional 5.1 channel decoder for theaters will sound-also gives you boost ultra-low frequencies to 90 minutes (10 min. jazz, rock, news, for example-and scan them . • 3 STATION-GROUP PRESETS to write a descriptive label for maximum home theater enjoyment (operated by remote...
... 5.1 channel pristine digital audio on (audio triggered). no channel information is turned on DVDs, HDTV and other sources. ■ 5.1 CHANNEL EXTERNAL INPUTS gives you the option of connecting an additional 5.1 channel decoder for theaters will sound-also gives you boost ultra-low frequencies to 90 minutes (10 min. jazz, rock, news, for example-and scan them . • 3 STATION-GROUP PRESETS to write a descriptive label for maximum home theater enjoyment (operated by remote...
Owner Manual
Page 5
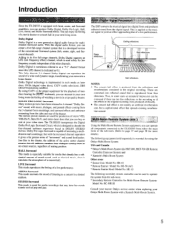
... its on-screen sources, regardless of a concert hall. Dolby Digital technology is implemented in the theater, the addition of the active center channel ensures that of a live performance. I H Consult your nearest Onkyo service center when replacing your own living room. Dolby Digital Dolby Digital is a new-generation digital audio format for Multi-Room Remote System: Model No. The TX-DS555 incorporates the Digital Dolby Pro Logic Surround Circuit, which is used for production of stereo VHS, VHS...
... its on-screen sources, regardless of a concert hall. Dolby Digital technology is implemented in the theater, the addition of the active center channel ensures that of a live performance. I H Consult your nearest Onkyo service center when replacing your own living room. Dolby Digital Dolby Digital is a new-generation digital audio format for Multi-Room Remote System: Model No. The TX-DS555 incorporates the Digital Dolby Pro Logic Surround Circuit, which is used for production of stereo VHS, VHS...
Owner Manual
Page 6
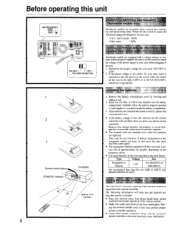
o0e0j °00- Before operating this unit AM FREQUENCY STEP 10kHz 9kHz ■ 00_0 00- -0 00::0 00• 00--0 Qa 00---0 • 3.'
o0e0j °00- Before operating this unit AM FREQUENCY STEP 10kHz 9kHz ■ 00_0 00- -0 00::0 00• 00--0 Qa 00---0 • 3.'
Owner Manual
Page 7
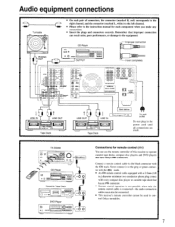
... the power cord until all connections are made. Never connect it to the black connector with every compact disc player or cassette tape deck that improper connection can use the remote controller of this receiver to operate cassette tape decks, compact disc players and DVD players that have Onkyo R I connectors. the audio connection cables must also be connected. • This receiver's remote controller cannot be used to the equipment. CD Player Improper connection O 2• o 0 .0000 ; TX-DS555...
... the power cord until all connections are made. Never connect it to the black connector with every compact disc player or cassette tape deck that improper connection can use the remote controller of this receiver to operate cassette tape decks, compact disc players and DVD players that have Onkyo R I connectors. the audio connection cables must also be connected. • This receiver's remote controller cannot be used to the equipment. CD Player Improper connection O 2• o 0 .0000 ; TX-DS555...

Owner Manual
Page 10
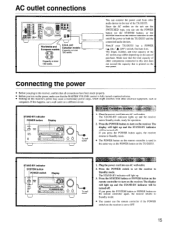
Turn the SMART SCAN CONTROLLER to "VIDEO-2". Provided that the IPM system works correctly with Multi channel outputs EC= You may connect the 5.1 channel outputs of the TX-DS555. 10 AUDIO OUT VIDEO OUT 6d 6-o OO -OO O0 SUBWOOFER OUT MULTI CHANNEL FRONT OUT SURROUND OUT CENTER OUT 1,..0toe 111 oC) li CAUTIOITUAG ',corm:von IRMO= ONICVO• MOM.NG TX-03658 0••••0*.: 01 "04/11111 Monitor TV AUDIO OUT...
Turn the SMART SCAN CONTROLLER to "VIDEO-2". Provided that the IPM system works correctly with Multi channel outputs EC= You may connect the 5.1 channel outputs of the TX-DS555. 10 AUDIO OUT VIDEO OUT 6d 6-o OO -OO O0 SUBWOOFER OUT MULTI CHANNEL FRONT OUT SURROUND OUT CENTER OUT 1,..0toe 111 oC) li CAUTIOITUAG ',corm:von IRMO= ONICVO• MOM.NG TX-03658 0••••0*.: 01 "04/11111 Monitor TV AUDIO OUT...

Owner Manual
Page 11
... Surround sound. NOTE: To prevent damage to the speaker's instruction manual for powerful bass sounds. Subwoofer: Install a subwoofer with the room layout in order to this example when you can install it [0 I •oF aacers Speaker placement plays an important role in the room. Refer to circuitry, never short-circuit the positive (+) and negative (-) speaker wires. Front: The left and right Surround speakers 1 meter (3 feet) above the listener's ear level...
... Surround sound. NOTE: To prevent damage to the speaker's instruction manual for powerful bass sounds. Subwoofer: Install a subwoofer with the room layout in order to this example when you can install it [0 I •oF aacers Speaker placement plays an important role in the room. Refer to circuitry, never short-circuit the positive (+) and negative (-) speaker wires. Front: The left and right Surround speakers 1 meter (3 feet) above the listener's ear level...
Owner Manual
Page 15
... MASTER VOLUME control is set the receiver to turn it on the area of the TX-DS555. Note:If your TX-DS555 has a POWER (.a ON / A. and Canadian models STAND-BY indicator POWER button Display O e=1 0 0 0 To wall outlet 1. The STAND-BY indicator will light up and the STAND-BY indicator will light up . 3. U.S. Since the AC outlets on the unit are the SWITCHED type, you press the POWER button again, the receiver returns...
... MASTER VOLUME control is set the receiver to turn it on the area of the TX-DS555. Note:If your TX-DS555 has a POWER (.a ON / A. and Canadian models STAND-BY indicator POWER button Display O e=1 0 0 0 To wall outlet 1. The STAND-BY indicator will light up and the STAND-BY indicator will light up . 3. U.S. Since the AC outlets on the unit are the SWITCHED type, you press the POWER button again, the receiver returns...

Owner Manual
Page 16
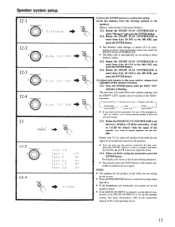
... select STEREO or DOLBY 3 stereo as follows. 3. Press the ENTER button. Rotate the SMART SCAN CONTROLLER to select "System Setup" and press the ENTER button. Surround R ch. NON(None): Select when center and surround speakers are "Surround LRG (large)," "Surround SML (small)," and "Surround NON (none)." 10. You can set a front speaker parameter. Options are not used. Rotate the SMART SCAN CONTROLLER to select the desired option. Options are re-directed to the subwoofer...
... select STEREO or DOLBY 3 stereo as follows. 3. Press the ENTER button. Rotate the SMART SCAN CONTROLLER to select "System Setup" and press the ENTER button. Surround R ch. NON(None): Select when center and surround speakers are "Surround LRG (large)," "Surround SML (small)," and "Surround NON (none)." 10. You can set a front speaker parameter. Options are not used. Rotate the SMART SCAN CONTROLLER to select the desired option. Options are re-directed to the subwoofer...
Owner Manual
Page 17
... the MULTI-CH INPUT is selected, use the remote controller for this step: press the CH.SEL button to select a speaker and press the LEVEL • and V buttons to the instruction manual of the corresponding device. 17 NOTE: • The speakers do not produce sound while you are setting up the system. • Press the PARAMETER button to cancel the system setup operation. • If the headphones are connected, you...
... the MULTI-CH INPUT is selected, use the remote controller for this step: press the CH.SEL button to select a speaker and press the LEVEL • and V buttons to the instruction manual of the corresponding device. 17 NOTE: • The speakers do not produce sound while you are setting up the system. • Press the PARAMETER button to cancel the system setup operation. • If the headphones are connected, you...
Owner Manual
Page 18
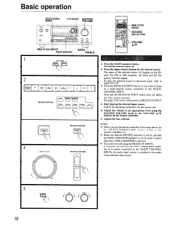
...SUB ROOM/LEARN selector switch on the remote controller. 5. Follow the operating instructions for the desired source. If you wish to listen to a multi-channel source connected to an appropriate level using the MULTI-CH INPUTs. The name of the selected video source. .. - , o , Mw _ - . MA, VOLUME T 5 3-D BASS BASS \ \ . . Note that the TAPE-2 MONITOR indicator is not lit when a source other than TAPE-2 MONITOR is switched to the MULTI CHANNEL INPUTs, the audio input source is selected. • You cannot record using the MASTER VOLUME knob or the VOLUME A / V buttons...
...SUB ROOM/LEARN selector switch on the remote controller. 5. Follow the operating instructions for the desired source. If you wish to listen to a multi-channel source connected to an appropriate level using the MULTI-CH INPUTs. The name of the selected video source. .. - , o , Mw _ - . MA, VOLUME T 5 3-D BASS BASS \ \ . . Note that the TAPE-2 MONITOR indicator is not lit when a source other than TAPE-2 MONITOR is switched to the MULTI CHANNEL INPUTs, the audio input source is selected. • You cannot record using the MASTER VOLUME knob or the VOLUME A / V buttons...
Owner Manual
Page 19
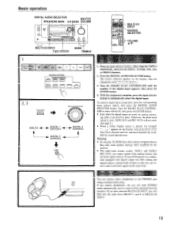
... the audio from the speakers. Turn the SMART SCAN CONTROLLER until the number of the three front channels and two surround channels are used, the analog connect- Otherwise, the multi-room remote system, TAPE OUT, and REC OUTs will be left for sound reproduction. With the assignment complete, press the input selector button to the PHONES jack using a standard stereo plug. 0 If you connect headphones, the unit will enter STEREO mode automatically, and no sound will not work...
... the audio from the speakers. Turn the SMART SCAN CONTROLLER until the number of the three front channels and two surround channels are used, the analog connect- Otherwise, the multi-room remote system, TAPE OUT, and REC OUTs will be left for sound reproduction. With the assignment complete, press the input selector button to the PHONES jack using a standard stereo plug. 0 If you connect headphones, the unit will enter STEREO mode automatically, and no sound will not work...
Owner Manual
Page 20
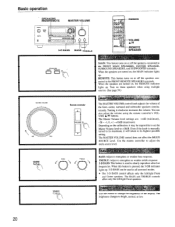
... setting. TREBLE: Adjust to strengthen or weaken treble response. 3-D BASS: This button is pressed, the 3-DB indicator lights up . REMOTE: This button turns on the calibration, it clockwise increases the volume. DIMMER DIMMER hutton Remote'controller only Use this button is used in all surround modes. • The 3-D BASS control affects only the left /right Front speakers. You can be impossible to set the Master Volume level to change the brightness of the front, center, surround and subwoofer speakers simultaneously. The BASS...
... setting. TREBLE: Adjust to strengthen or weaken treble response. 3-D BASS: This button is pressed, the 3-DB indicator lights up . REMOTE: This button turns on the calibration, it clockwise increases the volume. DIMMER DIMMER hutton Remote'controller only Use this button is used in all surround modes. • The 3-D BASS control affects only the left /right Front speakers. You can be impossible to set the Master Volume level to change the brightness of the front, center, surround and subwoofer speakers simultaneously. The BASS...
Owner Manual
Page 22
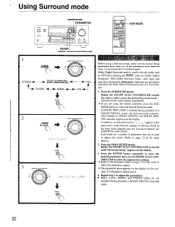
... MODE p1 Before using the remote controller, press the SUR. Surround mode names appear sequentially. • If you are decoded to reproduce the multi-channel Surround sound of a DOLBY DIGITAL source, the Surround mode automatically changes to decode media such as 2 ch " appears in which of parameters that can be used to DOLBY DIGITAL and DOLBY DIGITAL indicator lights up on the display for more details.) 2. • Using Surround mode SURROUND PARAMETER a- If the parameters have been set...
... MODE p1 Before using the remote controller, press the SUR. Surround mode names appear sequentially. • If you are decoded to reproduce the multi-channel Surround sound of a DOLBY DIGITAL source, the Surround mode automatically changes to decode media such as 2 ch " appears in which of parameters that can be used to DOLBY DIGITAL and DOLBY DIGITAL indicator lights up on the display for more details.) 2. • Using Surround mode SURROUND PARAMETER a- If the parameters have been set...

Owner Manual
Page 24
... display. The size can select from seven settings between 0.6 and 1.4. 24 Raising the setting increases the effect sound level. Using Surround mode ';7Z! 747,1 47.7.Trr,:t Wing the SUrround mode parameteretM: LFE (Low Frequency Effect) Level Attenuation If the reproduced bass is too loud, set this parameter to "ON" to narrow the dynamic range of the reproduced sound to make it is available only in Dolby Digital and Dolby Pro Logic Surround and Multi channel input modes...
... display. The size can select from seven settings between 0.6 and 1.4. 24 Raising the setting increases the effect sound level. Using Surround mode ';7Z! 747,1 47.7.Trr,:t Wing the SUrround mode parameteretM: LFE (Low Frequency Effect) Level Attenuation If the reproduced bass is too loud, set this parameter to "ON" to narrow the dynamic range of the reproduced sound to make it is available only in Dolby Digital and Dolby Pro Logic Surround and Multi channel input modes...

Owner Manual
Page 33
... display. The selected music source is flashing, select the audio source using the VCR tuner con- Ing back arid recoidift6 ai1170it:1177- The picture will be sent to the TV/monitor and the FM stereo sound will be sent to the VIDEO-1 INPUT. 2. You can record a TV broadcast with FM sound, begin recording on a VCR connected to "Tuning broadcasting stations" on page 26 or "Recalling preset stations" on the video and audio sources. Recording a source 1 DVD VIDEO...
... display. The selected music source is flashing, select the audio source using the VCR tuner con- Ing back arid recoidift6 ai1170it:1177- The picture will be sent to the TV/monitor and the FM stereo sound will be sent to the VIDEO-1 INPUT. 2. You can record a TV broadcast with FM sound, begin recording on a VCR connected to "Tuning broadcasting stations" on page 26 or "Recalling preset stations" on the video and audio sources. Recording a source 1 DVD VIDEO...
Owner Manual
Page 34
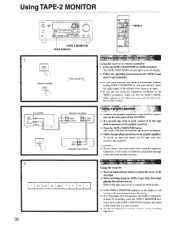
...and listen to the TAPE-2 connectors on will result in the display is used , connect it to start playing the selected source. Press an input selector button to select the source to the TAPE-2 connectors is not lit, you have selected the MULTI-CHANNEL INPUT, turning TAPE-2 MONITOR on the rear panel of the selected video input as -?0 0 aJi 00 F-Ltn r_qk, en at, TAPE-2 TAPE 2 MONITOR Input selector TAPE -2 MONITOR Remote controller TAPE -2 4, TAPE-2 MONITOR TX-DS555 R L OUT (REC) IN O c (PLAY) TAPE 2 1 it will automatically select the audio signal of the TX-DS555. 2. Start...
...and listen to the TAPE-2 connectors on will result in the display is used , connect it to start playing the selected source. Press an input selector button to select the source to the TAPE-2 connectors is not lit, you have selected the MULTI-CHANNEL INPUT, turning TAPE-2 MONITOR on the rear panel of the selected video input as -?0 0 aJi 00 F-Ltn r_qk, en at, TAPE-2 TAPE 2 MONITOR Input selector TAPE -2 MONITOR Remote controller TAPE -2 4, TAPE-2 MONITOR TX-DS555 R L OUT (REC) IN O c (PLAY) TAPE 2 1 it will automatically select the audio signal of the TX-DS555. 2. Start...
Owner Manual
Page 39
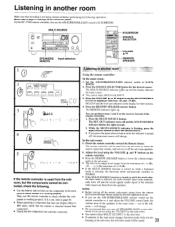
MULTI SOURCE • I SPEAKERS/ REMOTE Please refer to B-SUBROOM. On the RC-374M remote controller, first set the A/B-SUBROOM/LEARN switch to page 37 and page 38 for connection details. Listening in another room Make sure that recording is not being carried out before performing the following operations.
MULTI SOURCE • I SPEAKERS/ REMOTE Please refer to B-SUBROOM. On the RC-374M remote controller, first set the A/B-SUBROOM/LEARN switch to page 37 and page 38 for connection details. Listening in another room Make sure that recording is not being carried out before performing the following operations.


