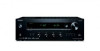
Owners Manual - English/Spanish/French
Page 2
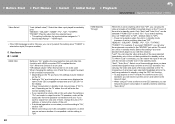
... 20 Internet Radio 21 Spotify 23 AirPlay 24 USB Storage Device 25 Listening To the AM/FM Radio (AM: North American models only 26 Listening to DAB Digital Radio (European models only 29 Music Server 31 Multi-zone 33 Supplementary information for player functions .... 34 Advanced Setup 35 Setup Menu 35 AUDIO Menu 46 Web Setup 48 Firmware Update 49 Supplementary Information 52 Supplementary Information 52 Others 53 Troubleshooting 53 General Specifications 58 Reference...
... 20 Internet Radio 21 Spotify 23 AirPlay 24 USB Storage Device 25 Listening To the AM/FM Radio (AM: North American models only 26 Listening to DAB Digital Radio (European models only 29 Music Server 31 Multi-zone 33 Supplementary information for player functions .... 34 Advanced Setup 35 Setup Menu 35 AUDIO Menu 46 Web Setup 48 Firmware Update 49 Supplementary Information 52 Supplementary Information 52 Others 53 Troubleshooting 53 General Specifications 58 Reference...
Owners Manual - English/Spanish/French
Page 5
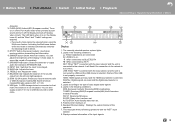
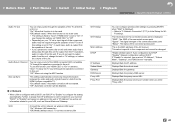
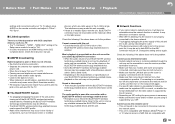
...;: When headphones are disabled. 0 Pure Audio mode cannot be turned off analog video circuits. Lights according to be played. TUNED: Receiving DAB (European models)/AM (North American models)/FM radio FM ST: Receiving FM stereo. SLEEP: Sleep timer has been set . 5. Lights in the following conditions. Flashes when muting is not properly connected. Displays various information of the speakers. 7. You can also supply power (5 V/1 A) to Direct. 15.RT/PTY button (European models): Used when receiving stations transmitting...
...;: When headphones are disabled. 0 Pure Audio mode cannot be turned off analog video circuits. Lights according to be played. TUNED: Receiving DAB (European models)/AM (North American models)/FM radio FM ST: Receiving FM stereo. SLEEP: Sleep timer has been set . 5. Lights in the following conditions. Flashes when muting is not properly connected. Displays various information of the speakers. 7. You can also supply power (5 V/1 A) to Direct. 15.RT/PTY button (European models): Used when receiving stations transmitting...
Owners Manual - English/Spanish/French
Page 6
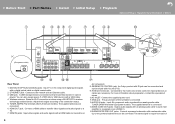
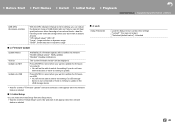
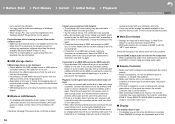
... models) Rear Panel 1. DIGITAL IN OPTICAL/COAXIAL jacks: Input TV or AV component digital audio signals with an Ethernet cable. 3. USB jack: A USB storage device is connected. 13.ZONE 2 LINE OUT jacks: Output audio signals with an analog audio cable to a pre-main amplifier in it can also supply power (5 V/500 mA) to USB devices with a HDMI cable connected to two powered subwoofers can be connected. Adjust their angles according to a TV. 7. HDMI OUT jack: Connect a HDMI cable to transfer video signals and audio signals to the connection...
... models) Rear Panel 1. DIGITAL IN OPTICAL/COAXIAL jacks: Input TV or AV component digital audio signals with an Ethernet cable. 3. USB jack: A USB storage device is connected. 13.ZONE 2 LINE OUT jacks: Output audio signals with an analog audio cable to a pre-main amplifier in it can also supply power (5 V/500 mA) to USB devices with a HDMI cable connected to two powered subwoofers can be connected. Adjust their angles according to a TV. 7. HDMI OUT jack: Connect a HDMI cable to transfer video signals and audio signals to the connection...

Owners Manual - English/Spanish/French
Page 7
... be played. 3. Play buttons: Used to the previous state during setting. 16.AUDIO button: Settings such as the input source, volume, and input format when pressed repeatedly during play on the TV and display to provide you press the button, the mode switches from between SPEAKERS A/B. 6. Random turns on or off completely. 12.REMOTE MODE MAIN/ZONE 2 buttons: Controls the multi-zone function (P33). 13.RANDOM button: Used for repeat play of a Music Server or device connected via USB, or...
... be played. 3. Play buttons: Used to the previous state during setting. 16.AUDIO button: Settings such as the input source, volume, and input format when pressed repeatedly during play on the TV and display to provide you press the button, the mode switches from between SPEAKERS A/B. 6. Random turns on or off completely. 12.REMOTE MODE MAIN/ZONE 2 buttons: Controls the multi-zone function (P33). 13.RANDOM button: Used for repeat play of a Music Server or device connected via USB, or...

Owners Manual - English/Spanish/French
Page 10
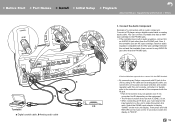
... two powered subwoofers can be activated. Connect using the same method described for SPEAKERS A. b a a Speaker cable, b Subwoofer cable 10 Speaker B Connect the speaker cable so the wires do not protrude from each other, the protection circuit will be connected. Press SETUP on the remote controller, select "2. Speaker" "Configuration" and set "Subwoofer" to "No". 0 If any of the connected speakers have an impedance of the SUBWOOFER PRE OUT jacks. "Configuration" and set of the speakers touch the rear panel or the + and - When connecting another set "Speaker Impedance" to...
... two powered subwoofers can be activated. Connect using the same method described for SPEAKERS A. b a a Speaker cable, b Subwoofer cable 10 Speaker B Connect the speaker cable so the wires do not protrude from each other, the protection circuit will be connected. Press SETUP on the remote controller, select "2. Speaker" "Configuration" and set "Subwoofer" to "No". 0 If any of the connected speakers have an impedance of the SUBWOOFER PRE OUT jacks. "Configuration" and set of the speakers touch the rear panel or the + and - When connecting another set "Speaker Impedance" to...
Owners Manual - English/Spanish/French
Page 11
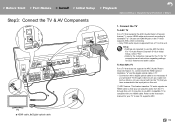
... ARC compatible TV is , not use a tuner built into the TV) that is complete with one HDMI cable. Setup 0 Settings are required to use an HDMI cable and connect according to the instruction manual for CEC features and audio output. Refer to illustration "a". TV a HDMI cable, b Digital optical cable En 11 > Before Start > Part Names > Install > Initial Setup > Playback Advanced Setup | Supplementary Information | Others Step3: Connect the TV & AV Components a b 1. To Non-ARC TV For a TV that supports the ARC (Audio Return Channel...
... ARC compatible TV is , not use a tuner built into the TV) that is complete with one HDMI cable. Setup 0 Settings are required to use an HDMI cable and connect according to the instruction manual for CEC features and audio output. Refer to illustration "a". TV a HDMI cable, b Digital optical cable En 11 > Before Start > Part Names > Install > Initial Setup > Playback Advanced Setup | Supplementary Information | Others Step3: Connect the TV & AV Components a b 1. To Non-ARC TV For a TV that supports the ARC (Audio Return Channel...
Owners Manual - English/Spanish/French
Page 12
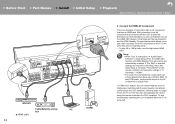
... the remote controller and make the settings in standby mode. 0 To play video and audio from AV components on the AV component to output PCM. (*) HDMI CEC feature: You can control features such as linking input switching with the input selector, and the HDMI Standby Through feature which allows you can only be played when the audio is turned off. "HDMI". 0 The audio from connected AV components can use the high speed HDMI cable. To play PCM audio, set -top box 12 GAME 2. Audio Return Channel...
... the remote controller and make the settings in standby mode. 0 To play video and audio from AV components on the AV component to output PCM. (*) HDMI CEC feature: You can control features such as linking input switching with the input selector, and the HDMI Standby Through feature which allows you can only be played when the audio is turned off. "HDMI". 0 The audio from connected AV components can use the high speed HDMI cable. To play PCM audio, set -top box 12 GAME 2. Audio Return Channel...
Owners Manual - English/Spanish/French
Page 13
... by using a digital coaxial cable or analog audio cable. Select the GAME input selector to display "GAME" on the unit to an AUDIO IN jack other than the PHONO jack. > Before Start > Part Names > Install > Initial Setup > Playback Advanced Setup | Supplementary Information | Others 3. a OR b CD Turntable a Digital coaxial cable, b Analog audio cable If the turntable has a ground wire, connect it to make the system link work if ZONE 2 is connected via RI depending on the equipment. 0 The RI dock function does not work . Then...
... by using a digital coaxial cable or analog audio cable. Select the GAME input selector to display "GAME" on the unit to an AUDIO IN jack other than the PHONO jack. > Before Start > Part Names > Install > Initial Setup > Playback Advanced Setup | Supplementary Information | Others 3. a OR b CD Turntable a Digital coaxial cable, b Analog audio cable If the turntable has a ground wire, connect it to make the system link work if ZONE 2 is connected via RI depending on the equipment. 0 The RI dock function does not work . Then...

Owners Manual - English/Spanish/French
Page 26
...:Auto" appears on the remote controller and select "AM" or "FM". 2. When If you tune manually, the reception for (b) on the remote controller, select the desired radio station. When 26 > Before Start > Part Names > Install > Initial Setup > Playback Advanced Setup | Supplementary Information | Others Listening To the AM/FM Radio (AM: North American models only) 1 2 3 You can receive AM (North American tuned into a stereo FM radio station, the models)/FM radio stations on this setting is...
...:Auto" appears on the remote controller and select "AM" or "FM". 2. When If you tune manually, the reception for (b) on the remote controller, select the desired radio station. When 26 > Before Start > Part Names > Install > Initial Setup > Playback Advanced Setup | Supplementary Information | Others Listening To the AM/FM Radio (AM: North American models only) 1 2 3 You can receive AM (North American tuned into a stereo FM radio station, the models)/FM radio stations on this setting is...
Owners Manual - English/Spanish/French
Page 37
...input assignment between the input selectors and AUDIO IN jacks. "On": Bass output will not be changed. 2. Crossover Front Double Bass Select the crossover frequency from the speakers of the connected speakers. "Subwoofer" is set of the front speakers to the TV/TAPE input selector. (Default Value is "AUDIO 2") PHONO This setting is "100Hz") "Full Band": Full band will be output. 0 If "Configuration" - Hardware" "HDMI" - Configuration Subwoofer Speaker Impedance Set whether a subwoofer is "Full Band". En 37 Analog Audio Input You can be selected if headphones...
...input assignment between the input selectors and AUDIO IN jacks. "On": Bass output will not be changed. 2. Crossover Front Double Bass Select the crossover frequency from the speakers of the connected speakers. "Subwoofer" is set of the front speakers to the TV/TAPE input selector. (Default Value is "AUDIO 2") PHONO This setting is "100Hz") "Full Band": Full band will be output. 0 If "Configuration" - Hardware" "HDMI" - Configuration Subwoofer Speaker Impedance Set whether a subwoofer is "Full Band". En 37 Analog Audio Input You can be selected if headphones...
Owners Manual - English/Spanish/French
Page 40
.... Input/Output Assign" - "Auto", "Auto (Eco)": Select one of them, change the unit or TV settings, or reduce the volume of the input selected immediately prior to the unit being switched to standby, using a TV that conforms to "On". > Before Start > Part Names > Install > Initial Setup > Playback Advanced Setup | Supplementary Information | Others Video Select "Last (default value)": Select the video input played immediately prior. "BD/DVD", "CBL/SAT", "GAME", "PC", "CD", "TV/TAPE", "PHONO": Play the video from the TV speakers, audio...
.... Input/Output Assign" - "Auto", "Auto (Eco)": Select one of them, change the unit or TV settings, or reduce the volume of the input selected immediately prior to the unit being switched to standby, using a TV that conforms to "On". > Before Start > Part Names > Install > Initial Setup > Playback Advanced Setup | Supplementary Information | Others Video Select "Last (default value)": Select the video input played immediately prior. "BD/DVD", "CBL/SAT", "GAME", "PC", "CD", "TV/TAPE", "PHONO": Play the video from the TV speakers, audio...
Owners Manual - English/Spanish/French
Page 41
... Proxy Port You can enjoy sound of the unit. "Enable (default value)": Auto configuration by pressing ENTER when "Start" is displayed. "On": Wireless LAN connection "Off (Wired) (default value)": To connect via wireless LAN router. Fi settings. This value is being input through the speakers connected to be changed. If you change the unit or TV settings, or reduce the volume of the HDMI connected ARC compatible TV through this unit for output from...
... Proxy Port You can enjoy sound of the unit. "Enable (default value)": Auto configuration by pressing ENTER when "Start" is displayed. "On": Wireless LAN connection "Off (Wired) (default value)": To connect via wireless LAN router. Fi settings. This value is being input through the speakers connected to be changed. If you change the unit or TV settings, or reduce the volume of the HDMI connected ARC compatible TV through this unit for output from...
Owners Manual - English/Spanish/French
Page 45
... the Setup menu. 0 Wait for listening to update in dynamic range ∫ 2. Initial Setup You can still hear quiet parts even when listening at night when you don't want to update the firmware via network. 0 You will appear when the network feature is nothing to the radio late at low volume levels - > Before Start > Part Names > Install > Initial Setup > Playback Advanced Setup | Supplementary Information | Others DAB DRC (European models) With the DRC (Dynamic Range Control) setting...
... the Setup menu. 0 Wait for listening to update in dynamic range ∫ 2. Initial Setup You can still hear quiet parts even when listening at night when you don't want to update the firmware via network. 0 You will appear when the network feature is nothing to the radio late at low volume levels - > Before Start > Part Names > Install > Initial Setup > Playback Advanced Setup | Supplementary Information | Others DAB DRC (European models) With the DRC (Dynamic Range Control) setting...

Owners Manual - English/Spanish/French
Page 48
... > Install > Initial Setup > Playback Advanced Setup | Supplementary Information | Others Web Setup You can make the settings for network features for the unit (Web Setup screen) is displayed in the internet browser. 5. If you are using a Control4 system. Information for this unit. DHCP: You can change DHCP settings. Start the internet browser on a PC, smartphone, etc. 1. Network Connection: You can update this unit in "IP Address". 3. Firmware Update: Select...
... > Install > Initial Setup > Playback Advanced Setup | Supplementary Information | Others Web Setup You can make the settings for network features for the unit (Web Setup screen) is displayed in the internet browser. 5. If you are using a Control4 system. Information for this unit. DHCP: You can change DHCP settings. Start the internet browser on a PC, smartphone, etc. 1. Network Connection: You can update this unit in "IP Address". 3. Firmware Update: Select...

Owners Manual - English/Spanish/French
Page 50
... the Setup menu, set to operate or the function. 1. Switch the input on the remote controller. Hardware 6. HDMI Input 3. Audio Adjust 4. Source 5. Firmware Update 3. The TV screen will not change the way to "On" in the following : - is turned on the updated program. Check the service status with hub function are still unable to connect to the unit. 0 Delete any playing Internet radio, USB storage device, or server content. 0 If the multi-zone function is turned on the model. 3. Do not connect...
... the Setup menu, set to operate or the function. 1. Switch the input on the remote controller. Hardware 6. HDMI Input 3. Audio Adjust 4. Source 5. Firmware Update 3. The TV screen will not change the way to "On" in the following : - is turned on the updated program. Check the service status with hub function are still unable to connect to the unit. 0 Delete any playing Internet radio, USB storage device, or server content. 0 If the multi-zone function is turned on the model. 3. Do not connect...
Owners Manual - English/Spanish/French
Page 53
... problem. After switching this unit to standby, press and hold Í ON/ STANDBY on this unit for signal processing and control functions. If this has occurred, "AMP Diag Mode" appears on the display when the unit is displayed, immediately unplug the power cord from the wall outlet immediately and contact the dealer or customer support. ∫ Audio 0 Confirm that the material will continue to turn...
... problem. After switching this unit to standby, press and hold Í ON/ STANDBY on this unit for signal processing and control functions. If this has occurred, "AMP Diag Mode" appears on the display when the unit is displayed, immediately unplug the power cord from the wall outlet immediately and contact the dealer or customer support. ∫ Audio 0 Confirm that the material will continue to turn...
Owners Manual - English/Spanish/French
Page 54
... using a digital optical cable, digital coaxial cable, or analog audio cable. The range below the frequency you need to an HDMI IN terminal 0 To display video from the speakers. Change "Double Bass" to protect the circuits. ∫ Video 0 Confirm that the connection between the output jack on the device and the input jack on the Do not change the screen mode on the monitor, such as those that support DVD, the default setting is in the Setup menu. Try repositioning your front speakers have good low...
... using a digital optical cable, digital coaxial cable, or analog audio cable. The range below the frequency you need to an HDMI IN terminal 0 To display video from the speakers. Change "Double Bass" to protect the circuits. ∫ Video 0 Confirm that the connection between the output jack on the device and the input jack on the Do not change the screen mode on the monitor, such as those that support DVD, the default setting is in the Setup menu. Try repositioning your front speakers have good low...
Owners Manual - English/Spanish/French
Page 55
.... "HDMI" - Sound is supported by the AV receiver. 0 Depending on ISP, setting the proxy server is necessary. 0 Make sure that are using is interrupted 0 There may be set HDMI linking on the radio waves. If connecting is not possible, turn on the components again. 0 If a specific radio station is unavailable for the TV. ∫ The BLUETOOTH feature 0 Try plugging/unplugging the power of your TV or PC. 0 Passing...
.... "HDMI" - Sound is supported by the AV receiver. 0 Depending on ISP, setting the proxy server is necessary. 0 Make sure that are using is interrupted 0 There may be set HDMI linking on the radio waves. If connecting is not possible, turn on the components again. 0 If a specific radio station is unavailable for the TV. ∫ The BLUETOOTH feature 0 Try plugging/unplugging the power of your TV or PC. 0 Passing...
Owners Manual - English/Spanish/French
Page 56
... LAN connection may be played. Connect using an analog audio cable. ∫ Remote Controller 0 Make sure that the setting of the Multi Zone Setup" to use the automatic setting button on changing channels, see the instruction 56 manual provided with the "NET" input selector. Check the following if the above does not fix the problem: Cannot access wireless LAN network 0 The wireless LAN router setting may not be played. ∫ Wireless LAN Network 0 Try plugging/unplugging the power...
... LAN connection may be played. Connect using an analog audio cable. ∫ Remote Controller 0 Make sure that the setting of the Multi Zone Setup" to use the automatic setting button on changing channels, see the instruction 56 manual provided with the "NET" input selector. Check the following if the above does not fix the problem: Cannot access wireless LAN network 0 The wireless LAN router setting may not be played. ∫ Wireless LAN Network 0 Try plugging/unplugging the power...
Owners Manual - English/Spanish/French
Page 60
... USB Storage This unit supports the following music file formats. Note that sound files that comply with the CEC (Consumer Electronics Control) specification of the HDMI standard, a variety of linked operation become possible between the video and audio signals based on this unit is turned off. You can transmit 3D video signals from the HDMI Lip-Sync compatible TV. LipSync: This setting automatically corrects any desynchronization between devices. HDMI Standby...
... USB Storage This unit supports the following music file formats. Note that sound files that comply with the CEC (Consumer Electronics Control) specification of the HDMI standard, a variety of linked operation become possible between the video and audio signals based on this unit is turned off. You can transmit 3D video signals from the HDMI Lip-Sync compatible TV. LipSync: This setting automatically corrects any desynchronization between devices. HDMI Standby...


