
Owner's Manual English
Page 2
... dangerous voltage points or short-out parts that produce heat. 9. Protect the power cord from being walked on top of free space at the top and sides and 10 cm (4") at plugs, convenience receptacles, and the point where they may be set 10 cm (4") away from the apparatus. 11. S3125A 13. Servicing is required when the apparatus...
... dangerous voltage points or short-out parts that produce heat. 9. Protect the power cord from being walked on top of free space at the top and sides and 10 cm (4") at plugs, convenience receptacles, and the point where they may be set 10 cm (4") away from the apparatus. 11. S3125A 13. Servicing is required when the apparatus...
Owner's Manual English
Page 3
... and headphones can radiate radio frequency energy and, if not installed and used to disconnect this equipment does cause harmful interference to provide reasonable protection against harmful interference in your Onkyo dealer. 8. For models with [POWER] button, or with Wet Hands-Never handle this Unit with both [POWER] and [ON/STANDBY] buttons: Pressing the [POWER] button to pack it how it was when you turn on...
... and headphones can radiate radio frequency energy and, if not installed and used to disconnect this equipment does cause harmful interference to provide reasonable protection against harmful interference in your Onkyo dealer. 8. For models with [POWER] button, or with Wet Hands-Never handle this Unit with both [POWER] and [ON/STANDBY] buttons: Pressing the [POWER] button to pack it how it was when you turn on...

Owner's Manual English
Page 4
... methods of measurement of voltage changes, voltage fluctuations and flicker - Limitation of radio disturbance characteristics - Fit a suitable fuse in the mains lead of this unit should be replaced, the replacement fuse must approved by qualified service personnel. En-4 Modè...wires in the plug. For European Models Declaration of the fuse. For models having a power cord with an appropriate fuse. Safety - IMPORTANT The wires in the mains lead are coloured in accordance with the letter L or coloured red. The wire which is coloured brown must be connected...
... methods of measurement of voltage changes, voltage fluctuations and flicker - Limitation of radio disturbance characteristics - Fit a suitable fuse in the mains lead of this unit should be replaced, the replacement fuse must approved by qualified service personnel. En-4 Modè...wires in the plug. For European Models Declaration of the fuse. For models having a power cord with an appropriate fuse. Safety - IMPORTANT The wires in the mains lead are coloured in accordance with the letter L or coloured red. The wire which is coloured brown must be connected...
Owner's Manual English
Page 5
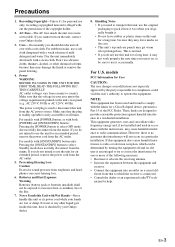
... Power Cord 18 Turning On the Receiver 19 Turning On and Standby 19 Auto Standby 19 Enjoying Audio Sources 20 Selecting the Speaker Set 20 Muting the Receiver (remote controller only 20 Using Headphones 20 Setting the Display Brightness 21 Using the Sleep Timer (remote controller only 21 Using the Tone and Balance Controls 21 Displaying the Tone Level 21 Setting the DIRECT Function 22 Setting the Digital Audio Input (for European model 22 Recording 23 Recording the Input Source 23 Listening to the Radio 24 Radio Frequency Setup 24 Listening to AM/FM Stations...
... Power Cord 18 Turning On the Receiver 19 Turning On and Standby 19 Auto Standby 19 Enjoying Audio Sources 20 Selecting the Speaker Set 20 Muting the Receiver (remote controller only 20 Using Headphones 20 Setting the Display Brightness 21 Using the Sleep Timer (remote controller only 21 Using the Tone and Balance Controls 21 Displaying the Tone Level 21 Setting the DIRECT Function 22 Setting the Digital Audio Input (for European model 22 Recording 23 Recording the Input Source 23 Listening to the Radio 24 Radio Frequency Setup 24 Listening to AM/FM Stations...
Owner's Manual English
Page 6
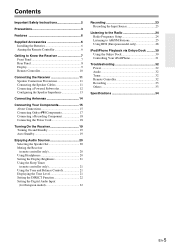
... ❑ Massive EI Transformer ❑ High-Current, Low-Impedance Drive ❑ Direct Mode ❑ 5 Analog Audio Inputs and 1 Output ❑ 3 Digital Audio Inputs (1 Optical, 2 Coaxial) (European Model only) ❑ Phono Input for Turntable Connection ❑ Independent Bass, Treble, and Balance Controls ❑ Subwoofer Pre-Out ❑ Speaker A/B Terminals ❑ Remote Interactive (RI) Input for Integrated Control of Compatible Onkyo Components ❑ Headphone Jack ❑ 40 FM/AM Random Presets ❑ Preset Station Naming (Up to 8 Characters) ❑ RDS (PS...
... ❑ Massive EI Transformer ❑ High-Current, Low-Impedance Drive ❑ Direct Mode ❑ 5 Analog Audio Inputs and 1 Output ❑ 3 Digital Audio Inputs (1 Optical, 2 Coaxial) (European Model only) ❑ Phono Input for Turntable Connection ❑ Independent Bass, Treble, and Balance Controls ❑ Subwoofer Pre-Out ❑ Speaker A/B Terminals ❑ Remote Interactive (RI) Input for Integrated Control of Compatible Onkyo Components ❑ Headphone Jack ❑ 40 FM/AM Random Presets ❑ Preset Station Naming (Up to 8 Characters) ❑ RDS (PS...

Owner's Manual English
Page 8
...-8 a REMOTE CONTROL jack (17) b FM ANTENNA jack and AM ANTENNA terminal (14) c SUBWOOFER PRE OUT jack (12) d SPEAKERS A and B terminals (11) e PHONO IN (MM) jacks and GND terminal (16) f CD IN jacks (16) g BD/DVD IN jacks (16) h DOCK IN jacks (16) i TAPE IN/OUT jacks (16, 18) j TV IN jacks (16) k DIGITAL IN (OPTICAL, COAXIAL) jacks (European model only) (16) See "Connecting the Receiver" for connection ( pages 11 to Know the Receiver-Continued Rear Panel North American model ab...
...-8 a REMOTE CONTROL jack (17) b FM ANTENNA jack and AM ANTENNA terminal (14) c SUBWOOFER PRE OUT jack (12) d SPEAKERS A and B terminals (11) e PHONO IN (MM) jacks and GND terminal (16) f CD IN jacks (16) g BD/DVD IN jacks (16) h DOCK IN jacks (16) i TAPE IN/OUT jacks (16, 18) j TV IN jacks (16) k DIGITAL IN (OPTICAL, COAXIAL) jacks (European model only) (16) See "Connecting the Receiver" for connection ( pages 11 to Know the Receiver-Continued Rear Panel North American model ab...

Owner's Manual English
Page 11
... instructions supplied with your speakers. • Pay close attention to 16 Ω. When the impedance of terminals. If you connect two sets of speaker terminals. Speaker set A Right Left speaker speaker -+ -+ Speaker set , use speakers whose impedance is 8 to speaker wiring polarity. Receiver En-11 In other words, connect positive (+) terminals only to positive (+) terminals, and negative (-) terminals only to 4 or 6 Ω ( page 13). Connecting the Speaker Cables 1 Strip about "Speakers A" and "Speakers...
... instructions supplied with your speakers. • Pay close attention to 16 Ω. When the impedance of terminals. If you connect two sets of speaker terminals. Speaker set A Right Left speaker speaker -+ -+ Speaker set , use speakers whose impedance is 8 to speaker wiring polarity. Receiver En-11 In other words, connect positive (+) terminals only to positive (+) terminals, and negative (-) terminals only to 4 or 6 Ω ( page 13). Connecting the Speaker Cables 1 Strip about "Speakers A" and "Speakers...

Owner's Manual English
Page 12
If your powered subwoofer. Powered subwoofer En-12 When SPEAKER A is linked to the amp's input. Connecting the Receiver-Continued Connecting a Powered Subwoofer Using a suitable cable, connect the receiver's SUBWOOFER PRE OUT to the input on your subwoofer is unpowered and you're using an external amplifier, connect the SUBWOOFER PRE OUT to SPEAKER A's On/Off. Note: SUBWOOFER PRE OUT is selected, the audio signal will output from the SUBWOOFER PRE OUT.
If your powered subwoofer. Powered subwoofer En-12 When SPEAKER A is linked to the amp's input. Connecting the Receiver-Continued Connecting a Powered Subwoofer Using a suitable cable, connect the receiver's SUBWOOFER PRE OUT to the input on your subwoofer is unpowered and you're using an external amplifier, connect the SUBWOOFER PRE OUT to SPEAKER A's On/Off. Note: SUBWOOFER PRE OUT is selected, the audio signal will output from the SUBWOOFER PRE OUT.
Owner's Manual English
Page 13
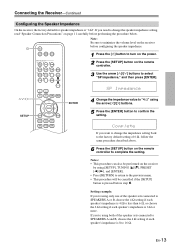
...;. Connecting the Receiver-Continued Configuring the Speaker Impedance On the receiver, the factory default for speaker impedance is pressed before configuring the speaker impedance. 1 Press the [] button to turn on the power. 2 Press the [SETUP] button on the remote controller. 3 Use the arrow buttons to select "SP Impedance," and then press [ENTER]. If you 're using both of the speaker sets connected to SPEAKERS A or B, choose the 4 Ω setting if each speaker's impedance is 4 Ω to minimize the volume level on the receiver ...
...;. Connecting the Receiver-Continued Configuring the Speaker Impedance On the receiver, the factory default for speaker impedance is pressed before configuring the speaker impedance. 1 Press the [] button to turn on the power. 2 Press the [SETUP] button on the remote controller. 3 Use the arrow buttons to select "SP Impedance," and then press [ENTER]. If you 're using both of the speaker sets connected to SPEAKERS A or B, choose the 4 Ω setting if each speaker's impedance is 4 Ω to minimize the volume level on the receiver ...
Owner's Manual English
Page 15
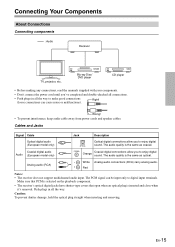
... manuals supplied with your components. • Don't connect the power cord until you to enjoy digital sound. The PCM signal can be input only to make good connections (loose connections can cause noise or malfunctions). Make sure that PCM is selected on the playback component. • The receiver's optical digital jacks have shutter-type covers that open when an optical plug is the same as optical. Cables and Jacks Signal Cable Optical digital audio (European model only) Coaxial digital audio Audio (European model only) Jack...
... manuals supplied with your components. • Don't connect the power cord until you to enjoy digital sound. The PCM signal can be input only to make good connections (loose connections can cause noise or malfunctions). Make sure that PCM is selected on the playback component. • The receiver's optical digital jacks have shutter-type covers that open when an optical plug is the same as optical. Cables and Jacks Signal Cable Optical digital audio (European model only) Coaxial digital audio Audio (European model only) Jack...
Owner's Manual English
Page 17
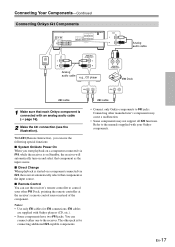
... remote controller at the receiver's remote control sensor instead of the component. Notes: • Use only cables for connecting additional -capable components. cable • Connect only Onkyo components to jacks. Refer to control your Onkyo components. You can use the following special functions: ■ System On/Auto Power On When you start playback on a component connected via , while the receiver is on Standby, the receiver will automatically turn on and select that component as the input source. ■ Remote Control...
... remote controller at the receiver's remote control sensor instead of the component. Notes: • Use only cables for connecting additional -capable components. cable • Connect only Onkyo components to jacks. Refer to control your Onkyo components. You can use the following special functions: ■ System On/Auto Power On When you start playback on a component connected via , while the receiver is on Standby, the receiver will automatically turn on and select that component as the input source. ■ Remote Control...
Owner's Manual English
Page 18
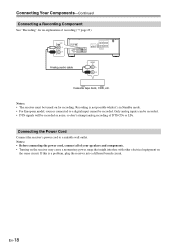
...; DTS signals will be recorded as noise, so don't attempt analog recording of recording ( page 23). En-18 Connecting the Power Cord Connect the receiver's power cord to a digital input cannot be turned on the same circuit. Analog audio cable Cassette tape deck, CDR, etc. Recording is a problem, plug the receiver into a different branch circuit. Notes: • Before connecting the power cord, connect all of your speakers and components. • Turning on the receiver...
...; DTS signals will be recorded as noise, so don't attempt analog recording of recording ( page 23). En-18 Connecting the Power Cord Connect the receiver's power cord to a digital input cannot be turned on the same circuit. Analog audio cable Cassette tape deck, CDR, etc. Recording is a problem, plug the receiver into a different branch circuit. Notes: • Before connecting the power cord, connect all of your speakers and components. • Turning on the receiver...
Owner's Manual English
Page 19
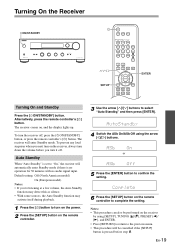
... display lights up. Turning On the Receiver M MON/STANDBY &(#5 SETUP ENTER Turning On and Standby Press the [ON/STANDBY] button. To turn it off , press the [ON/STANDBY] button, or press the remote controller's [] button. Default setting: Off (North American model) Notes: On (European model) • If you turn the receiver off . En-19 Auto Standby When "Auto Standby" is pressed before you 're listening at a low volume, the Auto Standby function may detect this as silence. • With some sources...
... display lights up. Turning On the Receiver M MON/STANDBY &(#5 SETUP ENTER Turning On and Standby Press the [ON/STANDBY] button. To turn it off , press the [ON/STANDBY] button, or press the remote controller's [] button. Default setting: Off (North American model) Notes: On (European model) • If you turn the receiver off . En-19 Auto Standby When "Auto Standby" is pressed before you 're listening at a low volume, the Auto Standby function may detect this as silence. • With some sources...
Owner's Manual English
Page 20
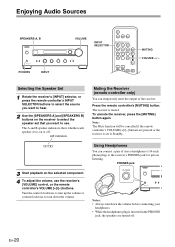
... jack Notes: • Always turn down the volume before connecting your headphones. • While the headphones plug is muted. Note: The Mute function will be cancelled if the remote controller's VOLUME [+]/[-] buttons are turned off . En-20 The A and B speaker indicators show whether each speaker set is set that you want to use the receiver's [VOLUME] control, or the remote controller's VOLUME [+]/[-] buttons. Using Headphones You can temporarily mute the output of stereo headphones (1/4-inch phone plug) to turn down the volume. To...
... jack Notes: • Always turn down the volume before connecting your headphones. • While the headphones plug is muted. Note: The Mute function will be cancelled if the remote controller's VOLUME [+]/[-] buttons are turned off . En-20 The A and B speaker indicators show whether each speaker set is set that you want to use the receiver's [VOLUME] control, or the remote controller's VOLUME [+]/[-] buttons. Using Headphones You can temporarily mute the output of stereo headphones (1/4-inch phone plug) to turn down the volume. To...
Owner's Manual English
Page 21
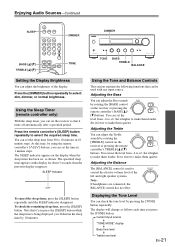
... them louder. Set it turns off automatically after a specified period. Current input source "TONE MODE" display Bass tone level Treble tone level En-21 Enjoying Audio Sources-Continued SLEEP DIMMER DIMMER BASS [F]/[H] TREBLE [F]/[H] TONE TONE BASS TREBLE BALANCE Setting the Display Brightness You can set the level from -6 to +6. Using the Sleep Timer (remote controller only) With the sleep timer, you can be used to make them louder. The SLEEP indicator appears on the receiver or pressing the remote controller's BASS buttons. SLEEP Indicator...
... them louder. Set it turns off automatically after a specified period. Current input source "TONE MODE" display Bass tone level Treble tone level En-21 Enjoying Audio Sources-Continued SLEEP DIMMER DIMMER BASS [F]/[H] TREBLE [F]/[H] TONE TONE BASS TREBLE BALANCE Setting the Display Brightness You can set the level from -6 to +6. Using the Sleep Timer (remote controller only) With the sleep timer, you can be used to make them louder. The SLEEP indicator appears on the receiver or pressing the remote controller's BASS buttons. SLEEP Indicator...
Owner's Manual English
Page 22
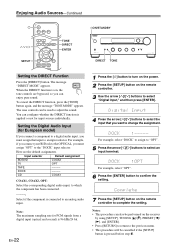
... the remote controller. 3 Use the arrow buttons to select "Digital Input," and then press [ENTER]. 4 Press the arrow buttons to select the input that input to an analog audio input. Note: The maximum sampling rate for PCM signals from a digital input (optical and coaxial) is applied or not for European model) If you connect a component to a digital audio input, you want to adjust the sound. Setting the Digital Audio Input (for input sources individually. En-22 1 Press the [] button to turn on the power. 2 Press the [SETUP] button...
... the remote controller. 3 Use the arrow buttons to select "Digital Input," and then press [ENTER]. 4 Press the arrow buttons to select the input that input to an analog audio input. Note: The maximum sampling rate for PCM signals from a digital input (optical and coaxial) is applied or not for European model) If you connect a component to a digital audio input, you want to adjust the sound. Setting the Digital Audio Input (for input sources individually. En-22 1 Press the [] button to turn on the power. 2 Press the [SETUP] button...
Owner's Manual English
Page 30
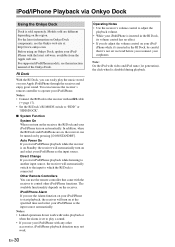
... Onkyo web site at the specified time and select your iPod/iPhone as the input source. Other Remote Controllers You can be careful that came with an cable ( page 17). • Set the RI Dock's RI MODE switch to adjust the playback volume. • While your iPod/iPhone is inserted in the RI Dock, be turned on by pressing [ON/STANDBY]. Note: On the iPod with video...
... Onkyo web site at the specified time and select your iPod/iPhone as the input source. Other Remote Controllers You can be careful that came with an cable ( page 17). • Set the RI Dock's RI MODE switch to adjust the playback volume. • While your iPod/iPhone is inserted in the RI Dock, be turned on by pressing [ON/STANDBY]. Note: On the iPod with video...
Owner's Manual English
Page 31
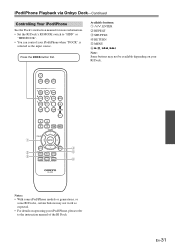
... via Onkyo Dock-Continued Controlling Your iPod/iPhone See the Dock's instruction manual for more information. • Set the RI Dock's RI MODE switch to "HDD" or "HDD/DOCK". • You can control your iPod/iPhone when "DOCK" is selected as expected. • For details on your iPod/iPhone, please refer to the instruction manual of the RI Dock En-31 Press the DOCK button first. Available buttons: 1 /, ENTER 2 REPEAT 3 SHUFFLE 4 RETURN 5 MENU...
... via Onkyo Dock-Continued Controlling Your iPod/iPhone See the Dock's instruction manual for more information. • Set the RI Dock's RI MODE switch to "HDD" or "HDD/DOCK". • You can control your iPod/iPhone when "DOCK" is selected as expected. • For details on your iPod/iPhone, please refer to the instruction manual of the RI Dock En-31 Press the DOCK button first. Available buttons: 1 /, ENTER 2 REPEAT 3 SHUFFLE 4 RETURN 5 MENU...
Owner's Manual English
Page 32
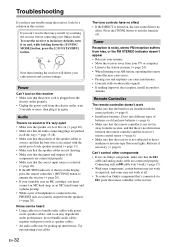
... on the receiver • Make sure that resetting the receiver will delete your TV or computer. • Listen to the station in all . • To control an Onkyo component that the cable and analog audio cable are connected properly. Press the [TONE] button to an AM station, operating the remote controller may be heard • Using cable ties to its factory defaults, turn it 's very quiet • Make sure the speaker set A or...
... on the receiver • Make sure that resetting the receiver will delete your TV or computer. • Listen to the station in all . • To control an Onkyo component that the cable and analog audio cable are connected properly. Press the [TONE] button to an AM station, operating the remote controller may be heard • Using cable ties to its factory defaults, turn it 's very quiet • Make sure the speaker set A or...

Owner's Manual English
Page 34
... 170 W No-sound Power Consumption (North American) 30 W (European) 35 W Stand-by Power Consumption (North American) 0.15 W (European) 0.25 W Dimensions (W × H × D) 435 × 150 × 328.5 mm (17-1/8" × 5-7/8" × 12-15/16") Weight 7.3 kg (16.1 lbs.) ■ Audio Inputs Analog Inputs Digital Inputs (European model only) PHONO, CD, DOCK, TAPE, TV, BD/DVD OPTICAL: TV COAXIAL: CD, BD/DVD ■ Audio Outputs Analog Outputs TAPE Pre Outputs SUBWOOFER Speaker Outputs SPEAKERS A SPEAKERS B Phones 1 (6.3 ø) ■ Others 1 Specifications and...
... 170 W No-sound Power Consumption (North American) 30 W (European) 35 W Stand-by Power Consumption (North American) 0.15 W (European) 0.25 W Dimensions (W × H × D) 435 × 150 × 328.5 mm (17-1/8" × 5-7/8" × 12-15/16") Weight 7.3 kg (16.1 lbs.) ■ Audio Inputs Analog Inputs Digital Inputs (European model only) PHONO, CD, DOCK, TAPE, TV, BD/DVD OPTICAL: TV COAXIAL: CD, BD/DVD ■ Audio Outputs Analog Outputs TAPE Pre Outputs SUBWOOFER Speaker Outputs SPEAKERS A SPEAKERS B Phones 1 (6.3 ø) ■ Others 1 Specifications and...


