
Owner Manual
Page 1
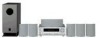
... Introduction 2 Connection 17 Turning On & First Time Setup..... 32 Basic Operation Playing your new 6.1ch Home Theater System. Please read this manual thoroughly before making connections and plugging in this manual for purchasing an Onkyo 6.1ch Home Theater System. 6.1ch Home Theater System HT-S680 AV Receiver (HT-R430) Front Speakers (SKF-330F L/R) Center Speaker (SKC-330C) Surround Speakers (SKM-330S L/R) Surround Back...
... Introduction 2 Connection 17 Turning On & First Time Setup..... 32 Basic Operation Playing your new 6.1ch Home Theater System. Please read this manual thoroughly before making connections and plugging in this manual for purchasing an Onkyo 6.1ch Home Theater System. 6.1ch Home Theater System HT-S680 AV Receiver (HT-R430) Front Speakers (SKF-330F L/R) Center Speaker (SKC-330C) Surround Speakers (SKM-330S L/R) Surround Back...

Owner Manual
Page 6
.... 6 Specifications and operation are the same regardless of the product name indicates the color. Supplied Accessories Make sure you have the following accessories: HT-R430 HT-R430 Surround speakers (SKM-330S L/R) Surround Back speaker (SKB-330) Remote controller & two batteries (AA/R6) Subwoofer (SKW-420) Indoor FM antenna (Connector type...
.... 6 Specifications and operation are the same regardless of the product name indicates the color. Supplied Accessories Make sure you have the following accessories: HT-R430 HT-R430 Surround speakers (SKM-330S L/R) Surround Back speaker (SKB-330) Remote controller & two batteries (AA/R6) Subwoofer (SKW-420) Indoor FM antenna (Connector type...

Owner Manual
Page 11
... This control is detected in Standby mode. Note: The Auto Standby function turns the subwoofer on the SKW-420, set the POWER switch to the HT-R430 with supplied RCA cable. Other models require M5 (5 mm) screws. E STANDBY/ON indicator Red: Subwoofer in standby mode Green: Subwoofer on With ... Auto Standby function, the SKW-420 automatically turns on when an input signal is used to attach the speaker to the SUBWOOFER PREOUT on your HT-R430 AV receiver, amp, or other receiver with the supplied speaker cables. F POWER switch (Not North American model) To turn off the SKW-...
... This control is detected in Standby mode. Note: The Auto Standby function turns the subwoofer on the SKW-420, set the POWER switch to the HT-R430 with supplied RCA cable. Other models require M5 (5 mm) screws. E STANDBY/ON indicator Red: Subwoofer in standby mode Green: Subwoofer on With ... Auto Standby function, the SKW-420 automatically turns on when an input signal is used to attach the speaker to the SUBWOOFER PREOUT on your HT-R430 AV receiver, amp, or other receiver with the supplied speaker cables. F POWER switch (Not North American model) To turn off the SKW-...
Owner Manual
Page 13
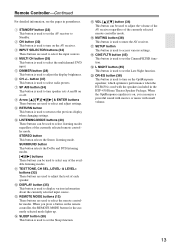
... the HT-R430 is used to turn speaker sets A and B on the AV receiver. N SLEEP button (39) This button is used to set the Sleep function. button (37) This button is used to turn on or off. Remote Controller-Continued For detailed information, see the pages in the HTP-430 Home Theater Speaker...
... the HT-R430 is used to turn speaker sets A and B on the AV receiver. N SLEEP button (39) This button is used to set the Sleep function. button (37) This button is used to turn on or off. Remote Controller-Continued For detailed information, see the pages in the HTP-430 Home Theater Speaker...

Owner Manual
Page 24
HT-R430 S VIDEO MONITOR OUT VIDEO MONITOR OUT S VIDEO IN VIDEO IN Signal flow ⇒ ⇒ TV S-Video input Composite video input Picture quality Better .... L R AUDIO OUT • With the basic a connection, you can listen to the AV receiver and use connection b or c . (Use a and b or a and c for recording.) Connection a b c HT-R430 VIDEO 2 IN L/R DIGITAL IN COAXIAL DIGITAL IN OPTICAL Signal flow ⇐ ⇐ ⇐ TV Analog audio L/R output Digital coaxial output Digital optical output...
HT-R430 S VIDEO MONITOR OUT VIDEO MONITOR OUT S VIDEO IN VIDEO IN Signal flow ⇒ ⇒ TV S-Video input Composite video input Picture quality Better .... L R AUDIO OUT • With the basic a connection, you can listen to the AV receiver and use connection b or c . (Use a and b or a and c for recording.) Connection a b c HT-R430 VIDEO 2 IN L/R DIGITAL IN COAXIAL DIGITAL IN OPTICAL Signal flow ⇐ ⇐ ⇐ TV Analog audio L/R output Digital coaxial output Digital optical output...

Owner Manual
Page 25
...AV receiver with an analog multichannel output, use connection b or c . (Use a and b or a and c for connection a . 25 Connection a b c d HT-R430 DVD IN FRONT DIGITAL IN COAXIAL DIGITAL IN OPTICAL 1 DVD IN FRONT, SURROUND, CENTER, and SUBWOOFER Signal flow ⇐ ⇐ ⇐ DVD player...coaxial output Digital optical output ⇐ Analog multichannel output • If your DVD player, and then make the connection. Connection A B DVD player HT-R430 S VIDEO DVD IN VIDEO DVD IN S VIDEO OUT VIDEO OUT Signal flow ⇐ ⇐ DVD player S-Video output Composite ...
...AV receiver with an analog multichannel output, use connection b or c . (Use a and b or a and c for connection a . 25 Connection a b c d HT-R430 DVD IN FRONT DIGITAL IN COAXIAL DIGITAL IN OPTICAL 1 DVD IN FRONT, SURROUND, CENTER, and SUBWOOFER Signal flow ⇐ ⇐ ⇐ DVD player...coaxial output Digital optical output ⇐ Analog multichannel output • If your DVD player, and then make the connection. Connection A B DVD player HT-R430 S VIDEO DVD IN VIDEO DVD IN S VIDEO OUT VIDEO OUT Signal flow ⇐ ⇐ DVD player S-Video output Composite ...

Owner Manual
Page 26
Connecting Your Components-Continued Connecting a VCR or DVD Recorder for recording.) Connection a b c HT-R430 VIDEO 1 IN L/R DIGITAL IN COAXIAL DIGITAL IN OPTICAL Signal flow ⇐ ⇐ ⇐ VCR/DVD recorder Analog audio L/R output Digital... matches the VCR/DVD recorder, and then make the connection. VIDEO VIDEO 1 IN B S VIDEO VIDEO 1 A IN Connection A B S VIDEO OUT VCR, DVD recorder VIDEO OUT HT-R430 S VIDEO VIDEO 1 IN VIDEO VIDEO 1 IN Signal flow ⇐ ⇐ VCR/DVD recorder S-Video output Composite video output Picture quality Better Standard Step...
Connecting Your Components-Continued Connecting a VCR or DVD Recorder for recording.) Connection a b c HT-R430 VIDEO 1 IN L/R DIGITAL IN COAXIAL DIGITAL IN OPTICAL Signal flow ⇐ ⇐ ⇐ VCR/DVD recorder Analog audio L/R output Digital... matches the VCR/DVD recorder, and then make the connection. VIDEO VIDEO 1 IN B S VIDEO VIDEO 1 A IN Connection A B S VIDEO OUT VCR, DVD recorder VIDEO OUT HT-R430 S VIDEO VIDEO 1 IN VIDEO VIDEO 1 IN Signal flow ⇐ ⇐ VCR/DVD recorder S-Video output Composite video output Picture quality Better Standard Step...

Owner Manual
Page 27
... a L R VIDEO 1 VIDEO VIDEO 1 B S VIDEO VIDEO 1 A Connection A B a L R AUDIO IN VCR, DVD recorder S VIDEO IN VIDEO IN HT-R430 S VIDEO VIDEO 1 OUT VIDEO VIDEO 1 OUT VIDEO 1 OUT L/R Signal flow ⇒ ⇒ ⇒ VCR/DVD recorder S-Video input Composite video... input Audio L/R input Picture quality Better Standard - VIDEO 3 IN L a R Connection A a VIDEO 3 IN A HT-R430 VIDEO 3 IN VIDEO 3 IN L/R L AUDIO R OUT VIDEO OUT Camcorder, games console, etc. Signal flow ⇐ ⇐ Camcorder/console Composite...
... a L R VIDEO 1 VIDEO VIDEO 1 B S VIDEO VIDEO 1 A Connection A B a L R AUDIO IN VCR, DVD recorder S VIDEO IN VIDEO IN HT-R430 S VIDEO VIDEO 1 OUT VIDEO VIDEO 1 OUT VIDEO 1 OUT L/R Signal flow ⇒ ⇒ ⇒ VCR/DVD recorder S-Video input Composite video... input Audio L/R input Picture quality Better Standard - VIDEO 3 IN L a R Connection A a VIDEO 3 IN A HT-R430 VIDEO 3 IN VIDEO 3 IN L/R L AUDIO R OUT VIDEO OUT Camcorder, games console, etc. Signal flow ⇐ ⇐ Camcorder/console Composite...

Owner Manual
Page 28
S VIDEO OUT VIDEO OUT HT-R430 S VIDEO VIDEO 2 IN VIDEO VIDEO 2 IN Signal flow ⇐ ⇐ Video source S-Video output Composite video output Picture quality Better Standard Step 2: Audio ... or record audio from the video source. • To enjoy Dolby and DTS listening modes, use connection b or c . (Use a and b or a and c for recording.) Connection a b c HT-R430 VIDEO 2 IN L/R DIGITAL IN COAXIAL DIGITAL IN OPTICAL Signal flow ⇐ ⇐ ⇐ Video source Analog audio L/R output Digital coaxial output Digital optical...
S VIDEO OUT VIDEO OUT HT-R430 S VIDEO VIDEO 2 IN VIDEO VIDEO 2 IN Signal flow ⇐ ⇐ Video source S-Video output Composite video output Picture quality Better Standard Step 2: Audio ... or record audio from the video source. • To enjoy Dolby and DTS listening modes, use connection b or c . (Use a and b or a and c for recording.) Connection a b c HT-R430 VIDEO 2 IN L/R DIGITAL IN COAXIAL DIGITAL IN OPTICAL Signal flow ⇐ ⇐ ⇐ Video source Analog audio L/R output Digital coaxial output Digital optical...

Owner Manual
Page 29
... connect a turntable with no Phono Preamp Built-in A phono preamp is necessary to connect a turntable that matches the CD player, or choose a for recording.) Connection a b c HT-R430 CD IN L/R DIGITAL IN COAXIAL DIGITAL IN OPTICAL Signal flow ⇐ ⇐ ⇐ CD or turntable Analog audio L/R output Digital coaxial output Digital...
... connect a turntable with no Phono Preamp Built-in A phono preamp is necessary to connect a turntable that matches the CD player, or choose a for recording.) Connection a b c HT-R430 CD IN L/R DIGITAL IN COAXIAL DIGITAL IN OPTICAL Signal flow ⇐ ⇐ ⇐ CD or turntable Analog audio L/R output Digital coaxial output Digital...

Owner Manual
Page 30
...the stated capacity (e.g., 100 W). The other COAXIAL c OPTICAL OUT IN a L R TAPE COAXIAL OUT L L OPTICAL OUT Cassette recorder, CDR, etc. Notes: • Onkyo components with the recorder. • To connect the recorder digitally for connecting the power cord of another AV component. Connection... a b c HT-R430 TAPE IN L/R TAPE OUT L/R DIGITAL IN COAXIAL DIGITAL IN OPTICAL Signal flow Cassette/CDR/MD/DAT recorder Analog audio L/R ...
...the stated capacity (e.g., 100 W). The other COAXIAL c OPTICAL OUT IN a L R TAPE COAXIAL OUT L L OPTICAL OUT Cassette recorder, CDR, etc. Notes: • Onkyo components with the recorder. • To connect the recorder digitally for connecting the power cord of another AV component. Connection... a b c HT-R430 TAPE IN L/R TAPE OUT L/R DIGITAL IN COAXIAL DIGITAL IN OPTICAL Signal flow Cassette/CDR/MD/DAT recorder Analog audio L/R ...
Owner Manual
Page 38
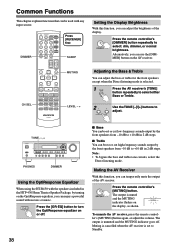
... . ■ Bass You can boost or cut low-frequency sounds output by the front speakers from -10 dB to +10 dB in the HTP-430 Home Theater Speaker Package, by the front speakers from -10 dB to + adjust. To unmute the AV receiver, press the remote controller's [MUTING] button again, or adjust... VIDEO 1/VCR VIDEO 2 VIDEO 3 DIMMER MEMORY TUNING MODE RETURN SETUP CLEAR TAPE TUNER CD MASTER VOLUME PHONES DIMMER Using the OptiResponse Equalizer When using the HT-R430 with the speakers included in 2 dB steps. ■ Treble You can adjust the brightness of the AV receiver.
... . ■ Bass You can boost or cut low-frequency sounds output by the front speakers from -10 dB to +10 dB in the HTP-430 Home Theater Speaker Package, by the front speakers from -10 dB to + adjust. To unmute the AV receiver, press the remote controller's [MUTING] button again, or adjust... VIDEO 1/VCR VIDEO 2 VIDEO 3 DIMMER MEMORY TUNING MODE RETURN SETUP CLEAR TAPE TUNER CD MASTER VOLUME PHONES DIMMER Using the OptiResponse Equalizer When using the HT-R430 with the speakers included in 2 dB steps. ■ Treble You can adjust the brightness of the AV receiver.
Owner Manual
Page 52
...connected to select an audio format from the wall outlet immediately. The AV receiver is designed for home theater enjoyment and has a wide volume range for precise adjustment. • If the MUTING indicator ... correctly (page 48). ing modes. Remove the power cord from a menu. • If your Onkyo dealer. Only the center speaker produces sound? • If you use the Pro Logic II Movie or...playback, so the subwoofer outputs no sound is set at minimum. Set it 's turned on the HT-R430. • Make sure that all speaker cables and input sources, and leave the AV receiver...
...connected to select an audio format from the wall outlet immediately. The AV receiver is designed for home theater enjoyment and has a wide volume range for precise adjustment. • If the MUTING indicator ... correctly (page 48). ing modes. Remove the power cord from a menu. • If your Onkyo dealer. Only the center speaker produces sound? • If you use the Pro Logic II Movie or...playback, so the subwoofer outputs no sound is set at minimum. Set it 's turned on the HT-R430. • Make sure that all speaker cables and input sources, and leave the AV receiver...

