
Owner Manual
Page 1
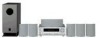
... before making connections and plugging in this manual for purchasing an Onkyo 6.1ch Home Theater System. Please retain this manual will enable you for future reference. 6.1ch Home Theater System HT-S680 AV Receiver (HT-R430) Front Speakers (SKF-330F L/R) Center Speaker (SKC-330C) Surround Speakers (SKM-330S L/R) Surround Back Speaker (SKB-330) Powered Subwoofer (SKW-420) Instruction Manual Thank you to obtain optimum performance and listening enjoyment from your AV components ....... 34 Using the Tuner 36 Enjoying the Listening Modes...
... before making connections and plugging in this manual for purchasing an Onkyo 6.1ch Home Theater System. Please retain this manual will enable you for future reference. 6.1ch Home Theater System HT-S680 AV Receiver (HT-R430) Front Speakers (SKF-330F L/R) Center Speaker (SKC-330C) Surround Speakers (SKM-330S L/R) Surround Back Speaker (SKB-330) Powered Subwoofer (SKW-420) Instruction Manual Thank you to obtain optimum performance and listening enjoyment from your AV components ....... 34 Using the Tuner 36 Enjoying the Listening Modes...

Owner Manual
Page 4
... music reproduction. Interstation noise from Dolby Laboratories. Special test tones from vibration. OptiResponse and OR-EQ are registered trademarks of Onkyo Corporation. *2. To prevent this , move the unit away from 1 kHz with Super Audio CD and DVD-Audio • A/B speaker drive • Color-coded speaker terminal FM/AM Tuner • 30 FM/AM presets • FM/AM auto tuning • RDS (Radio Data System) (Europe only) Remote Controller • Remote controller...
... music reproduction. Interstation noise from Dolby Laboratories. Special test tones from vibration. OptiResponse and OR-EQ are registered trademarks of Onkyo Corporation. *2. To prevent this , move the unit away from 1 kHz with Super Audio CD and DVD-Audio • A/B speaker drive • Color-coded speaker terminal FM/AM Tuner • 30 FM/AM presets • FM/AM auto tuning • RDS (Radio Data System) (Europe only) Remote Controller • Remote controller...
Owner Manual
Page 5
... Receiver 38 Using the Sleep Timer 39 Using Headphones 39 Adjusting Speaker Levels 39 Enjoying the Listening Modes Using the Listening Modes 40 Selecting Listening Modes 40 Advanced Operation Adjusting the Listening Modes 44 Using the Audio Adjust Functions 44 Using the Late Night Function (Dolby Digital only 45 Using the CinemaFILTER 45 Advanced Setup 46 Advanced Speaker Settings 46 Digital Input Signal Formats 50 Recording 51 Recording the Input Source 51 Recording from Different AV Sources ..........51 Troubleshooting 52 Power 52 Audio 52 Video 53 Tuner 53 Remote...
... Receiver 38 Using the Sleep Timer 39 Using Headphones 39 Adjusting Speaker Levels 39 Enjoying the Listening Modes Using the Listening Modes 40 Selecting Listening Modes 40 Advanced Operation Adjusting the Listening Modes 44 Using the Audio Adjust Functions 44 Using the Late Night Function (Dolby Digital only 45 Using the CinemaFILTER 45 Advanced Setup 46 Advanced Speaker Settings 46 Digital Input Signal Formats 50 Recording 51 Recording the Input Source 51 Recording from Different AV Sources ..........51 Troubleshooting 52 Power 52 Audio 52 Video 53 Tuner 53 Remote...
Owner Manual
Page 8
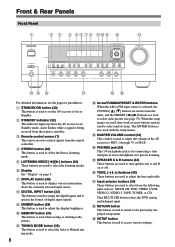
...& Rear Panels Front Panel 1 2 3 4 5 6 78 9JK L STANDBY/ON A SPEAKERS B PHONES TUNING / PRESET STANDBY ENTER TONE MULTl CH + STEREO LISTENING MODE DISPLAY DIGITAL INPUT DVD VIDEO 1/VCR VIDEO 2 VIDEO 3 DIMMER MEMORY TUNING MODE RETURN SETUP CLEAR TAPE TUNER CD M MASTER VOLUME NO P Q RS For detailed information, see page 37). C Remote-control sensor (7) This sensor receives control signals from the following input sources: MULTI CH, DVD, VIDEO 1/VCR, VIDEO 2, VIDEO 3, TAPE, TUNER, or CD. O SPEAKER A & B buttons (34) These buttons are used to turn speaker sets...
...& Rear Panels Front Panel 1 2 3 4 5 6 78 9JK L STANDBY/ON A SPEAKERS B PHONES TUNING / PRESET STANDBY ENTER TONE MULTl CH + STEREO LISTENING MODE DISPLAY DIGITAL INPUT DVD VIDEO 1/VCR VIDEO 2 VIDEO 3 DIMMER MEMORY TUNING MODE RETURN SETUP CLEAR TAPE TUNER CD M MASTER VOLUME NO P Q RS For detailed information, see page 37). C Remote-control sensor (7) This sensor receives control signals from the following input sources: MULTI CH, DVD, VIDEO 1/VCR, VIDEO 2, VIDEO 3, TAPE, TUNER, or CD. O SPEAKER A & B buttons (34) These buttons are used to turn speaker sets...

Owner Manual
Page 11
... enters Standby mode. North American models require 1/4-inch screws. D OUTPUT LEVEL control This control is detected in standby mode Green: Subwoofer on With the Auto Standby function, the SKW-420 automatically turns on your HT-R430 AV receiver, amp, or other receiver with the supplied speaker cables. E STANDBY/ON indicator Red: Subwoofer in Standby mode. Note: Use commercially available machine screws to attach the speaker to the same-colored positive speaker terminal. When there's no input signal for mounting instructions. To turn...
... enters Standby mode. North American models require 1/4-inch screws. D OUTPUT LEVEL control This control is detected in standby mode Green: Subwoofer on With the Auto Standby function, the SKW-420 automatically turns on your HT-R430 AV receiver, amp, or other receiver with the supplied speaker cables. E STANDBY/ON indicator Red: Subwoofer in Standby mode. Note: Use commercially available machine screws to attach the speaker to the same-colored positive speaker terminal. When there's no input signal for mounting instructions. To turn...
Owner Manual
Page 12
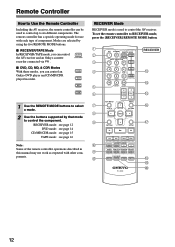
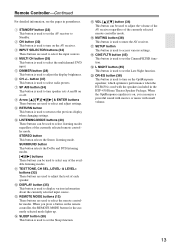
... operations described in this manual may not work as expected with each type of component. RECEIVER Mode RECEIVER mode is used to control up to six different components. Modes are selected by that mode to RECEIVER mode, press the [RECEIVER] REMOTE MODE button. DIMMER SLEEP CH DISC VOL TOP MENU SP A / B ENTER MENU MUTING RETURN SETUP RECEIVER M N O P Q J K L LISTENING MODE STEREO SURROUND AUDIO SUBTITLE RANDOM REPEAT TEST TONE CH SEL LEVEL- A B C D E F G H I ON STANDBY REMOTE MODE RECEIVER DVD TAPE/AMP INPUT SELECTOR 1 2 3 C D V1 V2 V3 4 5 6 MD MULTI...
... operations described in this manual may not work as expected with each type of component. RECEIVER Mode RECEIVER mode is used to control up to six different components. Modes are selected by that mode to RECEIVER mode, press the [RECEIVER] REMOTE MODE button. DIMMER SLEEP CH DISC VOL TOP MENU SP A / B ENTER MENU MUTING RETURN SETUP RECEIVER M N O P Q J K L LISTENING MODE STEREO SURROUND AUDIO SUBTITLE RANDOM REPEAT TEST TONE CH SEL LEVEL- A B C D E F G H I ON STANDBY REMOTE MODE RECEIVER DVD TAPE/AMP INPUT SELECTOR 1 2 3 C D V1 V2 V3 4 5 6 MD MULTI...
Owner Manual
Page 13
... brightness. D MULTI CH button (35) This button is used to adjust the volume of the AV receiver regardless of each speaker. E DIMMER button (38) This button is used to select the multichannel DVD input. button (37) This button is used to select any of the currently selected remote controller mode. SURROUND button This button selects the Dolby and DTS listening modes. [ ]/[ ] buttons These buttons can be used to set the Late Night function. Q SETUP button This button is used to select the remote controller modes. A STANDBY button (32) This button is used to turn on...
... brightness. D MULTI CH button (35) This button is used to adjust the volume of the AV receiver regardless of each speaker. E DIMMER button (38) This button is used to select the multichannel DVD input. button (37) This button is used to select any of the currently selected remote controller mode. SURROUND button This button selects the Dolby and DTS listening modes. [ ]/[ ] buttons These buttons can be used to set the Late Night function. Q SETUP button This button is used to select the remote controller modes. A STANDBY button (32) This button is used to turn on...

Owner Manual
Page 14
... turn on a component with the random playback function. M MENU button This button is used with selectable play modes on the DVD player. Q PLAY MODE button This button is used to display a DVD's menu. I J K ON STANDBY REMOTE MODE RECEIVER DVD TAPE/AMP INPUT SELECTOR 1 2 3 C D V1 V2 V3 4 5 6 MD MULTI CH DVD 7 8 9 CDR TAPE TUNER C D +10 0 CLR --/--- N SETUP button This button is used to clear entered numbers. D DISC +/- LEVEL+ PLAY MODE DISPLAY OR-EQ L NIGHT CINE FLTR RC-606S DVD L M N O P Q A STANDBY button This button sets the DVD player...
... turn on a component with the random playback function. M MENU button This button is used with selectable play modes on the DVD player. Q PLAY MODE button This button is used to display a DVD's menu. I J K ON STANDBY REMOTE MODE RECEIVER DVD TAPE/AMP INPUT SELECTOR 1 2 3 C D V1 V2 V3 4 5 6 MD MULTI CH DVD 7 8 9 CDR TAPE TUNER C D +10 0 CLR --/--- N SETUP button This button is used to clear entered numbers. D DISC +/- LEVEL+ PLAY MODE DISPLAY OR-EQ L NIGHT CINE FLTR RC-606S DVD L M N O P Q A STANDBY button This button sets the DVD player...
Owner Manual
Page 17
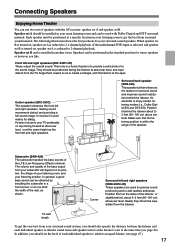
... the listener. 1/3 wall length To get the best from surround sound material. Connecting Speakers Enjoying Home Theater You can use two sets of speakers with the listener at the apex. Front left and right speakers, making sound movements distinct and providing a full sound image. Make sure that the sound from the TV. In general, a good bass sound can be obtained by installing the subwoofer in the standard position for stereo speakers or however...
... the listener. 1/3 wall length To get the best from surround sound material. Connecting Speakers Enjoying Home Theater You can use two sets of speakers with the listener at the apex. Front left and right speakers, making sound movements distinct and providing a full sound image. Make sure that the sound from the TV. In general, a good bass sound can be obtained by installing the subwoofer in the standard position for stereo speakers or however...

Owner Manual
Page 22
... it's removed. The audio quality is typically used on virtually all the way. Optical Digital Jacks The AV receiver's optical digital jack has shutter-type cover that open when an optical plug is commonly used to connect right-channel audio inputs and outputs (typically labeled "R"). AV Connection Color Coding RCA-type AV connections are usually color coded: red, white, and yellow. Use red plugs to connect DVD players with your other video equipment. This cable carries analog audio. This cable carries multichannel analog audio and...
... it's removed. The audio quality is typically used on virtually all the way. Optical Digital Jacks The AV receiver's optical digital jack has shutter-type cover that open when an optical plug is commonly used to connect right-channel audio inputs and outputs (typically labeled "R"). AV Connection Color Coding RCA-type AV connections are usually color coded: red, white, and yellow. Use red plugs to connect DVD players with your other video equipment. This cable carries analog audio. This cable carries multichannel analog audio and...

Owner Manual
Page 23
... AV receiver using one for example, your CD player, in mind that the AV receiver doesn't convert between formats. Video Input/Output Diagram DVD player, etc. For video components, such as a guide. Output Optical IN AV Receiver Optical Coaxial Coaxial Analog Multichannel Analog Multichannel OUT Input Cassette recorder, etc. The AV receiver supports several connection formats for Recording CD player, etc. Audio Input/Output Diagram for compatibility with a wide range of AV equipment. Analog TV, projector, etc. 23 Speakers (see...
... AV receiver using one for example, your CD player, in mind that the AV receiver doesn't convert between formats. Video Input/Output Diagram DVD player, etc. For video components, such as a guide. Output Optical IN AV Receiver Optical Coaxial Coaxial Analog Multichannel Analog Multichannel OUT Input Cassette recorder, etc. The AV receiver supports several connection formats for Recording CD player, etc. Audio Input/Output Diagram for compatibility with a wide range of AV equipment. Analog TV, projector, etc. 23 Speakers (see...

Owner Manual
Page 30
R R IN OUT REC PLAY • With the basic a connection, you can then be connected directly to On or Standby. Connection a b c HT-R430 TAPE IN L/R TAPE OUT L/R DIGITAL IN COAXIAL DIGITAL IN OPTICAL Signal flow Cassette/CDR/MD/DAT recorder Analog audio L/R output Analog audio L/R input Digital coaxial output Digital optical output Connecting the Power Cord of Another Component The AV receiver has an AC outlet on the country in the ON position so that you...
R R IN OUT REC PLAY • With the basic a connection, you can then be connected directly to On or Standby. Connection a b c HT-R430 TAPE IN L/R TAPE OUT L/R DIGITAL IN COAXIAL DIGITAL IN OPTICAL Signal flow Cassette/CDR/MD/DAT recorder Analog audio L/R output Analog audio L/R input Digital coaxial output Digital optical output Connecting the Power Cord of Another Component The AV receiver has an AC outlet on the country in the ON position so that you...

Owner Manual
Page 31
...Onkyo components. If the DVD player is connected to Standby, all channels because the Direct Change function selects only the DVD IN FRONT jacks. Notes: • Use only cables for connecting additional -compatible components. • Connect the AV receiver's jack to all components connected via will also enter Standby. Refer to malfunction. • Some components may not support all of your components. Connecting to other manufacturer's components may cause a momentary power surge that component as the input source automatically. cables are supplied with your speakers...
...Onkyo components. If the DVD player is connected to Standby, all channels because the Direct Change function selects only the DVD IN FRONT jacks. Notes: • Use only cables for connecting additional -compatible components. • Connect the AV receiver's jack to all components connected via will also enter Standby. Refer to malfunction. • Some components may not support all of your components. Connecting to other manufacturer's components may cause a momentary power surge that component as the input source automatically. cables are supplied with your speakers...

Owner Manual
Page 32
...Turning On STANDBY/ON STANDBY indicator STANDBY/ON A SPEAKERS B PHONES TUNING / PRESET STANDBY ENTER TONE MULTl CH + STEREO LISTENING MODE DISPLAY DIGITAL INPUT RT/PTY/TP MEMORY TUNING MODE RETURN SETUP CLEAR DVD VIDEO 1/VCR VIDEO 2 VIDEO 3 TAPE TUNER CD MASTER VOLUME Turning On the AV Receiver STANDBY ON RECEIVER ON STANDBY REMOTE MODE RECEIVER DVD TAPE/AMP INPUT SELECTOR 1 2 3 C D V1 V2 V3 4 5 6 MD MULTI CH DVD 7 8 9 CDR TAPE TUNER C D +10 0 CLR --/--- DIMMER SLEEP CH DISC VOL TOP MENU SP A / B MENU MUTING 1 AV receiver Remote controller...
...Turning On STANDBY/ON STANDBY indicator STANDBY/ON A SPEAKERS B PHONES TUNING / PRESET STANDBY ENTER TONE MULTl CH + STEREO LISTENING MODE DISPLAY DIGITAL INPUT RT/PTY/TP MEMORY TUNING MODE RETURN SETUP CLEAR DVD VIDEO 1/VCR VIDEO 2 VIDEO 3 TAPE TUNER CD MASTER VOLUME Turning On the AV Receiver STANDBY ON RECEIVER ON STANDBY REMOTE MODE RECEIVER DVD TAPE/AMP INPUT SELECTOR 1 2 3 C D V1 V2 V3 4 5 6 MD MULTI CH DVD 7 8 9 CDR TAPE TUNER C D +10 0 CLR --/--- DIMMER SLEEP CH DISC VOL TOP MENU SP A / B MENU MUTING 1 AV receiver Remote controller...
Owner Manual
Page 34
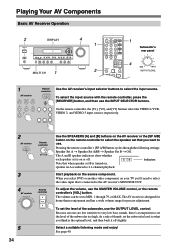
...AV Receiver Operation 2 DISPLAY STANDBY/ON A SPEAKERS B PHONES TUNING / PRESET STANDBY ENTER TONE MULTl CH + STEREO LISTENING MODE DISPLAY DIGITAL INPUT RT/PTY/TP MEMORY TUNING MODE RETURN SETUP CLEAR DVD VIDEO 1/VCR VIDEO 2 VIDEO 3 TAPE TUNER CD 4 MASTER VOLUME MULTI CH 1 1 2 ON STANDBY REMOTE MODE RECEIVER DVD TAPE/AMP INPUT SELECTOR 1 2 3 C D V1 V2 V3 4 5 6 MD MULTI CH DVD 7 8 9 CDR TAPE TUNER C D +10 0 CLR --/--- See page 40. Select a suitable listening mode and enjoy! Because our ears are less sensitive to very low bass sounds, there...
...AV Receiver Operation 2 DISPLAY STANDBY/ON A SPEAKERS B PHONES TUNING / PRESET STANDBY ENTER TONE MULTl CH + STEREO LISTENING MODE DISPLAY DIGITAL INPUT RT/PTY/TP MEMORY TUNING MODE RETURN SETUP CLEAR DVD VIDEO 1/VCR VIDEO 2 VIDEO 3 TAPE TUNER CD 4 MASTER VOLUME MULTI CH 1 1 2 ON STANDBY REMOTE MODE RECEIVER DVD TAPE/AMP INPUT SELECTOR 1 2 3 C D V1 V2 V3 4 5 6 MD MULTI CH DVD 7 8 9 CDR TAPE TUNER C D +10 0 CLR --/--- See page 40. Select a suitable listening mode and enjoy! Because our ears are less sensitive to very low bass sounds, there...
Owner Manual
Page 38
... select either Bass or Treble. 2 Use the TONE [-]/[+] buttons to +10 dB in the HTP-430 Home Theater Speaker Package, by the front speakers from -10 dB to + adjust. DIMMER SLEEP CH DISC VOL TOP MENU SP A / B ENTER MENU MUTING Press [RECEIVER] first SLEEP MUTING RETURN SETUP CH SEL LISTENING MODE STEREO SURROUND AUDIO SUBTITLE RANDOM REPEAT TEST TONE CH SEL LEVEL- DIMMER ON STANDBY REMOTE MODE RECEIVER DVD TAPE/AMP INPUT SELECTOR 1 2 3 C D V1 V2 V3 4 5 6 MD MULTI CH DVD...
... select either Bass or Treble. 2 Use the TONE [-]/[+] buttons to +10 dB in the HTP-430 Home Theater Speaker Package, by the front speakers from -10 dB to + adjust. DIMMER SLEEP CH DISC VOL TOP MENU SP A / B ENTER MENU MUTING Press [RECEIVER] first SLEEP MUTING RETURN SETUP CH SEL LISTENING MODE STEREO SURROUND AUDIO SUBTITLE RANDOM REPEAT TEST TONE CH SEL LEVEL- DIMMER ON STANDBY REMOTE MODE RECEIVER DVD TAPE/AMP INPUT SELECTOR 1 2 3 C D V1 V2 V3 4 5 6 MD MULTI CH DVD...

Owner Manual
Page 45
... left and right speakers to select: On: CinemaFILTER on . The default setting is on . DTS Neo:6 Music Mode Setting ■ Center Image The DTS Neo:6 Music listening mode creates 5-channel surround sound from 0 to 5 (default is set to Standby. Off: CinemaFILTER off . ton repeatedly to disturb anyone. 1 Press the [RECEIVER] button, and then press the [L NIGHT] but- CinemaFILTER can still hear quiet parts even when listening at low volume levels-ideal for...
... left and right speakers to select: On: CinemaFILTER on . The default setting is on . DTS Neo:6 Music Mode Setting ■ Center Image The DTS Neo:6 Music listening mode creates 5-channel surround sound from 0 to 5 (default is set to Standby. Off: CinemaFILTER off . ton repeatedly to disturb anyone. 1 Press the [RECEIVER] button, and then press the [L NIGHT] but- CinemaFILTER can still hear quiet parts even when listening at low volume levels-ideal for...
Owner Manual
Page 52
..., then plug it 's turned on , set A. • When you play DVDs, the default setting is reduced to 2-channel playback, so the subwoofer outputs no sound is properly plugged into the wall outlet. • Make sure that the power cord is output by the surround speakers. The AV receiver turns off as soon as those that the polarity of the input signal was too low so the sub- Press the [DIGITAL INPUT] button repeatedly. • Make sure that all audio connecting plugs are...
..., then plug it 's turned on , set A. • When you play DVDs, the default setting is reduced to 2-channel playback, so the subwoofer outputs no sound is properly plugged into the wall outlet. • Make sure that the power cord is output by the surround speakers. The AV receiver turns off as soon as those that the polarity of the input signal was too low so the sub- Press the [DIGITAL INPUT] button repeatedly. • Make sure that all audio connecting plugs are...

Owner Manual
Page 53
... DVD-Video discs, you need to select an audio output format from DTS to PCM, because the AV receiver does not switch formats immediately, you 've selected the correct remote control- ler mode (page 12). • To control Onkyo cassette tape deck, point the remote controller at the AV receiver. • To control Onkyo CD player or MD/CD recorder, point the remote controller at that can play DVDs, the default setting is connected to a digital input on . puter. • Listen to the station...
... DVD-Video discs, you need to select an audio output format from DTS to PCM, because the AV receiver does not switch formats immediately, you 've selected the correct remote control- ler mode (page 12). • To control Onkyo cassette tape deck, point the remote controller at the AV receiver. • To control Onkyo CD player or MD/CD recorder, point the remote controller at that can play DVDs, the default setting is connected to a digital input on . puter. • Listen to the station...

Owner Manual
Page 54
... fees) due to Standby. To reset the AV receiver to its factory defaults, turn it to Stereo, unless it back in again. Onkyo is set to lockup. Before you must make sure that this happens, unplug the power cord from the wall outlet, wait at least five seconds, and then plug it 's already set to Stereo, Mono, Direct. "Clear" will appear on the display and the AV...
... fees) due to Standby. To reset the AV receiver to its factory defaults, turn it to Stereo, unless it back in again. Onkyo is set to lockup. Before you must make sure that this happens, unplug the power cord from the wall outlet, wait at least five seconds, and then plug it 's already set to Stereo, Mono, Direct. "Clear" will appear on the display and the AV...


