
Owner Manual
Page 5
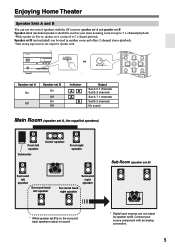
...analog connection. 5 STANDBY/ON STANDBY PHONES A SPEAKETRUNSING BPRESET MASTER VOLUME MULTI CH A SPEAKERS B DVD VCR/DVR CBL/SAT AUX TAPE TUNER C D SETUP ENTER RETURN TONE STEREO LISTENING MODE DISPLAY DIGITAL INPUT DIMMER MEMORY TUNING MODE CLEAR SETUP MIC AUX INPUT VIDEO L AUDIO R or TV VOL INPUT GUIDE TOP MENU CH DISC ALBUM VOL PREVIOUS MENU SP A / B PLAYLIST/CAT ENTER MUTING PLAYLIST/CAT SETUP RETURN Speaker set A On Off Speaker set B On Off On Off Indicator AB A B Output Set A: 5.1 channels Set B: 2 channels Set A: 7.1 channels Set B: 2 channels No sound...
...analog connection. 5 STANDBY/ON STANDBY PHONES A SPEAKETRUNSING BPRESET MASTER VOLUME MULTI CH A SPEAKERS B DVD VCR/DVR CBL/SAT AUX TAPE TUNER C D SETUP ENTER RETURN TONE STEREO LISTENING MODE DISPLAY DIGITAL INPUT DIMMER MEMORY TUNING MODE CLEAR SETUP MIC AUX INPUT VIDEO L AUDIO R or TV VOL INPUT GUIDE TOP MENU CH DISC ALBUM VOL PREVIOUS MENU SP A / B PLAYLIST/CAT ENTER MUTING PLAYLIST/CAT SETUP RETURN Speaker set A On Off Speaker set B On Off On Off Indicator AB A B Output Set A: 5.1 channels Set B: 2 channels Set A: 7.1 channels Set B: 2 channels No sound...
Owner Manual
Page 9
... Adjusting Speaker Levels 47 Enjoying the Listening Modes Using the Listening Modes 48 Selecting Listening Modes 48 About the Listening Modes 50 Using the Late Night Function (Dolby Digital only 52 Using the CinemaFILTER 52 Using the Audio Adjust Settings 52 Advanced Operation Recording 55 Advanced Setup 56 Advanced Speaker Settings 56 Digital Input Signal Formats 61 Correcting Sound and Picture Sync 61 Controlling Other Components 62 Entering Remote Control Codes 62 Remote Control Codes for Onkyo Components Connected via 63 Resetting REMOTE MODE Buttons 63 Resetting the Remote...
... Adjusting Speaker Levels 47 Enjoying the Listening Modes Using the Listening Modes 48 Selecting Listening Modes 48 About the Listening Modes 50 Using the Late Night Function (Dolby Digital only 52 Using the CinemaFILTER 52 Using the Audio Adjust Settings 52 Advanced Operation Recording 55 Advanced Setup 56 Advanced Speaker Settings 56 Digital Input Signal Formats 61 Correcting Sound and Picture Sync 61 Controlling Other Components 62 Entering Remote Control Codes 62 Remote Control Codes for Onkyo Components Connected via 63 Resetting REMOTE MODE Buttons 63 Resetting the Remote...

Owner Manual
Page 10
... receiver to select radio presets (see the pages in parentheses. I SPEAKERS A and B buttons (5, 42) Turn speaker sets A and B on page 11. Getting to Know the AV Receiver Front Panel North American Model 12 3 45 6 STANDBY/ON STANDBY TUNING PRESET 7 MASTER VOLUME PHONES MULTI CH A SPEAKERS B DVD VCR/DVR CBL/SAT AUX TAPE TUNER C D SETUP ENTER RETURN TONE STEREO LISTENING MODE DISPLAY DIGITAL INPUT DIMMER MEMORY TUNING MODE CLEAR SETUP MIC AUX INPUT VIDEO L AUDIO R 8 9 Other Models STANDBY/ON STANDBY PURE AUDIO J K L MN OPQRS T U TUNING PRESET MASTER VOLUME...
... receiver to select radio presets (see the pages in parentheses. I SPEAKERS A and B buttons (5, 42) Turn speaker sets A and B on page 11. Getting to Know the AV Receiver Front Panel North American Model 12 3 45 6 STANDBY/ON STANDBY TUNING PRESET 7 MASTER VOLUME PHONES MULTI CH A SPEAKERS B DVD VCR/DVR CBL/SAT AUX TAPE TUNER C D SETUP ENTER RETURN TONE STEREO LISTENING MODE DISPLAY DIGITAL INPUT DIMMER MEMORY TUNING MODE CLEAR SETUP MIC AUX INPUT VIDEO L AUDIO R 8 9 Other Models STANDBY/ON STANDBY PURE AUDIO J K L MN OPQRS T U TUNING PRESET MASTER VOLUME...
Owner Manual
Page 11
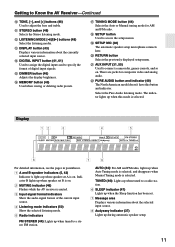
...the audio signal format of digital input signals. R SETUP button Used to adjust the bass and treble. Selects the Pure Audio listening mode. L LISTENING MODE [ ]/[ ] buttons (48) Select the listening modes. M DISPLAY button (43) Displays various information about the selected input source. 8 Audyssey indicator (37) Lights up when speaker set . 7 Message area Displays various information about the currently selected input source. P MEMORY button (45) Used when storing or deleting radio presets. S SETUP MIC (38) The automatic speaker setup microphone connects here. There are jacks for...
...the audio signal format of digital input signals. R SETUP button Used to adjust the bass and treble. Selects the Pure Audio listening mode. L LISTENING MODE [ ]/[ ] buttons (48) Select the listening modes. M DISPLAY button (43) Displays various information about the selected input source. 8 Audyssey indicator (37) Lights up when speaker set . 7 Message area Displays various information about the currently selected input source. P MEMORY button (45) Used when storing or deleting radio presets. S SETUP MIC (38) The automatic speaker setup microphone connects here. There are jacks for...

Owner Manual
Page 12
... and DVD players. N DVD IN These jacks can be connected here. ponent. O SUBWOOFER PRE OUT A powered subwoofer can be used to the jack on your TV or projector. D AM ANTENNA These push terminals are connected digitally. K CD IN This analog audio input is for connecting a CD player's analog audio output. The CBL/SAT inputs can be connected here. See pages 19-35 for connecting HDMI-compatible components. P FRONT SPEAKERS B These push terminals are for connecting a SIRIUS Satellite Radio antenna...
... and DVD players. N DVD IN These jacks can be connected here. ponent. O SUBWOOFER PRE OUT A powered subwoofer can be used to the jack on your TV or projector. D AM ANTENNA These push terminals are connected digitally. K CD IN This analog audio input is for connecting a CD player's analog audio output. The CBL/SAT inputs can be connected here. See pages 19-35 for connecting HDMI-compatible components. P FRONT SPEAKERS B These push terminals are for connecting a SIRIUS Satellite Radio antenna...

Owner Manual
Page 15
C MULTI CH button (43) Selects the multichannel DVD input. SURROUND button Selects the Dolby and DTS listening modes and the Neural Surround listening mode (North American model only). [ ]/[ ] buttons Used to access the setup menus. I TEST TONE, CH SEL, LEVEL-, and LEVEL+ buttons (47, 59) Used to adjust the level of the currently selected remote controller mode. M VOL [ ]/[ ] button (42) Adjusts the volume of the AV receiver regardless of each speaker. N MUTING button (46) Mutes or unmutes the AV receiver. button (45) Used to select AM and FM radio stations directly. 2 CH...
C MULTI CH button (43) Selects the multichannel DVD input. SURROUND button Selects the Dolby and DTS listening modes and the Neural Surround listening mode (North American model only). [ ]/[ ] buttons Used to access the setup menus. I TEST TONE, CH SEL, LEVEL-, and LEVEL+ buttons (47, 59) Used to adjust the level of the currently selected remote controller mode. M VOL [ ]/[ ] button (42) Adjusts the volume of the AV receiver regardless of each speaker. N MUTING button (46) Mutes or unmutes the AV receiver. button (45) Used to select AM and FM radio stations directly. 2 CH...

Owner Manual
Page 16
To select your DVD player as the input source, press: RECEIVER 6 DVD or 5 MULTI CH 1 2 3 4 5 6 7 8 9 J STANDBY/ON REMOTE MODE RECEIVER DVD TAPE/AMP INPUT SELECTOR M D/CDR 1 2 3 VCR/DVR CBL/SAT C D DOCK 4 5 6 TV AUX MULTI CH DVD 7 8 9 VCR TAPE TUNER 10 11 +10 0 C D 12 CABLE CLR SAT D TUN --/--- ENT DIMMER SLEEP TV VOL INPUT GUIDE TOP MENU CH DISC ALBUM VOL PREVIOUS MENU SP A / B PLAYLIST/CAT ENTER MUTING PLAYLIST/CAT SETUP RETURN LISTENING MODE STEREO SURROUND AUDIO SUBTITLE RANDOM REPEAT TEST TONE CH SEL LEVEL- B Number buttons Used to...
To select your DVD player as the input source, press: RECEIVER 6 DVD or 5 MULTI CH 1 2 3 4 5 6 7 8 9 J STANDBY/ON REMOTE MODE RECEIVER DVD TAPE/AMP INPUT SELECTOR M D/CDR 1 2 3 VCR/DVR CBL/SAT C D DOCK 4 5 6 TV AUX MULTI CH DVD 7 8 9 VCR TAPE TUNER 10 11 +10 0 C D 12 CABLE CLR SAT D TUN --/--- ENT DIMMER SLEEP TV VOL INPUT GUIDE TOP MENU CH DISC ALBUM VOL PREVIOUS MENU SP A / B PLAYLIST/CAT ENTER MUTING PLAYLIST/CAT SETUP RETURN LISTENING MODE STEREO SURROUND AUDIO SUBTITLE RANDOM REPEAT TEST TONE CH SEL LEVEL- B Number buttons Used to...

Owner Manual
Page 17
LEVEL+ PLAY MODE DISPLAY L NIGHT VCR DVD CINE FLTR HDD RC-681M K L M A STANDBY/ON button Sets the component to an RI Dock. B Number buttons Used to an RI Dock, it turns on the back light for locating specific points on an HDD-compatible component connected to On or Standby. D TOP MENU button Works as a Resume button when used with the repeat playback functions. On an HDD-compatible component connected to enter track numbers and times for 30 seconds. button Selects discs on a CD...
LEVEL+ PLAY MODE DISPLAY L NIGHT VCR DVD CINE FLTR HDD RC-681M K L M A STANDBY/ON button Sets the component to an RI Dock. B Number buttons Used to an RI Dock, it turns on the back light for locating specific points on an HDD-compatible component connected to On or Standby. D TOP MENU button Works as a Resume button when used with the repeat playback functions. On an HDD-compatible component connected to enter track numbers and times for 30 seconds. button Selects discs on a CD...

Owner Manual
Page 24
.../PR component video jacks slightly differently.) S-Video separates the luminance and color signals S and provides better picture quality than composite video. Jack OPTICAL COAXIAL L R Description This offers the best sound quality and allows you to enjoy Dolby Digital and DTS. This cable carries analog audio. Caution: To prevent shutter damage, hold the optical plug straight when inserting and removing. Use red plugs to connect composite video inputs and outputs. And use yellow plugs to connect right-channel audio inputs and outputs (typically...
.../PR component video jacks slightly differently.) S-Video separates the luminance and color signals S and provides better picture quality than composite video. Jack OPTICAL COAXIAL L R Description This offers the best sound quality and allows you to enjoy Dolby Digital and DTS. This cable carries analog audio. Caution: To prevent shutter damage, hold the optical plug straight when inserting and removing. Use red plugs to connect composite video inputs and outputs. And use yellow plugs to connect right-channel audio inputs and outputs (typically...

Owner Manual
Page 29
... 1: Connect your HDMI-compatible player to fully enjoy the AV receiver's listening modes, turn down the volume on your TV will be output. • The HDMI audio signal (sampling rate, bit length, etc.) may be turned on the AV receiver. ✽ Audio and video signals received via inputs other Step 2 HDMI ASSIGNABLE IN 1 Step 1 HDMI DIGITAL IN ASSIGNABLE COAXIAL 1 (DVD) 2 (CBL/SAT) OPTICAL 1 (VCR/DVR) 2 (CD) IN 2 IN 1 HDMI OUT ASSIGNABLE AM ANTENNA FM 75 SURROUND BACK SPEAKERS...
... 1: Connect your HDMI-compatible player to fully enjoy the AV receiver's listening modes, turn down the volume on your TV will be output. • The HDMI audio signal (sampling rate, bit length, etc.) may be turned on the AV receiver. ✽ Audio and video signals received via inputs other Step 2 HDMI ASSIGNABLE IN 1 Step 1 HDMI DIGITAL IN ASSIGNABLE COAXIAL 1 (DVD) 2 (CBL/SAT) OPTICAL 1 (VCR/DVR) 2 (CD) IN 2 IN 1 HDMI OUT ASSIGNABLE AM ANTENNA FM 75 SURROUND BACK SPEAKERS...

Owner Manual
Page 30
... speaker set B, use your VCR's tuner to listen to your TV via the AV receiver, useful if your favorite TV programs via the same type of connection. With this hookup, you can use a and b , or a and c .) Connection A B C a b c AV receiver COMPONENT VIDEO VCR/DVR IN VCR/DVR IN S VCR/DVR IN V VCR/DVR IN L/R DIGITAL IN COAXIAL 2 DIGITAL IN OPTICAL 1 Signal flow VCR or DVD recorder Picture quality Component video output Best S-Video output Better Composite video output...
... speaker set B, use your VCR's tuner to listen to your TV via the AV receiver, useful if your favorite TV programs via the same type of connection. With this hookup, you can use a and b , or a and c .) Connection A B C a b c AV receiver COMPONENT VIDEO VCR/DVR IN VCR/DVR IN S VCR/DVR IN V VCR/DVR IN L/R DIGITAL IN COAXIAL 2 DIGITAL IN OPTICAL 1 Signal flow VCR or DVD recorder Picture quality Component video output Best S-Video output Better Composite video output...

Owner Manual
Page 31
DIGITAL IN ASSIGNABLE COAX- TUNING PRESET MASTER VOLUME SETUP ENTER RETURN TUNING MODE SETUP MIC AUX INPUT VIDEO L AUDIO R a AUX INPUT L AUDIO R AUX INPUT A VIDEO L AUDIO R OUT VIDEO OUT Camcorder, games console, etc. Step 2: Make the audio connection a . The video source to be recorded must be connected to the AV receiver via the same type of connection. IAL 1 Y (DVD) a 2 (CBL/SAT) OPTICAL 1 (VCR/DVR) 2 (CD) CB/PB CR/PR CBL/SAT IN VCR/DVR IN DVD IN OUT COMPONENT VIDEO IN OUT IN L L REMOTE CONTROL R CD R TAPE ANTENNA AM...
DIGITAL IN ASSIGNABLE COAX- TUNING PRESET MASTER VOLUME SETUP ENTER RETURN TUNING MODE SETUP MIC AUX INPUT VIDEO L AUDIO R a AUX INPUT L AUDIO R AUX INPUT A VIDEO L AUDIO R OUT VIDEO OUT Camcorder, games console, etc. Step 2: Make the audio connection a . The video source to be recorded must be connected to the AV receiver via the same type of connection. IAL 1 Y (DVD) a 2 (CBL/SAT) OPTICAL 1 (VCR/DVR) 2 (CD) CB/PB CR/PR CBL/SAT IN VCR/DVR IN DVD IN OUT COMPONENT VIDEO IN OUT IN L L REMOTE CONTROL R CD R TAPE ANTENNA AM...

Owner Manual
Page 35
...Standby. cables are supplied with Onkyo players (DVD, CD, etc.). • Some components have two jacks. You can use the AV receiver's remote controller to control your other -capable Onkyo components, pointing the remote controller at the AV receiver's remote control sensor instead of your speakers and AV components. • Turning on the same circuit. Notes: • Before connecting the power cord, connect all components connected via , the AV receiver automatically selects that component as the Direct Change function only selects the FRONT DVD IN jacks. ■ Remote...
...Standby. cables are supplied with Onkyo players (DVD, CD, etc.). • Some components have two jacks. You can use the AV receiver's remote controller to control your other -capable Onkyo components, pointing the remote controller at the AV receiver's remote control sensor instead of your speakers and AV components. • Turning on the same circuit. Notes: • Before connecting the power cord, connect all components connected via , the AV receiver automatically selects that component as the Direct Change function only selects the FRONT DVD IN jacks. ■ Remote...
Owner Manual
Page 36
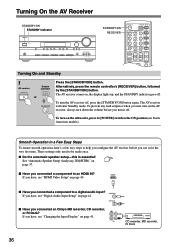
...Audio Input Setup" on , the display lights up, and the STANDBY indicator goes off , press the [STANDBY/ON] button again. If you connected an Onkyo MD recorder, CD recorder, or RI Dock? Turning On the AV Receiver STANDBY/ON STANDBY indicator STANDBY/ON STANDBY TUNING PRESET MASTER VOLUME PHONES MULTI CH A SPEAKERS B DVD VCR/DVR CBL/SAT AUX TAPE TUNER C D SETUP ENTER RETURN TONE STEREO LISTENING MODE DISPLAY DIGITAL INPUT DIMMER MEMORY TUNING MODE CLEAR SETUP MIC AUX INPUT VIDEO L AUDIO R Turning On and Standby STANDBY/ON RECEIVER STANDBY/ON REMOTE MODE RECEIVER DVD...
...Audio Input Setup" on , the display lights up, and the STANDBY indicator goes off , press the [STANDBY/ON] button again. If you connected an Onkyo MD recorder, CD recorder, or RI Dock? Turning On the AV Receiver STANDBY/ON STANDBY indicator STANDBY/ON STANDBY TUNING PRESET MASTER VOLUME PHONES MULTI CH A SPEAKERS B DVD VCR/DVR CBL/SAT AUX TAPE TUNER C D SETUP ENTER RETURN TONE STEREO LISTENING MODE DISPLAY DIGITAL INPUT DIMMER MEMORY TUNING MODE CLEAR SETUP MIC AUX INPUT VIDEO L AUDIO R Turning On and Standby STANDBY/ON RECEIVER STANDBY/ON REMOTE MODE RECEIVER DVD...

Owner Manual
Page 38
... 60) will be performed while a pair of the microphone by using a tripod or level table. 3 Press [ENTER]. First Time Setup-Continued Using Audyssey 2EQ/HTIB 1 STANDBY/ON STANDBY TUNING PRESET MASTER VOLUME PHONES MULTI CH A SPEAKERS B DVD VCR/DVR CBL/SAT AUX TAPE TUNER C D SETUP ENTER RETURN TONE STEREO LISTENING MODE DISPLAY DIGITAL INPUT DIMMER MEMORY TUNING MODE CLEAR SETUP MIC AUX INPUT VIDEO L AUDIO R 2, 6 SETUP MIC 1 Turn on the AV receiver. 2 Put the speaker setup microphone at any point in turn, as you would normally be will not...
... 60) will be performed while a pair of the microphone by using a tripod or level table. 3 Press [ENTER]. First Time Setup-Continued Using Audyssey 2EQ/HTIB 1 STANDBY/ON STANDBY TUNING PRESET MASTER VOLUME PHONES MULTI CH A SPEAKERS B DVD VCR/DVR CBL/SAT AUX TAPE TUNER C D SETUP ENTER RETURN TONE STEREO LISTENING MODE DISPLAY DIGITAL INPUT DIMMER MEMORY TUNING MODE CLEAR SETUP MIC AUX INPUT VIDEO L AUDIO R 2, 6 SETUP MIC 1 Turn on the AV receiver. 2 Put the speaker setup microphone at any point in turn, as you would normally be will not...
Owner Manual
Page 42
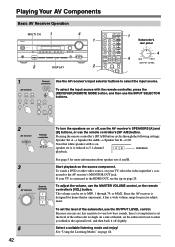
... 79, or MAX. Playing Your AV Components Basic AV Receiver Operation MULTI CH 1 4 STANDBY/ON STANDBY TUNING PRESET MASTER VOLUME PHONES MULTI CH A SPEAKERS B DVD VCR/DVR CBL/SAT AUX TAPE TUNER C D SETUP ENTER RETURN TONE STEREO LISTENING MODE DISPLAY DIGITAL INPUT DIMMER MEMORY TUNING MODE CLEAR SETUP MIC AUX INPUT VIDEO L AUDIO R 2 DISPLAY 1 2 STANDBY/ON REMOTE MODE RECEIVER DVD TAPE/AMP INPUT SELECTOR M D/CDR 1 2 3 VCR/DVR CBL/SAT C D DOCK 4 5 6 TV AUX MULTI CH DVD 7 8 9 VCR TAPE TUNER 10 11 +10 0 C D 12 CABLE CLR SAT D TUN...
... 79, or MAX. Playing Your AV Components Basic AV Receiver Operation MULTI CH 1 4 STANDBY/ON STANDBY TUNING PRESET MASTER VOLUME PHONES MULTI CH A SPEAKERS B DVD VCR/DVR CBL/SAT AUX TAPE TUNER C D SETUP ENTER RETURN TONE STEREO LISTENING MODE DISPLAY DIGITAL INPUT DIMMER MEMORY TUNING MODE CLEAR SETUP MIC AUX INPUT VIDEO L AUDIO R 2 DISPLAY 1 2 STANDBY/ON REMOTE MODE RECEIVER DVD TAPE/AMP INPUT SELECTOR M D/CDR 1 2 3 VCR/DVR CBL/SAT C D DOCK 4 5 6 TV AUX MULTI CH DVD 7 8 9 VCR TAPE TUNER 10 11 +10 0 C D 12 CABLE CLR SAT D TUN...

Owner Manual
Page 46
... 12 CABLE CLR SAT D TUN --/--- LEVEL+ PLAY MODE DISPLAY L NIGHT VCR DVD CINE FLTR HDD RC-681M LEVEL - + Adjusting the Bass and Treble You can boost or cut low-frequency sounds output by the front speakers from -10 dB to select: dim, dimmer, or normal brightness. STANDBY/ON STANDBY TONE, -, + TUNING PRESET MASTER VOLUME PHONES MULTI CH A SPEAKERS B DVD VCR/DVR CBL/SAT AUX TAPE TUNER C D SETUP ENTER RETURN TONE STEREO LISTENING MODE DISPLAY DIGITAL INPUT DIMMER MEMORY TUNING MODE CLEAR SETUP MIC AUX INPUT VIDEO L AUDIO R PHONES DIMMER Setting the Display...
... 12 CABLE CLR SAT D TUN --/--- LEVEL+ PLAY MODE DISPLAY L NIGHT VCR DVD CINE FLTR HDD RC-681M LEVEL - + Adjusting the Bass and Treble You can boost or cut low-frequency sounds output by the front speakers from -10 dB to select: dim, dimmer, or normal brightness. STANDBY/ON STANDBY TONE, -, + TUNING PRESET MASTER VOLUME PHONES MULTI CH A SPEAKERS B DVD VCR/DVR CBL/SAT AUX TAPE TUNER C D SETUP ENTER RETURN TONE STEREO LISTENING MODE DISPLAY DIGITAL INPUT DIMMER MEMORY TUNING MODE CLEAR SETUP MIC AUX INPUT VIDEO L AUDIO R PHONES DIMMER Setting the Display...

Owner Manual
Page 53
... Music, Dolby Digital, or Dolby Digital EX. 53 Setup closes. Input Channel Settings ■ Multiplex This setting determines which channel is output when the Mono listening mode is on . M/S: Both the main and sub channels are output (default). On: Panorama function on . Higher settings move it backward. With this setting, you to adjust the weight of the front stereo image when using a center speaker, the center channel sound will be adjusted from 0 to create the center channel. The Audio Adjust settings are handled. Sub: The sub channel...
... Music, Dolby Digital, or Dolby Digital EX. 53 Setup closes. Input Channel Settings ■ Multiplex This setting determines which channel is output when the Mono listening mode is on . M/S: Both the main and sub channels are output (default). On: Panorama function on . Higher settings move it backward. With this setting, you to adjust the weight of the front stereo image when using a center speaker, the center channel sound will be adjusted from 0 to create the center channel. The Audio Adjust settings are handled. Sub: The sub channel...

Owner Manual
Page 65
...'s supported by the speakers connected to PCM or DTS. On some DVD-Video discs, you need to make a separate analog or digital audio connection (page 29). • If your DVD player is connected via HDMI is output by the surround speakers. To listen to minimum, disconnect the power cord, and reconnect your TV. The surround speakers produce no sound • When the Stereo or Mono listening mode is selected, the surround speakers produce no sound is not output by your speakers and input sources...
...'s supported by the speakers connected to PCM or DTS. On some DVD-Video discs, you need to make a separate analog or digital audio connection (page 29). • If your DVD player is connected via HDMI is output by the surround speakers. To listen to minimum, disconnect the power cord, and reconnect your TV. The surround speakers produce no sound • When the Stereo or Mono listening mode is selected, the surround speakers produce no sound is not output by your speakers and input sources...

Owner Manual
Page 66
... select the multichannel DVD input, press the [MULTI CH] input selector button. • Check the audio output settings on . If you switch your player from a menu. Video There's no infor- The subwoofer produces no sound • The subwoofer outputs no sound while only speaker set A is off and the AV receiver outputs no sound. • Make sure the speakers are connected properly. This is usually because the DTS bitstream has been processed (e.g., output level, sampling rate, or frequency response changed...
... select the multichannel DVD input, press the [MULTI CH] input selector button. • Check the audio output settings on . If you switch your player from a menu. Video There's no infor- The subwoofer produces no sound • The subwoofer outputs no sound while only speaker set A is off and the AV receiver outputs no sound. • Make sure the speakers are connected properly. This is usually because the DTS bitstream has been processed (e.g., output level, sampling rate, or frequency response changed...

