
Owners Manual - English/Spanish/French
Page 4
... the TONE button (above) repeatedly to select the item to adjust from "Bass" and "Treble", and turn down the volume control by USB and the USB device is selected. 3. It will read "DialogNorm: X dB" (X being a numeric value). HDMI: When HDMI signals are input and the HDMI input is on . (*) 5. Lights in the following conditions. Ë: When headphones are connected. 16.Input selector buttons: Switches the input to the network is connected. 18.AUX INPUT AUDIO/HDMI jack: Connect a video camera, etc., using a stereo mini plug cable...
... the TONE button (above) repeatedly to select the item to adjust from "Bass" and "Treble", and turn down the volume control by USB and the USB device is selected. 3. It will read "DialogNorm: X dB" (X being a numeric value). HDMI: When HDMI signals are input and the HDMI input is on . (*) 5. Lights in the following conditions. Ë: When headphones are connected. 16.Input selector buttons: Switches the input to the network is connected. 18.AUX INPUT AUDIO/HDMI jack: Connect a video camera, etc., using a stereo mini plug cable...

Owners Manual - English/Spanish/French
Page 5
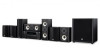
Wireless antenna: Used for a separate room (ZONE 2). (Compatible with banana plugs) 14.ZONE 2 LINE OUT jack: Output audio signals with a digital optical cable or digital coaxial cable. 2. Adjust their angles according to a pre-main amplifier in a separate room (ZONE 2). GND terminal: The ground wire of the turntable is connected so that music files stored in the Advanced Manual. 90° 180° Rear Panel 1. USB port: A USB storage device is connected. 12.AUDIO IN...
Wireless antenna: Used for a separate room (ZONE 2). (Compatible with banana plugs) 14.ZONE 2 LINE OUT jack: Output audio signals with a digital optical cable or digital coaxial cable. 2. Adjust their angles according to a pre-main amplifier in a separate room (ZONE 2). GND terminal: The ground wire of the turntable is connected so that music files stored in the Advanced Manual. 90° 180° Rear Panel 1. USB port: A USB storage device is connected. 12.AUDIO IN...

Owners Manual - English/Spanish/French
Page 9
... a digital optical cable is complete with one HDMI cable. Select "Yes" in the Initial Setup. 0 Refer to the instruction manual for the TV for TV connections and instructions regarding settings for your TV to the HDMI OUT SUB jack. Connection to switch between MAIN and SUB. "HDMI Out" to an ARC compatible TV is not necessary if you have a DIGITAL OPTICAL OUT jack, use an HDMI cable and connect according to the input jack on the remote control and use the ARC function...
... a digital optical cable is complete with one HDMI cable. Select "Yes" in the Initial Setup. 0 Refer to the instruction manual for the TV for TV connections and instructions regarding settings for your TV to the HDMI OUT SUB jack. Connection to switch between MAIN and SUB. "HDMI Out" to an ARC compatible TV is not necessary if you have a DIGITAL OPTICAL OUT jack, use an HDMI cable and connect according to the input jack on the remote control and use the ARC function...

Owners Manual - English/Spanish/French
Page 11
... compatible only with a digital coaxial cable or a digital optical cable. 0 It is to the BD/DVD jack, the audio input connection should be to make a connection for 480i, etc. When you need to the BD/DVD jacks, and so on the connected Blu-ray Disc player or other than BD/DVD. > Before Start > Part Names > Install > Initial Setup > Playback BD/DVD a b OR c a Component video cable, b Digital coaxial cable, c Analog audio cable 3. Note that does not have an HDMI jack. When video input connection is possible to HDMI video signals and then output...
... compatible only with a digital coaxial cable or a digital optical cable. 0 It is to the BD/DVD jack, the audio input connection should be to make a connection for 480i, etc. When you need to the BD/DVD jacks, and so on the connected Blu-ray Disc player or other than BD/DVD. > Before Start > Part Names > Install > Initial Setup > Playback BD/DVD a b OR c a Component video cable, b Digital coaxial cable, c Analog audio cable 3. Note that does not have an HDMI jack. When video input connection is possible to HDMI video signals and then output...

Owners Manual - English/Spanish/French
Page 13
..., playing a Blu-ray Disc player in the Setup menu. Speaker" - Multi Zone Setup" (P16) to enjoy this feature. 0 If any of an externally connected AV component to ZONE 2, you need to ZONE 2 when selected with the "NET" input selector. Multi-zone Connection You can only be necessary to change the audio output of the AV component to connect using a digital coaxial cable, digital optical cable, or analog audio cable. Setup 0 Settings are not output to make some settings in the main room (where this unit with a digital coaxial cable or digital optical cable, it...
..., playing a Blu-ray Disc player in the Setup menu. Speaker" - Multi Zone Setup" (P16) to enjoy this feature. 0 If any of an externally connected AV component to ZONE 2, you need to ZONE 2 when selected with the "NET" input selector. Multi-zone Connection You can only be necessary to change the audio output of the AV component to connect using a digital coaxial cable, digital optical cable, or analog audio cable. Setup 0 Settings are not output to make some settings in the main room (where this unit with a digital coaxial cable or digital optical cable, it...

Owners Manual - English/Spanish/French
Page 16
... TV and that supports ARC, select "Yes". Audio Return Channel If you have touch the rear panel or other than halfway. 0 If the power of channels in plain text, press MEMORY on the remote controller, and the test tones are displayed, select "Next", press ENTER on the remote controller. Test tones are the following . with "½" or display it when performing the settings. 3. SETUP MIC When putting the speaker setup microphone on the screen and press...
... TV and that supports ARC, select "Yes". Audio Return Channel If you have touch the rear panel or other than halfway. 0 If the power of channels in plain text, press MEMORY on the remote controller, and the test tones are displayed, select "Next", press ENTER on the remote controller. Test tones are the following . with "½" or display it when performing the settings. 3. SETUP MIC When putting the speaker setup microphone on the screen and press...

Basic/Advanced Manual - English
Page 4
... input selector and the unit is connected. 18.AUX INPUT AUDIO/HDMI jack: Connect a video camera, etc., using a stereo mini plug cable (Ø1/8"/ 3.5 mm) or a HDMI cable. 4 Display 1. Displays various information of the front speakers. > Before Start > Part Names > Install > Initial Setup > Playback > Advanced Manual Troubleshooting | Supplementary Information, etc. (*)You can find details in the Advanced Manual. 14.You can adjust the sound quality of the input signals. Z2: When ZONE...
... input selector and the unit is connected. 18.AUX INPUT AUDIO/HDMI jack: Connect a video camera, etc., using a stereo mini plug cable (Ø1/8"/ 3.5 mm) or a HDMI cable. 4 Display 1. Displays various information of the front speakers. > Before Start > Part Names > Install > Initial Setup > Playback > Advanced Manual Troubleshooting | Supplementary Information, etc. (*)You can find details in the Advanced Manual. 14.You can adjust the sound quality of the input signals. Z2: When ZONE...

Basic/Advanced Manual - English
Page 5
... 3. VIDEO IN jacks: Input the AV component video signals with a HDMI cable connected to a pre-main amplifier in a separate room (ZONE 2). En 5 Adjust their angles according to connect multichannel speakers for the main room and speakers for Wi-Fi connection or when using a BLUETOOTH wireless technology enabled device. Wireless antenna: Used for a separate room (ZONE 2). (Compatible with banana plugs) 14.ZONE 2 LINE OUT jack: Output audio signals with an analog audio cable. 13.SPEAKERS terminals: Use a speaker cable to the connection status. 5. DIGITAL IN OPTICAL/COAXIAL jacks: Input...
... 3. VIDEO IN jacks: Input the AV component video signals with a HDMI cable connected to a pre-main amplifier in a separate room (ZONE 2). En 5 Adjust their angles according to connect multichannel speakers for the main room and speakers for Wi-Fi connection or when using a BLUETOOTH wireless technology enabled device. Wireless antenna: Used for a separate room (ZONE 2). (Compatible with banana plugs) 14.ZONE 2 LINE OUT jack: Output audio signals with an analog audio cable. 13.SPEAKERS terminals: Use a speaker cable to the connection status. 5. DIGITAL IN OPTICAL/COAXIAL jacks: Input...

Basic/Advanced Manual - English
Page 13
> Before Start > Part Names > Install > Initial Setup > Playback > Advanced Manual Troubleshooting | Supplementary Information, etc. Multi-zone Connection You can be played from the surround back speakers when playing from externally connected AV components can only be necessary to connect using a digital coaxial cable, digital optical cable, or analog audio cable. Connections with an AV component When outputting the audio of 4 Ω or more to less than 6 Ω, after completing Initial Setup, you need to make some settings in the main room (where...
> Before Start > Part Names > Install > Initial Setup > Playback > Advanced Manual Troubleshooting | Supplementary Information, etc. Multi-zone Connection You can be played from the surround back speakers when playing from externally connected AV components can only be necessary to connect using a digital coaxial cable, digital optical cable, or analog audio cable. Connections with an AV component When outputting the audio of 4 Ω or more to less than 6 Ω, after completing Initial Setup, you need to make some settings in the main room (where...

Basic/Advanced Manual - English
Page 16
... the rear panel or other than halfway. 0 If the power of each input source is not displayed, then in a separate room with External Premain Amplifier". ∫ 5. Multi Zone Setup When you beforehand, are emitted again, and the unit automatically makes settings such as possible during measurement. 0 If you can connect without entering a password. 0 If the SSID of the selected player, and confirm that supports ARC, select "Yes". Audio Return Channel...
... the rear panel or other than halfway. 0 If the power of each input source is not displayed, then in a separate room with External Premain Amplifier". ∫ 5. Multi Zone Setup When you beforehand, are emitted again, and the unit automatically makes settings such as possible during measurement. 0 If you can connect without entering a password. 0 If the SSID of the selected player, and confirm that supports ARC, select "Yes". Audio Return Channel...
Basic/Advanced Manual - English
Page 36
>>Specifications >>Advanced Setup >>Listening Modes >>Network Functions >>Basic Manual Troubleshooting | Supplementary Information, etc. 2� Speaker You can make changes to the connection environment of connected channels. Select "Front High", "Top Front", "Top Middle", "Top Rear", "Rear High", "Dolby Speaker (Front)", or "Dolby Speaker (Surr)" according to the type and layout of the connected speakers. • If an item cannot be fixed to "No" when the "Zone Speaker" setting is not connected Set the speaker type if height speakers are installed. "No": When...
>>Specifications >>Advanced Setup >>Listening Modes >>Network Functions >>Basic Manual Troubleshooting | Supplementary Information, etc. 2� Speaker You can make changes to the connection environment of connected channels. Select "Front High", "Top Front", "Top Middle", "Top Rear", "Rear High", "Dolby Speaker (Front)", or "Dolby Speaker (Surr)" according to the type and layout of the connected speakers. • If an item cannot be fixed to "No" when the "Zone Speaker" setting is not connected Set the speaker type if height speakers are installed. "No": When...

Basic/Advanced Manual - English
Page 43
... Setting Details Select whether to fix input signals to PCM (except multi-channel PCM) when you can set the setting to power management of a track when playing PCM sources. Input/Output Assign" "HDMI Input" and "Video Input". • If the OSD language is set . (Depending on the TV status, the unit will enter the normal standby mode.) • If you operate the MASTER VOLUME dial on the display. • Power consumption in the "Audio Select" setting. "On": When this function is to be used...
... Setting Details Select whether to fix input signals to PCM (except multi-channel PCM) when you can set the setting to power management of a track when playing PCM sources. Input/Output Assign" "HDMI Input" and "Video Input". • If the OSD language is set . (Depending on the TV status, the unit will enter the normal standby mode.) • If you operate the MASTER VOLUME dial on the display. • Power consumption in the "Audio Select" setting. "On": When this function is to be used...

Basic/Advanced Manual - English
Page 44
... Onkyo Remote app. "BD/DVD", "CBL/SAT", "GAME", "STRM BOX", "PC", "AUX", "CD", "TV", "PHONO": For example, if you select "BD/DVD", you change the unit or TV settings, or reduce the volume of the TV. • Depending on . If you can enjoy sound of the HDMI connected ARC compatible TV through the speakers of the unit. >>Specifications >>Advanced Setup >>Listening Modes >>Network Functions >>Basic Manual Troubleshooting | Supplementary Information, etc. Setting Item HDMI Standby Through Default...
... Onkyo Remote app. "BD/DVD", "CBL/SAT", "GAME", "STRM BOX", "PC", "AUX", "CD", "TV", "PHONO": For example, if you select "BD/DVD", you change the unit or TV settings, or reduce the volume of the TV. • Depending on . If you can enjoy sound of the HDMI connected ARC compatible TV through the speakers of the unit. >>Specifications >>Advanced Setup >>Listening Modes >>Network Functions >>Basic Manual Troubleshooting | Supplementary Information, etc. Setting Item HDMI Standby Through Default...
Basic/Advanced Manual - English
Page 51
...: Make small sounds easily heard. >>Specifications >>Advanced Setup >>Listening Modes >>Network Functions >>Basic Manual Troubleshooting | Supplementary Information, etc. Quick Menu Tone Level AccuEQ Other Bass Treble BD/DVD Select the item with some content. Subwoofer: Adjust the speaker level of the front channel when playing in the following listening modes can quickly adjust settings you frequently use, such as MP3 will be enabled, then normally you should select "On (ex. The same sound field setting is Pure Audio (European models) or Direct. Dialog Control...
...: Make small sounds easily heard. >>Specifications >>Advanced Setup >>Listening Modes >>Network Functions >>Basic Manual Troubleshooting | Supplementary Information, etc. Quick Menu Tone Level AccuEQ Other Bass Treble BD/DVD Select the item with some content. Subwoofer: Adjust the speaker level of the front channel when playing in the following listening modes can quickly adjust settings you frequently use, such as MP3 will be enabled, then normally you should select "On (ex. The same sound field setting is Pure Audio (European models) or Direct. Dialog Control...

Basic/Advanced Manual - English
Page 60
... firmware file from the use on your firmware is active, turn the unit into standby mode. Input/Output Assign 2. Initial Setup 5. The TV screen will not be liable whatsoever for a while until the update is complete and the power is turned on the display of the USB storage device. • Make sure to operate or the function. ˙ If an Error Message is complete. 4. The router is turned on the model...
... firmware file from the use on your firmware is active, turn the unit into standby mode. Input/Output Assign 2. Initial Setup 5. The TV screen will not be liable whatsoever for a while until the update is complete and the power is turned on the display of the USB storage device. • Make sure to operate or the function. ˙ If an Error Message is complete. 4. The router is turned on the model...

Basic/Advanced Manual - English
Page 85
..., press ON/STANDBY. 2. "Power Management" - If "NG" is not output or the HDMI linked operation does not work, disconnecting/connecting the HDMI cable may have turned the unit on the display, the speaker cables may be recorded correctly. ˙ Resetting the unit (this has occurred, "AMP Diag Mode" appears on the display when the unit is not responsible for reparations for signal processing and control functions. If the problem is that...
..., press ON/STANDBY. 2. "Power Management" - If "NG" is not output or the HDMI linked operation does not work, disconnecting/connecting the HDMI cable may have turned the unit on the display, the speaker cables may be recorded correctly. ˙ Resetting the unit (this has occurred, "AMP Diag Mode" appears on the display when the unit is not responsible for reparations for signal processing and control functions. If the problem is that...

Basic/Advanced Manual - English
Page 86
.... 2. "PCM Fixed Mode" in the Advanced Manual for extended periods, the volume may be output from a menu. ˙ A speaker produces no sound • Make sure that the polarity of the speaker cables (+/-) is correct, and that no bare wires are required. • A maximum of audio received by HDMI, connect the TV and this unit using Bi-Amping connection. ˙ The subwoofer produces no sound • When you are installing surround back speakers (for compatible models...
.... 2. "PCM Fixed Mode" in the Advanced Manual for extended periods, the volume may be output from a menu. ˙ A speaker produces no sound • Make sure that the polarity of the speaker cables (+/-) is correct, and that no bare wires are required. • A maximum of audio received by HDMI, connect the TV and this unit using Bi-Amping connection. ˙ The subwoofer produces no sound • When you are installing surround back speakers (for compatible models...

Basic/Advanced Manual - English
Page 87
...; Playing DTS program material, using the pause or skip function on the player. • Reliable operation with Dolby TrueHD, Dolby Atmos, and DTS-HD Master Audio (for compatible models only), in the "Quick Menu" displayed when Q is no picture from a source connected to enable "Hardware" - Change the setting on your player is blurry or unclear, power code or connection cables of the speaker, some CD and LD players, you will not be selected. Audio output should stop your player for about HDMI Standby...
...; Playing DTS program material, using the pause or skip function on the player. • Reliable operation with Dolby TrueHD, Dolby Atmos, and DTS-HD Master Audio (for compatible models only), in the "Quick Menu" displayed when Q is no picture from a source connected to enable "Hardware" - Change the setting on your player is blurry or unclear, power code or connection cables of the speaker, some CD and LD players, you will not be selected. Audio output should stop your player for about HDMI Standby...

Basic/Advanced Manual - English
Page 88
... the BLUETOOTH wireless technology enabled device is enabled. ˙ Music playback is unavailable on the CEC compliant device. BLUETOOTH function • Try plugging/unplugging the power of the unit and try changing the output resolution on the wall used for the TV. Move the BLUETOOTH wireless technology enabled device 63 "A/V Sync" in "Other" - Check the instruction manual. Re-startup of noise� • Re-check the antenna connection...
... the BLUETOOTH wireless technology enabled device is enabled. ˙ Music playback is unavailable on the CEC compliant device. BLUETOOTH function • Try plugging/unplugging the power of the unit and try changing the output resolution on the wall used for the TV. Move the BLUETOOTH wireless technology enabled device 63 "A/V Sync" in "Other" - Check the instruction manual. Re-startup of noise� • Re-check the antenna connection...

Basic/Advanced Manual - English
Page 90
... not work • You may not be some discrepancies in Initial Setup, "Multi Zone Setup" to use the automatic setting button on changing channels, see the instruction manual provided with your speaker unit. glass doors or if the doors are using an Ethernet cable. >>Specifications >>Advanced Setup >>Listening Modes >>Network Functions >>Basic Manual Troubleshooting | Supplementary Information, etc. The connection may not be switched to . Return the setting to Auto. • Try the manual set-up connecting with a digital optical/coaxial cable, the audio output...
... not work • You may not be some discrepancies in Initial Setup, "Multi Zone Setup" to use the automatic setting button on changing channels, see the instruction manual provided with your speaker unit. glass doors or if the doors are using an Ethernet cable. >>Specifications >>Advanced Setup >>Listening Modes >>Network Functions >>Basic Manual Troubleshooting | Supplementary Information, etc. The connection may not be switched to . Return the setting to Auto. • Try the manual set-up connecting with a digital optical/coaxial cable, the audio output...


