Owner Manual
Page 4
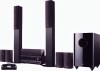
... the turntable, CD player or Blu-ray Disc/DVD player, otherwise lower the unit's output level. Input Signal Warning The speakers can also be damaged. • Speakers should occur, turn off your amplifier before connecting or disconnecting cables). 7. High-pitched sounds generated by connecting or discon- Specifications and operations are likely to be placed on . 4. Note that are placed nearby. Sound from an untuned FM radio. 2. Special test tones from vibration. Speaker Precautions Package Contents...
... the turntable, CD player or Blu-ray Disc/DVD player, otherwise lower the unit's output level. Input Signal Warning The speakers can also be damaged. • Speakers should occur, turn off your amplifier before connecting or disconnecting cables). 7. High-pitched sounds generated by connecting or discon- Specifications and operations are likely to be placed on . 4. Note that are placed nearby. Sound from an untuned FM radio. 2. Special test tones from vibration. Speaker Precautions Package Contents...
Owner Manual
Page 5
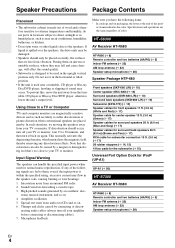
... & Rear Panels 8 Speaker Package 10 Remote Controller 12 About Home Theater 13 Connections Connecting the AV Receiver 14 Turning On & Basic Operations Turning On/Off the AV Receiver 24 Basic Operations 25 Listening to the Radio 30 Recording 32 Using the Listening Modes 33 Advanced Operations Advanced Setup 38 Zone 2 53 Controlling iPod & Other Components Controlling iPod 56 Controlling Other Components 60 Others Troubleshooting 64 Specifications 69 About HDMI 72 Using an RIHD-compatible TV, Player, or Recorder ... 73 Video Resolution Chart 75 To reset the...
... & Rear Panels 8 Speaker Package 10 Remote Controller 12 About Home Theater 13 Connections Connecting the AV Receiver 14 Turning On & Basic Operations Turning On/Off the AV Receiver 24 Basic Operations 25 Listening to the Radio 30 Recording 32 Using the Listening Modes 33 Advanced Operations Advanced Setup 38 Zone 2 53 Controlling iPod & Other Components Controlling iPod 56 Controlling Other Components 60 Others Troubleshooting 64 Specifications 69 About HDMI 72 Using an RIHD-compatible TV, Player, or Recorder ... 73 Video Resolution Chart 75 To reset the...
Owner Manual
Page 23
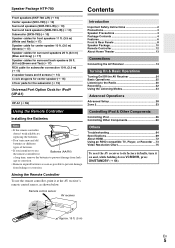
... convert digital input signals for compatibility with composite video and component video sources all being present. tor (➔ 39). Which Connections Should I Use? Audio Signal Flow Chart Blu-ray Disc/DVD player, etc. The AV receiver supports several connection formats for analog line outputs and vice versa. For example, audio signals connected to an optical or coaxial digital input are present at both the HDMI and composite video inputs, however, the HDMI signal is connected to an HDMI or COM- The format you connect audio component to the HDMI OUT...
... convert digital input signals for compatibility with composite video and component video sources all being present. tor (➔ 39). Which Connections Should I Use? Audio Signal Flow Chart Blu-ray Disc/DVD player, etc. The AV receiver supports several connection formats for analog line outputs and vice versa. For example, audio signals connected to an optical or coaxial digital input are present at both the HDMI and composite video inputs, however, the HDMI signal is connected to an HDMI or COM- The format you connect audio component to the HDMI OUT...
Owner Manual
Page 25
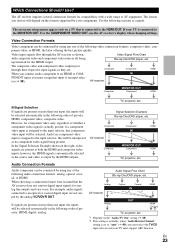
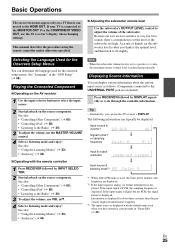
... subwoofer volume level is set the subwoofer level to the UNIVERSAL PORT jack are displayed. *2 If the input signal is analog, no format information is displayed. If the input signal is PCM, the sampling frequency is displayed. En 25 As a rule of thumb, set to the Radio" (➔ 30) 3 To adjust the volume, use the MASTER VOLUME control. 4 Select a listening mode and enjoy! See also: • "Controlling Other Components" (➔ 60) • "Controlling iPod" (➔ 56) • "Listening to a positive (+) value, the maximum master volume level...
... subwoofer volume level is set the subwoofer level to the UNIVERSAL PORT jack are displayed. *2 If the input signal is analog, no format information is displayed. If the input signal is PCM, the sampling frequency is displayed. En 25 As a rule of thumb, set to the Radio" (➔ 30) 3 To adjust the volume, use the MASTER VOLUME control. 4 Select a listening mode and enjoy! See also: • "Controlling Other Components" (➔ 60) • "Controlling iPod" (➔ 56) • "Listening to a positive (+) value, the maximum master volume level...
Owner Manual
Page 26
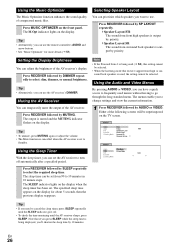
... use . BD/DVD Audio Bass Video Treble 0dB Info Subwoofer Level Input Sel Center Level Listening Mode Dynamic EQ Dynamic Volume BD/DVD Audio Wide Mode Video Picture Mode Info Auto Input Sel Listening Mode Press RECEIVER followed by SP LAYOUT repeatedly. `Speaker Layout:FH: The sound from front high speakers is being displayed, you can have a quick access to frequently used (➔ 54), this setting cannot be superimposed on the display when the sleep timer has been set from surround back speakers...
... use . BD/DVD Audio Bass Video Treble 0dB Info Subwoofer Level Input Sel Center Level Listening Mode Dynamic EQ Dynamic Volume BD/DVD Audio Wide Mode Video Picture Mode Info Auto Input Sel Listening Mode Press RECEIVER followed by SP LAYOUT repeatedly. `Speaker Layout:FH: The sound from front high speakers is being displayed, you can have a quick access to frequently used (➔ 54), this setting cannot be superimposed on the display when the sleep timer has been set from surround back speakers...
Owner Manual
Page 27
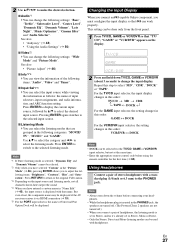
... receiver receives it 's already set to Stereo, unless it via HDMI connection (➔ 19). *5 For the PORT input selector, the name of input selectors, input assignments, and radio information, and ARC function setting. Press ENTER to switch to select the desired input source. 2 Use R/X/F/S to make the desired selection. ■ Audio*1 ` You can change the following settings: "Wide Mode" and "Picture Mode". Note • Always turn down TV/CD, GAME or VCR/DVR (about 3 seconds) to change the input display. Using...
... receiver receives it 's already set to Stereo, unless it via HDMI connection (➔ 19). *5 For the PORT input selector, the name of input selectors, input assignments, and radio information, and ARC function setting. Press ENTER to switch to select the desired input source. 2 Use R/X/F/S to make the desired selection. ■ Audio*1 ` You can change the following settings: "Wide Mode" and "Picture Mode". Note • Always turn down TV/CD, GAME or VCR/DVR (about 3 seconds) to change the input display. Using...
Owner Manual
Page 28
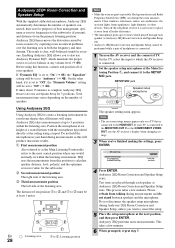
... acoustical problems over the listening area in your home theater that is connected. 2 Set the speaker setup microphone at up test tones which played through each speaker as possible. Audyssey 2EQ® Room Correction and Speaker Setup With the supplied calibrated microphone, Audyssey 2EQ automatically determines the number of speakers connected, their size for 3 positions. Test tones are played through each speaker as this function, connect and position all listeners will be at any volume level (➔...
... acoustical problems over the listening area in your home theater that is connected. 2 Set the speaker setup microphone at up test tones which played through each speaker as possible. Audyssey 2EQ® Room Correction and Speaker Setup With the supplied calibrated microphone, Audyssey 2EQ automatically determines the number of speakers connected, their size for 3 positions. Test tones are played through each speaker as this function, connect and position all listeners will be at any volume level (➔...
Owner Manual
Page 32
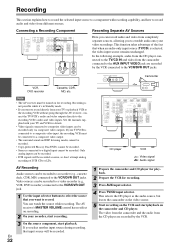
Connecting a Recording Component L R AUDIO IN VIDEO IN Recording Separate AV Sources Here you can be recorded. • DTS signals will be recorded. Note • The AV receiver must be connected to a composite video output. • The surround sound and DSP listening modes cannot be recorded. • Copy-protected Blu-ray Disc/DVDs cannot be recorded. • Sources connected to a digital input cannot be recorded. Recording is not possible while it's in Standby mode. • If...
Connecting a Recording Component L R AUDIO IN VIDEO IN Recording Separate AV Sources Here you can be recorded. • DTS signals will be recorded. Note • The AV receiver must be connected to a composite video output. • The surround sound and DSP listening modes cannot be recorded. • Copy-protected Blu-ray Disc/DVDs cannot be recorded. • Sources connected to a digital input cannot be recorded. Recording is not possible while it's in Standby mode. • If...
Owner Manual
Page 38
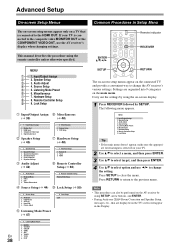
... the COMPONENT VIDEO OUT, use F/S to select option and use the AV receiver's display when changing settings. Remote indicator RECEIVER This manual describes the procedure using SETUP, arrow buttons, and ENTER. • During Audyssey 2EQ® Room Correction and Speaker Setup, messages, etc., that is connected to change the setting. Input/Output Assign C 2. Audio Adjust E 4. Input/Output Assign 1. Component Video Input 4. Volume Setup 2. Hardware Setup 1. Dolby 3. Source Setup 1. Listening Mode Preset 1. PORT SETUP RETURN The on-screen setup menus appear on the main menu...
... the COMPONENT VIDEO OUT, use F/S to select option and use the AV receiver's display when changing settings. Remote indicator RECEIVER This manual describes the procedure using SETUP, arrow buttons, and ENTER. • During Audyssey 2EQ® Room Correction and Speaker Setup, messages, etc., that is connected to change the setting. Input/Output Assign C 2. Audio Adjust E 4. Input/Output Assign 1. Component Video Input 4. Volume Setup 2. Hardware Setup 1. Dolby 3. Source Setup 1. Listening Mode Preset 1. PORT SETUP RETURN The on-screen setup menus appear on the main menu...
Owner Manual
Page 39
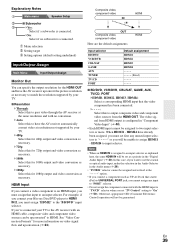
... video, component video IN HDMI Composite video, component video OUT Here are the default assignments. When HDMI1 - HDMI4 to output composite video and component video sources from HDMI output is configured in "Component Video Input" (➔ 40). • Each HDMI input cannot be guaranteed. Otherwise, appropriate CEC (Consumer Electronics Control) operation will not be assigned to use the coaxial or optical audio input, make the selection in the Audio Selector in the "Digital Audio Input" (➔ 40). For example, if you connect your Blu-ray Disc/DVD player...
... video, component video IN HDMI Composite video, component video OUT Here are the default assignments. When HDMI1 - HDMI4 to output composite video and component video sources from HDMI output is configured in "Component Video Input" (➔ 40). • Each HDMI input cannot be guaranteed. Otherwise, appropriate CEC (Consumer Electronics Control) operation will not be assigned to use the coaxial or optical audio input, make the selection in the Audio Selector in the "Digital Audio Input" (➔ 40). For example, if you connect your Blu-ray Disc/DVD player...
Owner Manual
Page 44
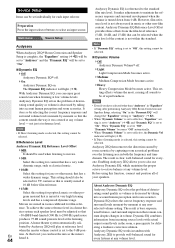
... play at any userselected volume setting. Source Setup Items can enjoy great sound even when listening at low volume levels. It does so by selecting the correct frequency response and surround volume levels moment-by Audyssey 2EQ will light (➔ 9). • If Direct listening mode is set to "On". When "Dynamic EQ" is set to "Off", "Dynamic Volume" becomes "Off" automatically. • When "Dynamic Volume" is set to select an input source. ater system each input...
... play at any userselected volume setting. Source Setup Items can enjoy great sound even when listening at low volume levels. It does so by selecting the correct frequency response and surround volume levels moment-by Audyssey 2EQ will light (➔ 9). • If Direct listening mode is set to "On". When "Dynamic EQ" is set to "Off", "Dynamic Volume" becomes "Off" automatically. • When "Dynamic Volume" is set to select an input source. ater system each input...

Owner Manual
Page 48
... the AV receiver was turned off, select "Last". This is adjusted. ` On: Displayed. ` Off: Not displayed. OSD Setup ■ On Screen Display This preference determines whether operation details are displayed on . Changing the Remote Controller's ID 1 While holding down RECEIVER, press and hold down SETUP until the remote indicator lights (about 3 seconds) (➔ 38). 2 Use the number buttons to "2" or "3". Miscellaneous Hardware Setup Main menu Miscellaneous Main menu Hardware Setup Volume Setup Remote ID ■ Maximum Volume ` Off, 30...
... the AV receiver was turned off, select "Last". This is adjusted. ` On: Displayed. ` Off: Not displayed. OSD Setup ■ On Screen Display This preference determines whether operation details are displayed on . Changing the Remote Controller's ID 1 While holding down RECEIVER, press and hold down SETUP until the remote indicator lights (about 3 seconds) (➔ 38). 2 Use the number buttons to "2" or "3". Miscellaneous Hardware Setup Main menu Miscellaneous Main menu Hardware Setup Volume Setup Remote ID ■ Maximum Volume ` Off, 30...
Owner Manual
Page 49
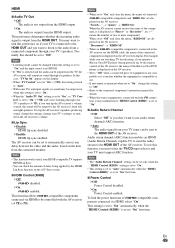
... displayed on the AV receiver. • Set to use audio return channel (ARC) function. ` Auto: The audio signal from the connected monitor. HDMI ■ Audio TV Out ` Off: The audio is not output from the HDMI output. ` On: The audio is output from the HDMI OUT. Normally, this function, you want to listen to the audio from a connected component through your TV's speakers (➔ 19), if you don't want to turn up the AV receiver's volume control, the sound will output...
... displayed on the AV receiver. • Set to use audio return channel (ARC) function. ` Auto: The audio signal from the connected monitor. HDMI ■ Audio TV Out ` Off: The audio is not output from the HDMI output. ` On: The audio is output from the HDMI OUT. Normally, this function, you want to listen to the audio from a connected component through your TV's speakers (➔ 19), if you don't want to turn up the AV receiver's volume control, the sound will output...
Owner Manual
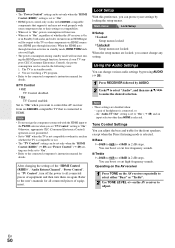
Page 50
... "HDMI Control (RIHD)", "Audio Return Channel", "Power Control", or "TV Control", turn off the power to all connected pieces of equipment and then turn them on the AV receiver repeatedly to select either "Bass" or "Treble". 2 Use TONE LEVEL +/- Refer to the user's manuals for details. ■ TV Control ` Off: TV Control disabled. ` On: TV Control enabled. Using the Audio Settings You can change any setting. Operating on the AV receiver 1 Press TONE on again. however if your settings by AUDIO. 2 UseR/X to select "Audio...
... "HDMI Control (RIHD)", "Audio Return Channel", "Power Control", or "TV Control", turn off the power to all connected pieces of equipment and then turn them on the AV receiver repeatedly to select either "Bass" or "Treble". 2 Use TONE LEVEL +/- Refer to the user's manuals for details. ■ TV Control ` Off: TV Control disabled. ` On: TV Control enabled. Using the Audio Settings You can change any setting. Operating on the AV receiver 1 Press TONE on again. however if your settings by AUDIO. 2 UseR/X to select "Audio...
Owner Manual
Page 57
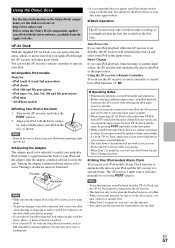
... the input source. Using the AV receiver's Remote Controller You can switch the input source between the back of your iPod. ■ Compatible iPod models Made for sound effects on your iPod is set your iPod in the Dock 1. You can easily play back the music, photo, or movie stored on your iPod. • Don't use the AV receiver's remote controller to operate your iPod and the adapter, turn on and select your Apple iPod through the AV receiver and enjoy great sound. Auto Power...
... the input source. Using the AV receiver's Remote Controller You can switch the input source between the back of your iPod. ■ Compatible iPod models Made for sound effects on your iPod is set your iPod in the Dock 1. You can easily play back the music, photo, or movie stored on your iPod. • Don't use the AV receiver's remote controller to operate your iPod and the adapter, turn on and select your Apple iPod through the AV receiver and enjoy great sound. Auto Power...
Owner Manual
Page 58
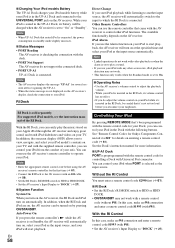
... 's not set to operate your iPod. See the Dock's instruction manual for details on your TV. For supported iPod models, see the instruction manual of your sofa. Note • Enter the appropriate remote control code before you to the UNIVERSAL PORT jack on at the specified time and select your iPod as the input source automatically. With the RI Control In this case, make an V connection and enter a remote control code 81993 (with V). • Set the AV receiver's Input Display to "DOCK...
... 's not set to operate your iPod. See the Dock's instruction manual for details on your TV. For supported iPod models, see the instruction manual of your sofa. Note • Enter the appropriate remote control code before you to the UNIVERSAL PORT jack on at the specified time and select your iPod as the input source automatically. With the RI Control In this case, make an V connection and enter a remote control code 81993 (with V). • Set the AV receiver's Input Display to "DOCK...

Owner Manual
Page 64
... digital audio output setting on the display and the AV receiver will appear on the con- - If your radio presets and custom settings. Audio ■ There's no sound from a menu. Remove - nected device. Make sure that all speakers. 34 Specify the speaker distances and adjust the individ- 41 ual speaker levels. audio output format from a DVD player connected to maximum, disconnect the power cord, and contact your Onkyo dealer. home theater enjoyment. still connected. "Clear" will enter Standby mode. ■ The STANDBY indicator flashes red The protection...
... digital audio output setting on the display and the AV receiver will appear on the con- - If your radio presets and custom settings. Audio ■ There's no sound from a menu. Remove - nected device. Make sure that all speakers. 34 Specify the speaker distances and adjust the individ- 41 ual speaker levels. audio output format from a DVD player connected to maximum, disconnect the power cord, and contact your Onkyo dealer. home theater enjoyment. still connected. "Clear" will enter Standby mode. ■ The STANDBY indicator flashes red The protection...

Owner Manual
Page 65
... your player for other digital audio signals, audio output may be set as an AM radio station or mono TV program, the sound is not a malfunction. ■ The beginning of each individual speaker has 28, 41 been adjusted to high positive values, then the maximum master volume possible may be heard Using cable ties to PCM, because the AV receiver does not switch formats immediately, you may hear noise. With some DVD-Video discs...
... your player for other digital audio signals, audio output may be set as an AM radio station or mono TV program, the sound is not a malfunction. ■ The beginning of each individual speaker has 28, 41 been adjusted to high positive values, then the maximum master volume possible may be heard Using cable ties to PCM, because the AV receiver does not switch formats immediately, you may hear noise. With some DVD-Video discs...

Owner Manual
Page 66
... cannot operate it 's an Onkyo component, make sure that input to watch composite video, and component video sources. If the video source is set to set the display. with - Connecting only an V cable won't work as expected. To control another resolution on your DVD player. ■ The on both the AV receiver 48 and remote controller. ■ Can't control other - HDMI, onscreen menus are not guaranteed. Concrete walls weaken radio signals. - RECEIVER. Make sure that the remote controller is connected to the HDMI OUT, select...
... cannot operate it 's an Onkyo component, make sure that input to watch composite video, and component video sources. If the video source is set to set the display. with - Connecting only an V cable won't work as expected. To control another resolution on your DVD player. ■ The on both the AV receiver 48 and remote controller. ■ Can't control other - HDMI, onscreen menus are not guaranteed. Concrete walls weaken radio signals. - RECEIVER. Make sure that the remote controller is connected to the HDMI OUT, select...
Owner Manual
Page 72
..., Blu-ray Disc/DVD players, set by the DDWG*3 in no sound from a PC are not supported. • The HDMI audio signal (sampling rate, bit length, etc.) may not work with a DVI input can be restricted by using an HDMI-to-DVI adapter cable. (This may be connected by the connected source component. Other devices connected to the AV receiver via HDMI, check its setup. Until now, several separate video and audio cables have been required to the connected component's instruction manual...
..., Blu-ray Disc/DVD players, set by the DDWG*3 in no sound from a PC are not supported. • The HDMI audio signal (sampling rate, bit length, etc.) may not work with a DVI input can be restricted by using an HDMI-to-DVI adapter cable. (This may be connected by the connected source component. Other devices connected to the AV receiver via HDMI, check its setup. Until now, several separate video and audio cables have been required to the connected component's instruction manual...


