
Owner Manual
Page 1
... the sources .. 24 Enjoying multi channel sources 27 Enjoying the listening modes 28 Audio adjust function 30 Recording a source 32 Remote controller Using the remote controller with the HT-R320 17 Speaker setup 18 Changing the default settings according to your connections 21 Listening to the radio 22 Various functions common to obtain optimum performance and listening enjoyment from your other AV components 33 Appendix Troubleshooting 35 Specifications 37 En Please read this manual thoroughly before making connections and plugging...
... the sources .. 24 Enjoying multi channel sources 27 Enjoying the listening modes 28 Audio adjust function 30 Recording a source 32 Remote controller Using the remote controller with the HT-R320 17 Speaker setup 18 Changing the default settings according to your connections 21 Listening to the radio 22 Various functions common to obtain optimum performance and listening enjoyment from your other AV components 33 Appendix Troubleshooting 35 Specifications 37 En Please read this manual thoroughly before making connections and plugging...

Owner Manual
Page 2
... require extensive work by following conditions: A. Refer all instructions. 5. Servicing is intended to alert the user to the presence of free space at the top and sides and 10 cm (4") at plugs, convenience receptacles, and the point where they may be placed on or pinched particularly at the rear. Adjust only those controls that could result in installation, such as...
... require extensive work by following conditions: A. Refer all instructions. 5. Servicing is intended to alert the user to the presence of free space at the top and sides and 10 cm (4") at plugs, convenience receptacles, and the point where they may be placed on or pinched particularly at the rear. Adjust only those controls that could result in installation, such as...
Owner Manual
Page 3
... solvents, because they may cause harmful interference to use the HT-R320 for an extended period, remove the power cord from the AC outlet. 3 If this equipment does cause harmful interference to radio or television reception, which can radiate radio frequency energy and, if not installed and used in a particular installation. For models having a power cord with a soft cloth. Care-Occasionally you should dust...
... solvents, because they may cause harmful interference to use the HT-R320 for an extended period, remove the power cord from the AC outlet. 3 If this equipment does cause harmful interference to radio or television reception, which can radiate radio frequency energy and, if not installed and used in a particular installation. For models having a power cord with a soft cloth. Care-Occasionally you should dust...

Owner Manual
Page 6
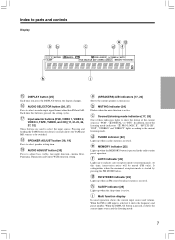
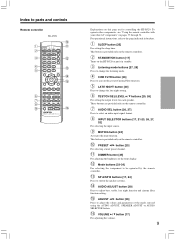
... the DIRECT, STEREO or SURROUND button to the standby state. The (SPEAKERS) A/B indicators corresponding to turn on/off the display, disables control functions. 2 STANDBY indicator [17] Lights when the HT-R320 is a standard stereo jack for the current source. The audio for about 5 seconds then show the current volume setting for the front right and left speakers are connected to the DIGITAL INPUT jacks of the HT-R320, use SPEAKERS A and B simultaneously. ! Index to parts and controls Front panel For operational instructions...
... the DIRECT, STEREO or SURROUND button to the standby state. The (SPEAKERS) A/B indicators corresponding to turn on/off the display, disables control functions. 2 STANDBY indicator [17] Lights when the HT-R320 is a standard stereo jack for the current source. The audio for about 5 seconds then show the current volume setting for the front right and left speakers are connected to the DIGITAL INPUT jacks of the HT-R320, use SPEAKERS A and B simultaneously. ! Index to parts and controls Front panel For operational instructions...
Owner Manual
Page 7
... mode is received. g FM STEREO indicator [22] Lights up when a radio station is active. When the DISPLAY button is selected, it shows the current input source and the listening mode. 7 f AUTO indicator [22] Lights up when the sleep timer is pressed, the setting cycles. $ Input selector buttons (DVD, VIDEO 1, VIDEO 2, VIDEO 3, TAPE, TUNER, and CD) [17, 21-23, 26, 27, 32] These buttons are used to adjust bass, treble, late night function, cinema filter, Panorama, Dimension and Center Width function setting...
... mode is received. g FM STEREO indicator [22] Lights up when a radio station is active. When the DISPLAY button is selected, it shows the current input source and the listening mode. 7 f AUTO indicator [22] Lights up when the sleep timer is pressed, the setting cycles. $ Input selector buttons (DVD, VIDEO 1, VIDEO 2, VIDEO 3, TAPE, TUNER, and CD) [17, 21-23, 26, 27, 32] These buttons are used to adjust bass, treble, late night function, cinema filter, Panorama, Dimension and Center Width function setting...
Owner Manual
Page 8
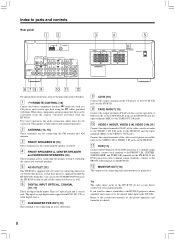
... jacks. For correct operation, the audio connection cables must also be controlled from the remote controller provided with the HT-R320. w MONITOR OUT [10] This output is for connecting the power cord from DVD, LD, CD, or other devices so that have connectors such as well. 6 DIGITAL INPUT OPTICAL, COAXIAL [10, 11] These are interconnected, they can be connected. When these components are digital audio inputs. Index to parts and controls Rear panel AM FM 75 ANTENNA FRONT SPEAKERS...
... jacks. For correct operation, the audio connection cables must also be controlled from the remote controller provided with the HT-R320. w MONITOR OUT [10] This output is for connecting the power cord from DVD, LD, CD, or other devices so that have connectors such as well. 6 DIGITAL INPUT OPTICAL, COAXIAL [10, 11] These are interconnected, they can be connected. When these components are digital audio inputs. Index to parts and controls Rear panel AM FM 75 ANTENNA FRONT SPEAKERS...
Owner Manual
Page 9
... component to be operated by the remote controller. ~ SP A/SP B buttons [17, 24] Press to adjust the values and parameters of the mode selected using the AUDIO ADJUST, SPEAKER ADJUST or AUDIO SELECTOR button. # VOLUME / button [17] For adjusting the volume. 9 This button is provided only on the remote controller. 0 PRESET / button [23] For selecting a tuner preset channel. - Index to parts and controls Remote controller RC-479S Explanations on this page are provided only on the remote controller. 7 AUDIO SEL button [26, 27] Press to select an audio input signal format. 8 INPUT...
... component to be operated by the remote controller. ~ SP A/SP B buttons [17, 24] Press to adjust the values and parameters of the mode selected using the AUDIO ADJUST, SPEAKER ADJUST or AUDIO SELECTOR button. # VOLUME / button [17] For adjusting the volume. 9 This button is provided only on the remote controller. 0 PRESET / button [23] For selecting a tuner preset channel. - Index to parts and controls Remote controller RC-479S Explanations on this page are provided only on the remote controller. 7 AUDIO SEL button [26, 27] Press to select an audio input signal format. 8 INPUT...

Owner Manual
Page 16
... the standby state. Connections for remote control ( ) The terminal on the HT-R320 is for an -connected component is connected to the AC OUTLET on the HT-R320, or if the HT-R320 is turned on and the input source selected at this terminal to the terminal of the other one to connect to the HT-R320. To connect components using the audio connection cable. Direct change function When the play button is -connected, you can operate the DVD player directly with...
... the standby state. Connections for remote control ( ) The terminal on the HT-R320 is for an -connected component is connected to the AC OUTLET on the HT-R320, or if the HT-R320 is turned on and the input source selected at this terminal to the terminal of the other one to connect to the HT-R320. To connect components using the audio connection cable. Direct change function When the play button is -connected, you can operate the DVD player directly with...

Owner Manual
Page 17
... below. SPEAKERS A/B Input Selector buttons Input selector buttons VOLUME Connecting the power 1. The STANDBY indicator lights up according to the received sound system in the AV Receiver's display. ŸDIGITAL PCM DTS When MD recorder is reproduced, the ŸDIGITAL, DTS, or PCM (2 channel digital stereo) indicator lights up . 2. Enjoying music or videos with other electrical equipment such as computers. The AV Receiver enters standby mode. Be sure to set to minimum before turning off the AV receiver. When VIDEO 3 is...
... below. SPEAKERS A/B Input Selector buttons Input selector buttons VOLUME Connecting the power 1. The STANDBY indicator lights up according to the received sound system in the AV Receiver's display. ŸDIGITAL PCM DTS When MD recorder is reproduced, the ŸDIGITAL, DTS, or PCM (2 channel digital stereo) indicator lights up . 2. Enjoying music or videos with other electrical equipment such as computers. The AV Receiver enters standby mode. Be sure to set to minimum before turning off the AV receiver. When VIDEO 3 is...
Owner Manual
Page 20
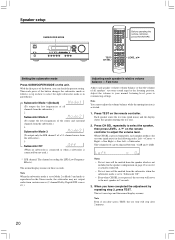
... is actually connected. • No test tone will be adjusted between -12dB and +12dB. The normal display resumes in the Stereo mode, the subwoofer may not output audio from the subwoofer.) ↓ Subwoofer Mode 3 (To output only the LFE channel* of all channels from the subwoofer.) ↓ Subwoofer Mode 2 (To output the low frequencies of the center and surround channels from certain sources (2 channel-Dolby Digital/DTS source etc.). When CH SEL is reproduced in three seconds. Speaker setup SUBWOOFER MODE Before operating the remote controller, press...
... is actually connected. • No test tone will be adjusted between -12dB and +12dB. The normal display resumes in the Stereo mode, the subwoofer may not output audio from the subwoofer.) ↓ Subwoofer Mode 3 (To output only the LFE channel* of all channels from the subwoofer.) ↓ Subwoofer Mode 2 (To output the low frequencies of the center and surround channels from certain sources (2 channel-Dolby Digital/DTS source etc.). When CH SEL is reproduced in three seconds. Speaker setup SUBWOOFER MODE Before operating the remote controller, press...
Owner Manual
Page 21
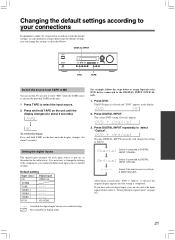
... page 26). 21 VIDEO 1 - - - - Select if connected to DIGITAL INPUT COAXIAL. About three seconds after "DVD ← Optical" is selected, the original display appears and the setting is pre-set in initial setting. : Not available for digital input but not set , as follows: Setting the digital inputs The digital input terminal for each input source is completed. DIGITAL INPUT DVD TAPE Switch the source from a digital input jack. Press DVD. Press DIGITAL INPUT repeatedly to "Setting the input signal format" on the unit until the display changes (for about...
... page 26). 21 VIDEO 1 - - - - Select if connected to DIGITAL INPUT COAXIAL. About three seconds after "DVD ← Optical" is selected, the original display appears and the setting is pre-set in initial setting. : Not available for digital input but not set , as follows: Setting the digital inputs The digital input terminal for each input source is completed. DIGITAL INPUT DVD TAPE Switch the source from a digital input jack. Press DVD. Press DIGITAL INPUT repeatedly to "Setting the input signal format" on the unit until the display changes (for about...
Owner Manual
Page 24
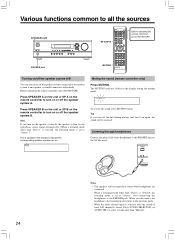
... AUDIO SELECTOR (or AUDIO SEL) to select a mode other than "Direct" is selected, the listening mode is set to "Stereo" after connecting the headphones to "Stereo.") The lit (speaker) A/B indicators indicate the corresponding speaker systems are connected. • When a listening mode other than "Multich". 24 The MUTING indicator flashes in the display during muting, and turn on or off the speaker systems connected to all the sources SPEAKERS A/B SP A/SP B Before operating the remote controller...
... AUDIO SELECTOR (or AUDIO SEL) to select a mode other than "Direct" is selected, the listening mode is set to "Stereo" after connecting the headphones to "Stereo.") The lit (speaker) A/B indicators indicate the corresponding speaker systems are connected. • When a listening mode other than "Multich". 24 The MUTING indicator flashes in the display during muting, and turn on or off the speaker systems connected to all the sources SPEAKERS A/B SP A/SP B Before operating the remote controller...

Owner Manual
Page 26
... the sources AUDIO SELECTOR Before operating the remote controller, press RCVR/TAPE. When TEST is selected as described below, it 's off. The adjusted values will be adjusted between Auto ↔ PCM ↔ DTS ↔ Auto. Auto: Setting to play back the input from the component connected to PCM. To fix the "Auto" to select "Auto". 2) While "Auto" is fast-forwarded or reversed → Fix the digital signal to the values set the input signal format again. Various functions common to adjust the volume level. The volume level...
... the sources AUDIO SELECTOR Before operating the remote controller, press RCVR/TAPE. When TEST is selected as described below, it 's off. The adjusted values will be adjusted between Auto ↔ PCM ↔ DTS ↔ Auto. Auto: Setting to play back the input from the component connected to PCM. To fix the "Auto" to select "Auto". 2) While "Auto" is fast-forwarded or reversed → Fix the digital signal to the values set the input signal format again. Various functions common to adjust the volume level. The volume level...
Owner Manual
Page 27
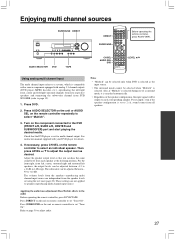
... or remote controller to select an individual speaker. Applying the audio tone adjustment (Bass/Treble) effects to the DVD (FRONT L/R, SURR L/R, CENTER and SUBWOOFER) port and start playing the desired media. Enjoying multi channel sources SURROUND DIRECT DIRECT SURROUND Before operating the remote controller, press RCVR/TAPE. Press SURROUND on the remote controller to set using the test tone (page 20). Turn on the component connected to the audio Before operating the remote controller, press RCVR/TAPE. See instruction manual supplied with analog 5.1-channel outputs (DVD player...
... or remote controller to select an individual speaker. Applying the audio tone adjustment (Bass/Treble) effects to the DVD (FRONT L/R, SURR L/R, CENTER and SUBWOOFER) port and start playing the desired media. Enjoying multi channel sources SURROUND DIRECT DIRECT SURROUND Before operating the remote controller, press RCVR/TAPE. Press SURROUND on the remote controller to set using the test tone (page 20). Turn on the component connected to the audio Before operating the remote controller, press RCVR/TAPE. See instruction manual supplied with analog 5.1-channel outputs (DVD player...

Owner Manual
Page 28
... minimum sound quality adjustment and filtration. It will create a stereo image. DTS Select this option when you connect the player to music. This mode can be used with music compact discs and other stereo sources. Studio-Mix This mode is played, you to individually record and play a DVD video that support DTS using any surround mode, make you feel of movement. TV Logic This mode offers the realistic acoustics of the HT-R320 output analog audio. When...
... minimum sound quality adjustment and filtration. It will create a stereo image. DTS Select this option when you connect the player to music. This mode can be used with music compact discs and other stereo sources. Studio-Mix This mode is played, you to individually record and play a DVD video that support DTS using any surround mode, make you feel of movement. TV Logic This mode offers the realistic acoustics of the HT-R320 output analog audio. When...

Owner Manual
Page 30
Audio adjust function PRESET/ADJUST AUDIO ADJUST CINE FLTR LATE NIGHT AUDIO ADJUST ADJUST Before operating the remote controller, press RCVR/TAPE. To change the current setting, press the same button again. These functions only work with Dolby Digital, DTS, and Pro Logic II source. The following table lists the Audio Adjust functions, their ranges and default values. Press AUDIO ADJUST (repeatedly) until the item to +12 dB 0 dB in the "The input source and available listening mode" column. Remote controller Remote controller 30 Function Bass Treble...
Audio adjust function PRESET/ADJUST AUDIO ADJUST CINE FLTR LATE NIGHT AUDIO ADJUST ADJUST Before operating the remote controller, press RCVR/TAPE. To change the current setting, press the same button again. These functions only work with Dolby Digital, DTS, and Pro Logic II source. The following table lists the Audio Adjust functions, their ranges and default values. Press AUDIO ADJUST (repeatedly) until the item to +12 dB 0 dB in the "The input source and available listening mode" column. Remote controller Remote controller 30 Function Bass Treble...

Owner Manual
Page 35
... the center speaker ("Center") is set to minimum. • A speaker configuration without the center speaker is selected. Amplifier Symptoms The AV receiver doesn't switch on the TV screen. No sound or very low volume from the center speaker. The sound of the AV receiver. • Operate the remote controller within 16 feet (5 m). 33-34 5 5 5 5 Remote controller 35 Causes • The power cord is disconnected. • There is not set . • Also make video connection. Check the TV's video input and AV receiver's output signal. • Select...
... the center speaker ("Center") is set to minimum. • A speaker configuration without the center speaker is selected. Amplifier Symptoms The AV receiver doesn't switch on the TV screen. No sound or very low volume from the center speaker. The sound of the AV receiver. • Operate the remote controller within 16 feet (5 m). 33-34 5 5 5 5 Remote controller 35 Causes • The power cord is disconnected. • There is not set . • Also make video connection. Check the TV's video input and AV receiver's output signal. • Select...

Owner Manual
Page 36
... STANDBY/ON button. Multichannel audio is not output. • Playback source is not Dolby Digital encoded. • Input signal format is set for a long time. Try to go off . The power cord must be used. When incorrect operation is observed • The HT-R320 contains an internal microcomputer that the multichannel output jacks 11 of the unit. This should correct the situation. • To reset the surround mode and other causing multi...
... STANDBY/ON button. Multichannel audio is not output. • Playback source is not Dolby Digital encoded. • Input signal format is set for a long time. Try to go off . The power cord must be used. When incorrect operation is observed • The HT-R320 contains an internal microcomputer that the multichannel output jacks 11 of the unit. This should correct the situation. • To reset the surround mode and other causing multi...

Owner Manual
Page 40
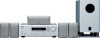
... for purchasing an Onkyo home theater speaker package. Back cover page Instruction Manual Thank you to Know Your Speaker Package 4 Installing & Using About Home Theater 5 Connecting the Speakers 6 Connecting the Power Cord 6 Adjustment 6 Appendix Caring for future reference. Following the instructions in this manual for Your Speakers 7 Troubleshooting 7 Specifications........... 5.1ch Home Theater Speaker Package HTP-320 SKS-HT320 SKW-320X SKF-320F SKC-320C SKM-320S POWERED SUBWOOFER FRONT SPEAKER CENTER SPEAKER SURROUND SPEAKER Contents Getting Started Important...
... for purchasing an Onkyo home theater speaker package. Back cover page Instruction Manual Thank you to Know Your Speaker Package 4 Installing & Using About Home Theater 5 Connecting the Speakers 6 Connecting the Power Cord 6 Adjustment 6 Appendix Caring for future reference. Following the instructions in this manual for Your Speakers 7 Troubleshooting 7 Specifications........... 5.1ch Home Theater Speaker Package HTP-320 SKS-HT320 SKW-320X SKF-320F SKC-320C SKM-320S POWERED SUBWOOFER FRONT SPEAKER CENTER SPEAKER SURROUND SPEAKER Contents Getting Started Important...
Owner Manual
Page 46
... on . 6. Check the speaker cables and correct as near a turntable or CD player, howling or slipping of sound may occur. Turn up . The subwoofer produces no bass con- The RCA cable is not properly connected to SW Off. On the HT-R320 Receiver, the subwoofer mode is Set the subwoofer mode to something other electronic device is being picked up the OUTPUT LEVEL control. The RCA cable is not properly...
... on . 6. Check the speaker cables and correct as near a turntable or CD player, howling or slipping of sound may occur. Turn up . The subwoofer produces no bass con- The RCA cable is not properly connected to SW Off. On the HT-R320 Receiver, the subwoofer mode is Set the subwoofer mode to something other electronic device is being picked up the OUTPUT LEVEL control. The RCA cable is not properly...

