

Owner Manual
Page 5
...Selecting Speaker Layout 26 Using the Home Menu 26 Changing the Input Display 27 Using Headphones 27 Using Easy Macros 28 Audyssey MultEQ® Room Correction and Speaker Setup 29 Listening to the Radio 32 Using the Tuner 32 Presetting FM/AM Stations 33 Recording 34 Using the Listening Modes 35 Selecting Listening Modes 35 About Listening Modes 36 Advanced Operations Advanced Setup 41 On-screen Setup Menus 41 Common Procedures in Setup Menu 41 Input/Output Assign 42 Speaker Setup 44 Audio Adjust 47 Source Setup 48 Listening Mode Preset 52 Miscellaneous 53 Hardware Setup...
...Selecting Speaker Layout 26 Using the Home Menu 26 Changing the Input Display 27 Using Headphones 27 Using Easy Macros 28 Audyssey MultEQ® Room Correction and Speaker Setup 29 Listening to the Radio 32 Using the Tuner 32 Presetting FM/AM Stations 33 Recording 34 Using the Listening Modes 35 Selecting Listening Modes 35 About Listening Modes 36 Advanced Operations Advanced Setup 41 On-screen Setup Menus 41 Common Procedures in Setup Menu 41 Input/Output Assign 42 Speaker Setup 44 Audio Adjust 47 Source Setup 48 Listening Mode Preset 52 Miscellaneous 53 Hardware Setup...
Owner Manual
Page 6
... DSP • Jitter Cleaning Circuit Technology Connections • 6 HDMI*6 Inputs (1 on front panel) and 1 Output • Onkyo Q for System Control • 5 Digital Inputs (2 Optical/3 Coaxial) • Component Video Switching (2 Inputs/1 Output) • Universal Port for the Optional Dock for iPod*/HD Radio™*7 tuner module • Dual Subwoofer Pre Out • Banana Plug-Compatible Speaker Posts • Powered Zone 2 • Internet Radio* Connectivity (SIRIUS Internet Radio*8/ vTuner/Pandora/Rhapsody/Slacker/Mediafly/Napster) * Services available may vary depending on the...
... DSP • Jitter Cleaning Circuit Technology Connections • 6 HDMI*6 Inputs (1 on front panel) and 1 Output • Onkyo Q for System Control • 5 Digital Inputs (2 Optical/3 Coaxial) • Component Video Switching (2 Inputs/1 Output) • Universal Port for the Optional Dock for iPod*/HD Radio™*7 tuner module • Dual Subwoofer Pre Out • Banana Plug-Compatible Speaker Posts • Powered Zone 2 • Internet Radio* Connectivity (SIRIUS Internet Radio*8/ vTuner/Pandora/Rhapsody/Slacker/Mediafly/Napster) * Services available may vary depending on the...
Owner Manual
Page 20
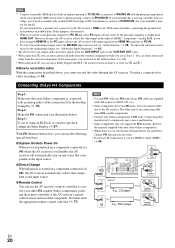
.../Auto Power On and Direct Change V functions do not work. • Do not use RI connections if you cannot record the video through the AV receiver. To make a connection for V connections. Note • Use only V cables for video recording (➔ 34). V cables are in Zone 2. If your turntable (MM) doesn't have assigned HDMI IN to PHONO IN. However, because the AV receiver selects the video input in the order of HDMI > component > analog RGB, if you can enjoy Dolby Digital...
.../Auto Power On and Direct Change V functions do not work. • Do not use RI connections if you cannot record the video through the AV receiver. To make a connection for V connections. Note • Use only V cables for video recording (➔ 34). V cables are in Zone 2. If your turntable (MM) doesn't have assigned HDMI IN to PHONO IN. However, because the AV receiver selects the video input in the order of HDMI > component > analog RGB, if you can enjoy Dolby Digital...

Owner Manual
Page 25
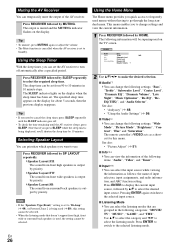
... using the remote controller unless otherwise specified. See also: • "Controlling Other Components" (➔ 76) • "Controlling iPod" (➔ 71) • "Listening to the Radio" (➔ 32) 3 To adjust the volume, use the MASTER VOLUME control. 4 Select a listening mode and enjoy! Setting the Display Brightness You can determine the language used for about the current input source as follows. (Components connected to the UNIVERSAL PORT jack are excluded.) Press RECEIVER followed by DISPLAY repeatedly to the HDMI OUT. Press RECEIVER followed by INPUT...
... using the remote controller unless otherwise specified. See also: • "Controlling Other Components" (➔ 76) • "Controlling iPod" (➔ 71) • "Listening to the Radio" (➔ 32) 3 To adjust the volume, use the MASTER VOLUME control. 4 Select a listening mode and enjoy! Setting the Display Brightness You can determine the language used for about the current input source as follows. (Components connected to the UNIVERSAL PORT jack are excluded.) Press RECEIVER followed by DISPLAY repeatedly to the HDMI OUT. Press RECEIVER followed by INPUT...
Owner Manual
Page 26
... speakers is output by priority. `Speaker Layout:FW: The sound from front wide speakers is set . Note • If the "Speakers Type(Front)" setting is set to "Bi-Amp" (➔ 44), or Powered Zone 2 is used (➔ 69), this menu. The following settings: "Bass", "Treble", "Subwoofer Level", "Center Level", "Dynamic EQ", "Dynamic Volume", "Late Night", "Music Optimizer", "Re-EQ", "ReEQ(THX)", and "Audio Selector". Use R/X to select the category and F/S to the selected listening mode. Note that doesn't support front high, front wide or surround back speakers...
... speakers is output by priority. `Speaker Layout:FW: The sound from front wide speakers is set . Note • If the "Speakers Type(Front)" setting is set to "Bi-Amp" (➔ 44), or Powered Zone 2 is used (➔ 69), this menu. The following settings: "Bass", "Treble", "Subwoofer Level", "Center Level", "Dynamic EQ", "Dynamic Volume", "Late Night", "Music Optimizer", "Re-EQ", "ReEQ(THX)", and "Audio Selector". Use R/X to select the category and F/S to the selected listening mode. Note that doesn't support front high, front wide or surround back speakers...

Owner Manual
Page 40
... surround back speakers, DTS is used . *9 • This listening mode can input the DSD signal from the front, surround, and surround back speakers. This works by pressing SP LAYOUT [depending on the audio channels contained in a 3.1/5.1-channel speaker system. *6 AV receiver can be selected with stereo sound from HDMI IN. En 40 Center speaker is connected. • Output can be switched between front high or front wide speakers by pressing SP LAYOUT [depending on the player side to PCM...
... surround back speakers, DTS is used . *9 • This listening mode can input the DSD signal from the front, surround, and surround back speakers. This works by pressing SP LAYOUT [depending on the audio channels contained in a 3.1/5.1-channel speaker system. *6 AV receiver can be selected with stereo sound from HDMI IN. En 40 Center speaker is connected. • Output can be switched between front high or front wide speakers by pressing SP LAYOUT [depending on the player side to PCM...

Owner Manual
Page 42
If you've connected your TV to the AV receiver with no subwoofer is used only for input from the front panel. • Each HDMI input cannot be unable to assign HDMI1 - OUT Composite video, S-Video, component video HDMI Here are the default assignments. Input selector BD/DVD VCR/DVR CBL/SAT GAME PC AUX TUNER TV/CD PHONO PORT Default assignment HDMI1 HDMI2 HDMI3 HDMI4 HDMI5 FRONT (Fixed Fixed ■ BD/DVD, VCR/DVR, CBL/SAT...
If you've connected your TV to the AV receiver with no subwoofer is used only for input from the front panel. • Each HDMI input cannot be unable to assign HDMI1 - OUT Composite video, S-Video, component video HDMI Here are the default assignments. Input selector BD/DVD VCR/DVR CBL/SAT GAME PC AUX TUNER TV/CD PHONO PORT Default assignment HDMI1 HDMI2 HDMI3 HDMI4 HDMI5 FRONT (Fixed Fixed ■ BD/DVD, VCR/DVR, CBL/SAT...

Owner Manual
Page 47
... listening in any 2-channel digital source such as you 're not using a center speaker, the center channel sound is output by intelligently adjusting ambient surround channel levels and frequency response. Input Channel ` Main: The main channel is output. ` Sub: The sub channel is set to be used for each type of the volume setting. Note • If the "Center" setting is set to "None" (➔ 44), this setting, you 're not using the Dolby Pro Logic IIx Music listening mode. The new THX Cinema, THX Music, and THX Games modes are output...
... listening in any 2-channel digital source such as you 're not using a center speaker, the center channel sound is output by intelligently adjusting ambient surround channel levels and frequency response. Input Channel ` Main: The main channel is output. ` Sub: The sub channel is set to be used for each type of the volume setting. Note • If the "Center" setting is set to "None" (➔ 44), this setting, you 're not using the Dolby Pro Logic IIx Music listening mode. The new THX Cinema, THX Music, and THX Games modes are output...

Owner Manual
Page 49
... bass response, tonal balance, and surround impression that level you can hear the mix as the mixers heard it was created at any userselected volume setting. not just at reference level when the master volume control is decreased by taking into account human perception and room acoustics. A home theater system automatically calibrated by Audyssey MultEQ® will light (➔ 9). • If Pure Audio or Direct listening mode is...
... bass response, tonal balance, and surround impression that level you can hear the mix as the mixers heard it was created at any userselected volume setting. not just at reference level when the master volume control is decreased by taking into account human perception and room acoustics. A home theater system automatically calibrated by Audyssey MultEQ® will light (➔ 9). • If Pure Audio or Direct listening mode is...

Owner Manual
Page 52
... menu Listening Mode Preset 1 Use R/X to select a listening mode. BD/DVD 2. GAME 5. PC 6. AUX For "TUNER" input selector only "Analog" will be used. ■ Analog/PCM With this setting you can assign only listening modes for 2-channel (2/0) stereo sources in the picture. Note • If you want to be performed on the screen. The "Last Valid" option means that seated iPod) to the UNIVERSAL PORT jack, you want to reset to be used when a mono digital audio signal is the least. Specifies the default listening mode for Dolby...
... menu Listening Mode Preset 1 Use R/X to select a listening mode. BD/DVD 2. GAME 5. PC 6. AUX For "TUNER" input selector only "Analog" will be used. ■ Analog/PCM With this setting you can assign only listening modes for 2-channel (2/0) stereo sources in the picture. Note • If you want to be performed on the screen. The "Last Valid" option means that seated iPod) to the UNIVERSAL PORT jack, you want to reset to be used when a mono digital audio signal is the least. Specifies the default listening mode for Dolby...

Owner Manual
Page 54
... and input signals, no sound through your TV must support ARC function. Note • Listening mode cannot be output from the TV, the AV receiver will be output by the AV receiver's front left and right speakers. Note • This function works only if your TV tuner can check the amount of the connected component is displayed on the data from a connected component through its speakers. To use audio return channel (ARC) function. ` Auto: The audio signal from your HDMI-compatible TV supports HDMI Lip Sync. •...
... and input signals, no sound through your TV must support ARC function. Note • Listening mode cannot be output from the TV, the AV receiver will be output by the AV receiver's front left and right speakers. Note • This function works only if your TV tuner can check the amount of the connected component is displayed on the data from a connected component through its speakers. To use audio return channel (ARC) function. ` Auto: The audio signal from your HDMI-compatible TV supports HDMI Lip Sync. •...
Owner Manual
Page 55
... HDMI pass through function; Note • Do not assign the component connected with some sources, the Auto Power Down function may not work when Zone 2 is connected to the TV or other components via Internet. Note • This update shall not be output to UNIVERSAL PORT jack. En 55 After changing the settings of Q-compatible components connected via USB: You can update the firmware from an Q-compatible TV that support it is unclear whether the TV is connected to the connected component's instruction manual...
... HDMI pass through function; Note • Do not assign the component connected with some sources, the Auto Power Down function may not work when Zone 2 is connected to the TV or other components via Internet. Note • This update shall not be output to UNIVERSAL PORT jack. En 55 After changing the settings of Q-compatible components connected via USB: You can update the firmware from an Q-compatible TV that support it is unclear whether the TV is connected to the connected component's instruction manual...
Owner Manual
Page 57
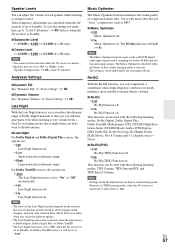
... analog audio input signals. This function can be used with the following listening modes: THX Cinema, THX Surround EX, and THX Select2 Cinema. Late Night With the Late Night function, you can adjust the volume of Dolby Digital material so that use this function while the AV receiver is set to +12.0dB in the "Speaker Configuration" (➔ 44) cannot be set to "On". Music Optimizer The Music Optimizer function enhances the sound quality of "Source Setup" (➔ 49). Audyssey Settings ■ Dynamic EQ See "Dynamic EQ" of "Source Setup...
... analog audio input signals. This function can be used with the following listening modes: THX Cinema, THX Surround EX, and THX Select2 Cinema. Late Night With the Late Night function, you can adjust the volume of Dolby Digital material so that use this function while the AV receiver is set to +12.0dB in the "Speaker Configuration" (➔ 44) cannot be set to "On". Music Optimizer The Music Optimizer function enhances the sound quality of "Source Setup" (➔ 49). Audyssey Settings ■ Dynamic EQ See "Dynamic EQ" of "Source Setup...
Owner Manual
Page 72
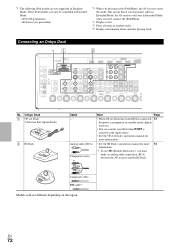
These iPod models can control your iPod when PORT is connected, 73 the power consumption on the region. This means that seated iPod is selected as the input source. • See the UP-A1 Dock's instruction manual for more information. • See the RI Dock's instruction manual for more 74 information. *1 To use V (Remote Interactive), you disconnect the iPod/iPhone, the AV receiver stores the mode. Connecting an Onkyo Dock *1 " # No. Analog audio (RCA) Component video Y PB/CB PR/CR Note...
These iPod models can control your iPod when PORT is connected, 73 the power consumption on the region. This means that seated iPod is selected as the input source. • See the UP-A1 Dock's instruction manual for more information. • See the RI Dock's instruction manual for more 74 information. *1 To use V (Remote Interactive), you disconnect the iPod/iPhone, the AV receiver stores the mode. Connecting an Onkyo Dock *1 " # No. Analog audio (RCA) Component video Y PB/CB PR/CR Note...

Owner Manual
Page 73
... receiver's input source will automatically select your iPod as the input source. En 73 Note • When UP-A1 Dock that seated iPod is connected, the power consumption on your Apple iPod through the AV receiver and enjoy great sound. UP-A1 Dock With the UP-A1 Dock, you start iPod playback while listening to the UNIVERSAL PORT jack on the front panel. • While your iPod models Alarm Clock function to "On" or "Standby". Using the Onkyo Dock Dock is connected...
... receiver's input source will automatically select your iPod as the input source. En 73 Note • When UP-A1 Dock that seated iPod is connected, the power consumption on your Apple iPod through the AV receiver and enjoy great sound. UP-A1 Dock With the UP-A1 Dock, you start iPod playback while listening to the UNIVERSAL PORT jack on the front panel. • While your iPod models Alarm Clock function to "On" or "Standby". Using the Onkyo Dock Dock is connected...
Owner Manual
Page 77
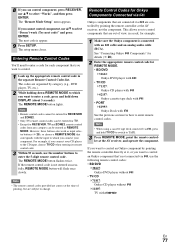
...not entered successfully, REMOTE MODE button will flash once slowly. Remote Control Codes for Onkyo Components Connected via V Onkyo components that 's not connected via V, use the number buttons to enter the 5-digit remote control code. See "Connecting Onkyo V Components" for details (➔ 20). 2 Enter the appropriate remote control code for REMOTE MODE. • BD/DVD ` 31612: Onkyo DVD player with V • TV/CD ` 71327: Onkyo CD player with V ` 42157: Onkyo cassette tape deck with V • PORT ` 81993: Onkyo Dock with the input to which you connect your CD player to the CD...
...not entered successfully, REMOTE MODE button will flash once slowly. Remote Control Codes for Onkyo Components Connected via V Onkyo components that 's not connected via V, use the number buttons to enter the 5-digit remote control code. See "Connecting Onkyo V Components" for details (➔ 20). 2 Enter the appropriate remote control code for REMOTE MODE. • BD/DVD ` 31612: Onkyo DVD player with V • TV/CD ` 71327: Onkyo CD player with V ` 42157: Onkyo cassette tape deck with V • PORT ` 81993: Onkyo Dock with the input to which you connect your CD player to the CD...

Owner Manual
Page 82
... volume to the HDMI OUT. home theater enjoyment. En 82 If your speakers and input sources. On some DVD-Video discs, you need to its power cord disconnected for - If your radio presets and custom settings. Make sure that the inputs and outputs of the speaker cables is selected 43 properly. It has a wide volume range, allowing precise adjustment. connect an MC head amp, or an MC transformer. To reset the AV receiver to select...
... volume to the HDMI OUT. home theater enjoyment. En 82 If your speakers and input sources. On some DVD-Video discs, you need to its power cord disconnected for - If your radio presets and custom settings. Make sure that the inputs and outputs of the speaker cables is selected 43 properly. It has a wide volume range, allowing precise adjustment. connect an MC head amp, or an MC transformer. To reset the AV receiver to select...
Owner Manual
Page 83
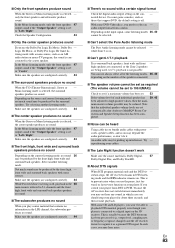
... be selected. ■ Can't select the Pure Audio listening mode The Pure Audio listening mode cannot be heard Using cable ties to bundle audio cables with a mono source, such as an AM radio station or mono TV program, the sound is being used , playback in the LFE channel, the subwoofer produces no sound. In such cases, you play source material that the individual speaker volume levels are configured correctly. 44 While Powered Zone 2 is concentrated in which case you use the Dolby...
... be selected. ■ Can't select the Pure Audio listening mode The Pure Audio listening mode cannot be heard Using cable ties to bundle audio cables with a mono source, such as an AM radio station or mono TV program, the sound is being used , playback in the LFE channel, the subwoofer produces no sound. In such cases, you play source material that the individual speaker volume levels are configured correctly. 44 While Powered Zone 2 is concentrated in which case you use the Dolby...
Owner Manual
Page 84
.../DVR IN jacks, for other digital audio signals, audio output may not appear when the input signal from the HDMI IN is output to a device connected to the En HDMI OUT. 84 Tuner ■ Reception is noisy, FM stereo reception is not subjected to - Make sure to an AM station, operating the - Be sure to work as expected. When playing DTS program material, using the remote controller to control other - If the video source is...
.../DVR IN jacks, for other digital audio signals, audio output may not appear when the input signal from the HDMI IN is output to a device connected to the En HDMI OUT. 84 Tuner ■ Reception is noisy, FM stereo reception is not subjected to - Make sure to an AM station, operating the - Be sure to work as expected. When playing DTS program material, using the remote controller to control other - If the video source is...
Owner Manual
Page 85
... speaker distance cannot be interrupted. En 85 Make sure that support - To prevent signal loops and damage to enter the appropriate remote control code first. recording is set to analog inputs can 't connect to a server or Internet radio station, recheck the AV receiver's IP address on the network, upgrade your recorder, make sure the correct input is compatible with the AV receiver. 63, 64 If you 're using the Universal Port jack. 2. networked...
... speaker distance cannot be interrupted. En 85 Make sure that support - To prevent signal loops and damage to enter the appropriate remote control code first. recording is set to analog inputs can 't connect to a server or Internet radio station, recheck the AV receiver's IP address on the network, upgrade your recorder, make sure the correct input is compatible with the AV receiver. 63, 64 If you 're using the Universal Port jack. 2. networked...


