
Owner Manual
Page 1
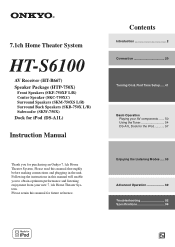
7.1ch Home Theater System HT-S6100 AV Receiver (HT-R667) Speaker Package (HTP-750X) Front Speakers (SKF-750XF L/R) Center Speaker (SKC-750XC) Surround Speakers (SKM-750XS L/R) Surround Back Speakers (SKB-750X L/R) Subwoofer (SKW-750X) Dock for iPod (DS-A1L) Instruction Manual Thank you to obtain ...optimum performance and listening enjoyment from your AV components ....... 50 Using the Tuner 54 DS-A1L Dock for purchasing an Onkyo 7.1ch Home Theater System. Contents Introduction 2 Connection 20 Turning ...
7.1ch Home Theater System HT-S6100 AV Receiver (HT-R667) Speaker Package (HTP-750X) Front Speakers (SKF-750XF L/R) Center Speaker (SKC-750XC) Surround Speakers (SKM-750XS L/R) Surround Back Speakers (SKB-750X L/R) Subwoofer (SKW-750X) Dock for iPod (DS-A1L) Instruction Manual Thank you to obtain ...optimum performance and listening enjoyment from your AV components ....... 50 Using the Tuner 54 DS-A1L Dock for purchasing an Onkyo 7.1ch Home Theater System. Contents Introduction 2 Connection 20 Turning ...
Owner Manual
Page 4
..., try moving the speakers away from fast-forwarding a cassette tape. 3. Sound from your TV or monitor. Amplifier oscillation. 5. MIYAGI ONKYO EUROPE ELECTRONICS GmbH 4 Speaker Precautions Placement • The subwoofer cabinet is made out of wood and is within the specified rating, excessive...or discon- Using Close to a TV or Computer TVs and computer monitors are magnetically sensitive devices and as that the ONKYO product described in this instruction manual is fitted with the following code: Blue: Neutral Brown: Live As the colours of the wires in own ...
..., try moving the speakers away from fast-forwarding a cassette tape. 3. Sound from your TV or monitor. Amplifier oscillation. 5. MIYAGI ONKYO EUROPE ELECTRONICS GmbH 4 Speaker Precautions Placement • The subwoofer cabinet is made out of wood and is within the specified rating, excessive...or discon- Using Close to a TV or Computer TVs and computer monitors are magnetically sensitive devices and as that the ONKYO product described in this instruction manual is fitted with the following code: Blue: Neutral Brown: Live As the colours of the wires in own ...
Owner Manual
Page 13
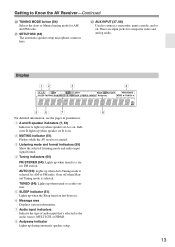
... (54) FM STEREO (54): Lights up during automatic speaker setup. 13 There are input jacks for AM and FM radio. Goes off when Manual Tuning mode is selected for AM or FM radio. Indicator B lights up when Auto Tuning mode is selected. U SETUP MIC (42) The ...automatic speaker setup microphone connects here. Getting to Know the AV Receiver-Continued T TUNING MODE button (54) Selects the Auto or Manual tuning mode for composite video and analog audio. Display 12 3 4 56 7 8 For detailed information, see the pages in parentheses. 1 A and B speaker indicators...
... (54) FM STEREO (54): Lights up during automatic speaker setup. 13 There are input jacks for AM and FM radio. Goes off when Manual Tuning mode is selected for AM or FM radio. Indicator B lights up when Auto Tuning mode is selected. U SETUP MIC (42) The ...automatic speaker setup microphone connects here. Getting to Know the AV Receiver-Continued T TUNING MODE button (54) Selects the Auto or Manual tuning mode for composite video and analog audio. Display 12 3 4 56 7 8 For detailed information, see the pages in parentheses. 1 A and B speaker indicators...
Owner Manual
Page 21
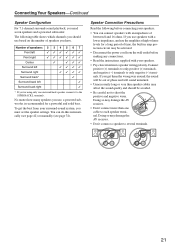
...; Disconnect the power cord from your surround-sound system, you use speakers with your speakers: • You can do this automatically (see page 42) or manually (see page 74). Doing so may damage the AV receiver. • Don't connect a speaker to only negative (-) terminals. You can connect speakers with an impedance...
...; Disconnect the power cord from your surround-sound system, you use speakers with your speakers: • You can do this automatically (see page 42) or manually (see page 74). Doing so may damage the AV receiver. • Don't connect a speaker to only negative (-) terminals. You can connect speakers with an impedance...
Owner Manual
Page 26
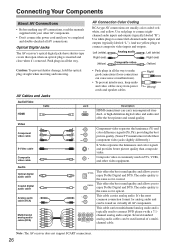
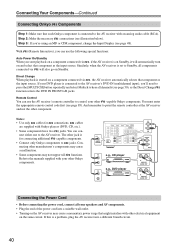
... audio. Note: The AV receiver does not support SCART connections. 26 Connecting Your Components About AV Connections • Before making any AV connections, read the manuals supplied with a 7.1channel analog audio output. Optical Digital Jacks The AV receiver's optical digital jacks have shutter-type covers that open when an optical plug...
... audio. Note: The AV receiver does not support SCART connections. 26 Connecting Your Components About AV Connections • Before making any AV connections, read the manuals supplied with a 7.1channel analog audio output. Optical Digital Jacks The AV receiver's optical digital jacks have shutter-type covers that open when an optical plug...
Owner Manual
Page 33
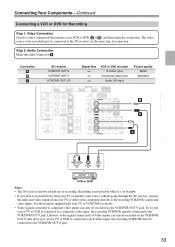
... a . So if your TV or VCR/DVR for details. • Video signals connected to the AV receiver via the VCR/DVR OUT V jack. See the manuals supplied with your source TV or VCR is not possible while it's on for Recording Step 1: Video Connection Choose a video connection that matches your VCR...
... a . So if your TV or VCR/DVR for details. • Video signals connected to the AV receiver via the VCR/DVR OUT V jack. See the manuals supplied with your source TV or VCR is not possible while it's on for Recording Step 1: Video Connection Choose a video connection that matches your VCR...
Owner Manual
Page 36
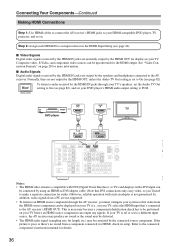
... signals received by the HDMI IN jacks are normally output by the HDMI OUT for display on your TV. Refer to the connected component's instruction manual for the HDMI output. Connecting Your Components-Continued Making HDMI Connections Step 1: Use HDMI cables to connect the AV receiver's HDMI jacks to your HDMI...
... signals received by the HDMI IN jacks are normally output by the HDMI OUT for display on your TV. Refer to the connected component's instruction manual for the HDMI output. Connecting Your Components-Continued Making HDMI Connections Step 1: Use HDMI cables to connect the AV receiver's HDMI jacks to your HDMI...
Owner Manual
Page 37
... VCR/DVR R SUB WOOFER DVD DOCK (for DS-A1L) Notes: • To connect an RI dock other than the DS-A1L, refer to its instruction manual. • While your iPod is seated in the Dock, its battery will be charged when the AV receiver is set to On or Standby. 37...
... VCR/DVR R SUB WOOFER DVD DOCK (for DS-A1L) Notes: • To connect an RI dock other than the DS-A1L, refer to its instruction manual. • While your iPod is seated in the Dock, its battery will be charged when the AV receiver is set to On or Standby. 37...
Owner Manual
Page 40
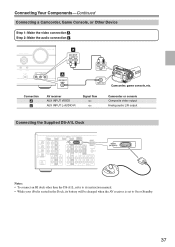
... as the input source. And remember to point the remote controller at the AV receiver and not the other -capable Onkyo components. Refer to the manuals supplied with Onkyo players (DVD, CD, etc.). • Some components have two jacks. With (Remote Interactive), you can connect either ...surge that might interfere with an analog audio cable (RCA). Connecting other jack is for connecting additional -capable components. • Connect only Onkyo components to jacks. Direct Change When playback is started on a component connected via , if the AV receiver is on Standby, it will...
... as the input source. And remember to point the remote controller at the AV receiver and not the other -capable Onkyo components. Refer to the manuals supplied with Onkyo players (DVD, CD, etc.). • Some components have two jacks. With (Remote Interactive), you can connect either ...surge that might interfere with an analog audio cable (RCA). Connecting other jack is for connecting additional -capable components. • Connect only Onkyo components to jacks. Direct Change When playback is started on a component connected via , if the AV receiver is on Standby, it will...

Owner Manual
Page 45
... Yes SBR : Yes SW : --- The speaker may be broken or the subwoofer may be detected by the automatic speaker setup. Changing the Speaker Settings Manually If you 're using a powered subwoofer and it outputs very low-frequency sound at a low volume level, it to the halfway point, set too high... and the sound distorts, detection issues may not be emitting sound that cannot be detected are connected properly. Contact your Onkyo dealer. FL : Error SL : Yes SBL : Yes C : Yes FR : Yes SR : Yes SBR : Yes SW : Yes Retry Cancel There is too high. ...
... Yes SBR : Yes SW : --- The speaker may be broken or the subwoofer may be detected by the automatic speaker setup. Changing the Speaker Settings Manually If you 're using a powered subwoofer and it outputs very low-frequency sound at a low volume level, it to the halfway point, set too high... and the sound distorts, detection issues may not be emitting sound that cannot be detected are connected properly. Contact your Onkyo dealer. FL : Error SL : Yes SBL : Yes C : Yes FR : Yes SR : Yes SBR : Yes SW : Yes Retry Cancel There is too high. ...

Owner Manual
Page 53
...RETURN MOVIE/TV MUSIC GAME LISTENING MODE DISPLAY DIGITAL INPUT DIMMER MEMORY TUNING MODE CLEAR SETUP MIC AUX INPUT VIDEO L AUDIO R AV RECEIVER HT-R667 DIGITAL INPUT 1 DIGITAL INPUT Press and hold the AV receiver's [DIGITAL INPUT] button for each digital signal format. DTS: Only DTS ...Common Functions-Continued Specifying the Digital Signal Format The following issues when playing PCM or DTS sources, you can specify the signal format manually. • If the beginnings of digital input signals automatically. If the input signal is not DTS, the DTS indicator will fl...
...RETURN MOVIE/TV MUSIC GAME LISTENING MODE DISPLAY DIGITAL INPUT DIMMER MEMORY TUNING MODE CLEAR SETUP MIC AUX INPUT VIDEO L AUDIO R AV RECEIVER HT-R667 DIGITAL INPUT 1 DIGITAL INPUT Press and hold the AV receiver's [DIGITAL INPUT] button for each digital signal format. DTS: Only DTS ...Common Functions-Continued Specifying the Digital Signal Format The following issues when playing PCM or DTS sources, you can specify the signal format manually. • If the beginnings of digital input signals automatically. If the input signal is not DTS, the DTS indicator will fl...
Owner Manual
Page 54
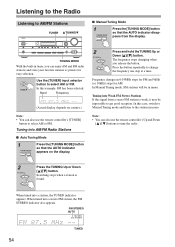
...to tune the radio. 2 TUNING Press the TUNING Up or Down [ ]/[ ] button. Band Frequency (Actual display depends on the display. ■ Manual Tuning Mode 1 TUNING MODE Press the [TUNING MODE] button so that the AUTO indicator appears on country.) Note: • You can enjoy AM and...RETURN MOVIE/TV MUSIC GAME LISTENING MODE DISPLAY DIGITAL INPUT DIMMER MEMORY TUNING MODE CLEAR SETUP MIC AUX INPUT VIDEO L AUDIO R AV RECEIVER HT-R667 TUNING MODE With the built-in mono. The frequency stops changing when you can also use the remote controller's Up and Down [ ]/[...
...to tune the radio. 2 TUNING Press the TUNING Up or Down [ ]/[ ] button. Band Frequency (Actual display depends on the display. ■ Manual Tuning Mode 1 TUNING MODE Press the [TUNING MODE] button so that the AUTO indicator appears on country.) Note: • You can enjoy AM and...RETURN MOVIE/TV MUSIC GAME LISTENING MODE DISPLAY DIGITAL INPUT DIMMER MEMORY TUNING MODE CLEAR SETUP MIC AUX INPUT VIDEO L AUDIO R AV RECEIVER HT-R667 TUNING MODE With the built-in mono. The frequency stops changing when you can also use the remote controller's Up and Down [ ]/[...
Owner Manual
Page 70
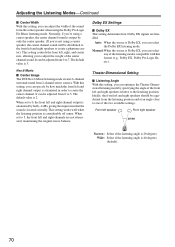
... to adjust the weight of the front left and right channel output is Dolby EX, you can be adjusted from 0 to create the center channel. Manual: When the source is attenuated in order to 7. It can select any of the sound from 0 to 5, the front left and right channels are handled...
... to adjust the weight of the front left and right channel output is Dolby EX, you can be adjusted from 0 to create the center channel. Manual: When the source is attenuated in order to 7. It can select any of the sound from 0 to 5, the front left and right channels are handled...

Owner Manual
Page 74
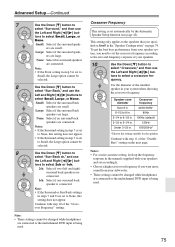
...specify Large (full band). Cone diameter The onscreen setup menus appear only on a TV that is connected. R667's own display when changing settings. 1 Press the [RECEIVER] button fol- Use the Up and Down ... Setup 3 This section explains how to check the speaker settings and how to set them manually, which speakers are connected and their sizes. Speaker Configuration, Crossover Frequency, and Double...(default crossover 100Hz). Use the Down [ ] button to select "Front," and then use the HT- None: Select if no subwoofer is selected, use the Left and Right [ ]/[ ] buttons to...
...specify Large (full band). Cone diameter The onscreen setup menus appear only on a TV that is connected. R667's own display when changing settings. 1 Press the [RECEIVER] button fol- Use the Up and Down ... Setup 3 This section explains how to check the speaker settings and how to set them manually, which speakers are connected and their sizes. Speaker Configuration, Crossover Frequency, and Double...(default crossover 100Hz). Use the Down [ ] button to select "Front," and then use the HT- None: Select if no subwoofer is selected, use the Left and Right [ ]/[ ] buttons to...
Owner Manual
Page 75
... in . tons to 5-1/4 in steps 7 and 9 are connected or the multichannel DVD input is connected. Speaker cone diameter Over 8 in. 6-1/2 to 8 in. 5-1/4 to 6-1/2 in the manuals supplied with your speakers and set accordingly. • Choose a higher crossover frequency if you want more sound from your speakers 10 Use the Down [ ] button...
... in . tons to 5-1/4 in steps 7 and 9 are connected or the multichannel DVD input is connected. Speaker cone diameter Over 8 in. 6-1/2 to 8 in. 5-1/4 to 6-1/2 in the manuals supplied with your speakers and set accordingly. • Choose a higher crossover frequency if you want more sound from your speakers 10 Use the Down [ ] button...
Owner Manual
Page 78
...set automatically by the Automatic Speaker Setup function (see page 77. 1 Press the [RECEIVER] REMOTE MODE button, followed by the [SETUP] button. Manual: You can be adjusted from -6 to No or None in 1 dB steps. To set to +6 dB in the Speaker Configuration (... on your TV. 6 2 Use the Up and Down [ ]/[ ] buttons to select another speaker. Equalizer Settings Equalizer Channel 63Hz 250Hz 1000Hz 4000Hz 16000Hz Manual Front 0dB 0dB 0dB 0dB 0dB Use the Up and Down [ ]/[ ] buttons to select "4. high frequencies (e.g., 16000Hz) affect treble sounds. Speakers that ...
...set automatically by the Automatic Speaker Setup function (see page 77. 1 Press the [RECEIVER] REMOTE MODE button, followed by the [SETUP] button. Manual: You can be adjusted from -6 to No or None in 1 dB steps. To set to +6 dB in the Speaker Configuration (... on your TV. 6 2 Use the Up and Down [ ]/[ ] buttons to select another speaker. Equalizer Settings Equalizer Channel 63Hz 250Hz 1000Hz 4000Hz 16000Hz Manual Front 0dB 0dB 0dB 0dB 0dB Use the Up and Down [ ]/[ ] buttons to select "4. high frequencies (e.g., 16000Hz) affect treble sounds. Speakers that ...

Owner Manual
Page 83
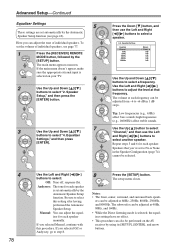
..., operation with CEC (Consumer Electronics Control), which stands for Remote Interactive over HDMI and is part of the system control function found on Onkyo components. Setup closes. 83 Advanced Setup-Continued Notes: • RIHD, which allows system control over HDMI, is the name of the ...can protect your other components. Lock Setup," and then press [ENTER]. 3 Use the Left and Right [ ]/[ ] buttons to the instruction manuals for playback on again. To stop the AV receiver's speakers producing sound, change the settings, change your components off and then back on ...
..., operation with CEC (Consumer Electronics Control), which stands for Remote Interactive over HDMI and is part of the system control function found on Onkyo components. Setup closes. 83 Advanced Setup-Continued Notes: • RIHD, which allows system control over HDMI, is the name of the ...can protect your other components. Lock Setup," and then press [ENTER]. 3 Use the Left and Right [ ]/[ ] buttons to the instruction manuals for playback on again. To stop the AV receiver's speakers producing sound, change the settings, change your components off and then back on ...

