
Owner Manual
Page 35
...HDCP (High-bandwidth Digital Content Protection): The video encryption technology developed by using an HDMI-to-DVI adapter cable. (This may not work with some components) to connect the AV receiver's HDMI OUT to the HDMI input on the following standard: Repeater System, Deep Color, Lip Sync, DTS-HD... video and audio cables have been required to output these formats from its HDMI OUT. It's designed to protect video content and requires a HDCP-compatible device to display the encrypted video. *3 DDWG (Digital Display Working Group): Led by Intel, Compaq, Fujitsu, Hewlett Packard, IBM, NEC,...
...HDCP (High-bandwidth Digital Content Protection): The video encryption technology developed by using an HDMI-to-DVI adapter cable. (This may not work with some components) to connect the AV receiver's HDMI OUT to the HDMI input on the following standard: Repeater System, Deep Color, Lip Sync, DTS-HD... video and audio cables have been required to output these formats from its HDMI OUT. It's designed to protect video content and requires a HDCP-compatible device to display the encrypted video. *3 DDWG (Digital Display Working Group): Led by Intel, Compaq, Fujitsu, Hewlett Packard, IBM, NEC,...
Owner Manual
Page 48
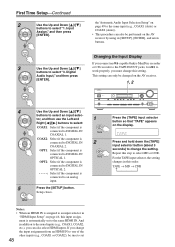
... DIGITAL INPUT DIMMER MEMORY TUNING MODE CLEAR SETUP MIC AUX INPUT VIDEO L AUDIO R AV RECEIVER HT-R667 4 Use the Up and Down [ ]/[ ] buttons to one of the other inputs (e.g., ...TAPE COAXIAL 1. Digital or CD recorder to the TAPE IN/OUT jacks, for to work properly, you connect an -capable Onkyo MiniDisc recorder 3 Use the Up and Down [ ]/[ ] buttons to an input...) to DIGITAL IN COAXIAL 2. OPT1: Select if the component is connected to change the input assignment from an HDMI IN to select an input selec- Input Assign," and then press [ENTER]. TAPE → MD → ...
... DIGITAL INPUT DIMMER MEMORY TUNING MODE CLEAR SETUP MIC AUX INPUT VIDEO L AUDIO R AV RECEIVER HT-R667 4 Use the Up and Down [ ]/[ ] buttons to one of the other inputs (e.g., ...TAPE COAXIAL 1. Digital or CD recorder to the TAPE IN/OUT jacks, for to work properly, you connect an -capable Onkyo MiniDisc recorder 3 Use the Up and Down [ ]/[ ] buttons to an input...) to DIGITAL IN COAXIAL 2. OPT1: Select if the component is connected to change the input assignment from an HDMI IN to select an input selec- Input Assign," and then press [ENTER]. TAPE → MD → ...
Owner Manual
Page 82
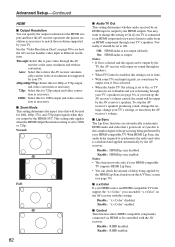
... setting is set to 1080i or 720p. You may be output by your TV's speakers. Off: HDMI audio is output. Notes: • This function works only if your HDMI-compatible TV supports HDMI Lip Sync. • You can check the amount of sync due to Auto. • With some... TVs and input signals, no conversion. Enable: "x.v.Color" enabled. ■ Control This function allows RIHD-compatible components connected via HDMI to synchronize the...
... setting is set to 1080i or 720p. You may be output by your TV's speakers. Off: HDMI audio is output. Notes: • This function works only if your HDMI-compatible TV supports HDMI Lip Sync. • You can check the amount of sync due to Auto. • With some... TVs and input signals, no conversion. Enable: "x.v.Color" enabled. ■ Control This function allows RIHD-compatible components connected via HDMI to synchronize the...

Owner Manual
Page 83
... Enable. Lock Setup With this Lock Setup item can be set only when the above Control setting is set to Enable. • HDMI power control only works with some components due to their settings or compatibility. • When set to Enable, the AV receiver consumes more power. • When set to ...On or on Standby, both set to Enable. • When the Audio TV Out setting is set to On, or TV Control is selected on Onkyo components. If the main menu doesn't appear, make sure the appropriate external input is set to select "8. Power Control To link the power functions ...
... Enable. Lock Setup With this Lock Setup item can be set only when the above Control setting is set to Enable. • HDMI power control only works with some components due to their settings or compatibility. • When set to Enable, the AV receiver consumes more power. • When set to ...On or on Standby, both set to Enable. • When the Audio TV Out setting is set to On, or TV Control is selected on Onkyo components. If the main menu doesn't appear, make sure the appropriate external input is set to select "8. Power Control To link the power functions ...
Owner Manual
Page 91
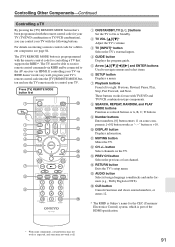
...M PREV CH button Selects the previous or last channel. P CLR button Cancels functions and clears entered numbers, or enters 12. * The RIHD is Onkyo's name for the CEC (Consumer Electronics Control) system, which is preprogrammed with TV/DVD and TV/VCR combination-type components. If controlling your TV....guide. N RETURN button Exits the TV's setup menu. The [TV] REMOTE MODE button is part of the HDMI specification. * With some components, certain buttons may not work very well, program your TV's remote control code into the [TV] REMOTE MODE button and use with the ...
...M PREV CH button Selects the previous or last channel. P CLR button Cancels functions and clears entered numbers, or enters 12. * The RIHD is Onkyo's name for the CEC (Consumer Electronics Control) system, which is preprogrammed with TV/DVD and TV/VCR combination-type components. If controlling your TV....guide. N RETURN button Exits the TV's setup menu. The [TV] REMOTE MODE button is part of the HDMI specification. * With some components, certain buttons may not work very well, program your TV's remote control code into the [TV] REMOTE MODE button and use with the ...
Owner Manual
Page 93
...A is selected (page 50). • Check the audio output settings on your player may produce a short audible noise. The DVD multichannel input doesn't work • Make sure that the source is reduced by 6 dB. About DTS signals • When playing DTS program material, using the pause, fast ... than it as those that can play DVDs, the default setting is connected to an HDMI input, your player. Try repositioning your DVD player. 93 The Late Night function doesn't work • Check the multichannel input connections (page 31). • Make sure that the multichannel input is ...
...A is selected (page 50). • Check the audio output settings on your player may produce a short audible noise. The DVD multichannel input doesn't work • Make sure that the source is reduced by 6 dB. About DTS signals • When playing DTS program material, using the pause, fast ... than it as those that can play DVDs, the default setting is connected to an HDMI input, your player. Try repositioning your DVD player. 93 The Late Night function doesn't work • Check the multichannel input connections (page 31). • Make sure that the multichannel input is ...


