
Owner Manual
Page 1
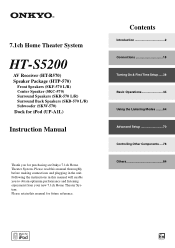
... Turning On & First Time Setup .....38 Basic Operations 44 Using the Listening Modes ........64 Advanced Setup 70 Controlling Other Components ....78 Others 84 En Please read this manual thoroughly before making connections and plugging in this manual for future reference. Please retain this manual will enable you for purchasing an Onkyo 7.1ch Home Theater System. 7.1ch Home Theater System HT-S5200 AV Receiver (HT-R570) Speaker Package (HTP-570) Front Speakers (SKF-570 L/R) Center Speaker (SKC-570) Surround Speakers...
... Turning On & First Time Setup .....38 Basic Operations 44 Using the Listening Modes ........64 Advanced Setup 70 Controlling Other Components ....78 Others 84 En Please read this manual thoroughly before making connections and plugging in this manual for future reference. Please retain this manual will enable you for purchasing an Onkyo 7.1ch Home Theater System. 7.1ch Home Theater System HT-S5200 AV Receiver (HT-R570) Speaker Package (HTP-570) Front Speakers (SKF-570 L/R) Center Speaker (SKC-570) Surround Speakers...
Owner Manual
Page 4
... unit away from vibration. Input Signal Warning The speakers can also be damaged. • Speakers should turn off your TV or monitor, wait 15 to your TV or monitor. Amplifier oscillation. 5. Interstation noise from fast-forwarding a cassette tape. 3. Specifications and operation are free from the turntable, CD player or DVD player, otherwise lower the unit's output level. If any discoloration effects. High-pitched sounds generated by an oscillator...
... unit away from vibration. Input Signal Warning The speakers can also be damaged. • Speakers should turn off your TV or monitor, wait 15 to your TV or monitor. Amplifier oscillation. 5. Interstation noise from fast-forwarding a cassette tape. 3. Specifications and operation are free from the turntable, CD player or DVD player, otherwise lower the unit's output level. If any discoloration effects. High-pitched sounds generated by an oscillator...
Owner Manual
Page 7
...; Non-Scaling Configuration • A-Form Listening Mode Memory • 24-bit/192kHz D/A Converters • Powerful and Highly Accurate 32-bit DSP Processing Connections • 4 HDMI*4 Inputs and 1 Output (Pass-Thru) • Component Video Switching (2 Inputs/1 Output) • 4 Digital Inputs (2 Optical/2 Coaxial) • Front "Portable" Input for iPod* and MP3 Players • Speaker A/ B Terminal • Banana Plug-Compatible Speaker Posts • Subwoofer Pre Out • Color-Coded Speaker Terminals Miscellaneous • 40 AM/FM/SIRIUS*5 Presets • Audyssey 2EQ*6 to Correct...
...; Non-Scaling Configuration • A-Form Listening Mode Memory • 24-bit/192kHz D/A Converters • Powerful and Highly Accurate 32-bit DSP Processing Connections • 4 HDMI*4 Inputs and 1 Output (Pass-Thru) • Component Video Switching (2 Inputs/1 Output) • 4 Digital Inputs (2 Optical/2 Coaxial) • Front "Portable" Input for iPod* and MP3 Players • Speaker A/ B Terminal • Banana Plug-Compatible Speaker Posts • Subwoofer Pre Out • Color-Coded Speaker Terminals Miscellaneous • 40 AM/FM/SIRIUS*5 Presets • Audyssey 2EQ*6 to Correct...
Owner Manual
Page 9
... Speaker Setup 39 Component Video Input Setup 42 Digital Input Setup 42 Changing the Input Display 43 Basic Operations Basic Operations 44 Basic AV receiver Operation 44 Setting the Display Brightness 45 Muting the AV receiver 45 Using the Sleep Timer 45 Using Headphones 46 Adjusting the Bass & Treble 46 Displaying Source Information 46 Using the Music Optimizer 47 Specifying the Digital Signal Format 47 Listening to the Radio 48 AM/FM Frequency Step Setup 48 Listening to AM/FM Stations 49 Presetting AM/FM Stations...
... Speaker Setup 39 Component Video Input Setup 42 Digital Input Setup 42 Changing the Input Display 43 Basic Operations Basic Operations 44 Basic AV receiver Operation 44 Setting the Display Brightness 45 Muting the AV receiver 45 Using the Sleep Timer 45 Using Headphones 46 Adjusting the Bass & Treble 46 Displaying Source Information 46 Using the Music Optimizer 47 Specifying the Digital Signal Format 47 Listening to the Radio 48 AM/FM Frequency Step Setup 48 Listening to AM/FM Stations 49 Presetting AM/FM Stations...
Owner Manual
Page 11
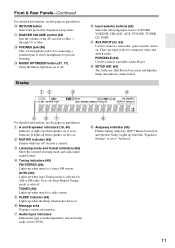
... following input sources: DVD/BD, VCR/DVR, CBL/SAT, AUX, TV/TAPE, TUNER, CD, PORT. T MUSIC OPTIMIZER button (47, 77) Turns the Music Optimizer on . D Listening mode and format indicators (64) Show the selected listening mode and audio input signal format. Goes off . I I Audyssey indicator (40) Flashes during Audyssey 2EQ™ Room Correction and Speaker Setup. There are input jacks for private listening. E Tuning indicators (49) FM STEREO (49): Lights up when the "Equalizer Settings" is set A is selected for AM or FM radio. Lights...
... following input sources: DVD/BD, VCR/DVR, CBL/SAT, AUX, TV/TAPE, TUNER, CD, PORT. T MUSIC OPTIMIZER button (47, 77) Turns the Music Optimizer on . D Listening mode and format indicators (64) Show the selected listening mode and audio input signal format. Goes off . I I Audyssey indicator (40) Flashes during Audyssey 2EQ™ Room Correction and Speaker Setup. There are input jacks for private listening. E Tuning indicators (49) FM STEREO (49): Lights up when the "Equalizer Settings" is set A is selected for AM or FM radio. Lights...
Owner Manual
Page 13
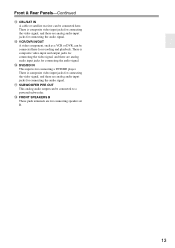
Front & Rear Panels-Continued O CBL/SAT IN A cable or satellite receiver can be connected to a powered subwoofer. R SUBWOOFER PRE OUT This analog audio output can be connected here for connecting speaker set B. 13 There is for connecting the audio signal. Q DVD/BD IN This input is composite video input jacks for connecting the video signal, and there are analog audio input jacks for connecting a DVD/BD player. There is composite video input jacks for connecting the video signal, and there are analog audio input jacks for connecting the audio signal. P VCR/DVR IN/OUT A video...
Front & Rear Panels-Continued O CBL/SAT IN A cable or satellite receiver can be connected to a powered subwoofer. R SUBWOOFER PRE OUT This analog audio output can be connected here for connecting speaker set B. 13 There is for connecting the audio signal. Q DVD/BD IN This input is composite video input jacks for connecting the video signal, and there are analog audio input jacks for connecting a DVD/BD player. There is composite video input jacks for connecting the video signal, and there are analog audio input jacks for connecting the audio signal. P VCR/DVR IN/OUT A video...
Owner Manual
Page 16
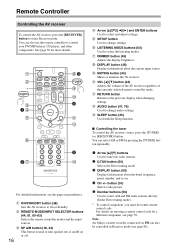
... Adjusts the volume of the AV receiver regardless of the currently selected remote controller mode. C REMOTE MODE/INPUT SELECTOR buttons (44, 61, 80-83) Selects the remote controller modes and the input sources. H DIMMER button (45) Adjusts the display brightness. N SLEEP button (45) Used with the Sleep function. ■ Controlling the tuner To control the AV receiver's tuner, press the [TUNER] (or [RECEIVER]) button. button (51) Selects radio presets. 5 Number buttons (50) Used to control your DVD/BD player, CD player, and other components. Note: An Onkyo cassette recorder connected...
... Adjusts the volume of the AV receiver regardless of the currently selected remote controller mode. C REMOTE MODE/INPUT SELECTOR buttons (44, 61, 80-83) Selects the remote controller modes and the input sources. H DIMMER button (45) Adjusts the display brightness. N SLEEP button (45) Used with the Sleep function. ■ Controlling the tuner To control the AV receiver's tuner, press the [TUNER] (or [RECEIVER]) button. button (51) Selects radio presets. 5 Number buttons (50) Used to control your DVD/BD player, CD player, and other components. Note: An Onkyo cassette recorder connected...
Owner Manual
Page 27
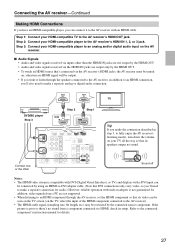
... analog and/or digital audio input on , otherwise no sound. Refer to fully enjoy the AV receiver's listening modes, turn down the volume on the TV, select the input of the HDMI component connected to the AV receiver). • The HDMI audio signal (sampling rate, bit length, etc.) may be output. • If you want to listen through the AV receiver, set the HDMI component so that its video can be connected by using an HDMI-to-DVI adapter cable...
... analog and/or digital audio input on , otherwise no sound. Refer to fully enjoy the AV receiver's listening modes, turn down the volume on the TV, select the input of the HDMI component connected to the AV receiver). • The HDMI audio signal (sampling rate, bit length, etc.) may be output. • If you want to listen through the AV receiver, set the HDMI component so that its video can be connected by using an HDMI-to-DVI adapter cable...
Owner Manual
Page 38
... COAXIAL OPTICAL ■ Did you did , see "Component Video Input Setup" on page 42, or CBPB "Digital Input Setup" on page 42 respectively. If you did , see "Changing the Input Display" on page 39. ■ Did you connect a component to help you configure the AV receiver before you turn down the volume before you turn the AV receiver off . The AV receiver will enter Standby mode. OUT IN TV/TAPE MD recorder, CD recorder, RI Dock...
... COAXIAL OPTICAL ■ Did you did , see "Component Video Input Setup" on page 42, or CBPB "Digital Input Setup" on page 42 respectively. If you did , see "Changing the Input Display" on page 39. ■ Did you connect a component to help you configure the AV receiver before you turn down the volume before you turn the AV receiver off . The AV receiver will enter Standby mode. OUT IN TV/TAPE MD recorder, CD recorder, RI Dock...
Owner Manual
Page 39
... with actual output sound levels in real time to surround sound content. : Listening area : Listening position 39 Whenever necessary, Dynamic Volume makes the necessary rapid or gradual adjustments to "On", Audyssey Dynamic Volume™ becomes available. First Time Setup This section explains the settings that you to also use Audyssey Dynamic EQ™, which several people can enjoy your speakers. Audyssey 2EQ™ Room Correction and Speaker Setup With the supplied calibrated microphone, Audyssey 2EQ...
... with actual output sound levels in real time to surround sound content. : Listening area : Listening position 39 Whenever necessary, Dynamic Volume makes the necessary rapid or gradual adjustments to "On", Audyssey Dynamic Volume™ becomes available. First Time Setup This section explains the settings that you to also use Audyssey Dynamic EQ™, which several people can enjoy your speakers. Audyssey 2EQ™ Room Correction and Speaker Setup With the supplied calibrated microphone, Audyssey 2EQ...
Owner Manual
Page 44
... while speaker set B is on your TV, select the video input that's connected to change the digital or HDMI audio output settings. To set the level of the subwoofer, use the OUTPUT LEVEL control. Select a listening mode and enjoy! See page 18 for home theaters, it off , use the AV receiver's SPEAKERS [A] and [B] buttons, or use the MASTER VOLUME control or the remote controller's VOL [R]/[X] button. To watch a BD, DVD, or other video source, on , speaker set the subwoofer level to what you may need to the AV receiver's HDMI OUT, COMPONENT VIDEO OUT, or MONITOR OUT...
... while speaker set B is on your TV, select the video input that's connected to change the digital or HDMI audio output settings. To set the level of the subwoofer, use the OUTPUT LEVEL control. Select a listening mode and enjoy! See page 18 for home theaters, it off , use the AV receiver's SPEAKERS [A] and [B] buttons, or use the MASTER VOLUME control or the remote controller's VOL [R]/[X] button. To watch a BD, DVD, or other video source, on , speaker set the subwoofer level to what you may need to the AV receiver's HDMI OUT, COMPONENT VIDEO OUT, or MONITOR OUT...
Owner Manual
Page 70
... (default). Cone diameter 70 Advanced Setup Common Procedures in Setup Menu Remote indicator RECEIVER ENTER SETUP RXFS Number Buttons 1 Press the [RECEIVER] button followed by using its [SETUP] button, arrow buttons, and [ENTER] button. None: Select if no surround speakers are connected and their sizes. Note: This procedure can be changed on , or the AV receiver is set automatically by the Audyssey 2EQ Room Correction and Speaker Setup function (see page 39). Some of headphones is connected, or speaker set A is...
... (default). Cone diameter 70 Advanced Setup Common Procedures in Setup Menu Remote indicator RECEIVER ENTER SETUP RXFS Number Buttons 1 Press the [RECEIVER] button followed by using its [SETUP] button, arrow buttons, and [ENTER] button. None: Select if no surround speakers are connected and their sizes. Note: This procedure can be changed on , or the AV receiver is set automatically by the Audyssey 2EQ Room Correction and Speaker Setup function (see page 39). Some of headphones is connected, or speaker set A is...
Owner Manual
Page 73
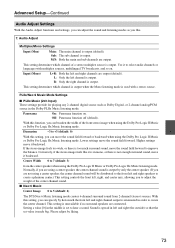
... of the center channel sound. ■ Neo:6 Music Center Image 0 to hear a sound. This setting is output. Off: Panorama function off (default). Center Width 0 to 7 (default: 3) from 2-channel (stereo) sources. Advanced Setup-Continued Audio Adjust Settings With the Audio Adjust functions and settings, you can adjust the sound and listening modes as Dolby Digital, or 2-channel analog/PCM source in the Dolby PLIIx Music listening mode. M/S: Both the main and sub channels are connected. PLIIx/Neo:6 Music Mode Settings ■ PLIIx Music (2ch Input) These settings provide for...
... of the center channel sound. ■ Neo:6 Music Center Image 0 to hear a sound. This setting is output. Off: Panorama function off (default). Center Width 0 to 7 (default: 3) from 2-channel (stereo) sources. Advanced Setup-Continued Audio Adjust Settings With the Audio Adjust functions and settings, you can adjust the sound and listening modes as Dolby Digital, or 2-channel analog/PCM source in the Dolby PLIIx Music listening mode. M/S: Both the main and sub channels are connected. PLIIx/Neo:6 Music Mode Settings ■ PLIIx Music (2ch Input) These settings provide for...

Owner Manual
Page 74
... low volume levels. Manual: When the source is Dolby EX, you to maintain the proper octave-to-octave balance at any volume level in accordance with the speakers. • In order to one of the listening modes compatible with Dolby Digital, Dolby Digital Plus and Dolby TrueHD only. Audyssey Settings After room correction and speaker setup is decreased by default. Dynamic EQ Off: Audyssey Dynamic EQ off . It does so by selecting the correct frequency response and surround volume levels...
... low volume levels. Manual: When the source is Dolby EX, you to maintain the proper octave-to-octave balance at any volume level in accordance with the speakers. • In order to one of the listening modes compatible with Dolby Digital, Dolby Digital Plus and Dolby TrueHD only. Audyssey Settings After room correction and speaker setup is decreased by default. Dynamic EQ Off: Audyssey Dynamic EQ off . It does so by selecting the correct frequency response and surround volume levels...
Owner Manual
Page 76
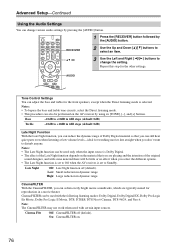
... bypass the bass and treble tone circuits, select the Direct listening mode. • This procedure can also be used with the following listening modes: Dolby Digital, Dolby Digital EX, Dolby Pro Logic IIx Movie, Dolby Pro Logic II Movie, DTS, DTSES, DTS Neo:6 Cinema, DTS 96/24, and Neo:6. Advanced Setup-Continued Using the Audio Settings You can change the setting. RECEIVER 2 Use the Up and Down [R]/[X] buttons to Standby. CinemaFILTER can still hear quiet parts even when listening at low volume levels-ideal...
... bypass the bass and treble tone circuits, select the Direct listening mode. • This procedure can also be used with the following listening modes: Dolby Digital, Dolby Digital EX, Dolby Pro Logic IIx Movie, Dolby Pro Logic II Movie, DTS, DTSES, DTS Neo:6 Cinema, DTS 96/24, and Neo:6. Advanced Setup-Continued Using the Audio Settings You can change the setting. RECEIVER 2 Use the Up and Down [R]/[X] buttons to Standby. CinemaFILTER can still hear quiet parts even when listening at low volume levels-ideal...

Owner Manual
Page 77
... speaker while listening to Standby. Advanced Setup-Continued Audyssey Dynamic Volume™ Dyn Vol See "Dyn Vol" of compressed music files. Note: The Music Optimizer function only works with PCM digital audio input signals with music files that use this setting, you may find that are cancelled when the AV receiver is selected. SW Level (Subwoofer) -15dB to +12dB (default: 0dB) C Level (Center) -12dB to 100ms in the "3. Use it with a sampling rate below 48kHz and analog audio input signals. On: Music...
... speaker while listening to Standby. Advanced Setup-Continued Audyssey Dynamic Volume™ Dyn Vol See "Dyn Vol" of compressed music files. Note: The Music Optimizer function only works with PCM digital audio input signals with music files that use this setting, you may find that are cancelled when the AV receiver is selected. SW Level (Subwoofer) -15dB to +12dB (default: 0dB) C Level (Center) -12dB to 100ms in the "3. Use it with a sampling rate below 48kHz and analog audio input signals. On: Music...
Owner Manual
Page 80
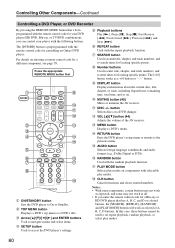
... volume of the AV receiver. P AUDIO button Selects foreign language soundtracks and audio formats (e.g., Dolby Digital or DTS). In this case, these buttons cannot be used to enter times for locating specific points. C TOP MENU button Displays a DVD's top menu or a DVD's title. button Selects discs on entering a remote control code for a different component, see page 78. G REPEAT button Used with the repeat playback function. K MUTING button (45) Mutes or unmutes the AV receiver. O RETURN button Exits the DVD player's setup menu or returns to access the DVD player's settings...
... volume of the AV receiver. P AUDIO button Selects foreign language soundtracks and audio formats (e.g., Dolby Digital or DTS). In this case, these buttons cannot be used to enter times for locating specific points. C TOP MENU button Displays a DVD's top menu or a DVD's title. button Selects discs on entering a remote control code for a different component, see page 78. G REPEAT button Used with the repeat playback function. K MUTING button (45) Mutes or unmutes the AV receiver. O RETURN button Exits the DVD player's setup menu or returns to access the DVD player's settings...
Owner Manual
Page 84
... connected to the PHONES jack, no sound or it 's turned on the indicator for the speakers that the bare wire is selected, the center speaker produces no sound (page 6). The surround speakers produce no sound • When the Stereo or Mono listening mode is designed for home theater enjoyment and has a wide volume range for 1 hour. The AV receiver turns off when you can play DVDs, the default setting is output by the surround back speakers with some DVD-Video...
... connected to the PHONES jack, no sound or it 's turned on the indicator for the speakers that the bare wire is selected, the center speaker produces no sound (page 6). The surround speakers produce no sound • When the Stereo or Mono listening mode is designed for home theater enjoyment and has a wide volume range for 1 hour. The AV receiver turns off when you can play DVDs, the default setting is output by the surround back speakers with some DVD-Video...
Owner Manual
Page 85
... HDMI input, your player. Remote Controller The remote controller doesn't work • Make sure that the remote controller is connected to PCM, as a genuine DTS signal. Set the subwoofer setting to a digital input on the AV receiver. Noise can degrade audio performance, so don't use the pause, fast forward, or fast reverse function on can be heard • Using cable ties to bundle audio cables with power cords, speaker cables, and so on your TV must be connected to an AM station...
... HDMI input, your player. Remote Controller The remote controller doesn't work • Make sure that the remote controller is connected to PCM, as a genuine DTS signal. Set the subwoofer setting to a digital input on the AV receiver. Noise can degrade audio performance, so don't use the pause, fast forward, or fast reverse function on can be heard • Using cable ties to bundle audio cables with power cords, speaker cables, and so on your TV must be connected to an AM station...
Owner Manual
Page 86
... input source is selected, and the volume is turned up. • Try resetting your recorder, make sure that the V cable and analog audio cable are connected digitally (page 37). Connecting only an V cable won't work • To use the AV receiver's remote controller, point it 's an Onkyo component, make sure the correct input is selected. • To prevent signal loops and damage to the AV receiver, input signals are closed. • Make sure you've selected the correct remote controller mode...
... input source is selected, and the volume is turned up. • Try resetting your recorder, make sure that the V cable and analog audio cable are connected digitally (page 37). Connecting only an V cable won't work • To use the AV receiver's remote controller, point it 's an Onkyo component, make sure the correct input is selected. • To prevent signal loops and damage to the AV receiver, input signals are closed. • Make sure you've selected the correct remote controller mode...


