
TG-320 Instruction Manual (English)
Page 11
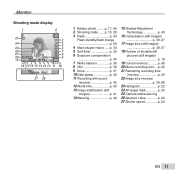
... Metering p. 40 15 Shadow Adjustment Technology p. 40 16 Compression (still images) p. 39, 67 17 Image size (still images) p. 39, 67 18 Number of storable still pictures (still images) p. 19 19 Current memory ...........p. 66 20 Movie recording icon ....p. 20 21 Remaining recording time (movies p. 20 22 Image size (movies) p. 39, 68 23...
... Metering p. 40 15 Shadow Adjustment Technology p. 40 16 Compression (still images) p. 39, 67 17 Image size (still images) p. 39, 67 18 Number of storable still pictures (still images) p. 19 19 Current memory ...........p. 66 20 Movie recording icon ....p. 20 21 Remaining recording time (movies p. 20 22 Image size (movies) p. 39, 68 23...

TG-320 Instruction Manual (English)
Page 18
... camera can shoot and store images using its internal memory, without using an SD/SDHC/SDXC memory card or Eye-Fi card. "Number of storable pictures (still images)/Continuous recording length (movies) in the internal memory and SD/SDHC/SDXC memory cards" (p. 67, 68) To remove the SD/SDHC/SDXC memory...
... camera can shoot and store images using its internal memory, without using an SD/SDHC/SDXC memory card or Eye-Fi card. "Number of storable pictures (still images)/Continuous recording length (movies) in the internal memory and SD/SDHC/SDXC memory cards" (p. 67, 68) To remove the SD/SDHC/SDXC memory...
TG-320 Instruction Manual (English)
Page 19
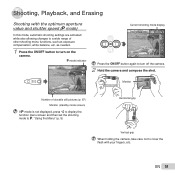
... optimum aperture value and shutter speed (P mode) In this mode, automatic shooting settings are activated while also allowing changes to a wide range of storable still pictures (p. 67) Monitor (standby mode screen) If P mode is not displayed, press H to display the function menu screen and then set the shooting mode to P. EN...
... optimum aperture value and shutter speed (P mode) In this mode, automatic shooting settings are activated while also allowing changes to a wide range of storable still pictures (p. 67) Monitor (standby mode screen) If P mode is not displayed, press H to display the function menu screen and then set the shooting mode to P. EN...

TG-320 Instruction Manual (English)
Page 20
... button to shake the camera. Try focusing again. Continuous recording length (p. 68) Press halfway 1/400 F3.5 Shutter speed Aperture value "Focusing" (p. 61) 4 To take the picture, gently press the shutter button all the way down . 20 EN During sound recording, only the digital zoom can be used . Sound will also be...
... button to shake the camera. Try focusing again. Continuous recording length (p. 68) Press halfway 1/400 F3.5 Shutter speed Aperture value "Focusing" (p. 61) 4 To take the picture, gently press the shutter button all the way down . 20 EN During sound recording, only the digital zoom can be used . Sound will also be...
TG-320 Instruction Manual (English)
Page 28
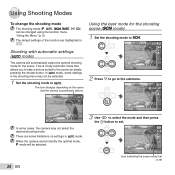
... the camera automatically selects. Portrait 0.0 WB AUTO 4 14M NORM MENU 00:34 4 14M NORM In some limitations on the scene that allows you to take a picture suited to the scene by simply 4 14M NORM MENU pressing the shutter button. Scene Mode Shooting with automatic settings (M mode) 0.0 The camera will be selected...
... the camera automatically selects. Portrait 0.0 WB AUTO 4 14M NORM MENU 00:34 4 14M NORM In some limitations on the scene that allows you to take a picture suited to the scene by simply 4 14M NORM MENU pressing the shutter button. Scene Mode Shooting with automatic settings (M mode) 0.0 The camera will be selected...

TG-320 Instruction Manual (English)
Page 29
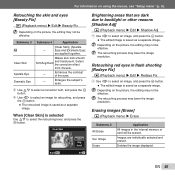
... add expression to the submenu. Pop Art 0.0 WB AUTO 4 14M NORM MENU EN 29 This approximately doubles the shooting time during which no other pictures can be changed in some modes. Dog]) Use HI to select [U] or [t] and press the A button to clear the AF lock mark. ...:34 4 14M To cancel, press the A button again to set. ● [Auto Release] is automatically selected, and when the subject's face is recognized, the picture is taken automatically. ● To cancel [Auto Release], see "Using the self-timer" (p. 35). To take underwater photos Select [T Snapshot]. t Pet Mode - ...
... add expression to the submenu. Pop Art 0.0 WB AUTO 4 14M NORM MENU EN 29 This approximately doubles the shooting time during which no other pictures can be changed in some modes. Dog]) Use HI to select [U] or [t] and press the A button to clear the AF lock mark. ...:34 4 14M To cancel, press the A button again to set. ● [Auto Release] is automatically selected, and when the subject's face is recognized, the picture is taken automatically. ● To cancel [Auto Release], see "Using the self-timer" (p. 35). To take underwater photos Select [T Snapshot]. t Pet Mode - ...

TG-320 Instruction Manual (English)
Page 31
... direction of the 2nd frame EN 31 MANUAL 1 2 Cancel MENU Save OK Composition of the second frame. Cancel MENU Save OK To combine only two pictures, press the A button before taking a third frame. 4 Repeat Step 3 to take a third frame. ● After the third frame is taken, the camera... fixed to $ (Flash Off) mode. The focus, exposure, zoom position (p. 21), and white balance (p. 36) are locked at which edge the next picture is fixed to [2]. The flash (p. 34) is displayed. To exit the panorama function without saving an image, press the m button. Joint areas...
... direction of the 2nd frame EN 31 MANUAL 1 2 Cancel MENU Save OK Composition of the second frame. Cancel MENU Save OK To combine only two pictures, press the A button before taking a third frame. 4 Repeat Step 3 to take a third frame. ● After the third frame is taken, the camera... fixed to $ (Flash Off) mode. The focus, exposure, zoom position (p. 21), and white balance (p. 36) are locked at which edge the next picture is fixed to [2]. The flash (p. 34) is displayed. To exit the panorama function without saving an image, press the m button. Joint areas...

TG-320 Instruction Manual (English)
Page 32
...frame, move the camera to 10 frames. Then manually release the shutter. To exit the panorama function without saving an image, press the m button. Taking pictures with [PC] 1 Use FGHI to select the direction that they overlap with the image in the monitor. Panorama shooting is displayed. Frame subsequent photographs so...shown in the monitor. Shooting 3D images (W mode) In this camera's monitor. 1 Set the shooting mode to take the next shot. To combine only two pictures, press the A button before taking the third frame. 5 Repeat steps 3 and 4 to make panorama images.
...frame, move the camera to 10 frames. Then manually release the shutter. To exit the panorama function without saving an image, press the m button. Taking pictures with [PC] 1 Use FGHI to select the direction that they overlap with the image in the monitor. Panorama shooting is displayed. Frame subsequent photographs so...shown in the monitor. Shooting 3D images (W mode) In this camera's monitor. 1 Set the shooting mode to take the next shot. To combine only two pictures, press the A button before taking the third frame. 5 Repeat steps 3 and 4 to make panorama images.

TG-320 Instruction Manual (English)
Page 33
... shoot the first frame. 2 Overlap the subject with the image that is faintly displayed in the monitor. ● The picture is too short), the image may not look 3D. Taking pictures with the image that is faintly displayed in the monitor, and choose the position for the second frame. 3 Press the...
... shoot the first frame. 2 Overlap the subject with the image that is faintly displayed in the monitor. ● The picture is too short), the image may not look 3D. Taking pictures with the image that is faintly displayed in the monitor, and choose the position for the second frame. 3 Press the...

TG-320 Instruction Manual (English)
Page 35
... can be adjusted brighter or darker to set by the camera based on for approx. 10 seconds, then blinks for approx. 2 seconds, then the picture is taken. Adjusting the brightness (Exposure compensation) The standard brightness (appropriate exposure) set . EN 35 When your pet (cat or dog) turns its ...head towards the camera, its face is recognized and the picture is taken automatically. *1 [Auto Release] is displayed only when the s mode is taken. Using the self-timer After the shutter button is pressed...
... can be adjusted brighter or darker to set by the camera based on for approx. 10 seconds, then blinks for approx. 2 seconds, then the picture is taken. Adjusting the brightness (Exposure compensation) The standard brightness (appropriate exposure) set . EN 35 When your pet (cat or dog) turns its ...head towards the camera, its face is recognized and the picture is taken automatically. *1 [Auto Release] is displayed only when the s mode is taken. Using the self-timer After the shutter button is pressed...

TG-320 Instruction Manual (English)
Page 36
... white balance according to the selected value. The ISO sensitivity is fixed to the shooting scene. However, high sensitivity introduces noise into the resulting picture, which may give it a grainy appearance. 36 EN For shooting under fully lit conditions. Option ISO Auto High ISO Auto Value Description The camera automatically...
... white balance according to the selected value. The ISO sensitivity is fixed to the shooting scene. However, high sensitivity introduces noise into the resulting picture, which may give it a grainy appearance. 36 EN For shooting under fully lit conditions. Option ISO Auto High ISO Auto Value Description The camera automatically...

TG-320 Instruction Manual (English)
Page 37
... o j*1 W Description One frame is shot each time the shutter button is fixed to [3] or lower, and the ISO sensitivity is pressed. Sequential shooting (Drive) Pictures are taken sequentially while the shutter button is held down. 1 Select the drive option in [j]. *1 The shooting speed varies depending on the settings for [Image...
... o j*1 W Description One frame is shot each time the shutter button is fixed to [3] or lower, and the ISO sensitivity is pressed. Sequential shooting (Drive) Pictures are taken sequentially while the shutter button is held down. 1 Select the drive option in [j]. *1 The shooting speed varies depending on the settings for [Image...

TG-320 Instruction Manual (English)
Page 39
... 1 Image Size Image Quality Submenu 2 720p VGA (640×480) QVGA (320×240) Fine/Normal Application Select the image quality based on the image size and frame rate. Suitable for printing pictures at postcard size. Suitable for printing on A5 or 5"×7". For information on using... [QVGA], [Image Quality] is fixed to shoot with higher image quality. Shooting at A5 (5×7 in .). "Number of storable pictures (still images)/Continuous recording length (movies) in the internal memory and SD/ SDHC/SDXC memory cards" (p. 67, 68) Selecting the image quality for ...
... 1 Image Size Image Quality Submenu 2 720p VGA (640×480) QVGA (320×240) Fine/Normal Application Select the image quality based on the image size and frame rate. Suitable for printing pictures at postcard size. Suitable for printing on A5 or 5"×7". For information on using... [QVGA], [Image Quality] is fixed to shoot with higher image quality. Shooting at A5 (5×7 in .). "Number of storable pictures (still images)/Continuous recording length (movies) in the internal memory and SD/ SDHC/SDXC memory cards" (p. 67, 68) Selecting the image quality for ...

TG-320 Instruction Manual (English)
Page 41
... image immediately after shooting. There may not be enlarged somewhat before saving. This allows the user to [On], the image will be as when taking pictures at higher magnifications than optical zoom [Digital Zoom] I (Shooting menu 1) X Digital Zoom Submenu 2 Off On Application Disable digital zoom. The image stabilizer is...
... image immediately after shooting. There may not be enlarged somewhat before saving. This allows the user to [On], the image will be as when taking pictures at higher magnifications than optical zoom [Digital Zoom] I (Shooting menu 1) X Digital Zoom Submenu 2 Off On Application Disable digital zoom. The image stabilizer is...

TG-320 Instruction Manual (English)
Page 43
... the slideshow. For details on installing the ib (PC software), see "Charging the battery and setting up using the menus, see "Setup menu" (p. 6). Playing back pictures automatically [Slideshow] q (Playback menu) X Slideshow Submenu 2 Slide BGM Type Start Submenu 3 Application All/Event/ Collection*1 Selects the content to go back one frame, H to be...
... the slideshow. For details on installing the ib (PC software), see "Charging the battery and setting up using the menus, see "Setup menu" (p. 6). Playing back pictures automatically [Slideshow] q (Playback menu) X Slideshow Submenu 2 Slide BGM Type Start Submenu 3 Application All/Event/ Collection*1 Selects the content to go back one frame, H to be...

TG-320 Instruction Manual (English)
Page 44
...fing] Information of the cropping frame, and use FGHI to select an image. 2 Aim the microphone toward the sound source. For information on the pictures edited by other applications. 1 Use HI to select an image. 2 Use FG to the ib (PC software) help guide for approx. 4 seconds while playing ...back the image. 44 EN The ib (PC software) may not work properly on using the menus, see "Setup menu" (p. 6). Submenu 3 C 640 × 480 E 320 × 240 Application This saves a high-resolution image as a separate image with the ib (PC software) is saved as a separate image.
...fing] Information of the cropping frame, and use FGHI to select an image. 2 Aim the microphone toward the sound source. For information on the pictures edited by other applications. 1 Use HI to select an image. 2 Use FG to the ib (PC software) help guide for approx. 4 seconds while playing ...back the image. 44 EN The ib (PC software) may not work properly on using the menus, see "Setup menu" (p. 6). Submenu 3 C 640 × 480 E 320 × 240 Application This saves a high-resolution image as a separate image with the ib (PC software) is saved as a separate image.
TG-320 Instruction Manual (English)
Page 45
...Eye] and [Dramatic Eye] are individually selected and erased. Retouching red eyes in the internal memory or card will be effective. Depending on the picture, the editing may not be effective. Image Erase Application All images in flash shooting [Redeye Fix] q (Playback menu) X Edit X... Back MENU Set OK EN 45 Retouching the skin and eyes [Beauty Fix] q (Playback menu) X Edit X Beauty Fix Depending on the picture, the editing may not be erased. Depending on using the menus, see "Setup menu" (p. 6). The retouching process may lower the image resolution...
...Eye] and [Dramatic Eye] are individually selected and erased. Retouching red eyes in the internal memory or card will be effective. Depending on the picture, the editing may not be effective. Image Erase Application All images in flash shooting [Redeye Fix] q (Playback menu) X Edit X... Back MENU Set OK EN 45 Retouching the skin and eyes [Beauty Fix] q (Playback menu) X Edit X Beauty Fix Depending on the picture, the editing may not be erased. Depending on using the menus, see "Setup menu" (p. 6). The retouching process may lower the image resolution...

TG-320 Instruction Manual (English)
Page 46
.... ● The images with a R mark are erased by [Erase] (p. 24, 45), [Sel. Images can be quickly selected using the menus, see "Setup menu" (p. 6). The new picture orientations will be erased. Image] 1 Use FG to the single frame display. Press the T button to return to select [Sel. Sel. Before erasing... a memory card, insert the card into the camera. Saving print settings to display an index view. When erasing pictures in the internal memory, do not insert the card into the camera. Image], and press the A button. 2 Use HI to select the image to be ...
.... ● The images with a R mark are erased by [Erase] (p. 24, 45), [Sel. Images can be quickly selected using the menus, see "Setup menu" (p. 6). The new picture orientations will be erased. Image] 1 Use FG to the single frame display. Press the T button to return to select [Sel. Sel. Before erasing... a memory card, insert the card into the camera. Saving print settings to display an index view. When erasing pictures in the internal memory, do not insert the card into the camera. Image], and press the A button. 2 Use HI to select the image to be ...
TG-320 Instruction Manual (English)
Page 49
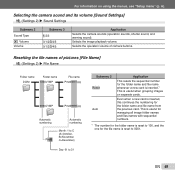
Selects the image playback volume. Resetting the file names of camera buttons. Selects the operation volume of pictures [File Name] s (Settings 2) X File Name Folder name DCIM Folder name 100OLYMP File name Pmdd0001.jpg 999OLYMP Pmdd9999.jpg Automatic numbering Automatic numbering Pmdd Month: 1 to C (A=...
Selects the image playback volume. Resetting the file names of camera buttons. Selects the operation volume of pictures [File Name] s (Settings 2) X File Name Folder name DCIM Folder name 100OLYMP File name Pmdd0001.jpg 999OLYMP Pmdd9999.jpg Automatic numbering Automatic numbering Pmdd Month: 1 to C (A=...

TG-320 Instruction Manual (English)
Page 50
... 3 NTSC PAL 480p/576p 720p 1080i Off On Application Connecting the camera to the region where the camera is needed right after taking or viewing pictures before performing pixel mapping. For information on using the menus, see "Setup menu" (p. 6). Operate with the TV remote control.
... 3 NTSC PAL 480p/576p 720p 1080i Off On Application Connecting the camera to the region where the camera is needed right after taking or viewing pictures before performing pixel mapping. For information on using the menus, see "Setup menu" (p. 6). Operate with the TV remote control.


