Stylus Verve Advanced Manual (English)
Page 1
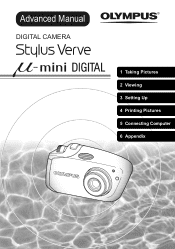
Advanced Manual DIGITAL CAMERA 1 Taking Pictures 2 Viewing 3 Setting Up 4 Printing Pictures 5 Connecting Computer 6 Appendix
Advanced Manual DIGITAL CAMERA 1 Taking Pictures 2 Viewing 3 Setting Up 4 Printing Pictures 5 Connecting Computer 6 Appendix
Stylus Verve Advanced Manual (English)
Page 2
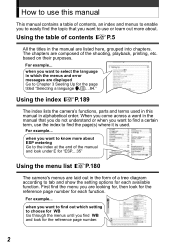
... function. For example... First find the menu you are looking for, then look under E for "ESP....35" Using the menu list gP.180 The camera's menus are laid out in which setting to choose for 0 Go through the menus until you want to find a certain term, use or learn out... and show the setting options for the page titled "Selecting a language W....84." based on their purposes. Using the index gP.189 The index lists the camera's functions, parts and terms used . Using the table of the shooting, playback, printing, etc. For example... How to use this manual in the manual ...
... function. For example... First find the menu you are looking for, then look under E for "ESP....35" Using the menu list gP.180 The camera's menus are laid out in which setting to choose for 0 Go through the menus until you want to find a certain term, use or learn out... and show the setting options for the page titled "Selecting a language W....84." based on their purposes. Using the index gP.189 The index lists the camera's functions, parts and terms used . Using the table of the shooting, playback, printing, etc. For example... How to use this manual in the manual ...
Stylus Verve Advanced Manual (English)
Page 3
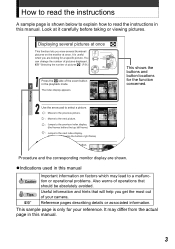
Useful information and hints that should be absolutely avoided. g Reference pages describing details or associated information. This sample page is only for your camera. It may lead to a malfunction or operational problems. Also warns of operations that will help you get the most out of the zoom button. It ...
Useful information and hints that should be absolutely avoided. g Reference pages describing details or associated information. This sample page is only for your camera. It may lead to a malfunction or operational problems. Also warns of operations that will help you get the most out of the zoom button. It ...

Stylus Verve Advanced Manual (English)
Page 4
The arrow mark ( ) at the bottom or top of the menu indicates that appears on the monitor when you turn the camera on and press the OK/MENU button is called the "Top menu." To cancel the menu display, press the OK/MENU button again. There are ... 2272×1704 SQ1 2048×1536 SQ2 640×480 SELECT GO Operational buttons (arrow pad and OK/MENU button) White Balance SET CARD CAMERA Press WB AUTO Tab ESP/n ESP DRIVE o ISO AUTO DIGITAL ZOOM OFF AF MODE SPOT Function Use the arrow pad to use the menus.
The arrow mark ( ) at the bottom or top of the menu indicates that appears on the monitor when you turn the camera on and press the OK/MENU button is called the "Top menu." To cancel the menu display, press the OK/MENU button again. There are ... 2272×1704 SQ1 2048×1536 SQ2 640×480 SELECT GO Operational buttons (arrow pad and OK/MENU button) White Balance SET CARD CAMERA Press WB AUTO Tab ESP/n ESP DRIVE o ISO AUTO DIGITAL ZOOM OFF AF MODE SPOT Function Use the arrow pad to use the menus.
Stylus Verve Advanced Manual (English)
Page 7
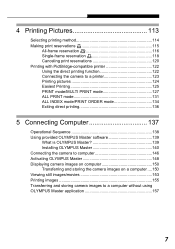
...reservation 118 Canceling print reservations 120 Printing with PictBridge-compatible printer 122 Using the direct printing function 122 Connecting the camera to a printer 123 Printing pictures 124 Easiest Printing 125 PRINT mode/MULTI PRINT mode 127 ALL PRINT mode ... 137 Operational Sequence 138 Using provided OLYMPUS Master software 139 What is OLYMPUS Master 139 Installing OLYMPUS Master 140 Connecting the camera to computer 146 Activating OLYMPUS Master 148 Displaying camera images on computer 150 Transferring and storing the camera images on a computer ....150 Viewing...
...reservation 118 Canceling print reservations 120 Printing with PictBridge-compatible printer 122 Using the direct printing function 122 Connecting the camera to a printer 123 Printing pictures 124 Easiest Printing 125 PRINT mode/MULTI PRINT mode 127 ALL PRINT mode ... 137 Operational Sequence 138 Using provided OLYMPUS Master software 139 What is OLYMPUS Master 139 Installing OLYMPUS Master 140 Connecting the camera to computer 146 Activating OLYMPUS Master 148 Displaying camera images on computer 150 Transferring and storing the camera images on a computer ....150 Viewing...
Stylus Verve Advanced Manual (English)
Page 8
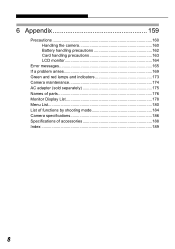
6 Appendix 159 Precautions 160 Handling the camera 160 Battery handling precautions 162 Card handling precautions 163 LCD monitor 164 Error messages 165 If a problem arises 169 Green and red lamps and indicators 173 Camera maintenance 174 AC adapter (sold separately 175 Names of parts 176 Monitor Display List 178 Menu List 180 List of functions by shooting mode 184 Camera specifications 186 Specifications of accessories 188 Index 189 8
6 Appendix 159 Precautions 160 Handling the camera 160 Battery handling precautions 162 Card handling precautions 163 LCD monitor 164 Error messages 165 If a problem arises 169 Green and red lamps and indicators 173 Camera maintenance 174 AC adapter (sold separately 175 Names of parts 176 Monitor Display List 178 Menu List 180 List of functions by shooting mode 184 Camera specifications 186 Specifications of accessories 188 Index 189 8
Stylus Verve Advanced Manual (English)
Page 10
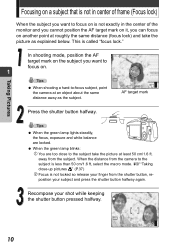
o HQ 2272*1704 20a AF target mark Press the shutter button halfway. When the distance from the camera to the subject take the picture as the subject. In shooting mode, position the AF P target mark on the subject you want to focus on ... that is not in the center of frame (Focus lock) When the subject you can focus on . 1 When shooting a hard-to-focus subject, point the camera at an object about the same distance away as explained below. away from the shutter button, re- This is not locked so release your finger...
o HQ 2272*1704 20a AF target mark Press the shutter button halfway. When the distance from the camera to the subject take the picture as the subject. In shooting mode, position the AF P target mark on the subject you want to focus on ... that is not in the center of frame (Focus lock) When the subject you can focus on . 1 When shooting a hard-to-focus subject, point the camera at an object about the same distance away as explained below. away from the shutter button, re- This is not locked so release your finger...
Stylus Verve Advanced Manual (English)
Page 11
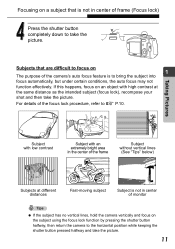
... shutter button completely down to take the picture. Focusing on a subject that are difficult to g P.10. If this happens, focus on 1 The purpose of the camera's auto focus feature is not in center of the focus lock procedure, refer to focus on an object with an extremely bright area in the...), recompose your shot and then take the picture. Subjects that is not in center of monitor If the subject has no vertical lines, hold the camera vertically and focus on the subject using the focus lock function by pressing the shutter button halfway, then return the...
... shutter button completely down to take the picture. Focusing on a subject that are difficult to g P.10. If this happens, focus on 1 The purpose of the camera's auto focus feature is not in center of the focus lock procedure, refer to focus on an object with an extremely bright area in the...), recompose your shot and then take the picture. Subjects that is not in center of monitor If the subject has no vertical lines, hold the camera vertically and focus on the subject using the focus lock function by pressing the shutter button halfway, then return the...
Stylus Verve Advanced Manual (English)
Page 12
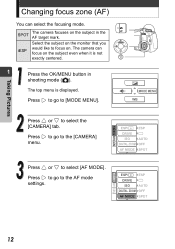
...the OK/MENU button in the AF target mark. The camera can select the focusing mode. SPOT The camera focuses on the subject in shooting mode (K). F K MODE MENU WB Press or to focus on. SET CARD CAMERA ESP/n ESP DRIVE o ISO AUTO DIGITAL ZOOM OFF AF MODE SPOT Press or to the AF ...mode settings. SET CARD CAMERA ESP/n ESP DRIVE o ISO AUTO DIGITAL ZOOM OFF AF MODE SPOT 12 Press to go to [MODE MENU]. Press...
...the OK/MENU button in the AF target mark. The camera can select the focusing mode. SPOT The camera focuses on the subject in shooting mode (K). F K MODE MENU WB Press or to focus on. SET CARD CAMERA ESP/n ESP DRIVE o ISO AUTO DIGITAL ZOOM OFF AF MODE SPOT Press or to the AF ...mode settings. SET CARD CAMERA ESP/n ESP DRIVE o ISO AUTO DIGITAL ZOOM OFF AF MODE SPOT 12 Press to go to [MODE MENU]. Press...

Stylus Verve Advanced Manual (English)
Page 13
Changing focus zone (AF) Press or to exit AF MODE SPOT the menu. 1 Take the picture using the monitor. ESP/n DRIVE The AF mode is set. Taking Pictures 13 ISO DIGITAL ZOOM iESP Press the OK/MENU button again to select [iESP] or SET CARD CAMERA [SPOT] and press the OK/MENU button.
Changing focus zone (AF) Press or to exit AF MODE SPOT the menu. 1 Take the picture using the monitor. ESP/n DRIVE The AF mode is set. Taking Pictures 13 ISO DIGITAL ZOOM iESP Press the OK/MENU button again to select [iESP] or SET CARD CAMERA [SPOT] and press the OK/MENU button.
Stylus Verve Advanced Manual (English)
Page 14
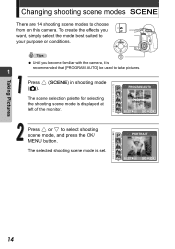
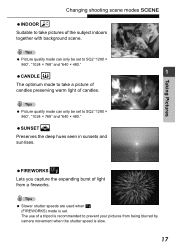
... AUTO The scene selection palette for selecting the shooting scene mode is recommended that [PROGRAM AUTO] be used to choose from on this camera. For normal shooting SELECT GO Press or to your purpose or conditions. The selected shooting scene mode is set. To create the effects... you become familiar with the camera, it is displayed at left of the monitor. Taking Pictures Changing shooting scene modes l There are 14 shooting scene modes to take pictures....
... AUTO The scene selection palette for selecting the shooting scene mode is recommended that [PROGRAM AUTO] be used to choose from on this camera. For normal shooting SELECT GO Press or to your purpose or conditions. The selected shooting scene mode is set. To create the effects... you become familiar with the camera, it is displayed at left of the monitor. Taking Pictures Changing shooting scene modes l There are 14 shooting scene modes to take pictures....
Stylus Verve Advanced Manual (English)
Page 15
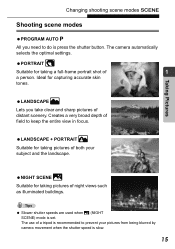
PORTRAIT I Suitable for taking pictures of both your pictures from being blurred by camera movement when the shutter speed is recommended to prevent your subject and the landscape. Creates a very broad depth of field to do is set. The ... view in focus. Taking Pictures Changing shooting scene modes l Shooting scene modes PROGRAM AUTO P All you take clear and sharp pictures of distant scenery. The camera automatically selects the optimal settings.
PORTRAIT I Suitable for taking pictures of both your pictures from being blurred by camera movement when the shutter speed is recommended to prevent your subject and the landscape. Creates a very broad depth of field to do is set. The ... view in focus. Taking Pictures Changing shooting scene modes l Shooting scene modes PROGRAM AUTO P All you take clear and sharp pictures of distant scenery. The camera automatically selects the optimal settings.
Stylus Verve Advanced Manual (English)
Page 16
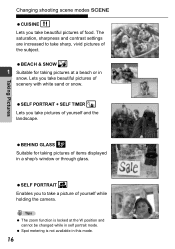
... N Lets you take pictures of scenery with white sand or snow. SELF PORTRAIT o Enables you to take sharp, vivid pictures of yourself while holding the camera. Taking Pictures Changing shooting scene modes l CUISINE G Lets you take beautiful pictures of items displayed in a shop's window or through glass. The saturation, sharpness and...
... N Lets you take pictures of scenery with white sand or snow. SELF PORTRAIT o Enables you to take sharp, vivid pictures of yourself while holding the camera. Taking Pictures Changing shooting scene modes l CUISINE G Lets you take beautiful pictures of items displayed in a shop's window or through glass. The saturation, sharpness and...
Stylus Verve Advanced Manual (English)
Page 17
... × 960", "1024 × 768" and "640 × 480." Picture quality mode can only be set to take pictures of light from being blurred by camera movement when the shutter speed is set.
... × 960", "1024 × 768" and "640 × 480." Picture quality mode can only be set to take pictures of light from being blurred by camera movement when the shutter speed is set.
Stylus Verve Advanced Manual (English)
Page 18
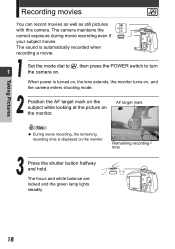
... on, the lens extends, the monitor turns on the monitor. Set the mode dial to n, then press the POWER switch to turn 1 the camera on the monitor. AF target mark N $ During movie recording, the remaining recording time is displayed on . The focus and white balance are locked...When power is automatically recorded when recording a movie. R HQ 00:36 Remaining recording time Press the shutter button halfway and hold. The camera maintains the correct exposure during movie recording even if your subject moves. Position the AF target mark on the subject while looking at the picture...
... on, the lens extends, the monitor turns on the monitor. Set the mode dial to n, then press the POWER switch to turn 1 the camera on the monitor. AF target mark N $ During movie recording, the remaining recording time is displayed on . The focus and white balance are locked...When power is automatically recorded when recording a movie. R HQ 00:36 Remaining recording time Press the shutter button halfway and hold. The camera maintains the correct exposure during movie recording even if your subject moves. Position the AF target mark on the subject while looking at the picture...
Stylus Verve Advanced Manual (English)
Page 19
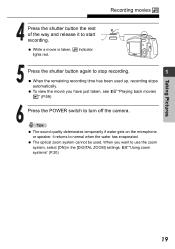
... back movies q" (P.59) Press the POWER switch to use the zoom system, select [ON] in the [DIGITAL ZOOM] settings. g"Using zoom systems" (P.20) 19 To view the movie you want to turn off the camera. The optical zoom system cannot be used up, recording stops automatically. Taking Pictures Recording movies N Press the...
... back movies q" (P.59) Press the POWER switch to use the zoom system, select [ON] in the [DIGITAL ZOOM] settings. g"Using zoom systems" (P.20) 19 To view the movie you want to turn off the camera. The optical zoom system cannot be used up, recording stops automatically. Taking Pictures Recording movies N Press the...
Stylus Verve Advanced Manual (English)
Page 20
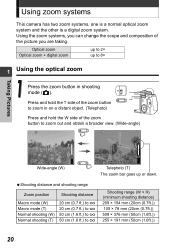
....)) 105 × 78 mm (20cm (0.7ft.)) 509 × 376 mm (50cm (1.6ft.)) 255 × 191 mm (50cm (1.6ft.)) 20 Using zoom systems This camera has two zoom systems, one is a normal optical zoom system and the other is a digital zoom system. Optical zoom Optical zoom + digital zoom up to 2× up or down.
....)) 105 × 78 mm (20cm (0.7ft.)) 509 × 376 mm (50cm (1.6ft.)) 255 × 191 mm (50cm (1.6ft.)) 20 Using zoom systems This camera has two zoom systems, one is a normal optical zoom system and the other is a digital zoom system. Optical zoom Optical zoom + digital zoom up to 2× up or down.
Stylus Verve Advanced Manual (English)
Page 21
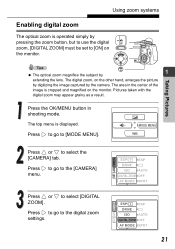
... and magnified on the other hand, enlarges the picture by digitizing the image captured by the camera. SET CARD CAMERA SET CARD CAMERA ESP/n ESP DRIVE o ISO AUTO DIGITAL ZOOM OFF AF MODE SPOT ESP/n ESP DRIVE o ISO AUTO DIGITAL ZOOM OFF AF MODE SPOT 21 The area in shooting mode...monitor. Press to go to the [CAMERA] menu. Using zoom systems Enabling digital zoom The optical zoom is operated simply by pressing the zoom button, but to use the digital zoom, [DIGITAL ZOOM] must be set to the digital zoom settings. Pictures taken with the digital zoom may appear grainy as a result...
... and magnified on the other hand, enlarges the picture by digitizing the image captured by the camera. SET CARD CAMERA SET CARD CAMERA ESP/n ESP DRIVE o ISO AUTO DIGITAL ZOOM OFF AF MODE SPOT ESP/n ESP DRIVE o ISO AUTO DIGITAL ZOOM OFF AF MODE SPOT 21 The area in shooting mode...monitor. Press to go to the [CAMERA] menu. Using zoom systems Enabling digital zoom The optical zoom is operated simply by pressing the zoom button, but to use the digital zoom, [DIGITAL ZOOM] must be set to the digital zoom settings. Pictures taken with the digital zoom may appear grainy as a result...

Stylus Verve Advanced Manual (English)
Page 22
SET CARD CAMERA ESP/n DRIVE ISO DIGITAL ZOOM AF MODE OFF ON 1 The digital zoom cannot be used when [OFF] is selected. Press the zoom button to occur at higher magnifications. Pictures taken with a tripod, etc. Camera movement is set. Taking Pictures Using zoom systems Press or... button again to select [ON] and press the OK/MENU button. o o White area : Range of digital zoom magnification. The digital zoom is likely to operate the digital zoom. Red area : Range of optical zoom magnification. Stabilize the camera with the digital zoom may appear grainy. to avoid...
SET CARD CAMERA ESP/n DRIVE ISO DIGITAL ZOOM AF MODE OFF ON 1 The digital zoom cannot be used when [OFF] is selected. Press the zoom button to occur at higher magnifications. Pictures taken with a tripod, etc. Camera movement is set. Taking Pictures Using zoom systems Press or... button again to select [ON] and press the OK/MENU button. o o White area : Range of digital zoom magnification. The digital zoom is likely to operate the digital zoom. Red area : Range of optical zoom magnification. Stabilize the camera with the digital zoom may appear grainy. to avoid...
Stylus Verve Advanced Manual (English)
Page 23
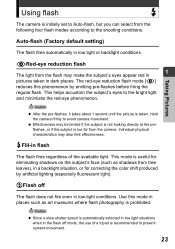
... flash may make the subject's eyes appear red in pictures taken in flash The flash fires regardless of a tripod is too far from the camera. The red-eye reduction flash mode [!] reduces this mode in low-light conditions. Taking Pictures After the pre-flashes, it takes about 1 ... not fire even in places such as shadows from the following four flash modes according to prevent camera movement. 23 This helps accustom the subject's eyes to avoid camera movement. Hold the camera firmly to the bright light and minimizes the red-eye phenomenon. Effectiveness may also limit effectiveness. ...
... flash may make the subject's eyes appear red in pictures taken in flash The flash fires regardless of a tripod is too far from the camera. The red-eye reduction flash mode [!] reduces this mode in low-light conditions. Taking Pictures After the pre-flashes, it takes about 1 ... not fire even in places such as shadows from the following four flash modes according to prevent camera movement. 23 This helps accustom the subject's eyes to avoid camera movement. Hold the camera firmly to the bright light and minimizes the red-eye phenomenon. Effectiveness may also limit effectiveness. ...


