
Camedia Master 4.1 Instruction Manual (4.9MB)
Page 2
... for version 4.1 16 Main menu for Pro version 18 Changing the Background Color 20 Changing the My Album location 21 Quick Reference 22 Transferring Images 23 Transferring Images from a Camera 23 Connecting the camera to the computer (Windows 23 Connecting the camera to the computer (Macintosh 24 Transferring images 25 Transferring Images from Media...
... for version 4.1 16 Main menu for Pro version 18 Changing the Background Color 20 Changing the My Album location 21 Quick Reference 22 Transferring Images 23 Transferring Images from a Camera 23 Connecting the camera to the computer (Windows 23 Connecting the camera to the computer (Macintosh 24 Transferring images 25 Transferring Images from Media...

Camedia Master 4.1 Instruction Manual (4.9MB)
Page 14
...interface (serial interface) Minimum 800 × 600 pixel resolution Minimum 65,536 colors This software only operates on support for the latest versions of operating systems, visit the Olympus web site (http://www.olympus.com). • The functions for connecting a camera to 9.2 (serial interface) CPU Power PC G3 or later RAM 40 MB... version OS Mac OS 9.0 or later/OS X 10.1 (USB interface) Mac OS 8.6 to the computer and directly transferring images are only available with an Olympus digital camera. • Operation of colors Only a Macintosh with a builtin USB port can be used.
...interface (serial interface) Minimum 800 × 600 pixel resolution Minimum 65,536 colors This software only operates on support for the latest versions of operating systems, visit the Olympus web site (http://www.olympus.com). • The functions for connecting a camera to 9.2 (serial interface) CPU Power PC G3 or later RAM 40 MB... version OS Mac OS 9.0 or later/OS X 10.1 (USB interface) Mac OS 8.6 to the computer and directly transferring images are only available with an Olympus digital camera. • Operation of colors Only a Macintosh with a builtin USB port can be used.

Camedia Master 4.1 Instruction Manual (4.9MB)
Page 20
The Options dialog box appears. 2 Click the [Background Color] tab. Background Color tab OK button Select one of the background colors. 3 Select one of the background colors, and click the [OK] button. This changes the background color for all CAMEDIA Master windows and dialog boxes. 20 Changing the Background Color You can select the background color used for all windows and dialog boxes in this software. Use the following procedure to change the background color. 1 In the main menu click the [Options] button.
The Options dialog box appears. 2 Click the [Background Color] tab. Background Color tab OK button Select one of the background colors. 3 Select one of the background colors, and click the [OK] button. This changes the background color for all CAMEDIA Master windows and dialog boxes. 20 Changing the Background Color You can select the background color used for all windows and dialog boxes in this software. Use the following procedure to change the background color. 1 In the main menu click the [Options] button.

Camedia Master 4.1 Instruction Manual (4.9MB)
Page 46
... the file type, and includes the following items. For image files General tab [General] tab • File Name • Thumbnail • Format • Pixels • Color Depth • File Size • File Location • Shooting Date • Updated Date • Linked sound - You can also add a comment (maximum 117 characters of...
... the file type, and includes the following items. For image files General tab [General] tab • File Name • Thumbnail • Format • Pixels • Color Depth • File Size • File Location • Shooting Date • Updated Date • Linked sound - You can also add a comment (maximum 117 characters of...

Camedia Master 4.1 Instruction Manual (4.9MB)
Page 47
... program • ISO speed rating • Exif version • Date and time of original data generation • Date and time of digital data generation • Exposure bias • Maximum lens aperture • Metering mode • Light source • Flash • Lens focal... length • User comments • Supported Flashpix version • Color space information • Custom image processing • Exposure mode • White balance • Digital zoom ratio • Scene capture type • Gain control • Contrast • Saturation &#...
... program • ISO speed rating • Exif version • Date and time of original data generation • Date and time of digital data generation • Exposure bias • Maximum lens aperture • Metering mode • Light source • Flash • Lens focal... length • User comments • Supported Flashpix version • Color space information • Custom image processing • Exposure mode • White balance • Digital zoom ratio • Scene capture type • Gain control • Contrast • Saturation &#...
Camedia Master 4.1 Instruction Manual (4.9MB)
Page 70
... including information about the scene is a new technology that connects the digital camera and printer. When you shoot with the image. You can easily print using the PRINT Image Matching function. A digital camera equipped with this extra data allows the printed image to make detailed ...PRINT Image Matching, you can print with the image files, allowing the digital camera to determine the ideal color settings for printing. 1 In the print window, click the [Printer Settings] button. With a combination of a digital camera and printer that supports it. The check box is inoperative if the...
... including information about the scene is a new technology that connects the digital camera and printer. When you shoot with the image. You can easily print using the PRINT Image Matching function. A digital camera equipped with this extra data allows the printed image to make detailed ...PRINT Image Matching, you can print with the image files, allowing the digital camera to determine the ideal color settings for printing. 1 In the print window, click the [Printer Settings] button. With a combination of a digital camera and printer that supports it. The check box is inoperative if the...

Camedia Master 4.1 Instruction Manual (4.9MB)
Page 77
...; Language (current language or English) • Month style (long or short) • Font • Style • Basic colors for Sundays, Saturdays, and weekdays • Color for the selected date (select from the 16 standard colors) The "Month style" (long or short) determines the month format as in the following example. • Long: August...
...; Language (current language or English) • Month style (long or short) • Font • Style • Basic colors for Sundays, Saturdays, and weekdays • Color for the selected date (select from the 16 standard colors) The "Month style" (long or short) determines the month format as in the following example. • Long: August...

Camedia Master 4.1 Instruction Manual (4.9MB)
Page 80
The text now appears in the layout. 5) Adjust the text position and size. To delete text Select the text you want to delete, and click the [Remove] button. 7 Set the number of the text with the mouse. To change the size, drag the edges of copies to print. 8 Click the [Print] button. 80 6 Enter text using the following procedure. 1) Click the [Text] button. The [Text] dialog box appears. 2) Select the font, style (regular, bold, italic, bold italic), size, and color. 3) Enter the text. 4) Click the [OK] button. To change the position, drag the text with the mouse.
The text now appears in the layout. 5) Adjust the text position and size. To delete text Select the text you want to delete, and click the [Remove] button. 7 Set the number of the text with the mouse. To change the size, drag the edges of copies to print. 8 Click the [Print] button. 80 6 Enter text using the following procedure. 1) Click the [Text] button. The [Text] dialog box appears. 2) Select the font, style (regular, bold, italic, bold italic), size, and color. 3) Enter the text. 4) Click the [OK] button. To change the position, drag the text with the mouse.

Camedia Master 4.1 Instruction Manual (4.9MB)
Page 98
... attach a comment to display a comment in the layout. The [Text] dialog box appears. 2) Select the font, style (regular, bold, italic, or bold italic), size and color. 3) Enter the text. 4) Click the [OK] button. The entered title or description appears in the layout. 2) In the Information field, check the [Comments] box. 3) Click...
... attach a comment to display a comment in the layout. The [Text] dialog box appears. 2) Select the font, style (regular, bold, italic, or bold italic), size and color. 3) Enter the text. 4) Click the [OK] button. The entered title or description appears in the layout. 2) In the Information field, check the [Comments] box. 3) Click...

Camedia Master 4.1 Instruction Manual (4.9MB)
Page 108
... the stitched image Select the background color from the 16 standard colors. 7 Select the size for the file, and click [OK]. 108 6 Click the [Stitch] button. The [Save As] dialog box appears. The saving operation may take a ... the name and location for the panorama image, relative to the state before stitching the images Click the [Try again] button. Image size selection Background color selection Try again button Save button To return to the pixel sizes of the original images. • Large (100%) • Medium (70%) • Small (50...
... the stitched image Select the background color from the 16 standard colors. 7 Select the size for the file, and click [OK]. 108 6 Click the [Stitch] button. The [Save As] dialog box appears. The saving operation may take a ... the name and location for the panorama image, relative to the state before stitching the images Click the [Try again] button. Image size selection Background color selection Try again button Save button To return to the pixel sizes of the original images. • Large (100%) • Medium (70%) • Small (50...

Camedia Master 4.1 Instruction Manual (4.9MB)
Page 111
6 Click the [Stitch] button. The saving operation may take a little time. To change the background color for the stitched image Select the background color from the 16 standard colors. 7 Select the image size (size as a proportion of the original image size) after stitching from the following: • Large... (100%) • Medium (70%) • Small (50%) 8 Click the [Save] button. Image size selection Background color selection Save button Try again button To go back to the unstitched state Click the [Try again] button. The [Save As] dialog box appears....
6 Click the [Stitch] button. The saving operation may take a little time. To change the background color for the stitched image Select the background color from the 16 standard colors. 7 Select the image size (size as a proportion of the original image size) after stitching from the following: • Large... (100%) • Medium (70%) • Small (50%) 8 Click the [Save] button. Image size selection Background color selection Save button Try again button To go back to the unstitched state Click the [Try again] button. The [Save As] dialog box appears....

Camedia Master 4.1 Instruction Manual (4.9MB)
Page 115
...this data is replaced by the new data. 115 If you copy or cut another selection to the clipboard, this software (Index, Upgrade, OLYMPUS Web Site, and About). • Image Display the menu for image manipulation (rotate, flip, resize, crop, insert text, template superimpose..., and distortion). • Filter Display the menu for adjusting image parameters and applying effects to the image (brightness/contrast, gamma, color balance, hue/ saturation/lightness, sharpness, blur, red-eye reduction, instant fix, sepia, and monochrome). • Help Display the menu for...
...this data is replaced by the new data. 115 If you copy or cut another selection to the clipboard, this software (Index, Upgrade, OLYMPUS Web Site, and About). • Image Display the menu for image manipulation (rotate, flip, resize, crop, insert text, template superimpose..., and distortion). • Filter Display the menu for adjusting image parameters and applying effects to the image (brightness/contrast, gamma, color balance, hue/ saturation/lightness, sharpness, blur, red-eye reduction, instant fix, sepia, and monochrome). • Help Display the menu for...

Camedia Master 4.1 Instruction Manual (4.9MB)
Page 127
... edit setting panel now shows the [Insert Text] dialog box. To change the position, drag the text with the mouse. 127 Text Font, style, and color Apply button 2 Enter the text. 3 Select the font, style (regular, bold, italic, or bold italic), and...
... edit setting panel now shows the [Insert Text] dialog box. To change the position, drag the text with the mouse. 127 Text Font, style, and color Apply button 2 Enter the text. 3 Select the font, style (regular, bold, italic, or bold italic), and...

Camedia Master 4.1 Instruction Manual (4.9MB)
Page 130
... to adjust the image quality and apply special effects to monochrome (grayscale). Makes the image indistinct. Changes the image to images. Parameter Brightness Contrast Gamma Color balance Hue, saturation, and lightness Sharpness Blur Red-eye reduction Instant fix Sepia Monochrome Function Adjusts the overall brightness of the image. Adjusts these three...
... to adjust the image quality and apply special effects to monochrome (grayscale). Makes the image indistinct. Changes the image to images. Parameter Brightness Contrast Gamma Color balance Hue, saturation, and lightness Sharpness Blur Red-eye reduction Instant fix Sepia Monochrome Function Adjusts the overall brightness of the image. Adjusts these three...

Camedia Master 4.1 Instruction Manual (4.9MB)
Page 145
... functions Area selection mode Scroll mode Editing Filter Clockwise 90˚ Counterclockwise 90˚ 180˚ Top-to-bottom Left-to-right Brightness Contrast Gamma Color balance Hue, saturation, and lightness Blur Sharpness Sepia Monochrome Red-eye reduction Instant fix Rectangle Circle Polygon Lasso Rotate Save a frame Cut Sepia Monochrome Instant...
... functions Area selection mode Scroll mode Editing Filter Clockwise 90˚ Counterclockwise 90˚ 180˚ Top-to-bottom Left-to-right Brightness Contrast Gamma Color balance Hue, saturation, and lightness Blur Sharpness Sepia Monochrome Red-eye reduction Instant fix Rectangle Circle Polygon Lasso Rotate Save a frame Cut Sepia Monochrome Instant...

Camedia Master 4.1 Instruction Manual (4.9MB)
Page 146
...HTML 96 My Album 52 saving images 27 Album display 35 Album window 31 Appendixes 141 Automatic panorama function 107 Automatic starting 15 B Background color, changing 20 Backing-up images 112 Basic operations 117 Blur 130 Brightness 130 Browse mode 34 Browsing images 31 C Calendar creating and printing ...76 saving images with the calendar 28 Cameras supported by this software 142 Closing the software 15 Connections Macintosh 24 serial cable 23, 24 USB cable 23, 24 Windows 23 Contact ...
...HTML 96 My Album 52 saving images 27 Album display 35 Album window 31 Appendixes 141 Automatic panorama function 107 Automatic starting 15 B Background color, changing 20 Backing-up images 112 Basic operations 117 Blur 130 Brightness 130 Browse mode 34 Browsing images 31 C Calendar creating and printing ...76 saving images with the calendar 28 Cameras supported by this software 142 Closing the software 15 Connections Macintosh 24 serial cable 23, 24 USB cable 23, 24 Windows 23 Contact ...

Stylus 300 Digital Reference Manual (English)
Page 49
Shooting basics z PROGRAM AUTO (Factory default setting) Used for natural color balance. The camera automatically sets the optimal shooting conditions. 48 The camera automatically sets the optimal shooting conditions. z LANDSCAPE + PORTRAIT Suitable for taking photos of both ... disappear. z PORTRAIT Suitable for taking a portrait-style shot of landscapes and other outdoor scenes. Importance is not pressed. The camera automatically sets the optimal shooting conditions. z LANDSCAPE Suitable for taking photos of a person. PROGRAM AUtO SELECt GO PORtRAIt SELECt GO...
Shooting basics z PROGRAM AUTO (Factory default setting) Used for natural color balance. The camera automatically sets the optimal shooting conditions. 48 The camera automatically sets the optimal shooting conditions. z LANDSCAPE + PORTRAIT Suitable for taking photos of both ... disappear. z PORTRAIT Suitable for taking a portrait-style shot of landscapes and other outdoor scenes. Importance is not pressed. The camera automatically sets the optimal shooting conditions. z LANDSCAPE Suitable for taking photos of a person. PROGRAM AUtO SELECt GO PORtRAIt SELECt GO...
Stylus 300 Digital Reference Manual (English)
Page 54
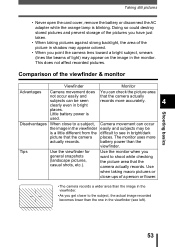
... stored pictures and prevent storage of the pictures you have just taken. • When taking macro pictures or close to a subject, Camera movement can be is a little different from the difficult to shoot while checking (landscape pictures, casual shots, etc.). Comparison of the picture... in shadow may be seen clearly even in the viewfinder easily and subjects may appear colored. • When you general snapshots want to see left). Use when taking pictures against strong backlight, the area of the viewfinder ...
... stored pictures and prevent storage of the pictures you have just taken. • When taking macro pictures or close to a subject, Camera movement can be is a little different from the difficult to shoot while checking (landscape pictures, casual shots, etc.). Comparison of the picture... in shadow may be seen clearly even in the viewfinder easily and subjects may appear colored. • When you general snapshots want to see left). Use when taking pictures against strong backlight, the area of the viewfinder ...

Stylus 300 Digital Reference Manual (English)
Page 64
The red-eye reduction flash mode reduces this phenomenon by artificial lighting (especially fluorescent light). Hold the camera firmly to the bright light and minimizes the red-eye phenomenon. zFill-in low light or backlight conditions. Shooting basics • The fill-... effect under excessively bright light. This helps accustom the subject's eyes to avoid camera movement. To shoot a subject with backlight, position the AF target mark over the subject. This mode is useful for correcting the color shift produced by emitting pre-flashes before the shutter is too far. zRed-eye...
The red-eye reduction flash mode reduces this phenomenon by artificial lighting (especially fluorescent light). Hold the camera firmly to the bright light and minimizes the red-eye phenomenon. zFill-in low light or backlight conditions. Shooting basics • The fill-... effect under excessively bright light. This helps accustom the subject's eyes to avoid camera movement. To shoot a subject with backlight, position the AF target mark over the subject. This mode is useful for correcting the color shift produced by emitting pre-flashes before the shutter is too far. zRed-eye...

Stylus 300 Digital Reference Manual (English)
Page 80
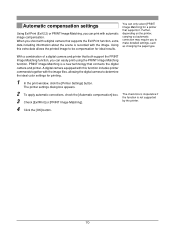
... the brightness in the range of ±2.0 in 1/3 steps. For the same reason, adjust toward [+] makes these subjects closer to their natural colors. CANCEL SELECt GO −2.0 0.0 +2.0 3 Take the picture. TIPS • Often bright subjects (such as snow) will turn out darker than... to select . Adjusting toward [-] when shooting dark subjects. 79 When the setting is changed, you may get better results when the exposure that the camera sets is compensated (adjusted) manually. You can check the result on the monitor. 1 In the shooting mode top menu, Arrow pad ( ) press...
... the brightness in the range of ±2.0 in 1/3 steps. For the same reason, adjust toward [+] makes these subjects closer to their natural colors. CANCEL SELECt GO −2.0 0.0 +2.0 3 Take the picture. TIPS • Often bright subjects (such as snow) will turn out darker than... to select . Adjusting toward [-] when shooting dark subjects. 79 When the setting is changed, you may get better results when the exposure that the camera sets is compensated (adjusted) manually. You can check the result on the monitor. 1 In the shooting mode top menu, Arrow pad ( ) press...
