
SP-600UZ Instruction Manual (English)
Page 3
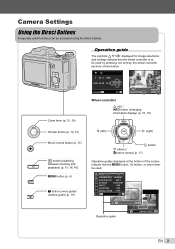
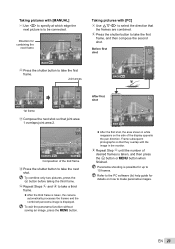
... SET OK 4/30 SINGLE PRINT NORM 12M FILE 100 0004 '10/02/26 12:30 PRINT OK MORE Wheel controller F (up) / INFO button (changing information display) (p. 16, 18) H (left) I (right) Movie record button (p. 15) q button (switching between shooting and playback) (p. 15, 16, 40) m button (p. 4) E... button (menu guide/ camera guide) (p. 19) A button G (down) / D button (erase) (p. 17) Operation guides displayed at the bottom of the screen indicate that the wheel controller is to be used functions can be accessed using the direct buttons. Zoom lever...
... SET OK 4/30 SINGLE PRINT NORM 12M FILE 100 0004 '10/02/26 12:30 PRINT OK MORE Wheel controller F (up) / INFO button (changing information display) (p. 16, 18) H (left) I (right) Movie record button (p. 15) q button (switching between shooting and playback) (p. 15, 16, 40) m button (p. 4) E... button (menu guide/ camera guide) (p. 19) A button G (down) / D button (erase) (p. 17) Operation guides displayed at the bottom of the screen indicate that the wheel controller is to be used functions can be accessed using the direct buttons. Zoom lever...

SP-600UZ Instruction Manual (English)
Page 4
...MENU SET OK 5 Press the m button to select the desired submenu 1 and then press the A button. In such cases, the following message is displayed after setting. 3 Use FG to complete the setting. Press the A button to select the page tabs. The function menu can be used to the ...2 PIC ORIENTATION ON 3 EXIT MENU SET OK 4 Use FG to select the desired submenu 2 and then press the A button. ● Once a setting is displayed. 1 IMAGE SIZE 12M 2 COMPRESSION NORMAL SHADOW ADJUST AUTO AF MODE FACE/iESP 1 ESP/ ESP 2 FINE ZOOM OFF 3 DIGITAL ZOOM OFF EXIT MENU SET OK 2...
...MENU SET OK 5 Press the m button to select the desired submenu 1 and then press the A button. In such cases, the following message is displayed after setting. 3 Use FG to complete the setting. Press the A button to select the page tabs. The function menu can be used to the ...2 PIC ORIENTATION ON 3 EXIT MENU SET OK 4 Use FG to select the desired submenu 2 and then press the A button. ● Once a setting is displayed. 1 IMAGE SIZE 12M 2 COMPRESSION NORMAL SHADOW ADJUST AUTO AF MODE FACE/iESP 1 ESP/ ESP 2 FINE ZOOM OFF 3 DIGITAL ZOOM OFF EXIT MENU SET OK 2...

SP-600UZ Instruction Manual (English)
Page 7
p. 15, 16, 40 6 A button (OK p. 3 7 Wheel controller p. 3 INFO button (changing information display p. 16, 18 D button (erase p. 17 8 E button (camera guide/menu guide) ......... 1 2 10 11 12 13 3 1 4 5 6 7 8 9 14 15 16 1 Strap eyelet p. 10 2 Monitor p. 8, 14, 42, 51 3 Indicator ...
p. 15, 16, 40 6 A button (OK p. 3 7 Wheel controller p. 3 INFO button (changing information display p. 16, 18 D button (erase p. 17 8 E button (camera guide/menu guide) ......... 1 2 10 11 12 13 3 1 4 5 6 7 8 9 14 15 16 1 Strap eyelet p. 10 2 Monitor p. 8, 14, 42, 51 3 Indicator ...

SP-600UZ Instruction Manual (English)
Page 8
... 12 Image stabilization (still images)/ Digital image stabilization (movies) p. 32 13 Metering p. 30 14 Shadow Adjustment Technology p. 30 15 Compression (still images)..... Monitor Shooting mode display 1 2 24 23 22 21 20 19 00:34 18 4 12M NORM P 3 4 5 P0.0 6 7 WB AUTO 8 ISO AUTO 9 10 17 16 15 14 13 12 11 1/100...
... 12 Image stabilization (still images)/ Digital image stabilization (movies) p. 32 13 Metering p. 30 14 Shadow Adjustment Technology p. 30 15 Compression (still images)..... Monitor Shooting mode display 1 2 24 23 22 21 20 19 00:34 18 4 12M NORM P 3 4 5 P0.0 6 7 WB AUTO 8 ISO AUTO 9 10 17 16 15 14 13 12 11 1/100...
SP-600UZ Instruction Manual (English)
Page 9
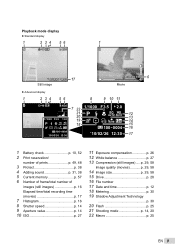
... and time p. 12 18 Metering p. 30 19 Shadow Adjustment Technology p. 30 20 Flash p. 25 21 Shooting mode p. 14, 20 22 Macro p. 25 EN 9 Playback mode display ● Standard display 1 2 34 56 1 10 4/30 '10/02/26 12:30 17 Still image 00:12/00:34 6 Movie ● Advanced... display 1 2 34 56 8 9 10 11 10 4/30 7 22 1/1000 F3.5 2.0 1/1000 F3.5 2.0 P ISO WB AUTO AUTO 21 20 P 19 18 ISO WB AUTO AUTO 12 13 ...
... and time p. 12 18 Metering p. 30 19 Shadow Adjustment Technology p. 30 20 Flash p. 25 21 Shooting mode p. 14, 20 22 Macro p. 25 EN 9 Playback mode display ● Standard display 1 2 34 56 1 10 4/30 '10/02/26 12:30 17 Still image 00:12/00:34 6 Movie ● Advanced... display 1 2 34 56 8 9 10 11 10 4/30 7 22 1/1000 F3.5 2.0 1/1000 F3.5 2.0 P ISO WB AUTO AUTO 21 20 P 19 18 ISO WB AUTO AUTO 12 13 ...
SP-600UZ Instruction Manual (English)
Page 11
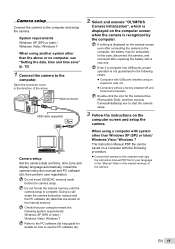
...camera drive (Removable Disk), and then execute CameraInitialSetup.exe to the computer. Camera setup Set the camera date and time, time zone and display language automatically; System requirements Windows XP (SP2 or later) / Windows Vista / Windows 7 When using a computer with system other than ... the icon for details on a computer with a new one. Multi-connector USB cable (supplied) 2 Select and execute "OLYMPUS Camera Initialization", which is displayed on the internal memory. In this case, disconnect the camera, and reconnect after connecting the camera to the computer, the ...
...camera drive (Removable Disk), and then execute CameraInitialSetup.exe to the computer. Camera setup Set the camera date and time, time zone and display language automatically; System requirements Windows XP (SP2 or later) / Windows Vista / Windows 7 When using a computer with system other than ... the icon for details on a computer with a new one. Multi-connector USB cable (supplied) 2 Select and execute "OLYMPUS Camera Initialization", which is displayed on the internal memory. In this case, disconnect the camera, and reconnect after connecting the camera to the computer, the ...
SP-600UZ Instruction Manual (English)
Page 12
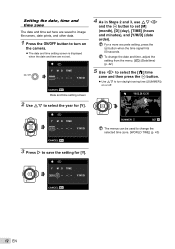
... select the [x] time zone and then press the A button. ● Use FG to turn on the camera. ● The date and time setting screen is displayed when the date and time are not set [M] (month), [D] (day), [TIME] (hours and minutes), and [Y/M/D] (date order). X Y M D TIME 2010. 00 Y/M/D CANCEL MENU 12 EN To...
... select the [x] time zone and then press the A button. ● Use FG to turn on the camera. ● The date and time setting screen is displayed when the date and time are not set [M] (month), [D] (day), [TIME] (hours and minutes), and [Y/M/D] (date order). X Y M D TIME 2010. 00 Y/M/D CANCEL MENU 12 EN To...
SP-600UZ Instruction Manual (English)
Page 13
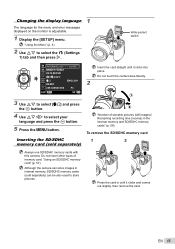
... an SD/SDHC memory card" (p. 57) Although the camera can be also used to store pictures. Changing the display language 1 The language for the menu and error messages displayed on the monitor is adjustable. 1 Display the [SETUP] menu. Press the card in the internal memory and SD/SDHC memory cards" (p. 58) To remove...
... an SD/SDHC memory card" (p. 57) Although the camera can be also used to store pictures. Changing the display language 1 The language for the menu and error messages displayed on the monitor is adjustable. 1 Display the [SETUP] menu. Press the card in the internal memory and SD/SDHC memory cards" (p. 58) To remove...
SP-600UZ Instruction Manual (English)
Page 14
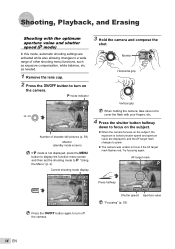
... take care not to cover the flash with the optimum aperture value and shutter speed (P mode) In this mode, automatic shooting settings are displayed), and the AF target mark changes to green. ● The camera was unable to focus if the AF target mark flashes red. as...AUTO Shutter speed Aperture value ISO AUTO "Focusing" (p. 53) Press the n button again to turn on the subject, the exposure is not displayed, press the m button to display the function menu screen and then set the shooting mode to P. Monitor Horizontal grip P Vertical grip 0.0 WB AUTO ISO AUTO 00:34 4 ...
... take care not to cover the flash with the optimum aperture value and shutter speed (P mode) In this mode, automatic shooting settings are displayed), and the AF target mark changes to green. ● The camera was unable to focus if the AF target mark flashes red. as...AUTO Shutter speed Aperture value ISO AUTO "Focusing" (p. 53) Press the n button again to turn on the subject, the exposure is not displayed, press the m button to display the function menu screen and then set the shooting mode to P. Monitor Horizontal grip P Vertical grip 0.0 WB AUTO ISO AUTO 00:34 4 ...

SP-600UZ Instruction Manual (English)
Page 16
...Viewing images 1 Press the q button. If the peak fills too much of the frame, the image will appear mostly black. Displays previous image Displays next image Keep turning the wheel controller to select an image. ● It can be changed to best match the situation, for example...audio playback A ! The green section shows luminance distribution within the screen's center. 2 Turn the wheel controller to fast forward or reverse. The display size of the screen or for making a precise composition by pressing HI. icon appears on images with an image, select the image and press ...
...Viewing images 1 Press the q button. If the peak fills too much of the frame, the image will appear mostly black. Displays previous image Displays next image Keep turning the wheel controller to select an image. ● It can be changed to best match the situation, for example...audio playback A ! The green section shows luminance distribution within the screen's center. 2 Turn the wheel controller to fast forward or reverse. The display size of the screen or for making a precise composition by pressing HI. icon appears on images with an image, select the image and press ...

SP-600UZ Instruction Manual (English)
Page 17
... paused MOVIE PLAY OK '10/02/26 12:30 Movie Operations during playback (Single image erase) 1 Display the image you want to select [ERASE], and press the A button. [ALL ERASE] (p. 37) and [SEL. Hold I to display the last frame. ERASE BACK MENU ALL ERASE SEL. EN 17 Keep turning the wheel controller... or rewind. Adjusting the volume Turn the wheel controller or use FG to adjust the volume. 00:14/00:34 During pause Cueing Use F to display the first frame and press G to fast forward. The speed at the same time.
... paused MOVIE PLAY OK '10/02/26 12:30 Movie Operations during playback (Single image erase) 1 Display the image you want to select [ERASE], and press the A button. [ALL ERASE] (p. 37) and [SEL. Hold I to display the last frame. ERASE BACK MENU ALL ERASE SEL. EN 17 Keep turning the wheel controller... or rewind. Adjusting the volume Turn the wheel controller or use FG to adjust the volume. 00:14/00:34 During pause Cueing Use F to display the first frame and press G to fast forward. The speed at the same time.
SP-600UZ Instruction Manual (English)
Page 18
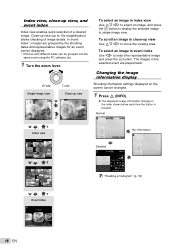
... 12:30 T '10/02/26 12:30 To select an image in index view Use FGHI to select an image, and press the A button to display the selected image in single-image view. Close-up view (up to 10x magnification) allows checking of a desired image. To scroll an image... in the selected event are grouped by the shooting dates and representative images for an event can be displayed. *1 Pictures with different dates can be grouped into the same event using the PC software (ib). 1 Turn the zoom lever. Normal 10 4/30 W T Index view...
... 12:30 T '10/02/26 12:30 To select an image in index view Use FGHI to select an image, and press the A button to display the selected image in single-image view. Close-up view (up to 10x magnification) allows checking of a desired image. To scroll an image... in the selected event are grouped by the shooting dates and representative images for an event can be displayed. *1 Pictures with different dates can be grouped into the same event using the PC software (ib). 1 Turn the zoom lever. Normal 10 4/30 W T Index view...
SP-600UZ Instruction Manual (English)
Page 19
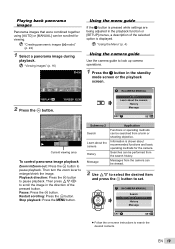
... panorama image playback Zoom in the standby mode screen or the playback screen. "Creating panoramic images (A mode)" (p. 22) 1 Select a panorama image during playback. Information is displayed. EN 19 Pause: Press the A button. IN-CAMERA MANUAL Search Learn about recommended functions and basic operating methods for viewing. "Viewing images" (p. 16) 4/30 Using...
... panorama image playback Zoom in the standby mode screen or the playback screen. "Creating panoramic images (A mode)" (p. 22) 1 Select a panorama image during playback. Information is displayed. EN 19 Pause: Press the A button. IN-CAMERA MANUAL Search Learn about recommended functions and basic operating methods for viewing. "Viewing images" (p. 16) 4/30 Using...

SP-600UZ Instruction Manual (English)
Page 22
...] or [PC]. 22 EN Three frames are combined into a panorama image using the guide frame and manually releases the shutter. The flash (p. 25) is displayed. AUTO Target mark Pointer CANCEL MENU SAVE OK Screen when combining images from left to take a third frame. ● After the third frame is taken...
...] or [PC]. 22 EN Three frames are combined into a panorama image using the guide frame and manually releases the shutter. The flash (p. 25) is displayed. AUTO Target mark Pointer CANCEL MENU SAVE OK Screen when combining images from left to take a third frame. ● After the third frame is taken...
SP-600UZ Instruction Manual (English)
Page 23
...] 1 Use HI to specify at which edge the next picture is to 10 frames. Panorama shooting is possible for details on the side of the display opposite the pan direction. Refer to the PC software (ib) help guide for up to be connected. After first shot PC 1 2 EXIT MENU ●... on how to take a third frame. ● After the third frame is taken, the camera automatically processes the frames and the combined panorama image is displayed.
...] 1 Use HI to specify at which edge the next picture is to 10 frames. Panorama shooting is possible for details on the side of the display opposite the pan direction. Refer to the PC software (ib) help guide for up to be connected. After first shot PC 1 2 EXIT MENU ●... on how to take a third frame. ● After the third frame is taken, the camera automatically processes the frames and the combined panorama image is displayed.

SP-600UZ Instruction Manual (English)
Page 32
... The image stabilizer is not used. Images may not be stabilized if camera shake is fixed in focus, without having to display the explanation). Displaying icon guides [ICON GUIDE] J (Shooting menu 2) X ICON GUIDE Available shooting modes:P M s P A Q Submenu 2 Application...)/ A (Movie menu) X IS MOVIE MODE (movies) Available shooting modes:P M s P A Q Submenu 2 Application OFF ON The image stabilizer is displayed. There may be a noise coming from inside the camera when the shutter button is pressed with [IMAGE STABILIZER] (still images) set to aid focusing. ...
... The image stabilizer is not used. Images may not be stabilized if camera shake is fixed in focus, without having to display the explanation). Displaying icon guides [ICON GUIDE] J (Shooting menu 2) X ICON GUIDE Available shooting modes:P M s P A Q Submenu 2 Application...)/ A (Movie menu) X IS MOVIE MODE (movies) Available shooting modes:P M s P A Q Submenu 2 Application OFF ON The image stabilizer is displayed. There may be a noise coming from inside the camera when the shutter button is pressed with [IMAGE STABILIZER] (still images) set to aid focusing. ...
SP-600UZ Instruction Manual (English)
Page 33
... A button. BACK 2010/ 02/26 Related items 35ºN 139ºE Images corresponding the related items EN 33 Menus for details on how to display an image. Single-frame advance/rewind: During a slideshow, press I to skip ahead one frame or press H to be included in the slideshow.... have been created with the PC software (ib) before using the menus, see "Camera setup" (p. 11). When a related item of the image displayed is selected with FG, images related to the PC software (ib) help guide for Playback, Editing, and Printing Functions The menu descriptions shall begin with...
... A button. BACK 2010/ 02/26 Related items 35ºN 139ºE Images corresponding the related items EN 33 Menus for details on how to display an image. Single-frame advance/rewind: During a slideshow, press I to skip ahead one frame or press H to be included in the slideshow.... have been created with the PC software (ib) before using the menus, see "Camera setup" (p. 11). When a related item of the image displayed is selected with FG, images related to the PC software (ib) help guide for Playback, Editing, and Printing Functions The menu descriptions shall begin with...

SP-600UZ Instruction Manual (English)
Page 35
Using a PC software (ib) and importing data back to the PC software (ib) help guide for details on the picture, the editing may not be displayed. Refer to the camera The following functions can be effective. Event index (p. 18) The representative images for retouching, and press the A button. ● The retouched ...
Using a PC software (ib) and importing data back to the PC software (ib) help guide for details on the picture, the editing may not be displayed. Refer to the camera The following functions can be effective. Event index (p. 18) The representative images for retouching, and press the A button. ● The retouched ...
SP-600UZ Instruction Manual (English)
Page 37
... a separate image. Depending on using the FGHI buttons. The retouching process may lower the image resolution. IMAGE] 1 Use FG to the single frame display. IMAGE R mark OK ERASE/CANCEL MENU 3 Repeat Step 2 to select the images to be erased, and then press the m button to erase... the selected images. 4 Use FG to display an index view. The retouching process may lower the image resolution. ERASE/ Deletes the image displayed. SEL. EN 37 "Selecting a storage device [INTERNAL/ SD]" (p. 39) Protected images cannot be erased...
... a separate image. Depending on using the FGHI buttons. The retouching process may lower the image resolution. IMAGE] 1 Use FG to the single frame display. IMAGE R mark OK ERASE/CANCEL MENU 3 Repeat Step 2 to select the images to be erased, and then press the m button to erase... the selected images. 4 Use FG to display an index view. The retouching process may lower the image resolution. ERASE/ Deletes the image displayed. SEL. EN 37 "Selecting a storage device [INTERNAL/ SD]" (p. 39) Protected images cannot be erased...
SP-600UZ Instruction Manual (English)
Page 39
...formatted, the camera instruction manual and the PC software (ib) data that no important data is used. Changing the display language [D] r (Settings 1) X D "Changing the display language" (p. 13) Submenu 2 Languages Application The language for Other Camera Settings The default settings of the function are...INTERNAL/SD Submenu 2 AUTO IN*1 Application If a card is inserted, the card is inserted. Menus for the menus and error messages displayed on the monitor is inserted, the card will become available by performing [DATA REPAIR] when images never appear on using the menus, see...
...formatted, the camera instruction manual and the PC software (ib) data that no important data is used. Changing the display language [D] r (Settings 1) X D "Changing the display language" (p. 13) Submenu 2 Languages Application The language for Other Camera Settings The default settings of the function are...INTERNAL/SD Submenu 2 AUTO IN*1 Application If a card is inserted, the card is inserted. Menus for the menus and error messages displayed on the monitor is inserted, the card will become available by performing [DATA REPAIR] when images never appear on using the menus, see...


