
SP-600UZ Instruction Manual (English)
Page 1
... service life. Before you start to use your camera before taking important photographs. ● In the interest of continually improving products, Olympus reserves the right to update or modify information contained in a safe place for future reference. ● The application software and instruction manual PDF file are stored on the internal memory of the camera. ● We recommend that you for purchasing an Olympus digital camera. Keep this manual...
... service life. Before you start to use your camera before taking important photographs. ● In the interest of continually improving products, Olympus reserves the right to update or modify information contained in a safe place for future reference. ● The application software and instruction manual PDF file are stored on the internal memory of the camera. ● We recommend that you for purchasing an Olympus digital camera. Keep this manual...
SP-600UZ Instruction Manual (English)
Page 3
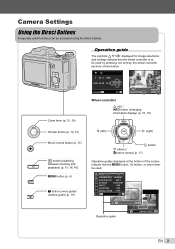
... (changing information display) (p. 16, 18) H (left) I (right) Movie record button (p. 15) q button (switching between shooting and playback) (p. 15, 16, 40) m button (p. 4) E button (menu guide/ camera guide) (p. 19) A button G (down) / D button (erase) (p. 17) Operation guides displayed at the bottom of the screen indicate that the wheel controller is to be used functions can be used. 1 IMAGE SIZE 12M 2 COMPRESSION NORMAL SHADOW ADJUST AUTO AF MODE FACE/iESP 1 ESP/ ESP 2 FINE ZOOM OFF 3 DIGITAL ZOOM OFF EXIT MENU SET OK SEL. Camera Settings Using the Direct Buttons...
... (changing information display) (p. 16, 18) H (left) I (right) Movie record button (p. 15) q button (switching between shooting and playback) (p. 15, 16, 40) m button (p. 4) E button (menu guide/ camera guide) (p. 19) A button G (down) / D button (erase) (p. 17) Operation guides displayed at the bottom of the screen indicate that the wheel controller is to be used functions can be used. 1 IMAGE SIZE 12M 2 COMPRESSION NORMAL SHADOW ADJUST AUTO AF MODE FACE/iESP 1 ESP/ ESP 2 FINE ZOOM OFF 3 DIGITAL ZOOM OFF EXIT MENU SET OK SEL. Camera Settings Using the Direct Buttons...

SP-600UZ Instruction Manual (English)
Page 4
... A button. Shooting mode Function menu o [SETUP] menu SLIDESHOW PHOTO SURFING EVENT BEAUTY FIX EDIT ERASE SETUP Use FG to select the shooting mode and press the A button. In the [SETUP] menu, various camera functions can be set, including shooting and playback functions not displayed in some shooting modes. Shooting Selected option Playback PROGRAM AUTO P 0.0 WB AUTO ISO AUTO 4 12M To select the shooting mode Use HI to select a menu and press the A button. In such cases, the following message is displayed. 1 IMAGE SIZE 12M 2 COMPRESSION NORMAL SHADOW ADJUST AUTO...
... A button. Shooting mode Function menu o [SETUP] menu SLIDESHOW PHOTO SURFING EVENT BEAUTY FIX EDIT ERASE SETUP Use FG to select the shooting mode and press the A button. In the [SETUP] menu, various camera functions can be set, including shooting and playback functions not displayed in some shooting modes. Shooting Selected option Playback PROGRAM AUTO P 0.0 WB AUTO ISO AUTO 4 12M To select the shooting mode Use HI to select a menu and press the A button. In such cases, the following message is displayed. 1 IMAGE SIZE 12M 2 COMPRESSION NORMAL SHADOW ADJUST AUTO...
SP-600UZ Instruction Manual (English)
Page 5
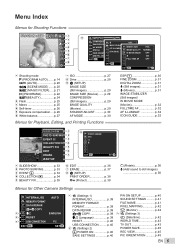
...ON OFF EXIT MENU SET OK 1 Shooting mode P (PROGRAM AUTO).......p. 14 M (iAUTO p. 20 s (SCENE MODE) ......p. 20 P (MAGIC FILTER).....p. 21 A (PANORAMA p. 22 Q(BEAUTY p. 24 2 Flash p. 25 3 Macro p. 25 4 Self-timer p. 26 5 Exposure compensation....p. 26 6 White balance p. 27 7 ISO p. 27 8 Drive p. 28 9 o (SETUP) IMAGE SIZE (Still images p. 29 IMAGE SIZE (Movies) .......p. 29 COMPRESSION (Still images p. 29 IMAGE QUALITY (Movies p. 29 SHADOW ADJUST ...........p. 30 AF MODE p. 30 Menus for Playback, Editing, and Printing Functions ESP/n p. 30 FINE ZOOM p. 31 DIGITAL ZOOM p. 31...
...ON OFF EXIT MENU SET OK 1 Shooting mode P (PROGRAM AUTO).......p. 14 M (iAUTO p. 20 s (SCENE MODE) ......p. 20 P (MAGIC FILTER).....p. 21 A (PANORAMA p. 22 Q(BEAUTY p. 24 2 Flash p. 25 3 Macro p. 25 4 Self-timer p. 26 5 Exposure compensation....p. 26 6 White balance p. 27 7 ISO p. 27 8 Drive p. 28 9 o (SETUP) IMAGE SIZE (Still images p. 29 IMAGE SIZE (Movies) .......p. 29 COMPRESSION (Still images p. 29 IMAGE QUALITY (Movies p. 29 SHADOW ADJUST ...........p. 30 AF MODE p. 30 Menus for Playback, Editing, and Printing Functions ESP/n p. 30 FINE ZOOM p. 31 DIGITAL ZOOM p. 31...
SP-600UZ Instruction Manual (English)
Page 11
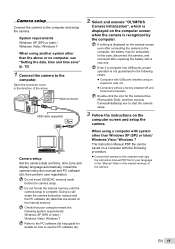
.... Camera setup Set the camera date and time, time zone and display language automatically; Doing so will erase the camera instruction manual and the PC software (ib) data that your language in the "Manual" folder in the following system requirements: Windows XP (SP2 or later) / Windows Vista / Windows 7 Refer to the PC software (ib) help guide for the camera drive (Removable Disk), and then execute CameraInitialSetup.exe to the computer and setup the camera. Do not format the internal memory until the camera setup...
.... Camera setup Set the camera date and time, time zone and display language automatically; Doing so will erase the camera instruction manual and the PC software (ib) data that your language in the "Manual" folder in the following system requirements: Windows XP (SP2 or later) / Windows Vista / Windows 7 Refer to the PC software (ib) help guide for the camera drive (Removable Disk), and then execute CameraInitialSetup.exe to the computer and setup the camera. Do not format the internal memory until the camera setup...
SP-600UZ Instruction Manual (English)
Page 12
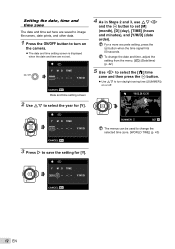
.... X Y M D TIME 2010 Y/M/D CANCEL MENU 4 As in Steps 2 and 3, use FGHI and the A button to save the setting for [Y]. X Y M D TIME Y/M/D CANCEL MENU Date and time setting screen 2 Use FG to turn daylight saving time ([SUMMER]) on the camera. ● The date and time setting screen is displayed when the date and time are saved to image file names, date prints, and other data. 1 Press the n button to select the year for [Y]. Setting the date, time and time zone The date and time set here are not set [M] (month...
.... X Y M D TIME 2010 Y/M/D CANCEL MENU 4 As in Steps 2 and 3, use FGHI and the A button to save the setting for [Y]. X Y M D TIME Y/M/D CANCEL MENU Date and time setting screen 2 Use FG to turn daylight saving time ([SUMMER]) on the camera. ● The date and time setting screen is displayed when the date and time are saved to image file names, date prints, and other data. 1 Press the n button to select the year for [Y]. Setting the date, time and time zone The date and time set here are not set [M] (month...
SP-600UZ Instruction Manual (English)
Page 13
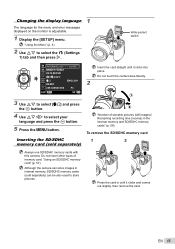
... card in internal memory, SD/SDHC memory cards (sold separately) "Number of memory card. Do not touch the contact area directly. 3 Use FG to select [D] and press the A button. 4 Use FGHI to select your language and press the A button. 5 Press the m button. Inserting the SD/SDHC memory card (sold separately) can store images in until it clicks and comes out slightly, then remove the card. EN 13 Write-protect switch 1 INTERNAL/SD AUTO 2 MEMORY FORMAT DATA REPAIR COPY 1 2 RESET ENGLISH 2 3 USB CONNECTION PC EXIT MENU SET...
... card in internal memory, SD/SDHC memory cards (sold separately) "Number of memory card. Do not touch the contact area directly. 3 Use FG to select [D] and press the A button. 4 Use FGHI to select your language and press the A button. 5 Press the m button. Inserting the SD/SDHC memory card (sold separately) can store images in until it clicks and comes out slightly, then remove the card. EN 13 Write-protect switch 1 INTERNAL/SD AUTO 2 MEMORY FORMAT DATA REPAIR COPY 1 2 RESET ENGLISH 2 3 USB CONNECTION PC EXIT MENU SET...
SP-600UZ Instruction Manual (English)
Page 14
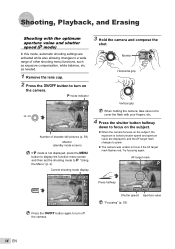
as exposure compensation, white balance, etc. Try focusing again. Monitor Horizontal grip P Vertical grip 0.0 WB AUTO ISO AUTO 00:34 4 12M Number of storable still pictures (p. 58) Monitor (standby mode screen) If P mode is locked (shutter speed and aperture value are activated while also allowing changes to a wide range of other shooting menu functions, such as needed. 1 Remove the lens cap. 2 Press the n button to turn off the camera. 14 EN "Using the Menu" (p. 4) Current shooting mode display When holding the camera, take care...
as exposure compensation, white balance, etc. Try focusing again. Monitor Horizontal grip P Vertical grip 0.0 WB AUTO ISO AUTO 00:34 4 12M Number of storable still pictures (p. 58) Monitor (standby mode screen) If P mode is locked (shutter speed and aperture value are activated while also allowing changes to a wide range of other shooting menu functions, such as needed. 1 Remove the lens cap. 2 Press the n button to turn off the camera. 14 EN "Using the Menu" (p. 4) Current shooting mode display When holding the camera, take care...

SP-600UZ Instruction Manual (English)
Page 15
... with optical zoom, set shooting mode can be used . W side T side Press fully 1/400 F3.5 Image review screen To view images during shooting Pressing the q button enables playback of images. Remaining recording time (p. 58) 00:34 REC 00:12 Recording time Lights up red when recording The effects of the set [R] (movies) (p. 31) to shake the camera. When using optical zoom Optical zoom range When using fine zoom When using digital zoom Fine zoom range Digital zoom range EN 15 Zoom bar P P 0.0 0.0 WB WB AUTO AUTO ISO ISO AUTO AUTO 00...
... with optical zoom, set shooting mode can be used . W side T side Press fully 1/400 F3.5 Image review screen To view images during shooting Pressing the q button enables playback of images. Remaining recording time (p. 58) 00:34 REC 00:12 Recording time Lights up red when recording The effects of the set [R] (movies) (p. 31) to shake the camera. When using optical zoom Optical zoom range When using fine zoom When using digital zoom Fine zoom range Digital zoom range EN 15 Zoom bar P P 0.0 0.0 WB WB AUTO AUTO ISO ISO AUTO AUTO 00...
SP-600UZ Instruction Manual (English)
Page 18
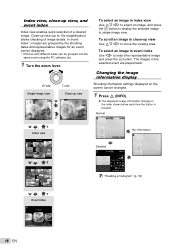
... image. In event index*1, images are played back. The images in the selected event are grouped by the shooting dates and representative images for an event can be displayed. *1 Pictures with different dates can be grouped into the same event using the PC software (ib). 1 Turn the zoom lever. Changing the image information display Shooting information settings displayed on the screen can be changed. 1 Press F (INFO). ● The displayed image information changes in event index Use...
... image. In event index*1, images are played back. The images in the selected event are grouped by the shooting dates and representative images for an event can be displayed. *1 Pictures with different dates can be grouped into the same event using the PC software (ib). 1 Turn the zoom lever. Changing the image information display Shooting information settings displayed on the screen can be changed. 1 Press F (INFO). ● The displayed image information changes in event index Use...
SP-600UZ Instruction Manual (English)
Page 19
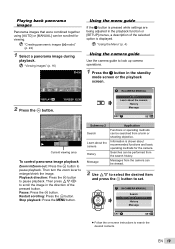
...or the playback screen. "Creating panoramic images (A mode)" (p. 22) 1 Select a panorama image during playback. Then press FGHI to enlarge/shrink the image. Submenu 2 Search Learn about the camera History Message EXIT SET OK Current viewing area To control panorama image playback Zoom in the playback function or [SETUP] menus, a description of the pressed button. Stop playback: Press the m button. IN-CAMERA MANUAL Search Learn about recommended functions and basic operating methods for viewing. "Using the Menu" (p. 4) Using the camera guide Use the camera guide to...
...or the playback screen. "Creating panoramic images (A mode)" (p. 22) 1 Select a panorama image during playback. Then press FGHI to enlarge/shrink the image. Submenu 2 Search Learn about the camera History Message EXIT SET OK Current viewing area To control panorama image playback Zoom in the playback function or [SETUP] menus, a description of the pressed button. Stop playback: Press the m button. IN-CAMERA MANUAL Search Learn about recommended functions and basic operating methods for viewing. "Using the Menu" (p. 4) Using the camera guide Use the camera guide to...

SP-600UZ Instruction Manual (English)
Page 22
... camera. The focus, exposure (p. 26), zoom position (p. 15), and white balance (p. 27) are combined into a panorama image using the guide frame and manually releases the shutter. Creating panoramic images (A mode) 1 Set the shooting mode to take the first frame. 2 Move the camera slightly in the direction of the second frame. The user only composes the shots so that were taken are locked at the first frame. AUTO CANCEL MENU SAVE OK To combine only two pictures...
... camera. The focus, exposure (p. 26), zoom position (p. 15), and white balance (p. 27) are combined into a panorama image using the guide frame and manually releases the shutter. Creating panoramic images (A mode) 1 Set the shooting mode to take the first frame. 2 Move the camera slightly in the direction of the second frame. The user only composes the shots so that were taken are locked at the first frame. AUTO CANCEL MENU SAVE OK To combine only two pictures...

SP-600UZ Instruction Manual (English)
Page 24
... function may take the picture. ● The unedited image and edited image are both saved. ● If the image cannot be retouched, only the unedited image is limited to Q. BEAUTY P 0.0 WB AUTO 4 12M 2 Point the camera toward the subject. Check the frame appearing around the face detected by the camera, and then press the shutter button to take some time to appear for taking the picture. 1 Set the shooting mode...
... function may take the picture. ● The unedited image and edited image are both saved. ● If the image cannot be retouched, only the unedited image is limited to Q. BEAUTY P 0.0 WB AUTO 4 12M 2 Point the camera toward the subject. Check the frame appearing around the face detected by the camera, and then press the shutter button to take some time to appear for taking the picture. 1 Set the shooting mode...

SP-600UZ Instruction Manual (English)
Page 32
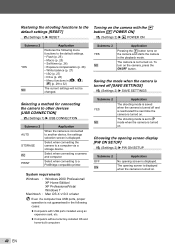
... button down brings the subject into focus and locks the focus. Using the AF illuminator to focus on to [OFF]. Shooting pictures while keeping the subject in place on a tripod or other stable surface. This reduces focusing time. Displaying icon guides [ICON GUIDE] J (Shooting menu 2) X ICON GUIDE Available shooting modes:P M s P A Q Submenu 2 Application OFF No icon guide is not used. Reducing the blur caused by the camera shake when shooting [IMAGE STABILIZER] (still images)/ [IS MOVIE MODE] (movies) J (Shooting menu 2) X IMAGE STABILIZER (still images)/ A (Movie...
... button down brings the subject into focus and locks the focus. Using the AF illuminator to focus on to [OFF]. Shooting pictures while keeping the subject in place on a tripod or other stable surface. This reduces focusing time. Displaying icon guides [ICON GUIDE] J (Shooting menu 2) X ICON GUIDE Available shooting modes:P M s P A Q Submenu 2 Application OFF No icon guide is not used. Reducing the blur caused by the camera shake when shooting [IMAGE STABILIZER] (still images)/ [IS MOVIE MODE] (movies) J (Shooting menu 2) X IMAGE STABILIZER (still images)/ A (Movie...
SP-600UZ Instruction Manual (English)
Page 40
...; Macro (p. 25) • Self-timer (p. 26) • Exposure compensation (p. 26) • White balance (p. 27) • ISO (p. 27) • Drive (p. 28) • Menu functions in the playback mode. Choosing the opening screen display [PW ON SETUP] s (Settings 2) X PW ON SETUP Submenu 2 OFF ON Application No opening screen is displayed when the camera is not turned on . 40 EN Submenu 2 YES NO Application Pressing the q button turns on the camera, press the n button. Select when connecting the camera to a PictBridge-compatible printer...
...; Macro (p. 25) • Self-timer (p. 26) • Exposure compensation (p. 26) • White balance (p. 27) • ISO (p. 27) • Drive (p. 28) • Menu functions in the playback mode. Choosing the opening screen display [PW ON SETUP] s (Settings 2) X PW ON SETUP Submenu 2 OFF ON Application No opening screen is displayed when the camera is not turned on . 40 EN Submenu 2 YES NO Application Pressing the q button turns on the camera, press the n button. Select when connecting the camera to a PictBridge-compatible printer...
SP-600UZ Instruction Manual (English)
Page 44
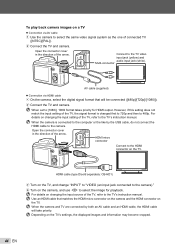
... connected to the camera)." 4 Turn on the camera, and use HI to select the image for HDMI output. When set to [1080i], 1080i format takes priority for playback. Depending on the TV. Connect to the TV video input jack (yellow) and audio input jack (white). For details on changing the input source of the arrow. When the camera and TV are connected by the USB cable, do not connect...
... connected to the camera)." 4 Turn on the camera, and use HI to select the image for HDMI output. When set to [1080i], 1080i format takes priority for playback. Depending on the TV. Connect to the TV video input jack (yellow) and audio input jack (white). For details on changing the input source of the arrow. When the camera and TV are connected by the USB cable, do not connect...
SP-600UZ Instruction Manual (English)
Page 49
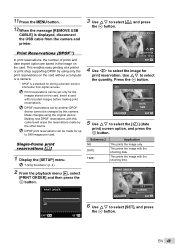
... message [REMOVE USB CABLE] is a standard for up to 999 images per card. Make changes using only the print reservations on the card. DPOF print reservations can be made by this camera will erase the reservations made for storing automatic printout information from the camera and printer. Insert a card with this camera. Making new DPOF reservations with recorded images before making print reservations. Print Reservations (DPOF*1) In print reservations, the number of prints and date imprint option are saved...
... message [REMOVE USB CABLE] is a standard for up to 999 images per card. Make changes using only the print reservations on the card. DPOF print reservations can be made by this camera will erase the reservations made for storing automatic printout information from the camera and printer. Insert a card with this camera. Making new DPOF reservations with recorded images before making print reservations. Print Reservations (DPOF*1) In print reservations, the number of prints and date imprint option are saved...
SP-600UZ Instruction Manual (English)
Page 51
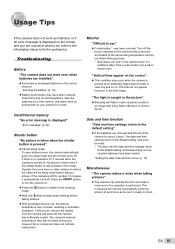
... the shutter button is displayed". "Setting the date, time and time zone" (p. 12) Miscellaneous "The camera makes a noise when taking a picture. EN 51 Card/Internal memory "An error message is pressed". ● Cancel sleep mode. Press the n button to the shooting mode. ● Wait until the camera has sufficiently cooled. Troubleshooting Battery "The camera does not work as it is caught in the picture". ● Shooting with flash in dark situations results in an image...
... the shutter button is displayed". "Setting the date, time and time zone" (p. 12) Miscellaneous "The camera makes a noise when taking a picture. EN 51 Card/Internal memory "An error message is pressed". ● Cancel sleep mode. Press the n button to the shooting mode. ● Wait until the camera has sufficiently cooled. Troubleshooting Battery "The camera does not work as it is caught in the picture". ● Shooting with flash in dark situations results in an image...
SP-600UZ Instruction Manual (English)
Page 52
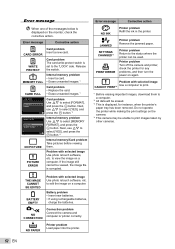
...displayed on the monitor, check the corrective action. to print images taken by other cameras. JAMMED SETTINGS CHANGED*3 PRINT ERROR Printer problem Remove the jammed paper. CANNOT PRINT*4 *1 Before erasing important images, download them . Do not operate the printer while making the print settings on a computer. Error message Corrective action Card problem Insert a new card. PICTURE ERROR Problem with selected image Use photo retouch software, etc. Problem with selected image Use a computer to select [FORMAT], and press the A button. THE IMAGE CANNOT BE EDITED BATTERY...
...displayed on the monitor, check the corrective action. to print images taken by other cameras. JAMMED SETTINGS CHANGED*3 PRINT ERROR Printer problem Remove the jammed paper. CANNOT PRINT*4 *1 Before erasing important images, download them . Do not operate the printer while making the print settings on a computer. Error message Corrective action Card problem Insert a new card. PICTURE ERROR Problem with selected image Use photo retouch software, etc. Problem with selected image Use a computer to select [FORMAT], and press the A button. THE IMAGE CANNOT BE EDITED BATTERY...
SP-600UZ Instruction Manual (English)
Page 57
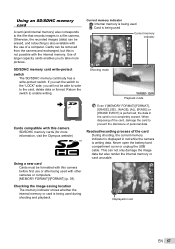
.../SDHC memory card write-protect switch The SD/SDHC memory card body has a write-protect switch. Return the switch to enable writing. IMAGE], [ALL ERASE] or [ERASE EVENT] is performed, the data in red while the camera is being used during shooting and playback. Never open the battery/card compartment cover or unplug the USB cable. Readout/recording process of personal data. P 0.0 WB AUTO ISO AUTO 4 12M Displayed in a film camera. Cards can be removed from the camera and exchanged, but also render the internal memory or card...
.../SDHC memory card write-protect switch The SD/SDHC memory card body has a write-protect switch. Return the switch to enable writing. IMAGE], [ALL ERASE] or [ERASE EVENT] is performed, the data in red while the camera is being used during shooting and playback. Never open the battery/card compartment cover or unplug the USB cable. Readout/recording process of personal data. P 0.0 WB AUTO ISO AUTO 4 12M Displayed in a film camera. Cards can be removed from the camera and exchanged, but also render the internal memory or card...


