

FE-5020 Instruction Manual (English)
Page 3
... 2 VIDEO OUT 3 POWER SAVE NTSC OFF SETUP 1X POWER SAVE OFF 2 VIDEO OUT NTSC ON 3 POWER SAVE OFF EXIT MENU SET OK BACK MENU SET OK To quickly move the page. There may be additional operations. CAMERA MENU EXIT MENU SET OK Shooting mode top menu 2 Use klmn to this page. Pressing and holding the E button displays an explanation (menu guide) of Setting Operations Using the Menu Various camera settings can be accessed through the menus, including functions used during shooting and playback and the date/time and screen display. Buttons in use m button...
... 2 VIDEO OUT 3 POWER SAVE NTSC OFF SETUP 1X POWER SAVE OFF 2 VIDEO OUT NTSC ON 3 POWER SAVE OFF EXIT MENU SET OK BACK MENU SET OK To quickly move the page. There may be additional operations. CAMERA MENU EXIT MENU SET OK Shooting mode top menu 2 Use klmn to this page. Pressing and holding the E button displays an explanation (menu guide) of Setting Operations Using the Menu Various camera settings can be accessed through the menus, including functions used during shooting and playback and the date/time and screen display. Buttons in use m button...

FE-5020 Instruction Manual (English)
Page 5
... In playback mode, settings can be adjusted. PLAYBACK MENU 1 3 6 2 4 7 5 8 EXIT MENU SET OK Playback mode top menu 1 G SLIDESHOW p. 28 2 H PERFECT FIX p. 28 3 I EDIT Q (Resize p. 28 P (Crop p. 28 INDEX p. 29 4 J PLAYBACK MENU 0 (Protect p. 29 y (Rotate p. 29 R (Add sound to still images p. 29 5 K ERASE p. 30 6 L PRINT ORDER p. 30 7 E SETUP* *Same as "Menus for Shooting Functions" 8 F SILENT MODE p. 34 EN 5 p. 23 2 B CAMERA MENU WB p. 24 ISO p. 24 FINE ZOOM p. 25 DIS MOVIE MODE ...... p. 25 R (Still images/ movies p. 25 PANORAMA p. 26 AF MODE p. 26 3C SWITCH...
... In playback mode, settings can be adjusted. PLAYBACK MENU 1 3 6 2 4 7 5 8 EXIT MENU SET OK Playback mode top menu 1 G SLIDESHOW p. 28 2 H PERFECT FIX p. 28 3 I EDIT Q (Resize p. 28 P (Crop p. 28 INDEX p. 29 4 J PLAYBACK MENU 0 (Protect p. 29 y (Rotate p. 29 R (Add sound to still images p. 29 5 K ERASE p. 30 6 L PRINT ORDER p. 30 7 E SETUP* *Same as "Menus for Shooting Functions" 8 F SILENT MODE p. 34 EN 5 p. 23 2 B CAMERA MENU WB p. 24 ISO p. 24 FINE ZOOM p. 25 DIS MOVIE MODE ...... p. 25 R (Still images/ movies p. 25 PANORAMA p. 26 AF MODE p. 26 3C SWITCH...

FE-5020 Instruction Manual (English)
Page 8
... memory p. 47 12 Self-timer p. 21 13 Aperture value p. 14 14 Shutter speed p. 14 15 Exposure compensation p. 20 16 Compression/frame rate p. 23 17 Image size p. 23 18 ISO p. 24 19 White balance p. 24 8 EN Monitor Shooting mode display 1 23 5 P 6 7 8 19 18 ISO 400 17 12M 16 NORM +2.0 1/30 F3.3 9 IN 4 15 14 13 12 11 10 Still image 1 Shooting mode p. 14 2 Flash mode p. 19 3 Silent mode p. 34 4 Digital image stabilization p. 25 5 Macro/super macro p. 20 6 Battery...
... memory p. 47 12 Self-timer p. 21 13 Aperture value p. 14 14 Shutter speed p. 14 15 Exposure compensation p. 20 16 Compression/frame rate p. 23 17 Image size p. 23 18 ISO p. 24 19 White balance p. 24 8 EN Monitor Shooting mode display 1 23 5 P 6 7 8 19 18 ISO 400 17 12M 16 NORM +2.0 1/30 F3.3 9 IN 4 15 14 13 12 11 10 Still image 1 Shooting mode p. 14 2 Flash mode p. 19 3 Silent mode p. 34 4 Digital image stabilization p. 25 5 Macro/super macro p. 20 6 Battery...

FE-5020 Instruction Manual (English)
Page 11
... 1 FE-4010/X-930 1 2 This camera allows the user to the battery exterior (scratches, etc.) may produce heat or an explosion. Turn off the camera before opening the battery/card compartment cover. EN 11 Loading the battery and the xD-Picture Card™ (sold separately) is inserted. Insert the battery while sliding the battery lock knob in the direction of storable pictures (still pictures)/ Continuous recording length (movies) in the internal memory and xD-Picture Card" (p. 48) Battery lock...
... 1 FE-4010/X-930 1 2 This camera allows the user to the battery exterior (scratches, etc.) may produce heat or an explosion. Turn off the camera before opening the battery/card compartment cover. EN 11 Loading the battery and the xD-Picture Card™ (sold separately) is inserted. Insert the battery while sliding the battery lock knob in the direction of storable pictures (still pictures)/ Continuous recording length (movies) in the internal memory and xD-Picture Card" (p. 48) Battery lock...
FE-5020 Instruction Manual (English)
Page 13
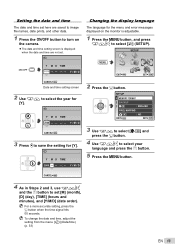
... B button to set . X Y M D TIME 2009 Y M D CANCEL MENU 3 Press n to save the setting for the menu and error messages displayed on the camera. ● The date and time setting screen is adjustable. 1 Press the m button, and press klmn to select [E] (SETUP). SETUP 1 MEMORY FORMAT 2 BACKUP 3 ENGLISH PIXEL MAPPING EXIT MENU NO SET OK 3 Use kl to select [W] and press the B button. 4 Use klmn to select the year for [Y]. X Y M D TIME 2009 Y M D Changing the display language The language for [Y]. For a more accurate setting, press the B button when...
... B button to set . X Y M D TIME 2009 Y M D CANCEL MENU 3 Press n to save the setting for the menu and error messages displayed on the camera. ● The date and time setting screen is adjustable. 1 Press the m button, and press klmn to select [E] (SETUP). SETUP 1 MEMORY FORMAT 2 BACKUP 3 ENGLISH PIXEL MAPPING EXIT MENU NO SET OK 3 Use kl to select [W] and press the B button. 4 Use klmn to select the year for [Y]. X Y M D TIME 2009 Y M D Changing the display language The language for [Y]. For a more accurate setting, press the B button when...

FE-5020 Instruction Manual (English)
Page 18
... red when recording REC Press halfway 12M NORM IN 4 By switching to any of other shooting modes, most function settings in h mode will change to start tracking, see "To focus on a moving subject continuously (AF Tracking) Press m to stop recording. Sound will be recorded. When the camera cannot identify which is caused by camera shake and subject movement. 1 Press the K button a few times to set [R] (movies) (p. 25) to set h. A mode indicator Using the digital image stabilization mode (h mode) This mode...
... red when recording REC Press halfway 12M NORM IN 4 By switching to any of other shooting modes, most function settings in h mode will change to start tracking, see "To focus on a moving subject continuously (AF Tracking) Press m to stop recording. Sound will be recorded. When the camera cannot identify which is caused by camera shake and subject movement. 1 Press the K button a few times to set [R] (movies) (p. 25) to set h. A mode indicator Using the digital image stabilization mode (h mode) This mode...

FE-5020 Instruction Manual (English)
Page 21
... changes in shooting mode. Changing the shooting information display The display of the screen or for approx. 2 seconds, and then the picture is taken after a short delay. 1 Press the Y button. "Shooting mode display" (p. 8) Normal P ISO 400 12M NORM +2.0 Grid P IN 4 No information ISO 400 12M NORM +2.0 IN 4 Self-timer shooting is deactivated. Using the FUNC menu The FUNC menu provides the following menu functions that can be quickly accessed and set. • [WB] (p. 24) • [A IMAGE...
... changes in shooting mode. Changing the shooting information display The display of the screen or for approx. 2 seconds, and then the picture is taken after a short delay. 1 Press the Y button. "Shooting mode display" (p. 8) Normal P ISO 400 12M NORM +2.0 Grid P IN 4 No information ISO 400 12M NORM +2.0 IN 4 Self-timer shooting is deactivated. Using the FUNC menu The FUNC menu provides the following menu functions that can be quickly accessed and set. • [WB] (p. 24) • [A IMAGE...
FE-5020 Instruction Manual (English)
Page 24
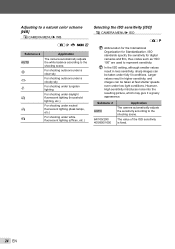
... light conditions. ISO standards specify the sensitivity for Standardization. Adjusting to a natural color scheme [WB] B CAMERA MENU X WB E: P h s n Submenu 2 AUTO 5 3 1 w x y Application The camera automatically adjusts the white balance according to the shooting scene. However, High sensitivity introduces noise into the resulting picture, which may give it a grainy appearance. In the ISO setting, although smaller values result in higher sensitivity, and images can be taken at fast shutter speeds...
... light conditions. ISO standards specify the sensitivity for Standardization. Adjusting to a natural color scheme [WB] B CAMERA MENU X WB E: P h s n Submenu 2 AUTO 5 3 1 w x y Application The camera automatically adjusts the white balance according to the shooting scene. However, High sensitivity introduces noise into the resulting picture, which may give it a grainy appearance. In the ISO setting, although smaller values result in higher sensitivity, and images can be taken at fast shutter speeds...
FE-5020 Instruction Manual (English)
Page 26
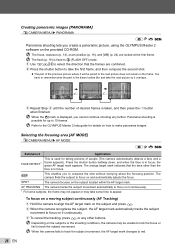
... then compose the second shot. ● The part of people (The camera automatically detects a face and a frame appears). Refer to the OLYMPUS Master 2 help guide for taking pictures of the previous picture where it will be unable to lock the focus or fail to appear. Press the shutter button halfway down, and when the face is displayed, you create a panoramic picture, using the OLYMPUS Master 2 software on the subject...
... then compose the second shot. ● The part of people (The camera automatically detects a face and a frame appears). Refer to the OLYMPUS Master 2 help guide for taking pictures of the previous picture where it will be unable to lock the focus or fail to appear. Press the shutter button halfway down, and when the face is displayed, you create a panoramic picture, using the OLYMPUS Master 2 software on the subject...
FE-5020 Instruction Manual (English)
Page 29
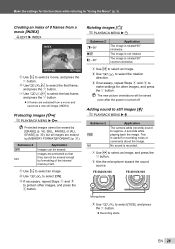
... recorded. 1 Use mn to "Using the Menu" (p. 3). This is rotated 90° counter-clockwise. 1 Use mn to select an image. 2 Use kl to select the rotation direction. 3 If necessary, repeat Steps 1 and 2 to protect other images, and press the B button. Make the settings for approx. 4 seconds while playing back the image. Protecting images [0] J PLAYBACK MENU X 0 Protected images cannot be erased except by formatting of 9 frames from a movie and saved as a new still image (INDEX). FE-5020/X-935 FE-4010...
... recorded. 1 Use mn to "Using the Menu" (p. 3). This is rotated 90° counter-clockwise. 1 Use mn to select an image. 2 Use kl to select the rotation direction. 3 If necessary, repeat Steps 1 and 2 to protect other images, and press the B button. Make the settings for approx. 4 seconds while playing back the image. Protecting images [0] J PLAYBACK MENU X 0 Protected images cannot be erased except by formatting of 9 frames from a movie and saved as a new still image (INDEX). FE-5020/X-935 FE-4010...
FE-5020 Instruction Manual (English)
Page 31
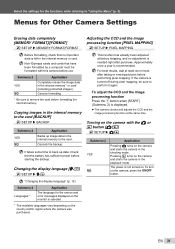
... internal memory or card. For best results, wait at least one minute after purchase. The power is not turned on the camera, press the n button. Non-Olympus cards and cards that the battery has sufficient power before use. Copying images in the internal memory to perform it again. Cancels the backup. Changing the display language [W] E SETUP X W This function has already been adjusted at the same time. Select the settings for the menus and error messages displayed...
... internal memory or card. For best results, wait at least one minute after purchase. The power is not turned on the camera, press the n button. Non-Olympus cards and cards that the battery has sufficient power before use. Copying images in the internal memory to perform it again. Cancels the backup. Changing the display language [W] E SETUP X W This function has already been adjusted at the same time. Select the settings for the menus and error messages displayed...

FE-5020 Instruction Manual (English)
Page 34
... changing the input source of pictures are muted. [SOUND SETTINGS] (p. 33) 34 EN To resume standby mode Press any button. Turning off to the TV video input jack (yellow) and audio input jack (white). Depending on a TV 1 Connect the TV and camera. The electronic sounds (button operation sound, shutter sound, warning sound) and playback sounds are not muted. Saving battery power between shots [POWER SAVE] E SETUP X POWER SAVE Submenu 2 OFF ON Application Cancels [POWER SAVE]. To play back camera images on the TV's settings, the displayed images...
... changing the input source of pictures are muted. [SOUND SETTINGS] (p. 33) 34 EN To resume standby mode Press any button. Turning off to the TV video input jack (yellow) and audio input jack (white). Depending on a TV 1 Connect the TV and camera. The electronic sounds (button operation sound, shutter sound, warning sound) and playback sounds are not muted. Saving battery power between shots [POWER SAVE] E SETUP X POWER SAVE Submenu 2 OFF ON Application Cancels [POWER SAVE]. To play back camera images on the TV's settings, the displayed images...

FE-5020 Instruction Manual (English)
Page 35
... is a standard for connecting digital cameras and printers of different makers and printing out pictures directly. n button Multi-connector USB cable (supplied) Printing images at the printer's standard settings [EASY PRINT] EASY PRINT START PC / CUSTOM PRINT OK 1 Display the image to be set with the camera vary depending on the printer that is displayed on the screen, disconnect the USB cable from the camera and printer. "Viewing images" (p. 15) Printing can print images directly without using a computer. EXIT PRINT OK EN 35 The printing modes, paper sizes, and other...
... is a standard for connecting digital cameras and printers of different makers and printing out pictures directly. n button Multi-connector USB cable (supplied) Printing images at the printer's standard settings [EASY PRINT] EASY PRINT START PC / CUSTOM PRINT OK 1 Display the image to be set with the camera vary depending on the printer that is displayed on the screen, disconnect the USB cable from the camera and printer. "Viewing images" (p. 15) Printing can print images directly without using a computer. EXIT PRINT OK EN 35 The printing modes, paper sizes, and other...
FE-5020 Instruction Manual (English)
Page 40
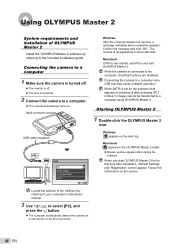
... to the included installation guide. When you start OLYMPUS Master 2. Connecting the camera to a computer 1 Make sure the camera is turned off. ● The monitor is off. ● The lens is set for the first time after selecting [PC] in the OLYMPUS Master 2 folder. ● Browse window appears after starting the software. Multi-connector USB cable (supplied) USB PC EASY PRINT CUSTOM PRINT EXIT SET OK Windows After the computer detects the camera, a message indicating setup completion appears...
... to the included installation guide. When you start OLYMPUS Master 2. Connecting the camera to a computer 1 Make sure the camera is turned off. ● The monitor is off. ● The lens is set for the first time after selecting [PC] in the OLYMPUS Master 2 folder. ● Browse window appears after starting the software. Multi-connector USB cable (supplied) USB PC EASY PRINT CUSTOM PRINT EXIT SET OK Windows After the computer detects the camera, a message indicating setup completion appears...
FE-5020 Instruction Manual (English)
Page 42
.... Date and time function "Date and time settings return to the default setting". ● If the batteries are unsure of auto focus as far as intended, or if an error message is displayed on how long the batteries have been loaded. To save battery power, the camera automatically goes into the camera" (p. 11) ● Battery performance may also increase during use , the internal temperature may increase, resulting in this mode. Press the n button to set a shooting mode. ●...
.... Date and time function "Date and time settings return to the default setting". ● If the batteries are unsure of auto focus as far as intended, or if an error message is displayed on how long the batteries have been loaded. To save battery power, the camera automatically goes into the camera" (p. 11) ● Battery performance may also increase during use , the internal temperature may increase, resulting in this mode. Press the n button to set a shooting mode. ●...

FE-5020 Instruction Manual (English)
Page 43
... software, etc. Next, use kl to select [YES], and press the B button.*2 MEMORY SETUP IN POWER OFF MEMORY FORMAT SET OK Internal memory problem Use kl to print images taken by other cameras. NO INK Printer problem Refill the ink in the printer. PRINT ERROR Printer problem Turn off the camera and printer, check the printer for instance, when the printer's paper tray has been removed. Error message q CARD ERROR q WRITE PROTECT Corrective action Card problem Insert a new card. Battery problem Charge the battery. Error message When one of the messages below is displayed...
... software, etc. Next, use kl to select [YES], and press the B button.*2 MEMORY SETUP IN POWER OFF MEMORY FORMAT SET OK Internal memory problem Use kl to print images taken by other cameras. NO INK Printer problem Refill the ink in the printer. PRINT ERROR Printer problem Turn off the camera and printer, check the printer for instance, when the printer's paper tray has been removed. Error message q CARD ERROR q WRITE PROTECT Corrective action Card problem Insert a new card. Battery problem Charge the battery. Error message When one of the messages below is displayed...

FE-5020 Instruction Manual (English)
Page 47
... used P Current memory indicator Using an xD-Picture Card A card (and internal memory) also corresponds to the film that was used for another purpose in a film camera. Use of the card access lamp. Cards can be removed from the camera and exchanged, but also render the internal memory or card unusable. Readout/recording process of the card Never open the battery/card compartment cover or unplug the USB cable while the camera is reading or writing data...
... used P Current memory indicator Using an xD-Picture Card A card (and internal memory) also corresponds to the film that was used for another purpose in a film camera. Use of the card access lamp. Cards can be removed from the camera and exchanged, but also render the internal memory or card unusable. Readout/recording process of the card Never open the battery/card compartment cover or unplug the USB cable while the camera is reading or writing data...

FE-5020 Instruction Manual (English)
Page 52
... time to its color may change temporarily. However, black spots or bright spots of light may appear constantly on or its characteristics or the angle at low temperatures may be uniform in a playback mode failure or damage to keep the camera and spare battery as warm as possible. Due to turn on the LCD Monitor. Battery Handling Precautions • This camera uses a lithium ion battery...
... time to its color may change temporarily. However, black spots or bright spots of light may appear constantly on or its characteristics or the angle at low temperatures may be uniform in a playback mode failure or damage to keep the camera and spare battery as warm as possible. Due to turn on the LCD Monitor. Battery Handling Precautions • This camera uses a lithium ion battery...

FE-5020 Instruction Manual (English)
Page 59
... a 35 mm camera) FE-4010/X-930: Olympus lens 4.65 to 18.6 mm, f2.6 to 5.9 (equivalent to 26.3 to 105 mm on a 35 mm camera) Photometric system : Digital ESP metering system Shutter speed : FE-5020/X-935: 4 to 1/2000 sec. SPECIFICATIONS Camera Product type : Digital camera (for Camera File system (DCF)) Applicable standards : Exif 2.2, Digital Print Order Format (DPOF), PRINT Image Matching III, PictBridge Sound with still pictures : Wave format Movie : AVI Motion JPEG Memory : Internal memory xD-Picture Card (16 MB...
... a 35 mm camera) FE-4010/X-930: Olympus lens 4.65 to 18.6 mm, f2.6 to 5.9 (equivalent to 26.3 to 105 mm on a 35 mm camera) Photometric system : Digital ESP metering system Shutter speed : FE-5020/X-935: 4 to 1/2000 sec. SPECIFICATIONS Camera Product type : Digital camera (for Camera File system (DCF)) Applicable standards : Exif 2.2, Digital Print Order Format (DPOF), PRINT Image Matching III, PictBridge Sound with still pictures : Wave format Movie : AVI Motion JPEG Memory : Internal memory xD-Picture Card (16 MB...
FE-5020 Instruction Manual (English)
Page 62
... 35 Playback image Close-up view 22 Index view 22 Movies 15 On TV 34 Viewing images 15 P mode 14 PW ON SETUP 32 POWER SAVE 34 Print 35 Print Reservations (DPOF 38 Protecting images 0 29 R RESET D 27 Rotating images y 29 S s mode 17 Self-timer 21 Shooting 14 Shooting movies n 18 SHUTTER SOUND 33 SILENT MODE F 34 SLIDESHOW G 28 Sound recording R 25, 29 SOUND SETTINGS 33 SPOT 26 Strap 10 SUPER MACRO 20 SWITCH SHOOTING MODES C ....... 27 T Turning on the camera 13 K/q 31 U USB cable 35, 40 Using the Menu 3 V VIDEO...
... 35 Playback image Close-up view 22 Index view 22 Movies 15 On TV 34 Viewing images 15 P mode 14 PW ON SETUP 32 POWER SAVE 34 Print 35 Print Reservations (DPOF 38 Protecting images 0 29 R RESET D 27 Rotating images y 29 S s mode 17 Self-timer 21 Shooting 14 Shooting movies n 18 SHUTTER SOUND 33 SILENT MODE F 34 SLIDESHOW G 28 Sound recording R 25, 29 SOUND SETTINGS 33 SPOT 26 Strap 10 SUPER MACRO 20 SWITCH SHOOTING MODES C ....... 27 T Turning on the camera 13 K/q 31 U USB cable 35, 40 Using the Menu 3 V VIDEO...


