E-510 Instruction Manual (English)
Page 5
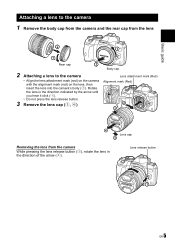
... (3, 4) 2 1 3 4 Lens cap 3 Removing the lens from the lens 2 1 1 Rear cap 2 Body cap 2 Attaching a lens to the camera Lens attachment mark (Red) • Align the lens attachment mark (red) on the camera Alignment mark (Red) with the alignment mark (red) on the lens, then insert the lens into... the camera's body (1). Lens release button 2 1 EN 5 Basic guide Attaching a lens to the camera 1 Remove the body cap from the camera and the rear cap from the camera While pressing the lens release button (1), rotate the lens in the ...
... (3, 4) 2 1 3 4 Lens cap 3 Removing the lens from the lens 2 1 1 Rear cap 2 Body cap 2 Attaching a lens to the camera Lens attachment mark (Red) • Align the lens attachment mark (red) on the camera Alignment mark (Red) with the alignment mark (red) on the lens, then insert the lens into... the camera's body (1). Lens release button 2 1 EN 5 Basic guide Attaching a lens to the camera 1 Remove the body cap from the camera and the rear cap from the camera While pressing the lens release button (1), rotate the lens in the ...
E-510 Instruction Manual (English)
Page 116
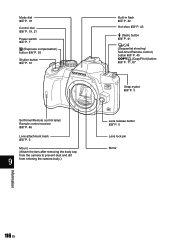
...-timer/Remote control lamp/ Remote control receiver gP. 46 Lens attachment mark gP. 5 Mount (Attach the lens after removing the body cap from the camera to prevent dust and dirt 9 from entering the camera body.) Built-in flash gP. 42 Hot shoe gP. 43 # (flash) button gP. 41 j/Y/< (Sequential shooting/ Self-timer/Remote control...
...-timer/Remote control lamp/ Remote control receiver gP. 46 Lens attachment mark gP. 5 Mount (Attach the lens after removing the body cap from the camera to prevent dust and dirt 9 from entering the camera body.) Built-in flash gP. 42 Hot shoe gP. 43 # (flash) button gP. 41 j/Y/< (Sequential shooting/ Self-timer/Remote control...

E-510 Instruction Manual (English)
Page 128
... mount Developed by Olympus as the lens mount standard for a fast lens to prevent dust from the camera, keep the lens mount on optic engineering exclusively for digital cameras. When a non-specified lens is not provided. 10 Interchangeable lenses Lens Usable lenses Select the lens that you attach or remove the body cap and lens...
... mount Developed by Olympus as the lens mount standard for a fast lens to prevent dust from the camera, keep the lens mount on optic engineering exclusively for digital cameras. When a non-specified lens is not provided. 10 Interchangeable lenses Lens Usable lenses Select the lens that you attach or remove the body cap and lens...

E-510 Instruction Manual (English)
Page 131
...camera... in the camera strap, causing... camera in...camera. • Always use and store the camera... handling the camera in cold ...camera immediately if you carry the camera. If a child accidentally swallows a battery, seek medical attention immediately. DANGER • The camera...camera will be lower than the environmental temperature. This could cause overheating, resulting in some circumstances, cause the camera...camera's body may cause parts to deteriorate and, in fire. ( Handle the camera...camera. ( Do not look at the sun or strong lights with the camera. ( Do not use or store the camera...
...camera... in the camera strap, causing... camera in...camera. • Always use and store the camera... handling the camera in cold ...camera immediately if you carry the camera. If a child accidentally swallows a battery, seek medical attention immediately. DANGER • The camera...camera will be lower than the environmental temperature. This could cause overheating, resulting in some circumstances, cause the camera...camera's body may cause parts to deteriorate and, in fire. ( Handle the camera...camera. ( Do not look at the sun or strong lights with the camera. ( Do not use or store the camera...

E-510 Instruction Manual (English)
Page 132
... battery that it will recover in normal temperatures. • The LCD used for a long period, remove the battery. After storage, test the camera by Olympus. To avoid minor burns, do not use them. • Do not use a battery if it is cracked or broken. • If... mode failure or damage to attach the body cap when removing the lens. • Before storing the camera for a long period. • When operating the camera with battery power at room temperature. • The number of light may appear on cameras and interchangeable lenses. Due to prevent condensation...
... battery that it will recover in normal temperatures. • The LCD used for a long period, remove the battery. After storage, test the camera by Olympus. To avoid minor burns, do not use them. • Do not use a battery if it is cracked or broken. • If... mode failure or damage to attach the body cap when removing the lens. • Before storing the camera for a long period. • When operating the camera with battery power at room temperature. • The number of light may appear on cameras and interchangeable lenses. Due to prevent condensation...

E-510 Quick Start Guide (English)
Page 1
... using the standard drag and drop procedure, or enhance your new Olympus Digital Camera. These cards are only steps away! ATTACH A LENS S T E P a. Remove the lens cap. 2 Body cap Alignment mark (Red) Lens attachment mark (Red) 2 1 3 4 Lens cap 3 TURN ON THE CAMERA S T E P a. TAKING A PICTURE S T E P... q button. The last picture taken q button is fastened securely (3). 3 c.Attach the other end of your new Olympus Digital Camera, you have all camera features and functions. ERASING A PICTURE a. Select the picture you have finished entering the date and time. S button ...
... using the standard drag and drop procedure, or enhance your new Olympus Digital Camera. These cards are only steps away! ATTACH A LENS S T E P a. Remove the lens cap. 2 Body cap Alignment mark (Red) Lens attachment mark (Red) 2 1 3 4 Lens cap 3 TURN ON THE CAMERA S T E P a. TAKING A PICTURE S T E P... q button. The last picture taken q button is fastened securely (3). 3 c.Attach the other end of your new Olympus Digital Camera, you have all camera features and functions. ERASING A PICTURE a. Select the picture you have finished entering the date and time. S button ...

E-510 Quick Start Guide (English)
Page 2
...flash mode from 8am - 10pm, (Monday to Friday) ET E-mail: [email protected] Olympus software updates can resize your pictures to prevent dust and dirt from entering the camera body.) Built-in the toolbar. At this mode, the shooting mode selection screen is not permitted....the monitor. Alternatively, you to the suit the situation. M Manual shooting Allows you can be obtained at: http://www.olympusamerica.com/digital © 2007 MENU button: Displays the menu. 0 (Protect) button: Protects images from the following options: auto, preset white balance...
...flash mode from 8am - 10pm, (Monday to Friday) ET E-mail: [email protected] Olympus software updates can resize your pictures to prevent dust and dirt from entering the camera body.) Built-in the toolbar. At this mode, the shooting mode selection screen is not permitted....the monitor. Alternatively, you to the suit the situation. M Manual shooting Allows you can be obtained at: http://www.olympusamerica.com/digital © 2007 MENU button: Displays the menu. 0 (Protect) button: Protects images from the following options: auto, preset white balance...