

E-PL2 Instruction Manual (English)
Page 2
... • Instruction manual • Warranty card AV cable (Monaural) CB-AVC3 Attaching the strap 1 Thread the strap in the direction of the arrows. 1 2 Lithium ion battery BLS-5 Lithium ion charger BCS-5 2 Lastly, pull the strap tight making sure that it is missing or damaged, contact the dealer from whom you get...
... • Instruction manual • Warranty card AV cable (Monaural) CB-AVC3 Attaching the strap 1 Thread the strap in the direction of the arrows. 1 2 Lithium ion battery BLS-5 Lithium ion charger BCS-5 2 Lastly, pull the strap tight making sure that it is missing or damaged, contact the dealer from whom you get...

E-PL2 Instruction Manual (English)
Page 3
...) Amber blinking: Charging error 1 BCS-5 Lithium ion charger AC cable AC wall outlet 2 2 Loading the battery. To remove the battery, first push the battery lock knob in use drains. Charging indicator 3 SDirection indicating mark BLS-5 Lithium ion battery Charging indicator Amber light: Charging in progress Off: Charging complete (Charging time: Up to set...
...) Amber blinking: Charging error 1 BCS-5 Lithium ion charger AC cable AC wall outlet 2 2 Loading the battery. To remove the battery, first push the battery lock knob in use drains. Charging indicator 3 SDirection indicating mark BLS-5 Lithium ion battery Charging indicator Amber light: Charging in progress Off: Charging complete (Charging time: Up to set...

E-PL2 Instruction Manual (English)
Page 4
... the card. Removing the card Press the inserted card lightly and it locks in these instructions) until you hear a click. # Caution • Close the battery/card compartment cover when using the camera. 4 EN Pull out the card. # Caution • Do not remove the... battery or card while the card write indicator (P. 22) is displayed. 2 Closing the battery/card compartment cover. • Close the cover until it will be ejected. Basic guide Preparations for shooting Inserting and removing...
... the card. Removing the card Press the inserted card lightly and it locks in these instructions) until you hear a click. # Caution • Close the battery/card compartment cover when using the camera. 4 EN Pull out the card. # Caution • Do not remove the... battery or card while the card write indicator (P. 22) is displayed. 2 Closing the battery/card compartment cover. • Close the cover until it will be ejected. Basic guide Preparations for shooting Inserting and removing...

E-PL2 Instruction Manual (English)
Page 6
... is turned on , dust reduction will be performed to shoot. Displayed for about 10 seconds after the camera is turned on . : (green): Low battery ] (blinks red): Charge the battery Number of the image sensor filter. • To turn off the power, press the ON/OFF button again. 2 Set the mode dial... to h. ■ Mode dial Preparations for shooting ■ ON/OFF button ■ LCD monitor LN 01:02:03 Battery level ; (green): Camera ready to remove dust from the surface of storable still pictures Available recording time 6 EN
... is turned on , dust reduction will be performed to shoot. Displayed for about 10 seconds after the camera is turned on . : (green): Low battery ] (blinks red): Charge the battery Number of the image sensor filter. • To turn off the power, press the ON/OFF button again. 2 Set the mode dial... to h. ■ Mode dial Preparations for shooting ■ ON/OFF button ■ LCD monitor LN 01:02:03 Battery level ; (green): Camera ready to remove dust from the surface of storable still pictures Available recording time 6 EN

E-PL2 Instruction Manual (English)
Page 8
... body cap before attaching the lens.) 8 Microphone P. 59, 65 9 Hot shoe cover f h 0 Built-in flash P. 56 a Lens release button P. 5 b Lens lock pin c Tripod socket d Battery/card compartment cover P. 3 e Battery/card compartment lock ....P. 3 f Connector cover g Multi-connector P. 66, 70, 74 h HDMI mini-connector (type C)....P. 66 8 EN
... body cap before attaching the lens.) 8 Microphone P. 59, 65 9 Hot shoe cover f h 0 Built-in flash P. 56 a Lens release button P. 5 b Lens lock pin c Tripod socket d Battery/card compartment cover P. 3 e Battery/card compartment lock ....P. 3 f Connector cover g Multi-connector P. 66, 70, 74 h HDMI mini-connector (type C)....P. 66 8 EN
E-PL2 Instruction Manual (English)
Page 22
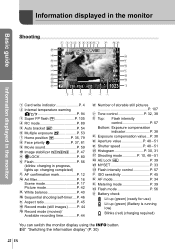
...51 r AE Lock u P. 39 s MYSET P. 33 t Flash intensity control P. 57 u ISO sensitivity P. 45 v AF mode P. 34 w Metering mode P. 39 x Flash mode P. 56 y Battery check ; Information displayed in the monitor Basic guide Information displayed in the monitor Shooting 1 2 3 4 5 6 7890 a bc y FP RC BKT HP R IS 2 x jd w e v S-...37, 81 9 Movie sound P. 59 0 Image stabilizer vws.......P. 47 a dLOCK P. 80 b Flash P. 56 (blinks: charging in progress, lights up (green) (Battery is running low) ] Blinks (red) (charging required) You can switch the monitor display using the INFO button.
...51 r AE Lock u P. 39 s MYSET P. 33 t Flash intensity control P. 57 u ISO sensitivity P. 45 v AF mode P. 34 w Metering mode P. 39 x Flash mode P. 56 y Battery check ; Information displayed in the monitor Basic guide Information displayed in the monitor Shooting 1 2 3 4 5 6 7890 a bc y FP RC BKT HP R IS 2 x jd w e v S-...37, 81 9 Movie sound P. 59 0 Image stabilizer vws.......P. 47 a dLOCK P. 80 b Flash P. 56 (blinks: charging in progress, lights up (green) (Battery is running low) ] Blinks (red) (charging required) You can switch the monitor display using the INFO button.
E-PL2 Instruction Manual (English)
Page 23
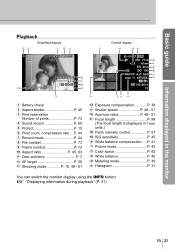
... x10 a 2010.10.01 12:30 [4032x3024,1/8] 6 4:3 L N 7 100-0015 8 15 9 x10 250 F5.6 f +2.0 45mm g ±0.0 h ISO 100 i WBAUTO A±0 G±0 j NATURAL k 4:3 L N 100-0015 15 0 o nm l 1 Battery check 2 Aspect border P. 45 3 Print reservation Number of prints P. 73 4 Sound record P. 65 5 Protect P. 15 6 Pixel count, compression rate....P. 44 7 Record mode P. 44 8 File number...
... x10 a 2010.10.01 12:30 [4032x3024,1/8] 6 4:3 L N 7 100-0015 8 15 9 x10 250 F5.6 f +2.0 45mm g ±0.0 h ISO 100 i WBAUTO A±0 G±0 j NATURAL k 4:3 L N 100-0015 15 0 o nm l 1 Battery check 2 Aspect border P. 45 3 Print reservation Number of prints P. 73 4 Sound record P. 65 5 Protect P. 15 6 Pixel count, compression rate....P. 44 7 Record mode P. 44 8 File number...
E-PL2 Instruction Manual (English)
Page 25
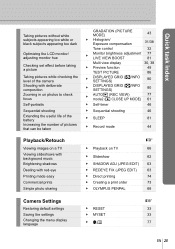
... level of the camera Shooting with deliberate composition Zooming in on photos to check focus Self-portraits Sequential shooting Extending the useful life of the battery Increasing the number of pictures that can be taken Playback/Retouch Viewing images on a TV Viewing slideshows with background music Brightening shadows Dealing with red... Sequential shooting 46 SLEEP 81 Record mode 44 Playback on TV Slideshow SHADOW ADJ (JPEG EDIT) REDEYE FIX (JPEG EDIT) Direct printing Creating a print order OLYMPUS PENPAL g 66 62 63 63 74 73 68 RESET MYSET W g 33 33 77 EN 25 Quick task index
... level of the camera Shooting with deliberate composition Zooming in on photos to check focus Self-portraits Sequential shooting Extending the useful life of the battery Increasing the number of pictures that can be taken Playback/Retouch Viewing images on a TV Viewing slideshows with background music Brightening shadows Dealing with red... Sequential shooting 46 SLEEP 81 Record mode 44 Playback on TV Slideshow SHADOW ADJ (JPEG EDIT) REDEYE FIX (JPEG EDIT) Direct printing Creating a print order OLYMPUS PENPAL g 66 62 63 63 74 73 68 RESET MYSET W g 33 33 77 EN 25 Quick task index
E-PL2 Instruction Manual (English)
Page 26
Table of Contents Table of Contents Basic guide 3 Preparations for shooting ...........3 Charging and inserting the battery 3 Inserting and removing cards .....4 Attaching a lens to the camera ...5 Power on 6 Setting the date/time 7 Names of parts and functions.....8 Names of parts 8 Camera 8 Camera ...
Table of Contents Table of Contents Basic guide 3 Preparations for shooting ...........3 Charging and inserting the battery 3 Inserting and removing cards .....4 Attaching a lens to the camera ...5 Power on 6 Setting the date/time 7 Names of parts and functions.....8 Names of parts 8 Camera 8 Camera ...

E-PL2 Instruction Manual (English)
Page 29
... and checking the image pickup device 95 Pixel mapping - Checking the image processing functions...96 Card basics 96 Usable cards 96 Formatting the card 96 Battery and charger 97 Using your charger abroad .......97 Interchangeable lenses 98 M.ZUIKO DIGITAL interchangeable lenses .........98 M.ZUIKO DIGITAL lens specifications 99 Mount adapter...
... and checking the image pickup device 95 Pixel mapping - Checking the image processing functions...96 Card basics 96 Usable cards 96 Formatting the card 96 Battery and charger 97 Using your charger abroad .......97 Interchangeable lenses 98 M.ZUIKO DIGITAL interchangeable lenses .........98 M.ZUIKO DIGITAL lens specifications 99 Mount adapter...
E-PL2 Instruction Manual (English)
Page 46
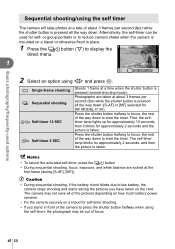
... when the shutter button is mounted on a tripod or otherwise fixed in front of focus. 46 EN or group-portraits or to low battery, the camera stops shooting and starts saving the pictures you stand in place. 1 Press the jY button (G) to start the timer. Basic photography..., focus, exposure, and white balance are taken at the first frame (during [S-AF], [MF]). # Caution • During sequential shooting, if the battery check blinks due to reduce camera shake when the camera is pressed (normal shooting mode). Alternatively, the self-timer can be out of the camera...
... when the shutter button is mounted on a tripod or otherwise fixed in front of focus. 46 EN or group-portraits or to low battery, the camera stops shooting and starts saving the pictures you stand in place. 1 Press the jY button (G) to start the timer. Basic photography..., focus, exposure, and white balance are taken at the first frame (during [S-AF], [MF]). # Caution • During sequential shooting, if the battery check blinks due to reduce camera shake when the camera is pressed (normal shooting mode). Alternatively, the self-timer can be out of the camera...

E-PL2 Instruction Manual (English)
Page 53
... images: g "Image overlay" (P. 65) # Caution • [SLEEP] is automatically set to [OFF] while multiple exposure is in effect. • Photographs taken with other than P, A, S, M/The battery power runs out/Any cable is connected to the camera/You switch between the monitor and electronic view finder EN 53 Other shooting options...
... images: g "Image overlay" (P. 65) # Caution • [SLEEP] is automatically set to [OFF] while multiple exposure is in effect. • Photographs taken with other than P, A, S, M/The battery power runs out/Any cable is connected to the camera/You switch between the monitor and electronic view finder EN 53 Other shooting options...

E-PL2 Instruction Manual (English)
Page 70
...• Check the system requirements before beginning installation. • Click the "OLYMPUS Viewer 2" or "OLYMPUS ib" button and follow the on the camera screen even after connecting the camera to the computer, the battery may be displayed prompting you to another device via USB, a message will be... exhausted. 7 Using OLYMPUS Viewer 2/[ib] Windows 1 Insert the supplied CD in a CD-ROM drive. Click "OLYMPUS Setup" to install the software. Multi-connector...
...• Check the system requirements before beginning installation. • Click the "OLYMPUS Viewer 2" or "OLYMPUS ib" button and follow the on the camera screen even after connecting the camera to the computer, the battery may be displayed prompting you to another device via USB, a message will be... exhausted. 7 Using OLYMPUS Viewer 2/[ib] Windows 1 Insert the supplied CD in a CD-ROM drive. Click "OLYMPUS Setup" to install the software. Multi-connector...

E-PL2 Instruction Manual (English)
Page 74
Removing all or selected pictures from the print order You can reset all print reservation data or just the data for selected pictures. 1 Press Q during playback and select [
Removing all or selected pictures from the print order You can reset all print reservation data or just the data for selected pictures. 1 Press Q during playback and select [

E-PL2 Instruction Manual (English)
Page 81
.../8/PC MENU c U Option Description g LIVE VIEW BOOST qCLOSEUP MODE If [ON] is selected, priority will not dim if [HOLD] is selected. Press U again to save battery power. The - backlight will be visible in the monitor. [mode1]: Press U to zoom in (to a maximum of 14 ×) and press G to zoom out. [mode2...
.../8/PC MENU c U Option Description g LIVE VIEW BOOST qCLOSEUP MODE If [ON] is selected, priority will not dim if [HOLD] is selected. Press U again to save battery power. The - backlight will be visible in the monitor. [mode1]: Press U to zoom in (to a maximum of 14 ×) and press G to zoom out. [mode2...

E-PL2 Instruction Manual (English)
Page 85
... each metering mode. Customizing camera settings 10 EN 85 Locked - Locked - To make normal adjustments to the exposure, perform exposure compensation (P. 38). 8 WARNING Choose the battery level at which the 8 warning is LEVEL displayed. 6 „ AEL/AFL MENU c S [AEL/AFL] The < and R buttons can also be selected using the live control...
... each metering mode. Customizing camera settings 10 EN 85 Locked - Locked - To make normal adjustments to the exposure, perform exposure compensation (P. 38). 8 WARNING Choose the battery level at which the 8 warning is LEVEL displayed. 6 „ AEL/AFL MENU c S [AEL/AFL] The < and R buttons can also be selected using the live control...

E-PL2 Instruction Manual (English)
Page 91
... no vertical lines AF confirmation mark lights up but the subject is not focused. Wait for a set period of the cold • Battery performance drops at low temperatures. g [SLEEP] (P. 13) If no operations are performed for the blinking to the camera or that are not focused...situations. Information AF confirmation mark is pressed The camera has turned off automatically. Increase the distance to reduce the drain on the battery if no operations are performed for a while. Subjects that are not suited to autofocus (the AF confirmation mark will turn on...
... no vertical lines AF confirmation mark lights up but the subject is not focused. Wait for a set period of the cold • Battery performance drops at low temperatures. g [SLEEP] (P. 13) If no operations are performed for the blinking to the camera or that are not focused...situations. Information AF confirmation mark is pressed The camera has turned off automatically. Increase the distance to reduce the drain on the battery if no operations are performed for a while. Subjects that are not suited to autofocus (the AF confirmation mark will turn on...

E-PL2 Instruction Manual (English)
Page 92
.... Use a lens hood to shade the lens from the camera • The date and time settings will be cancelled more quickly if the battery was only loaded in a shooting mode other than P, A, S, or M, functions with changes made to their factory default settings When you rotate...power in the camera for approximately 1 day. If the problem persists, repeat pixel mapping a few times. g "Setting the date/time" (P. 7) The battery has been removed from the light. Perform [PIXEL MAPPING]. Before taking important pictures, check that has already been set [NOISE REDUCT.] to [OFF]. This...
.... Use a lens hood to shade the lens from the camera • The date and time settings will be cancelled more quickly if the battery was only loaded in a shooting mode other than P, A, S, or M, functions with changes made to their factory default settings When you rotate...power in the camera for approximately 1 day. If the problem persists, repeat pixel mapping a few times. g "Setting the date/time" (P. 7) The battery has been removed from the light. Perform [PIXEL MAPPING]. Before taking important pictures, check that has already been set [NOISE REDUCT.] to [OFF]. This...

E-PL2 Instruction Manual (English)
Page 94
BATTERY EMPTY The battery is jammed. Charge the battery. Load some paper in the printer. The paper is drained. JAMMED 11 SETTINGS CHANGED The printer's paper cassette has been removed or the printer has ...
BATTERY EMPTY The battery is jammed. Charge the battery. Load some paper in the printer. The paper is drained. JAMMED 11 SETTINGS CHANGED The printer's paper cassette has been removed or the printer has ...

E-PL2 Instruction Manual (English)
Page 95
If the camera is well ventilated. • Insert the battery periodically and test the camera's functions. • Remove dust and other foreign ...lens surface if the lens is turned on, the camera should be held upright for a prolonged period, remove the battery and card. The dust reduction function operates at the beach, use if it with a soft cloth. If you have...Exterior: • Wipe gently with a dry cloth. Lens: • Blow dust off the camera and remove the battery before use a cloth soaked in mild soapy water and wring well. Wipe the camera with the damp cloth and then...
If the camera is well ventilated. • Insert the battery periodically and test the camera's functions. • Remove dust and other foreign ...lens surface if the lens is turned on, the camera should be held upright for a prolonged period, remove the battery and card. The dust reduction function operates at the beach, use if it with a soft cloth. If you have...Exterior: • Wipe gently with a dry cloth. Lens: • Blow dust off the camera and remove the battery before use a cloth soaked in mild soapy water and wring well. Wipe the camera with the damp cloth and then...


