
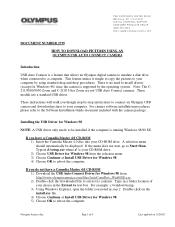
Auto-Connect USB Instructions for E-10 (English)
Page 1
... 4.0 CD-ROM 1) Download the USB Auto-Connect Driver for Windows 98. 4) Choose OK to be displayed. For example: c:\windows\temp. 3) Using Windows Explorer, open the folder you though step-by-step instructions to connect an Olympus USB camera and download pictures to your CD-ROM drive. 2) Choose USB Driver for Windows 98 from the selection menu. 3) Choose Continue at Install USB Driver for Windows 98) since the camera is a feature that allows an Olympus digital camera to emulate a disk drive when connected to reboot...
... 4.0 CD-ROM 1) Download the USB Auto-Connect Driver for Windows 98. 4) Choose OK to be displayed. For example: c:\windows\temp. 3) Using Windows Explorer, open the folder you though step-by-step instructions to connect an Olympus USB camera and download pictures to your CD-ROM drive. 2) Choose USB Driver for Windows 98 from the selection menu. 3) Choose Continue at Install USB Driver for Windows 98) since the camera is a feature that allows an Olympus digital camera to emulate a disk drive when connected to reboot...
Auto-Connect USB Instructions for E-10 (English)
Page 2
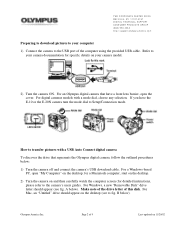
... to Setup/Connection mode. For Windows, a new "Removable Disk" drive letter should appear on your computer 1) Connect the camera to your camera model. 2) Turn the camera ON. A below : 1) Turn the camera off and connect the camera's USB download cable. Olympus America Inc. com Preparing to download pictures to the USB port of the computer using the provided USB cable. For an Olympus digital camera that represents the Olympus digital camera, follow the outlined procedures below ). for a Macintosh computer, start on the desktop. 2) Turn the camera...
... to Setup/Connection mode. For Windows, a new "Removable Disk" drive letter should appear on your computer 1) Connect the camera to your camera model. 2) Turn the camera ON. A below : 1) Turn the camera off and connect the camera's USB download cable. Olympus America Inc. com Preparing to download pictures to the USB port of the computer using the provided USB cable. For an Olympus digital camera that represents the Olympus digital camera, follow the outlined procedures below ). for a Macintosh computer, start on the desktop. 2) Turn the camera...
Auto-Connect USB Instructions for E-10 (English)
Page 3
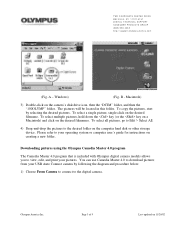
...://support.olympusamerica. Windows) (Fig. B - Macintosh) 3) Double-click on the desired filenames. To select a single picture, single-click on 11/20/02 Downloading pictures using the Olympus Camedia Master 4.0 program The Camedia Master 4.0 program that is included with Olympus digital camera models allows you to download pictures from your operating system or computer user's guide for instructions on the computer hard disk or other storage device. Page 3 of 9 Last updated...
...://support.olympusamerica. Windows) (Fig. B - Macintosh) 3) Double-click on the desired filenames. To select a single picture, single-click on 11/20/02 Downloading pictures using the Olympus Camedia Master 4.0 program The Camedia Master 4.0 program that is included with Olympus digital camera models allows you to download pictures from your operating system or computer user's guide for instructions on the computer hard disk or other storage device. Page 3 of 9 Last updated...

D-510 Zoom Instruction Manual
Page 5
... Retain Settings Even After Power is Turned Off (Clear Settings 98 Turning Off Warning Sounds (Beep Sound 99 To Adjust Monitor Brightness (Monitor Adjustment 100 Chapter 6 Advanced Playback Techniques 101 Use of the Playback Menu 102 Functions of the Subject) .... 74 Correcting Image Brightness (Exposure Compensation 76 ISO Light Sensitivity Level (Setting ISO Sensitivity 78 Enlarging Shots Even Further (Digital Zoom 80 Creating Panoramic Pictures (Panorama Function 82 Adjusting the Color Tone (White Balance 85 Picture Preferences: Quality vs. Chapter 4 Taking Better Pictures 49...
... Retain Settings Even After Power is Turned Off (Clear Settings 98 Turning Off Warning Sounds (Beep Sound 99 To Adjust Monitor Brightness (Monitor Adjustment 100 Chapter 6 Advanced Playback Techniques 101 Use of the Playback Menu 102 Functions of the Subject) .... 74 Correcting Image Brightness (Exposure Compensation 76 ISO Light Sensitivity Level (Setting ISO Sensitivity 78 Enlarging Shots Even Further (Digital Zoom 80 Creating Panoramic Pictures (Panorama Function 82 Adjusting the Color Tone (White Balance 85 Picture Preferences: Quality vs. Chapter 4 Taking Better Pictures 49...
D-510 Zoom Instruction Manual
Page 6
... a Windows PC 127 Transferring Image Files to a Macintosh 129 Disconnecting the Camera or Removing the SmartMedia Card 131 Disconnecting from a Windows PC 131 Disconnecting from a Macintosh 133 Transferring Files Without Using the Camera 134 Appendix 135 Answers to Frequently Asked Questions 136 Troubleshooting (Check before Taking in for Repair 138 Operating Problems 138 Picture Problems 140 Error Codes 142 Using the Camera with Optional Equipment 143 Optional Items 144 Compatibility of the Still Picture Data 145 Specifications...
... a Windows PC 127 Transferring Image Files to a Macintosh 129 Disconnecting the Camera or Removing the SmartMedia Card 131 Disconnecting from a Windows PC 131 Disconnecting from a Macintosh 133 Transferring Files Without Using the Camera 134 Appendix 135 Answers to Frequently Asked Questions 136 Troubleshooting (Check before Taking in for Repair 138 Operating Problems 138 Picture Problems 140 Error Codes 142 Using the Camera with Optional Equipment 143 Optional Items 144 Compatibility of the Still Picture Data 145 Specifications...
D-510 Zoom Instruction Manual
Page 57
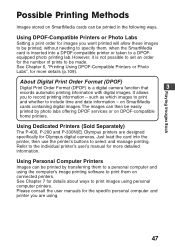
... the user manuals for the specific personal computer and printer you are designed specifically for images you to a DPOFequipped photo printing lab. However, it is a digital camera function that 3 records automatic printing information with digital images. on SmartMedia cards can be made. Using Dedicated Printers (Sold Separately) The P-400, P-200 and P-330N(E) Olympus printers are using personal computer printers. Just load the card into a DPOF-compatible printer or taken to record printing information - Using DPOF-Compatible Printers or Photo Labs Setting a print order...
... the user manuals for the specific personal computer and printer you are designed specifically for images you to a DPOFequipped photo printing lab. However, it is a digital camera function that 3 records automatic printing information with digital images. on SmartMedia cards can be made. Using Dedicated Printers (Sold Separately) The P-400, P-200 and P-330N(E) Olympus printers are using personal computer printers. Just load the card into a DPOF-compatible printer or taken to record printing information - Using DPOF-Compatible Printers or Photo Labs Setting a print order...

D-510 Zoom Instruction Manual
Page 80
...80 PANORAMA Panorama shooting Allows panoramic shots to be taken. 82 WB White balance Record mode Sharpness Contrast CARD SETUP Card setup Canceling automatic color balance adjustment, and adjusting the setting to be adjusted. 100 Use of the Shooting Menu Functions of storable pictures. See "Using the Shooting Menu" (p.72) for information on or off . 98 Setting the camera warning beep sound on how to operate the shooting menu. © © © © Group CAM (Shooting) PIC (Image) CARD (Card) SET (Settings) 70 Item Purpose Page Spot metering mode Exposure is...
...80 PANORAMA Panorama shooting Allows panoramic shots to be taken. 82 WB White balance Record mode Sharpness Contrast CARD SETUP Card setup Canceling automatic color balance adjustment, and adjusting the setting to be adjusted. 100 Use of the Shooting Menu Functions of storable pictures. See "Using the Shooting Menu" (p.72) for information on or off . 98 Setting the camera warning beep sound on how to operate the shooting menu. © © © © Group CAM (Shooting) PIC (Image) CARD (Card) SET (Settings) 70 Item Purpose Page Spot metering mode Exposure is...

D-510 Zoom Instruction Manual
Page 92
Taking Panoramic shots Select "PANORAMA", then press ୴. The direction in which the edges of cards. Shooting Group Menu Items: CAM [ ESP ] [ 0.0 ] ISO [ AUTO ] DIGITAL ZOOM [ OFF ] PANORAMA CANCEL GO Highlight "PANORAMA" and press ୴. Creating Panoramic Pictures (Panorama Function) Using standard Olympus SmartMedia cards also allows you to the right. With multiple images in the panorama will be displayed on the monitor. 1 Set the camera on a tripod. This function is possible to use CAMEDIA Master to the right for...
Taking Panoramic shots Select "PANORAMA", then press ୴. The direction in which the edges of cards. Shooting Group Menu Items: CAM [ ESP ] [ 0.0 ] ISO [ AUTO ] DIGITAL ZOOM [ OFF ] PANORAMA CANCEL GO Highlight "PANORAMA" and press ୴. Creating Panoramic Pictures (Panorama Function) Using standard Olympus SmartMedia cards also allows you to the right. With multiple images in the panorama will be displayed on the monitor. 1 Set the camera on a tripod. This function is possible to use CAMEDIA Master to the right for...

D-510 Zoom Instruction Manual
Page 94
... change these settings for information on again. Panorama stitching will return to position the camera correctly when taking a panorama. Creating Panoramic Pictures (continued) 8 Press the OK button several times until the shooting menu goes off the panorama function. Turning the camera off also turns off . Refer to the CAMEDIA Master online help for the subsequent shots. • Be careful to normal shooting mode when it will not be pieced together using the panorama function, it is turned...
... change these settings for information on again. Panorama stitching will return to position the camera correctly when taking a panorama. Creating Panoramic Pictures (continued) 8 Press the OK button several times until the shooting menu goes off the panorama function. Turning the camera off also turns off . Refer to the CAMEDIA Master online help for the subsequent shots. • Be careful to normal shooting mode when it will not be pieced together using the panorama function, it is turned...
D-510 Zoom Instruction Manual
Page 100
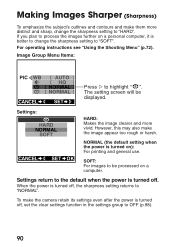
For operating instructions see "Using the Shooting Menu" (p.72). Settings: HARD NORMAL SOFT CANCEL SET OK HARD: Makes the image clearer and more distinct and sharp, change the sharpness setting to the default when the power is turned off . Settings return to "SOFT". If you plan to "NORMAL". When the power is turned off , the sharpness setting returns to process the images further on ): For printing and general use. NORMAL (the default setting when...
For operating instructions see "Using the Shooting Menu" (p.72). Settings: HARD NORMAL SOFT CANCEL SET OK HARD: Makes the image clearer and more distinct and sharp, change the sharpness setting to the default when the power is turned off . Settings return to "SOFT". If you plan to "NORMAL". When the power is turned off , the sharpness setting returns to process the images further on ): For printing and general use. NORMAL (the default setting when...

D-510 Zoom Instruction Manual
Page 103
For operating instructions see "Using the Shooting Menu" (p.72). The Rec View setting remains even after a picture is being seen through the camera's lens (except directly after taking a picture, at which time the monitor will display the most recently taken picture to be displayed. [ ON ] 5 Advanced Shooting Techniques SET CANCEL SET Settings: REC VIEW OFF ON OFF (default setting): When the monitor is on, it is being seen through the camera's lens. Image Group Menu Items: REC VIEW [ OFF ] Press...
For operating instructions see "Using the Shooting Menu" (p.72). The Rec View setting remains even after a picture is being seen through the camera's lens (except directly after taking a picture, at which time the monitor will display the most recently taken picture to be displayed. [ ON ] 5 Advanced Shooting Techniques SET CANCEL SET Settings: REC VIEW OFF ON OFF (default setting): When the monitor is on, it is being seen through the camera's lens. Image Group Menu Items: REC VIEW [ OFF ] Press...
D-510 Zoom Instruction Manual
Page 130
... using the included USB (Universal Serial Bus) cable allows you to transfer images stored on the SmartMedia card installed in the camera to be compatible. • Standard USB equipped. • Mac OS 8.6 and USB MASS Storage Support 1.3.5 have been preinstalled at the time of USB support. Using the USB cable to connect the camera and computer may require a computer equipped with the following specification have been verified as to the computer's hard disk...
... using the included USB (Universal Serial Bus) cable allows you to transfer images stored on the SmartMedia card installed in the camera to be compatible. • Standard USB equipped. • Mac OS 8.6 and USB MASS Storage Support 1.3.5 have been preinstalled at the time of USB support. Using the USB cable to connect the camera and computer may require a computer equipped with the following specification have been verified as to the computer's hard disk...

D-510 Zoom Instruction Manual
Page 131
...; Proper operation cannot be connected for computers that the camera is connected, the camera will automatically turn on the card could be destroyed or an error with the computer could occur. Caution on the compatibility between the hub and computer. CAUTION • Connecting the camera to the computer directly, without using the AC adapter Before connecting the AC adapter, always make sure that have been downloaded into standby (power saving) mode...
...; Proper operation cannot be connected for computers that the camera is connected, the camera will automatically turn on the card could be destroyed or an error with the computer could occur. Caution on the compatibility between the hub and computer. CAUTION • Connecting the camera to the computer directly, without using the AC adapter Before connecting the AC adapter, always make sure that have been downloaded into standby (power saving) mode...
D-510 Zoom Instruction Manual
Page 148
... if the memory gauge is no card in the camera. ➜ Insert a new card into the camera. • The card is full. ➜ Insert a new card, erase unwanted images or transfer the data to a computer and delete all of time. • The monitor is being left on continuously while shooting. ➜ Make efforts to turn the monitor off . ➜ Open the lens barrier and turn on the power. • The batteries are...
... if the memory gauge is no card in the camera. ➜ Insert a new card into the camera. • The card is full. ➜ Insert a new card, erase unwanted images or transfer the data to a computer and delete all of time. • The monitor is being left on continuously while shooting. ➜ Make efforts to turn the monitor off . ➜ Open the lens barrier and turn on the power. • The batteries are...

D-510 Zoom Instruction Manual
Page 149
... installed correctly. ➜ Reinstall the USB driver according by following the steps in direct sunlight. ➜ Block the sunlight or move to the shade. Take some pictures before resuming use the seal again. Editing, Protection, One-Frame Erase, All Erase Frames or Card Formatting does not function • A write-protect seal has been placed on the monitor in the sequence, panorama, or movie picture modes. The flash does not work with shooting...
... installed correctly. ➜ Reinstall the USB driver according by following the steps in direct sunlight. ➜ Block the sunlight or move to the shade. Take some pictures before resuming use the seal again. Editing, Protection, One-Frame Erase, All Erase Frames or Card Formatting does not function • A write-protect seal has been placed on the monitor in the sequence, panorama, or movie picture modes. The flash does not work with shooting...

D-510 Zoom Instruction Manual
Page 150
... the shutter button while looking into the viewfinder, not while standing in front of the camera. • The flash was needed to take a clear picture, but the camera was set to No Flash. ➜ The shutter speed become slower and the exposure time becomes longer, so use the tripod or hold the camera as steady as possible to avoid camera movement. • Quick Focus was used in dim light. 140 The picture...
... the shutter button while looking into the viewfinder, not while standing in front of the camera. • The flash was needed to take a clear picture, but the camera was set to No Flash. ➜ The shutter speed become slower and the exposure time becomes longer, so use the tripod or hold the camera as steady as possible to avoid camera movement. • Quick Focus was used in dim light. 140 The picture...
D-510 Zoom Instruction Manual
Page 156
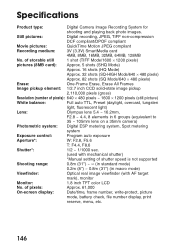
... control: Program auto exposure Aperture*: W: F2.8, F5.6 T: F4.4, F8.6 Shutter*: 1/2 ~ 1/1000 sec. (used with mechanical shutter) *Manual setting of pixels: Approx. 61,000 On-screen display: Date/time, frame number, write-protect, picture mode, battery check, file number display, print reserve, menu, etc. 146 Specifications Product type: Digital Camera Image Recording System for shooting and playing back photo images. of storable still 1 shot (TIFF Mode/1600 × 1200 pixels) pictures (8MB card): Approx. 5 shots (SHQ Mode) Approx. 16 shots (HQ Mode) Approx. 32 shots...
... control: Program auto exposure Aperture*: W: F2.8, F5.6 T: F4.4, F8.6 Shutter*: 1/2 ~ 1/1000 sec. (used with mechanical shutter) *Manual setting of pixels: Approx. 61,000 On-screen display: Date/time, frame number, write-protect, picture mode, battery check, file number display, print reserve, menu, etc. 146 Specifications Product type: Digital Camera Image Recording System for shooting and playing back photo images. of storable still 1 shot (TIFF Mode/1600 × 1200 pixels) pictures (8MB card): Approx. 5 shots (SHQ Mode) Approx. 16 shots (HQ Mode) Approx. 32 shots...
D-510 Zoom Instruction Manual
Page 157
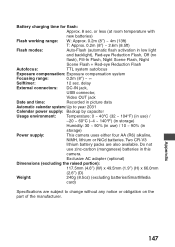
... (8.5ft) Flash modes: Auto-Flash (automatic flash activation in this camera. Exclusive AC adapter (optional) Dimensions (excluding the raised portion): 117.5mm (4.6″) (W) x 49.5mm (1.9″) (H) x 66.0mm (2.6″) (D) Weight: 240g (8.5oz) (excluding batteries/SmartMedia card) Specifications are also available. Appendix 147 delay External connectors: DC-IN jack, USB connector, Video OUT jack Date and time: Recorded in picture data Automatic calendar system: Up to change without any...
... (8.5ft) Flash modes: Auto-Flash (automatic flash activation in this camera. Exclusive AC adapter (optional) Dimensions (excluding the raised portion): 117.5mm (4.6″) (W) x 49.5mm (1.9″) (H) x 66.0mm (2.6″) (D) Weight: 240g (8.5oz) (excluding batteries/SmartMedia card) Specifications are also available. Appendix 147 delay External connectors: DC-IN jack, USB connector, Video OUT jack Date and time: Recorded in picture data Automatic calendar system: Up to change without any...

D-510 Zoom Instruction Manual
Page 159
... size clear printed images require large number of a US committee responsible for setting a standard for television broadcast transmission, now known more as the video signal standard it developed. JPEG (Joint Photographic Experts Group) A compression format for saving black and white and color image data. TTL (Through-The-Lens) System An exposure adjustment mechanism in JPEG format when the Record mode is used to light so that images can be handled by the International...
... size clear printed images require large number of a US committee responsible for setting a standard for television broadcast transmission, now known more as the video signal standard it developed. JPEG (Joint Photographic Experts Group) A compression format for saving black and white and color image data. TTL (Through-The-Lens) System An exposure adjustment mechanism in JPEG format when the Record mode is used to light so that images can be handled by the International...
D-510 Zoom Quick Start Guide
Page 1
...; © Group CAM (Shooting) PIC (Image) CARD (Card) SET (Settings) Item Spot metering mode Exposure compensation ISO ISO sensitivity DIGITAL ZOOM Digital zoom PANORAMA Panorama shooting WB White balance Record mode Sharpness Contrast CARD SETUP Card setup REC VIEW Rec view FILE File naming Clear settings Beep sound Date & time Monitor adjustment Purpose Exposure is required. Allows movie pictures to be erased Deletes the image currently being written to the camera's Reference Manual on the functions described here, refer to the SmartMedia card. Allows the number of the subject...
...; © Group CAM (Shooting) PIC (Image) CARD (Card) SET (Settings) Item Spot metering mode Exposure compensation ISO ISO sensitivity DIGITAL ZOOM Digital zoom PANORAMA Panorama shooting WB White balance Record mode Sharpness Contrast CARD SETUP Card setup REC VIEW Rec view FILE File naming Clear settings Beep sound Date & time Monitor adjustment Purpose Exposure is required. Allows movie pictures to be erased Deletes the image currently being written to the camera's Reference Manual on the functions described here, refer to the SmartMedia card. Allows the number of the subject...


