

User Manual
Page 2
For more details on the functions described here, refer to the "Reference Manual" on CD-ROM. 2 En CONTENTS/TABLE DES MATIÉRES/INHALT/CONTENIDO ENGLISH 2 FRANÇAIS 44 DEUTSCH 86 ESPAÑOL 128 CONTENTS GETTING STARTED 4 MENU FUNCTIONS 16 SHOOTING BASICS 22 En ADVANCED SHOOTING 30 PLAYBACK 32 PRINT SETTINGS 37 DOWNLOADING PICTURES TO A COMPUTER . . . . . 38 ERROR CODES 40 SPECIFICATIONS 41 These instructions are only for quick reference.
For more details on the functions described here, refer to the "Reference Manual" on CD-ROM. 2 En CONTENTS/TABLE DES MATIÉRES/INHALT/CONTENIDO ENGLISH 2 FRANÇAIS 44 DEUTSCH 86 ESPAÑOL 128 CONTENTS GETTING STARTED 4 MENU FUNCTIONS 16 SHOOTING BASICS 22 En ADVANCED SHOOTING 30 PLAYBACK 32 PRINT SETTINGS 37 DOWNLOADING PICTURES TO A COMPUTER . . . . . 38 ERROR CODES 40 SPECIFICATIONS 41 These instructions are only for quick reference.
User Manual
Page 3
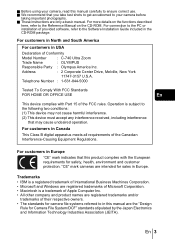
...this manual carefully to the Software Installation Guide included in Canada This Class B digital apparatus meets all requirements of Conformity Model Number : C-740 Ultra Zoom Trade Name : OLYMPUS Responsible Party : Olympus America Inc. For connection to the PC or installation of provided software, refer to...interference that you take test shots to get accustomed to the Reference Manual on the CD-ROM. For more details on the functions described here, refer to your camera, read this manual are only a basic manual. For customers in North and South America For customers in ...
...this manual carefully to the Software Installation Guide included in Canada This Class B digital apparatus meets all requirements of Conformity Model Number : C-740 Ultra Zoom Trade Name : OLYMPUS Responsible Party : Olympus America Inc. For connection to the PC or installation of provided software, refer to...interference that you take test shots to get accustomed to the Reference Manual on the CD-ROM. For more details on the functions described here, refer to your camera, read this manual are only a basic manual. For customers in North and South America For customers in ...
User Manual
Page 12
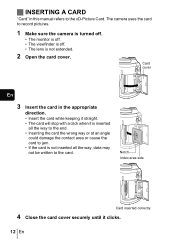
Card cover En 3 Insert the card in this manual refers to the xD-Picture Card. Notch Index area side Card inserted correctly 4 Close the card cover securely until it is inserted all the way to ...
Card cover En 3 Insert the card in this manual refers to the xD-Picture Card. Notch Index area side Card inserted correctly 4 Close the card cover securely until it is inserted all the way to ...

User Manual
Page 18
Press ac to the "Reference Manual" on the monitor. For more details on the functions described here, refer to select a tab and display the associated menu items. These instructions are only for quick reference. Mode menus The MODE MENU has 4 tabs. Selects the ISO sensitivity from o (single-frame ...AUTO, 100, 200 and 400. Selects the shooting mode from A (Aperture priority shooting), S (Shutter priority shooting) and M (Manual shooting). 18 En INFO Displays all the shooting information on CD-ROM. u Displays a histogram showing the luminance distribution of still pictures.
Press ac to the "Reference Manual" on the monitor. For more details on the functions described here, refer to select a tab and display the associated menu items. These instructions are only for quick reference. Mode menus The MODE MENU has 4 tabs. Selects the ISO sensitivity from o (single-frame ...AUTO, 100, 200 and 400. Selects the shooting mode from A (Aperture priority shooting), S (Shutter priority shooting) and M (Manual shooting). 18 En INFO Displays all the shooting information on CD-ROM. u Displays a histogram showing the luminance distribution of still pictures.

User Manual
Page 36
... on and set it to the video input mode. • For details of switching to video input, refer to q and turn the camera on. • The last picture taken is displayed on your TV's instruction manual. 3 Set the mode dial to your TV. 1 Make sure that the camera's video output signal type...
... on and set it to the video input mode. • For details of switching to video input, refer to q and turn the camera on. • The last picture taken is displayed on your TV's instruction manual. 3 Set the mode dial to your TV. 1 Make sure that the camera's video output signal type...

User Manual
Page 37
... the frame to be printed easily by a DPOF-compatible photo lab or on a personal DPOF-compatible printer. Single-frame reservation Use this feature to the "Reference Manual" on CD-ROM. Resetting the print reservation data This function allows you to print only selected pictures. DPOF is a format used to crop part of... photo lab. DPOF is DPOF? En 37 All-frame reservation Use this feature to reset all the pictures stored on the card. For more details, refer to print all the print reservation data for Digital Print Order Format.
... the frame to be printed easily by a DPOF-compatible photo lab or on a personal DPOF-compatible printer. Single-frame reservation Use this feature to the "Reference Manual" on CD-ROM. Resetting the print reservation data This function allows you to print only selected pictures. DPOF is a format used to crop part of... photo lab. DPOF is DPOF? En 37 All-frame reservation Use this feature to reset all the pictures stored on the card. For more details, refer to print all the print reservation data for Digital Print Order Format.
User Manual
Page 38
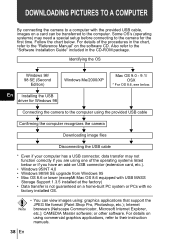
....); DOWNLOADING PICTURES TO A COMPUTER By connecting the camera to a computer with the provided USB cable, images on using commercial graphics applications, refer to their instruction manuals. 38 En For details of the operating systems listed below or if you have an add-on USB connector (extension card, etc.). &#... data transfer may not function correctly if you are using one of the procedures in the CD-ROM package. Connecting the camera to the "Reference Manual" on a home-built PC system or PCs with USB MASS Storage Support 1.3.5 installed at the factory) • Data transfer is not ...
....); DOWNLOADING PICTURES TO A COMPUTER By connecting the camera to a computer with the provided USB cable, images on using commercial graphics applications, refer to their instruction manuals. 38 En For details of the operating systems listed below or if you have an add-on USB connector (extension card, etc.). &#... data transfer may not function correctly if you are using one of the procedures in the CD-ROM package. Connecting the camera to the "Reference Manual" on a home-built PC system or PCs with USB MASS Storage Support 1.3.5 installed at the factory) • Data transfer is not ...

User Manual
Page 39
... camera directly to your computer have a built-in the CD-ROM package. Does your computer using the provided USB cable. Check the Olympus website for playing back movies. Windows 95 Windows NT Mac OS before OS 9 You can download images directly to your computer using a... Consult your computer first. Is there a port marked on CD-ROM. For more details, refer to -date compatibility information. Does your computer? QuickTime is needed for the most up-to the "Reference Manual" on your computer have a USB interface? Depending on the software, image files may not ...
... camera directly to your computer have a built-in the CD-ROM package. Does your computer using the provided USB cable. Check the Olympus website for playing back movies. Windows 95 Windows NT Mac OS before OS 9 You can download images directly to your computer using a... Consult your computer first. Is there a port marked on CD-ROM. For more details, refer to -date compatibility information. Does your computer? QuickTime is needed for the most up-to the "Reference Manual" on your computer have a USB interface? Depending on the software, image files may not ...
Reference Manual
Page 1
DIGITAL CAMERA C-740 Ultra Zoom REFERENCE MANUAL CAMERA OPERATION MANUAL Explanation of how to download images between your digital camera and PC. DIGITAL CAMERA - PC CONNECTION OPERATION MANUAL Explanation of digital camera functions and operating instructions.
DIGITAL CAMERA C-740 Ultra Zoom REFERENCE MANUAL CAMERA OPERATION MANUAL Explanation of how to download images between your digital camera and PC. DIGITAL CAMERA - PC CONNECTION OPERATION MANUAL Explanation of digital camera functions and operating instructions.
Reference Manual
Page 2
Keep this manual. In the interest of continually improving products, Olympus reserves the right to update or modify information contained in this manual in a safe place for purchasing an Olympus digital camera. Before you start to use your camera before taking important photographs. DIGITAL CAMERA C-740 Ultra Zoom REFERENCE MANUAL Thank you take test shots to get accustomed to your new camera, please read these instructions carefully to enjoy optimum performance and a longer service life. We recommend that you for future reference.
Keep this manual. In the interest of continually improving products, Olympus reserves the right to update or modify information contained in this manual in a safe place for purchasing an Olympus digital camera. Before you start to use your camera before taking important photographs. DIGITAL CAMERA C-740 Ultra Zoom REFERENCE MANUAL Thank you take test shots to get accustomed to your new camera, please read these instructions carefully to enjoy optimum performance and a longer service life. We recommend that you for future reference.

Reference Manual
Page 3
...with Part 15 of their respective owners. • The standards for camera file systems referred to the following two conditions: (1) This device may cause undesired operation. For customers ... harmful interference. (2) This device must accept any interference received, including interference that this manual are intended for sales in Europe. "CE" mark cameras are the "Design Rule...B digital apparatus meets all requirements of Conformity Model Number : C-740 Ultra Zoom Trade Name : OLYMPUS Responsible Party : Olympus America Inc. Telephone Number : 631-844-5000 Tested To Comply...
...with Part 15 of their respective owners. • The standards for camera file systems referred to the following two conditions: (1) This device may cause undesired operation. For customers ... harmful interference. (2) This device must accept any interference received, including interference that this manual are intended for sales in Europe. "CE" mark cameras are the "Design Rule...B digital apparatus meets all requirements of Conformity Model Number : C-740 Ultra Zoom Trade Name : OLYMPUS Responsible Party : Olympus America Inc. Telephone Number : 631-844-5000 Tested To Comply...

Reference Manual
Page 9
Reference pages describing details or associated information. 8 Useful information and hints that should be absolutely avoided. Video output selection 151 9 Print setting 152 How to print ... of factory default settings 177 Modes and Shooting Functions 180 Camera maintenance 183 Specifications 184 Glossary of terms 186 Index 189 Indications used in this manual l Note Important information on factors which may lead to a malfunction or operational problems. Also warns of operations that will help you get the most out...
Reference pages describing details or associated information. 8 Useful information and hints that should be absolutely avoided. Video output selection 151 9 Print setting 152 How to print ... of factory default settings 177 Modes and Shooting Functions 180 Camera maintenance 183 Specifications 184 Glossary of terms 186 Index 189 Indications used in this manual l Note Important information on factors which may lead to a malfunction or operational problems. Also warns of operations that will help you get the most out...

Reference Manual
Page 17
It may differ from the actual page in this manual Set the mode dial to perform menu operations. How to use the menus" (P.33). Follow the arrows to any of the marks shown here. Only arrows applicable to use this manual. 16 For details on operating procedures, see "How to the operation are shown. This sample page is only for your reference. This represents the arrow pad.
It may differ from the actual page in this manual Set the mode dial to perform menu operations. How to use the menus" (P.33). Follow the arrows to any of the marks shown here. Only arrows applicable to use this manual. 16 For details on operating procedures, see "How to the operation are shown. This sample page is only for your reference. This represents the arrow pad.
Reference Manual
Page 23
... device (such as a PC, etc.). Compatible cards d • xD-Picture Card (16 - 256 MB) • This camera may not recognize a non-Olympus card or a card that was formatted on this manual refers to the xD-Picture Card. Before use, Note be erased, 1 overwritten, and/or edited on the card can write down the...
... device (such as a PC, etc.). Compatible cards d • xD-Picture Card (16 - 256 MB) • This camera may not recognize a non-Olympus card or a card that was formatted on this manual refers to the xD-Picture Card. Before use, Note be erased, 1 overwritten, and/or edited on the card can write down the...

Reference Manual
Page 27
... -screen display in the illustrations and explanations. Power switch Mode dial Getting started 2 Press e. • The top menu is displayed. 3 Press d on -screen display. This reference manual shows the English on . Available language vary depending on the area where you purchased this camera. 1 Set the mode dial to P and press the power...
... -screen display in the illustrations and explanations. Power switch Mode dial Getting started 2 Press e. • The top menu is displayed. 3 Press d on -screen display. This reference manual shows the English on . Available language vary depending on the area where you purchased this camera. 1 Set the mode dial to P and press the power...

Reference Manual
Page 46
..." (P.66) r My Mode Allows you to set the aperture and shutter speed manually. M Manual shooting 3 Allows you to save your own personal mode and use these customized settings when taking pictures. To check the exposure, refer to get the type of picture you want, regardless of movement. The subject will be clear and...
..." (P.66) r My Mode Allows you to set the aperture and shutter speed manually. M Manual shooting 3 Allows you to save your own personal mode and use these customized settings when taking pictures. To check the exposure, refer to get the type of picture you want, regardless of movement. The subject will be clear and...

Reference Manual
Page 74
MF AF F2.8 • During operation, the area you check whether the focus is in red on is enlarged. Focusing applications Manual focus If auto focus is unable to select MF. When the focus distance selection screen appears on the monitor, press b to focus on the left ...of the MF AF monitor is for reference only. • When the indicator is displayed in the right position. • The distance indicator on a subject, use manual focus. This lets you are focusing on the monitor. 73 Arrow pad OK button F2.8 5 Advanced...
MF AF F2.8 • During operation, the area you check whether the focus is in red on is enlarged. Focusing applications Manual focus If auto focus is unable to select MF. When the focus distance selection screen appears on the monitor, press b to focus on the left ...of the MF AF monitor is for reference only. • When the indicator is displayed in the right position. • The distance indicator on a subject, use manual focus. This lets you are focusing on the monitor. 73 Arrow pad OK button F2.8 5 Advanced...

Reference Manual
Page 121
... camera with a TV. • Make sure that the TV and camera are recommended to play back both still pictures and movies on your TV's instruction manual. 3 Set the mode dial to the TV. • The picture may appear off . Video output Note selection" (P.151) • The camera's monitor or viewfinder turns.... Video cable Video OUT jack 2 Turn the TV on and set it to the video input mode. • For details of switching to video input, refer to your TV. g"VIDEO OUT - Playback on a TV Use the video cable provided with the camera to use the video cable provided to connect the...
... camera with a TV. • Make sure that the TV and camera are recommended to play back both still pictures and movies on your TV's instruction manual. 3 Set the mode dial to the TV. • The picture may appear off . Video output Note selection" (P.151) • The camera's monitor or viewfinder turns.... Video cable Video OUT jack 2 Turn the TV on and set it to the video input mode. • For details of switching to video input, refer to your TV. g"VIDEO OUT - Playback on a TV Use the video cable provided with the camera to use the video cable provided to connect the...

Reference Manual
Page 214
Some camera models have either a lamp on the right of the viewfinder or a card access lamp, and the location varies depending on the right of the viewfinder or the card access lamp is Windows Me/2000, proceed to "Windows Me/2000/XP" ( p.21). Refer to display the menu. Windows 20 Windows 98 1 Make sure that the lamp on the model. Card access lamp 3 Click "Eject" on the menu. Disconnecting the camera from your computer If your camera's reference manual. Lamp 2 Double-click the "My Computer" icon and right-click the "Removable Disk" to your OS is not blinking.
Some camera models have either a lamp on the right of the viewfinder or a card access lamp, and the location varies depending on the right of the viewfinder or the card access lamp is Windows Me/2000, proceed to "Windows Me/2000/XP" ( p.21). Refer to display the menu. Windows 20 Windows 98 1 Make sure that the lamp on the model. Card access lamp 3 Click "Eject" on the menu. Disconnecting the camera from your computer If your camera's reference manual. Lamp 2 Double-click the "My Computer" icon and right-click the "Removable Disk" to your OS is not blinking.

Reference Manual
Page 215
Windows Windows Me/2000/XP 1 Make sure that the lamp on the right of the viewfinder or the card access lamp is not blinking. Refer to your computer. Lamp 5 Remove the USB cable from the camera. 6 Remove the USB cable from your computer 4 Make sure that the lamp on the right of the viewfinder or a card access lamp, and the location varies depending on the model. Disconnecting the camera from your camera's reference manual. Some camera models have either a lamp on the right of the viewfinder or the card access lamp is not blinking. Lamp 21
Windows Windows Me/2000/XP 1 Make sure that the lamp on the right of the viewfinder or the card access lamp is not blinking. Refer to your computer. Lamp 5 Remove the USB cable from the camera. 6 Remove the USB cable from your computer 4 Make sure that the lamp on the right of the viewfinder or a card access lamp, and the location varies depending on the model. Disconnecting the camera from your camera's reference manual. Some camera models have either a lamp on the right of the viewfinder or the card access lamp is not blinking. Lamp 21


