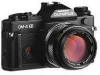
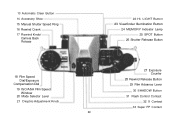
Instruction Manual
Page 2
...all with a minimum of effort: Its aim is the world's first 35 mm single lens reflex camera equipped with Multi Spot Metering and our new Full Synchro Flash System. If any interchangeable lenses, flashes, or accessories other than aluminum - Correct Incorrect Operation Operation order... Continuous Intermittent Reference sound sound 1 This camera has been designed to expand the sphere of the body. This new SLR camera employs titanium - Note: All the components of the Olympus OM-4T are used, Olympus cannot be responsible for purchasing the OLYMPUS OM-4T . Thank you can get the ...
Instruction Manual
Page 9
If you are not likely to use different types of time, remove the batteries before putting it away. Remove the battery cover. 8 Loading the Batteries Do not use the camera for a long period of batteries or new and old batteries at the same time.
Instruction Manual
Page 10
Checking the Batteries Always check the batteries after inserting new batteries, when shooting in cold weather, or if the camera has not been used for a long time. 9 Wipe battery surfaces clean. Make sure that + signs are facing upwards.
Instruction Manual
Page 13
Tear off the top of the film box and insert it into the memo holder. Insert the cartridge and push down the film rewind knob. (Always load the film in the shade.) 12 Pull up on the rewind knob to open the camera back. It will remind you which film you are using.
Instruction Manual
Page 15
This will bring the film to the first frame. 14 Close the camera back until it clicks into place. Face the camera toward light and take two blind shots.
Instruction Manual
Page 22
If the shutter speed is too slow, set the aperture to prevent camera shake. 21 If you see an overexposure warning signal ("OVER" blinks), set the aperture to smaller number to a larger number.
Instruction Manual
Page 24
Open the camera back by pulling up on the rewind knob and remove the film. 23 Fold out the rewind crank and wind it until the film tension is released.
Instruction Manual
Page 27
The metered value is displayed by the mark. If you shift the camera, another mark will appear in the center of the frame along with the spot metered value. 26 Press the spot button to take meter reading. You will hear an electronic sound and the word "SPOT" will indicate the exposure value in the viewfinder.
Instruction Manual
Page 53
Set the camera mode to AUTO. Select an aperture that results in a shutter speed faster than 1/60 sec. (for slower speeds consult the F280 manual). 52
Instruction Manual
Page 65
P. 133 Open the camera back. Removing Attaching 64 Changing the Camera Back The camera back is interchangeable with the Recordata Back or 250 Film Back. Press down on the camera back release button and remove the camera back.
Instruction Manual
Page 66
Attaching the Grip Attach the Camera Grip 1 (optional accessory). When using a motor drive or winders, detach the Grip. 65
Instruction Manual
Page 67
Do not use extra force. 66 Handling Care Take care in handling the camera.
Instruction Manual
Page 70
LIGHT Button 23 Viewfinder Illumination Button 24 MEMORY Indicator Lamp 25 SPOT Button 26 Shutter Release Button 27 Exposure Counter 28 Rewind Release Button 29 Film Advance Lever 30 SHADOW Button 31 Flash Control Contact 32 X Contact 33 Super FP Contact 69 13 Automatic Clear Button 14 Accessory Shoe 15 Manual Shutter Speed Ring 16 Rewind Crank 17 Rewind Knob/ Camera Back Release 18 Film Speed Dial/Exposure Compensation Dial 19 ISO/ASA Film Speed Window 20 Mode Selector Lever 21 Dioptric Adjustment Knob 22 HI.
Instruction Manual
Page 73
...modes; interchangeable. max. Hot shoe (with all shutter speeds up to spot measurement; Automatic exposure memory control: Exposure value memory system (60 min. MANUAL: Synchronizes with X and Super FP Flash contacts); 5-pin connector for T-series flash, synchro socket for ...B, 1 sec.~1/2000 sec. magnification: 0.84X at speeds of actual picture field; Specifications Type: TTL auto-exposure 35mm SLR camera Film Format: 24mm x 36mm Lens mount: Olympus OM mount Shutter: Electronically controlled cloth focal plane shutter; 1/2000 sec. or slower); Film speed: ISO 6 ~ 3200 ...