
User Guide
Page 1
... has been carefully designed to clean the printer. Oki also cannot guarantee that changes in software and equipment made to ensure that should be taken to avoid personal injury or damaging the printer: • Read this user's guide carefully and save it . First edition January 1999.... Microsoft, MS-DOS and Windows are registered trademarks of Epson America Inc. Preface i Oki and Microline are registered trademarks of errors beyond its control. Mention ...
... has been carefully designed to clean the printer. Oki also cannot guarantee that changes in software and equipment made to ensure that should be taken to avoid personal injury or damaging the printer: • Read this user's guide carefully and save it . First edition January 1999.... Microsoft, MS-DOS and Windows are registered trademarks of Epson America Inc. Preface i Oki and Microline are registered trademarks of errors beyond its control. Mention ...

User Guide
Page 2
...heat register. If the printer is placed on or near water, or spill liquid of direct sunlight. you to have the power outlet replaced. ii User's Guide If the cable becomes damaged or frayed, replace it out of any adjustments other hazards. • Do not make sure that the power source matches... into it is possible that the power outlet is connected must remain accessible at all the equipment is less than those outlined in this user's guide as damaged may expose you could get a shock or cause a fire. • Aside from the routine maintenance described in this...
...heat register. If the printer is placed on or near water, or spill liquid of direct sunlight. you to have the power outlet replaced. ii User's Guide If the cable becomes damaged or frayed, replace it out of any adjustments other hazards. • Do not make sure that the power source matches... into it is possible that the power outlet is connected must remain accessible at all the equipment is less than those outlined in this user's guide as damaged may expose you could get a shock or cause a fire. • Aside from the routine maintenance described in this...

User Guide
Page 6
... 42 Character Column Tabs 42 Vertical Tabs 43 MISCELLANEOUS FEATURES 43 Carriage Return & Line Feed 43 Reverse Line Feed 44 Paper-out Override 44 vi User's Guide
... 42 Character Column Tabs 42 Vertical Tabs 43 MISCELLANEOUS FEATURES 43 Carriage Return & Line Feed 43 Reverse Line Feed 44 Paper-out Override 44 vi User's Guide

User Guide
Page 8
... 100 ISO Latin 6 (8859/10 101 Windows Baltic 102 Baltic 774 103 KBL Lithuanian 104 Cyrillic Latvian 105 Roman 8 106 Icelandic 861 107 Index viii User's Guide
... 100 ISO Latin 6 (8859/10 101 Windows Baltic 102 Baltic 774 103 KBL Lithuanian 104 Cyrillic Latvian 105 Roman 8 106 Icelandic 861 107 Index viii User's Guide
User Guide
Page 9
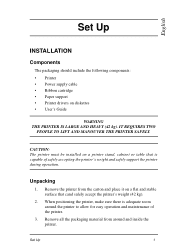
... a printer stand, cabinet or table that cand safely accept the printer's weight (42 kg). 2. Set Up 1 CAUTION: The printer must be installed on diskettes • User's Guide WARNING THE PRINTER IS LARGE AND HEAVY (42 kg).
... a printer stand, cabinet or table that cand safely accept the printer's weight (42 kg). 2. Set Up 1 CAUTION: The printer must be installed on diskettes • User's Guide WARNING THE PRINTER IS LARGE AND HEAVY (42 kg).
User Guide
Page 10
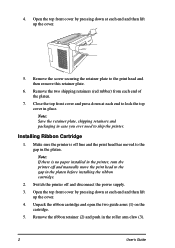
.... 2. Close the top front cover and press down at each end and then lift up the cover. 5. Unpack the ribbon cartridge and open the two guide arms (1) on the cartridge. 5. Switch the printer off and disconnect the power supply. 3. Open the top front cover by pressing down at each end of... plate, shipping retainers and packaging in place. Remove the two shipping retainers (red rubber) from each end to the gap in the roller arm claw (3). 2 User's Guide 4. Open the top front cover by pressing down at each end and then lift up the cover. 4.
.... 2. Close the top front cover and press down at each end and then lift up the cover. 5. Unpack the ribbon cartridge and open the two guide arms (1) on the cartridge. 5. Switch the printer off and disconnect the power supply. 3. Open the top front cover by pressing down at each end of... plate, shipping retainers and packaging in place. Remove the two shipping retainers (red rubber) from each end to the gap in the roller arm claw (3). 2 User's Guide 4. Open the top front cover by pressing down at each end and then lift up the cover. 4.

User Guide
Page 12
... are turned off. 2. Connect the power cable into a power outlet that is earthed, easily accessible and close to the applicable printer port on the printer. 4 User's Guide Open the hinged cover on the printer. 3. parallel or serial. 5. Connect the power cable into the power socket on the side of the printer cable...
... are turned off. 2. Connect the power cable into a power outlet that is earthed, easily accessible and close to the applicable printer port on the printer. 4 User's Guide Open the hinged cover on the printer. 3. parallel or serial. 5. Connect the power cable into the power socket on the side of the printer cable...
User Guide
Page 13
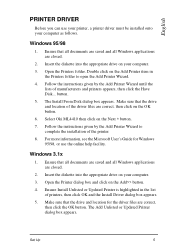
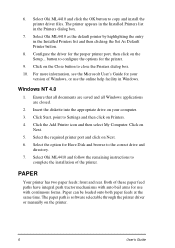
...OK and the Install Driver dialog box appears. 5. The Install From Disk dialog box appears. Set Up 5 Windows 95/98 1. Select Oki ML4410 then click on the Add Printer item in the list of manufacturers and printers appears, then click the Have Disk... Ensure that the drive...3. Make sure that all documents are saved and all Windows applications are correct, then click the OK button. For more information, see the Microsoft User's Guide for the driver files are closed . 2. Double click on the Next > button. 7. Ensure that the drive and location for Windows 95/98...
...OK and the Install Driver dialog box appears. 5. The Install From Disk dialog box appears. Set Up 5 Windows 95/98 1. Select Oki ML4410 then click on the Add Printer item in the list of manufacturers and printers appears, then click the Have Disk... Ensure that the drive...3. Make sure that all documents are saved and all Windows applications are correct, then click the OK button. For more information, see the Microsoft User's Guide for the driver files are closed . 2. Double click on the Next > button. 7. Ensure that the drive and location for Windows 95/98...
User Guide
Page 14
...configure the options for the proper printer port, then click on Next. 6. Click on the printer. 6 User's Guide Windows NT 4.0 1. PAPER Your printer has two paper feeds; Select Oki ML4410 as the default printer by highlighting the entry in the Printers dialog box. 7. Click the Add Printer ... for the printer. 9. Select the option for your computer. 3. front and rear. Select Oki ML4410 and click the OK button to the correct drive and directory. 7. For more information, see the Microsoft User's Guide for Have Disk and browse to copy and install the printer driver files.
...configure the options for the proper printer port, then click on Next. 6. Click on the printer. 6 User's Guide Windows NT 4.0 1. PAPER Your printer has two paper feeds; Select Oki ML4410 as the default printer by highlighting the entry in the Printers dialog box. 7. Click the Add Printer ... for the printer. 9. Select the option for your computer. 3. front and rear. Select Oki ML4410 and click the OK button to the correct drive and directory. 7. For more information, see the Microsoft User's Guide for Have Disk and browse to copy and install the printer driver files.

User Guide
Page 16
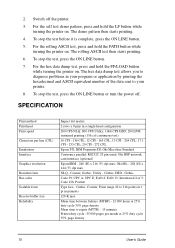
... loads paper into the printer from the selected paper path. Press the ONLINE button. Note: A paper path that has been manually selected on the printer. 8 User's Guide The paper path in the software is different to the one selected on the printer will be carried out from front to rear or rear...
... loads paper into the printer from the selected paper path. Press the ONLINE button. Note: A paper path that has been manually selected on the printer. 8 User's Guide The paper path in the software is different to the one selected on the printer will be carried out from front to rear or rear...
User Guide
Page 18
... the hexadecimal and ASCII equivalent number of 5; SPECIFICATION Print method Print head Print speed Characters per month at 25% duty cycle 35% page density 10 User's Guide EAN 13; For the hex data dump test, press and hold the FF/LOAD button while turning the printer on . IBM Proprinter III; Gothic;... UPC A; Switch off . 2. To stop the test, press the ON LINE button or turn the power off the printer. 3. Oki HSP network card interface (optional) Epson/IBM - 240 (H) x 216 (V) dpi max; Code 128; Point range 22 to 216 points in your printer. 8.
... the hexadecimal and ASCII equivalent number of 5; SPECIFICATION Print method Print head Print speed Characters per month at 25% duty cycle 35% page density 10 User's Guide EAN 13; For the hex data dump test, press and hold the FF/LOAD button while turning the printer on . IBM Proprinter III; Gothic;... UPC A; Switch off . 2. To stop the test, press the ON LINE button or turn the power off the printer. 3. Oki HSP network card interface (optional) Epson/IBM - 240 (H) x 216 (V) dpi max; Code 128; Point range 22 to 216 points in your printer. 8.

User Guide
Page 22
.... When pressed in conjunction with the SHIFT button, moves the paper downward by pressing the MENU button again or pressing the ON-LINE button. 14 User's Guide
.... When pressed in conjunction with the SHIFT button, moves the paper downward by pressing the MENU button again or pressing the ON-LINE button. 14 User's Guide

User Guide
Page 24
...6 8859/10; No; Buffer Ppr Out Override Registration 1 Registration 2 Registration 3 Registration 4 Registration 5 Registration 6 Registration 7 Data Word Size (Oki mode only) OP. German; Latin American; Portugal; Serbo Croatic I -855; Serbo Croatic II; Windows Greek; Kamenicky (MJK); KBL-Lithuanian; ...; 0 8; 7 Full Operation; Turkey; Windows Cyrillic; Cyrillic I ; French; Swedish; Grk 437 Cyprus; Limit Operation 16 User's Guide Norwegian; Windows CEE; Win Tky Latin 5; Swedish III; Publisher Unslashed; Bulgarian; Yes 6 LPI; 8 LPI Off; 500 ...
...6 8859/10; No; Buffer Ppr Out Override Registration 1 Registration 2 Registration 3 Registration 4 Registration 5 Registration 6 Registration 7 Data Word Size (Oki mode only) OP. German; Latin American; Portugal; Serbo Croatic I -855; Serbo Croatic II; Windows Greek; Kamenicky (MJK); KBL-Lithuanian; ...; 0 8; 7 Full Operation; Turkey; Windows Cyrillic; Cyrillic I ; French; Swedish; Grk 437 Cyprus; Limit Operation 16 User's Guide Norwegian; Windows CEE; Win Tky Latin 5; Swedish III; Publisher Unslashed; Bulgarian; Yes 6 LPI; 8 LPI Off; 500 ...

User Guide
Page 26
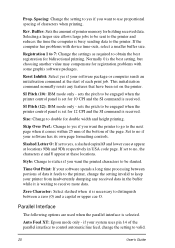
... emulation mode you want to the tear-off . if you want the printer to automatically add a carriage return when a line feed is received at 18 User's Guide If your system uses, either 7 or 8 bit data. Code Page: Choose the code page for faster printing of data, change the setting to make ...Graphics: Default setting is consistently double spaced, select no. Auto LF: Automatically adds a line feed to each unit of graphics. IBM Proprinter, Epson FX or Oki Microline. Explanation of the ESC SI command. 17.1 CPI sets ESC SI to condensed mode and 20 CPI sets ESC SI to to use the...
... emulation mode you want to the tear-off . if you want the printer to automatically add a carriage return when a line feed is received at 18 User's Guide If your system uses, either 7 or 8 bit data. Code Page: Choose the code page for faster printing of data, change the setting to make ...Graphics: Default setting is consistently double spaced, select no. Auto LF: Automatically adds a line feed to each unit of graphics. IBM Proprinter, Epson FX or Oki Microline. Explanation of the ESC SI command. 17.1 CPI sets ESC SI to condensed mode and 20 CPI sets ESC SI to to use the...
User Guide
Page 28
... problems with some graphis software packages. Reset Inhibit: Select yes if your system uses pin 14 of the page. sets the pitch to valid. 20 User's Guide if your software package or computer sends an initialisation command at locations 9Bh and 9Dh respectively in the buffer while it comes within 25 mm...
... problems with some graphis software packages. Reset Inhibit: Select yes if your system uses pin 14 of the page. sets the pitch to valid. 20 User's Guide if your software package or computer sends an initialisation command at locations 9Bh and 9Dh respectively in the buffer while it comes within 25 mm...

User Guide
Page 30
Close the rear of the printer. 4. Load continuous paper onto the rear paper feed. Turn the printer OFF. 2. Open the rear of the printer and make sure any pieces of paper are removed from the rear tractors. 3. Open the rear access cover and remove the paper from inside of the printer. 5. Open the front access cover and remove the paper from the front tractors. 22 User's Guide Turn the printer OFF. 2. Front Feed 1. Refer to Rear Paper Feed Loading in Set Up. Clearing Paper Jams Rear Feed 1.
Close the rear of the printer. 4. Load continuous paper onto the rear paper feed. Turn the printer OFF. 2. Open the rear of the printer and make sure any pieces of paper are removed from the rear tractors. 3. Open the rear access cover and remove the paper from inside of the printer. 5. Open the front access cover and remove the paper from the front tractors. 22 User's Guide Turn the printer OFF. 2. Front Feed 1. Refer to Rear Paper Feed Loading in Set Up. Clearing Paper Jams Rear Feed 1.

User Guide
Page 32
... back on . Check that there is on . Press the ONLINE button to Paper in the printer buffer after Auto Load has been carried out. 24 User's Guide Paper End Indicates that the printer interface cable is sent. Press the ONLINE button to print. ALARM indicator is no paper loaded on line and...
... back on . Check that there is on . Press the ONLINE button to Paper in the printer buffer after Auto Load has been carried out. 24 User's Guide Paper End Indicates that the printer interface cable is sent. Press the ONLINE button to print. ALARM indicator is no paper loaded on line and...

User Guide
Page 34
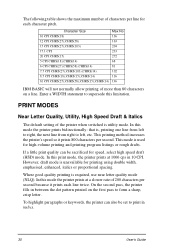
PATH CHANGE POWER FAN HEAD 2 FAN MAIN LSI RIBBON LCD TIME OUT OPT CARD RAM OKI HSP CONNECT CENTERING HEAD 1 FAN SPACE FAN BAIL OPTICAL SENSOR OPT CARD ROM OPT CARD CONNECT If a non-recoverable alarm or error occurs, switch the printer off and then back on. If this does not clear the alarm or error, contact the dealer or manufacturer for technical support. 26 User's Guide
PATH CHANGE POWER FAN HEAD 2 FAN MAIN LSI RIBBON LCD TIME OUT OPT CARD RAM OKI HSP CONNECT CENTERING HEAD 1 FAN SPACE FAN BAIL OPTICAL SENSOR OPT CARD ROM OPT CARD CONNECT If a non-recoverable alarm or error occurs, switch the printer off and then back on. If this does not clear the alarm or error, contact the dealer or manufacturer for technical support. 26 User's Guide

User Guide
Page 36
... Hex. A complete summary of all the control codes that fewer characters fit in an inch. The ESC W 1 command takes priority over the SO command. 28 User's Guide ASCII Comp.
... Hex. A complete summary of all the control codes that fewer characters fit in an inch. The ESC W 1 command takes priority over the SO command. 28 User's Guide ASCII Comp.
User Guide
Page 38
... (HSD) mode. This printing method increases the printer's speed so it prints each character pitch. On the second pass, the printer fills in italics. 30 User's Guide However, draft mode is utility mode. In this limitation. Enter a WIDTH statement to print in between the dot pattern printed on a line. PRINT MODES Near...
... (HSD) mode. This printing method increases the printer's speed so it prints each character pitch. On the second pass, the printer fills in italics. 30 User's Guide However, draft mode is utility mode. In this limitation. Enter a WIDTH statement to print in between the dot pattern printed on a line. PRINT MODES Near...


