User Manual
Page 10
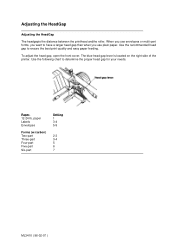
... printer. paper Labels Envelopes Forms (w/carbon) Two-part Three-part Four-part Five-part Six-part Setting 1 3-4 5-9 2-3 3-4 5 6 7 ML3410 ( 96-02-07 ) Adjusting the HeadGap Adjusting the HeadGap The headgapis the distance between the printhead andthe roller. Paper 12-24 lb. Use the following chart to have a larger head gap than when you want to determine the proper head gap for your needs. Use the recommended head gap to ensure the best print quality and easy paper feeding...
... printer. paper Labels Envelopes Forms (w/carbon) Two-part Three-part Four-part Five-part Six-part Setting 1 3-4 5-9 2-3 3-4 5 6 7 ML3410 ( 96-02-07 ) Adjusting the HeadGap Adjusting the HeadGap The headgapis the distance between the printhead andthe roller. Paper 12-24 lb. Use the following chart to have a larger head gap than when you want to determine the proper head gap for your needs. Use the recommended head gap to ensure the best print quality and easy paper feeding...
User Manual
Page 11
... SELECT button or turn off the printer to stop the test. This test prints the character set up your printer and any time you want to make sure your printer is working properly. Important Use only continuous forms paper to run these after you call for service. The test prints a two-page sample of the printout handy if you 've set in tests to verify that it•s running. Rolling ASCII Test Turn the printer...
... SELECT button or turn off the printer to stop the test. This test prints the character set up your printer and any time you want to make sure your printer is working properly. Important Use only continuous forms paper to run these after you call for service. The test prints a two-page sample of the printout handy if you 've set in tests to verify that it•s running. Rolling ASCII Test Turn the printer...
User Manual
Page 16
... the Form Tear Off selection for each of form position by pressing the TEAR button. After you remove a printed page from the printer without feeding an extra sheet of paper. You can tear it by changing the setting for the Form Tear Off menu selection to the tear bar so you are separate menu groups for the one you can check the top of the three possible paper paths. A few seconds after printing stops, the paper moves...
... the Form Tear Off selection for each of form position by pressing the TEAR button. After you remove a printed page from the printer without feeding an extra sheet of paper. You can tear it by changing the setting for the Form Tear Off menu selection to the tear bar so you are separate menu groups for the one you can check the top of the three possible paper paths. A few seconds after printing stops, the paper moves...
User Manual
Page 18
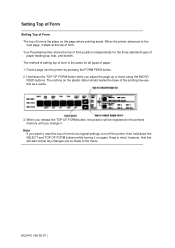
... the FORM FEED button. 2. Keep in the printers memory until you want to reset the top of form to its original settings, turn off the printer, then hold down using the MICRO FEED buttons. Note If you change it on again. When the printer advances to the menu. The red line on the page where printing starts. When you release the TOP OF FORM button, the position will also cancel any changes you adjust the...
... the FORM FEED button. 2. Keep in the printers memory until you want to reset the top of form to its original settings, turn off the printer, then hold down using the MICRO FEED buttons. Note If you change it on again. When the printer advances to the menu. The red line on the page where printing starts. When you release the TOP OF FORM button, the position will also cancel any changes you adjust the...
User Manual
Page 19
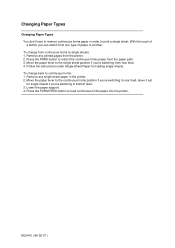
... rear feed, leave it set for loading single sheets. To change back to continuous forms: 1. Press the FORM FEED button to bottom feed. 3. Follow the instructions under Single-Sheet Paper for single sheets if you 're switching from continuous forms to single sheets: 1. Lower the paper support. 4. ML3410 ( 96-02-07 ) Changing Paper Types Changing Paper Types You don't have to remove continuous forms paper in the printer. 2. Move the paper lever to the single sheet position if you 're switching to feed continuous forms paper...
... rear feed, leave it set for loading single sheets. To change back to continuous forms: 1. Press the FORM FEED button to bottom feed. 3. Follow the instructions under Single-Sheet Paper for single sheets if you 're switching from continuous forms to single sheets: 1. Lower the paper support. 4. ML3410 ( 96-02-07 ) Changing Paper Types Changing Paper Types You don't have to remove continuous forms paper in the printer. 2. Move the paper lever to the single sheet position if you 're switching to feed continuous forms paper...

User Manual
Page 21
... printing using single-sheet paper. Output tray 1. Installing the Optional Cut Sheet Feeder Installing the Optional Cut Sheet Feeder A Cut Sheet Feeder (CSF) is off . 4. The CSF feeds paper automatically, controlled from the printer•s front panel or from the computer. Push the bail lever forward to the open position and the paper lever back to the single sheet position. 5. Remove the back cover: tilt it back slightly and lift it onto the printer. Cut Sheet...
... printing using single-sheet paper. Output tray 1. Installing the Optional Cut Sheet Feeder Installing the Optional Cut Sheet Feeder A Cut Sheet Feeder (CSF) is off . 4. The CSF feeds paper automatically, controlled from the printer•s front panel or from the computer. Push the bail lever forward to the open position and the paper lever back to the single sheet position. 5. Remove the back cover: tilt it back slightly and lift it onto the printer. Cut Sheet...
User Manual
Page 27
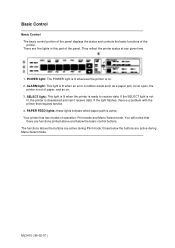
... printer. ML3410 ( 96-02-07 ) If the light flashes, there•s a problem with the printer that there are active during Print mode; Basic Control Basic Control The basic control portion of the panel displays the status and controls the basic functions of operation: Print mode and Menu Select mode. You will notice that requires service. 4. There are active during Menu Select mode. They reflect the printer status at any given time. 1. those below the buttons are functions printed...
... printer. ML3410 ( 96-02-07 ) If the light flashes, there•s a problem with the printer that there are active during Print mode; Basic Control Basic Control The basic control portion of the panel displays the status and controls the basic functions of operation: Print mode and Menu Select mode. You will notice that requires service. 4. There are active during Menu Select mode. They reflect the printer status at any given time. 1. those below the buttons are functions printed...

User Manual
Page 28
... you release the buttons. LINE FEED button: Press this button sets the top of paper. This lets you use single sheet paper without wasting an extra sheet of form the point on ). 2. TOP OF FORM button: When the printer is in fine increments. If you hold down in Print mode. ML3410 ( 96-02-07 ) Print Mode Print Mode When you turn your printer on, it a second time to enable the printer to receive data again (SELECT light goes on...
... you release the buttons. LINE FEED button: Press this button sets the top of paper. This lets you use single sheet paper without wasting an extra sheet of form the point on ). 2. TOP OF FORM button: When the printer is in fine increments. If you hold down in Print mode. ML3410 ( 96-02-07 ) Print Mode Print Mode When you turn your printer on, it a second time to enable the printer to receive data again (SELECT light goes on...

User Manual
Page 35
... settings are for your printer. Note To reset the printer to the factory menu settings, turn it back on the paper. Press the SET button to cycle through . ML3410 ( 96-02-07 ) To choose a setting, press the SET button until you come up again. See Appendix A for an item. Press the EXIT button to save your way around in a group. Use this list to find your changes and leave the menu. Making Selections Making Selections...
... settings are for your printer. Note To reset the printer to the factory menu settings, turn it back on the paper. Press the SET button to cycle through . ML3410 ( 96-02-07 ) To choose a setting, press the SET button until you come up again. See Appendix A for an item. Press the EXIT button to save your way around in a group. Use this list to find your changes and leave the menu. Making Selections Making Selections...

User Manual
Page 36
Chapter 4 Computer Control Computer Control This chapter explains the basics of setting up a software package for more details. This information should help you get started; ML3410 ( 96-02-07 ) It covers the fundamentals of controlling the printer through your printer. be sure to read your software documentation carefully for use with your printer, MS-DOS printing commands, and provides some tips on writing BASIC programs to control your computer.
Chapter 4 Computer Control Computer Control This chapter explains the basics of setting up a software package for more details. This information should help you get started; ML3410 ( 96-02-07 ) It covers the fundamentals of controlling the printer through your printer. be sure to read your software documentation carefully for use with your printer, MS-DOS printing commands, and provides some tips on writing BASIC programs to control your computer.

User Manual
Page 38
... filename > devicename ¨ COPY filename devicename If you've used a word processor or other software package to prepare your software doesnt control these kinds of features, it's just as easy to print using DOS commands. ML3410 ( 96-02-07 ) This is particularly true if the software lets you control a documents appearance, page length, margins, printing features, and so on a disk in a format that packages...
... filename > devicename ¨ COPY filename devicename If you've used a word processor or other software package to prepare your software doesnt control these kinds of features, it's just as easy to print using DOS commands. ML3410 ( 96-02-07 ) This is particularly true if the software lets you control a documents appearance, page length, margins, printing features, and so on a disk in a format that packages...

User Manual
Page 43
... special characters. There are control codes, special characters used in a less standard way to the serial port you're using your keyboard, you cant send them to the printer enclosed in double quotes, as you would with a serial interface, you have to use the MODE command, as described on the same line" For serial printers If you send an LPRINT statement, the text between the #1 and the data: PRINT#1, "A line...
... special characters. There are control codes, special characters used in a less standard way to the serial port you're using your keyboard, you cant send them to the printer enclosed in double quotes, as you would with a serial interface, you have to use the MODE command, as described on the same line" For serial printers If you send an LPRINT statement, the text between the #1 and the data: PRINT#1, "A line...

User Manual
Page 46
... selecting a time for unformatted listings or programs that dont format the page. Page Width 13.6²,8² The 8² setting emulates a narrow carriage printer. If you change from one path to tea-roff. Use only for the printer to wait after data before advancing the page to another, the parameters automatically change, too. Line Spacing 6 LPI, 8 LPI Sets the distance between lines in lines per inch. Skip Over Perforation...
... selecting a time for unformatted listings or programs that dont format the page. Page Width 13.6²,8² The 8² setting emulates a narrow carriage printer. If you change from one path to tea-roff. Use only for the printer to wait after data before advancing the page to another, the parameters automatically change, too. Line Spacing 6 LPI, 8 LPI Sets the distance between lines in lines per inch. Skip Over Perforation...

User Manual
Page 49
... the printer to Limited Operation deacti-vates the menu mode and these control panel but-tons: TOP OF FORM, MICRO FEED UP/DOWN, PRINT QUALITY, and PITCH. Operator Panel Function Full Operation, Limited Operation Reset Inhibit No, Yes Print Suppress Effective Yes, No Auto LF Auto CR (IBM only) CSF Bin Select No,Yes No,Yes Bin 1, Bin 2 SI Select Pitch (10 CPI) (IBM only) 17.1 CPI 15 CPI SI Select Pitch (12 CPI) (IBM only) 20 CPI 12 CPI Changing this setting...
... the printer to Limited Operation deacti-vates the menu mode and these control panel but-tons: TOP OF FORM, MICRO FEED UP/DOWN, PRINT QUALITY, and PITCH. Operator Panel Function Full Operation, Limited Operation Reset Inhibit No, Yes Print Suppress Effective Yes, No Auto LF Auto CR (IBM only) CSF Bin Select No,Yes No,Yes Bin 1, Bin 2 SI Select Pitch (10 CPI) (IBM only) 17.1 CPI 15 CPI SI Select Pitch (12 CPI) (IBM only) 20 CPI 12 CPI Changing this setting...

User Manual
Page 52
... character pitch) ML3410 ( 96-02-07 ) n, n=0 to position = (n+(n256)) /120 inches from left margin. n NUL Decimal 13 27 68 n n ... k=0: clear tabs Default: every 8 columns Move to position = (n+(n256)) /60 inches from printing position. n, n=0 to 255 moves to right and moves to left (odd) 0P, P, P, P9 PPPP=number of units to move (size of characters per line k=1 to follow A=motion absolute (even) or relative (odd) A=relative movement right (even) or left and prints. Control Codes...
... character pitch) ML3410 ( 96-02-07 ) n, n=0 to position = (n+(n256)) /120 inches from left margin. n NUL Decimal 13 27 68 n n ... k=0: clear tabs Default: every 8 columns Move to position = (n+(n256)) /60 inches from printing position. n, n=0 to 255 moves to right and moves to left (odd) 0P, P, P, P9 PPPP=number of units to move (size of characters per line k=1 to follow A=motion absolute (even) or relative (odd) A=relative movement right (even) or left and prints. Control Codes...

User Manual
Page 57
... Spacing ESC p n 27 120 n 27 40 0 27 107 n 27 112 n Select Pica Pitch ESC P (10 cpi) 27 80 1B 49 n 1B 10 41 m n ... ML3410 ( 96-02-07 ) Print Control Codes ESC I n 27 73 n Bar Code Commands Select Bar Code Type and Size ESC DLE A m n ... 27 16 65 m n ... n=0: Utility printing n=1: NLQ printing n=0: NLQ Courier (default) n=1: NLQ Gothic See also ESC ! n=1: Start proportional spacing n=0: Stop proportional spacing In compressed mode, selects 17.1 cpi. Activates graphic character set...
... Spacing ESC p n 27 120 n 27 40 0 27 107 n 27 112 n Select Pica Pitch ESC P (10 cpi) 27 80 1B 49 n 1B 10 41 m n ... ML3410 ( 96-02-07 ) Print Control Codes ESC I n 27 73 n Bar Code Commands Select Bar Code Type and Size ESC DLE A m n ... 27 16 65 m n ... n=0: Utility printing n=1: NLQ printing n=0: NLQ Courier (default) n=1: NLQ Gothic See also ESC ! n=1: Start proportional spacing n=0: Stop proportional spacing In compressed mode, selects 17.1 cpi. Activates graphic character set...

User Manual
Page 61
... Significant Bit to 0. PRINT SUPPRESS EFFECTIVE menu item must be YES for this to menu defaults, current position becomes top of the features to be deactivated. 0=10 cpi 1=12 cpi 2=Proportional spacing 4=Compressed 8=Emphasized 16=Enhanced 32=Double Width 64=Italics 128=Underlining Clears buffer, resets printer to be active. control codes unaffected. Composite Command ESC ! Custom character data is not included in the sum, it will be activated. ML3410 ( 96...
... Significant Bit to 0. PRINT SUPPRESS EFFECTIVE menu item must be YES for this to menu defaults, current position becomes top of the features to be deactivated. 0=10 cpi 1=12 cpi 2=Proportional spacing 4=Compressed 8=Emphasized 16=Enhanced 32=Double Width 64=Italics 128=Underlining Clears buffer, resets printer to be active. control codes unaffected. Composite Command ESC ! Custom character data is not included in the sum, it will be activated. ML3410 ( 96...

User Manual
Page 62
... to factory default. When PAPER OUT light is on, pressing SELECT prints 1 line of data at 50% of form before registering paper end error. printer reset to menu default if applicable, non-menu features returned to reduce noise. Print Suppress Mode Off DC1 Disable Paper-~ Out Sensor ESC 8 Enable Paper- ML3410 ( 96-02-07 ) Sensor can also be controlled by the menu. Prints at a time. n=1: Half-speed printing ON n=0: Half-speed printing OFF Print buffer cleared, receive buffer unaffected; Paper-out sensor is left. Out ESC 9 Sensor 17...
... to factory default. When PAPER OUT light is on, pressing SELECT prints 1 line of data at 50% of form before registering paper end error. printer reset to menu default if applicable, non-menu features returned to reduce noise. Print Suppress Mode Off DC1 Disable Paper-~ Out Sensor ESC 8 Enable Paper- ML3410 ( 96-02-07 ) Sensor can also be controlled by the menu. Prints at a time. n=1: Half-speed printing ON n=0: Half-speed printing OFF Print buffer cleared, receive buffer unaffected; Paper-out sensor is left. Out ESC 9 Sensor 17...

User Manual
Page 67
... n=17: Carriage returnn=19: Forward line feedn=25: Reverse line feed n = 0 to 9 Top of the page,printer advances to topof next page.n = 0 to 255 nn is a 2-digit ASCIInumber When printing positionis within 2n/6 of thebottom of form set at cur-rent printing position. Clears Print Suppressmodeprinte r canaccept data. ML3410 ( 96-02-07 ) Use to right only inboth text & graphics. Carriage return/line feed control ESC ? Can be disabledthrough...
... n=17: Carriage returnn=19: Forward line feedn=25: Reverse line feed n = 0 to 9 Top of the page,printer advances to topof next page.n = 0 to 255 nn is a 2-digit ASCIInumber When printing positionis within 2n/6 of thebottom of form set at cur-rent printing position. Clears Print Suppressmodeprinte r canaccept data. ML3410 ( 96-02-07 ) Use to right only inboth text & graphics. Carriage return/line feed control ESC ? Can be disabledthrough...

User Manual
Page 78
... Specifications subject to 16.5 inches wide Use bottom feed only. Specifications Specifications Printhead: 9 pin Print speed @ 10 cpi: HSD 550 cps Utility 417 cps NLQ 104 cps Emulations: Epson FX/IBM ProPrinter, co-resident Pacemark/Microline, by means of optional chip set Interface: Parallel and RS232C serial, standard Optional Twin-Ax/Co-Ax (3rd partycall 1-800-OKIDATA for information) Graphics resolution: 1445216 dpi maximum Fonts: NLQ: Courier, Gothic, Proportional Draft: Utility, High...
... Specifications subject to 16.5 inches wide Use bottom feed only. Specifications Specifications Printhead: 9 pin Print speed @ 10 cpi: HSD 550 cps Utility 417 cps NLQ 104 cps Emulations: Epson FX/IBM ProPrinter, co-resident Pacemark/Microline, by means of optional chip set Interface: Parallel and RS232C serial, standard Optional Twin-Ax/Co-Ax (3rd partycall 1-800-OKIDATA for information) Graphics resolution: 1445216 dpi maximum Fonts: NLQ: Courier, Gothic, Proportional Draft: Utility, High...


