ML1120 User's Guide (English)
Page 3
... 8 Buttons 8 Lights 9 Print Modes 10 Change Print Mode 10 Menus 11 Entering the Menu Mode 11 Changing Menu Settings 11 Groups, Items, and Settings 12 Printer Control 12 Font 13 Symbol Sets 14 Rear Feed 15 Bottom Feed 17 Top Feed 18 Set-Up 20 Parallel I/F 22 Serial I/F 23 Loading Paper... Sheets 24 Loading Continuous Forms, Rear Feed 26 Loading Continuous Forms, Bottom Feed 28 Set Top of Form (TOF 38 General Information 38 Use the Printer Menu panel.jpg 38 Temporary TOF 39 Form Tear Off 40 Turn On Forms Tear Off 40 Microline 1120 User's Guide 3
... 8 Buttons 8 Lights 9 Print Modes 10 Change Print Mode 10 Menus 11 Entering the Menu Mode 11 Changing Menu Settings 11 Groups, Items, and Settings 12 Printer Control 12 Font 13 Symbol Sets 14 Rear Feed 15 Bottom Feed 17 Top Feed 18 Set-Up 20 Parallel I/F 22 Serial I/F 23 Loading Paper... Sheets 24 Loading Continuous Forms, Rear Feed 26 Loading Continuous Forms, Bottom Feed 28 Set Top of Form (TOF 38 General Information 38 Use the Printer Menu panel.jpg 38 Temporary TOF 39 Form Tear Off 40 Turn On Forms Tear Off 40 Microline 1120 User's Guide 3
ML1120 User's Guide (English)
Page 4
... Method 44 Printhead 44 Ribbon Life 44 Emulations 44 Interfaces (Standard 44 Receive Buffer Size 44 Print Speed 44 Reliability 45 Print Media Specifications 45 Printer Dimensions 48 Printer Weight 48 Environmental Requirements 48 Electrical Requirements 48 Utilities 49 Overview 49 Accessing 49 Descriptions of Utilities 50 Installing the Utilities 51...
... Method 44 Printhead 44 Ribbon Life 44 Emulations 44 Interfaces (Standard 44 Receive Buffer Size 44 Print Speed 44 Reliability 45 Print Media Specifications 45 Printer Dimensions 48 Printer Weight 48 Environmental Requirements 48 Electrical Requirements 48 Utilities 49 Overview 49 Accessing 49 Descriptions of Utilities 50 Installing the Utilities 51...
ML1120 User's Guide (English)
Page 5
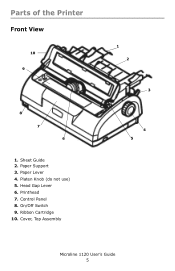
Parts of the Printer Front View F1_24_front.jpg 10 9 8 7 6 1. On/Off Switch 9. Sheet Guide 2. Paper Lever 4. Control Panel 8. Platen Knob (do not use) 5. Paper Support 3. Printhead 7. Head Gap Lever 6. Cover, Top Assembly 1 2 3 4 5 Microline 1120 User's Guide 5 Ribbon Cartridge 10.
Parts of the Printer Front View F1_24_front.jpg 10 9 8 7 6 1. On/Off Switch 9. Sheet Guide 2. Paper Lever 4. Control Panel 8. Platen Knob (do not use) 5. Paper Support 3. Printhead 7. Head Gap Lever 6. Cover, Top Assembly 1 2 3 4 5 Microline 1120 User's Guide 5 Ribbon Cartridge 10.
ML1120 User's Guide (English)
Page 8
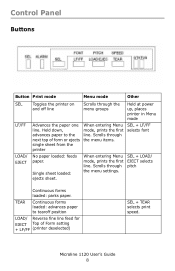
...1120 User's Guide 8 Single sheet loaded: ejects sheet. TEAR Continuous forms loaded: advances paper to the next top of Form setting + LF/FF (printer deselected) SEL + TEAR selects print speed. Control Panel Buttons panel.jpg Button Print mode Menu mode Other SEL LF/FF LOAD/ EJECT Toggles the... the menu items. SEL + LF/FF selects font No paper loaded: feeds paper. Scrolls through the menu groups Held at power up, places printer in Menu mode Advances the paper one line. When entering Menu mode, prints the first line. Scrolls through the menu settings. Held down, advances...
...1120 User's Guide 8 Single sheet loaded: ejects sheet. TEAR Continuous forms loaded: advances paper to the next top of Form setting + LF/FF (printer deselected) SEL + TEAR selects print speed. Control Panel Buttons panel.jpg Button Print mode Menu mode Other SEL LF/FF LOAD/ EJECT Toggles the... the menu items. SEL + LF/FF selects font No paper loaded: feeds paper. Scrolls through the menu groups Held at power up, places printer in Menu mode Advances the paper one line. When entering Menu mode, prints the first line. Scrolls through the menu settings. Held down, advances...
ML1120 User's Guide (English)
Page 9
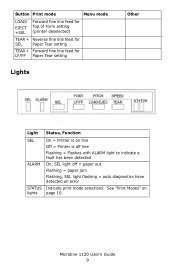
See "Print Modes" on line Off = Printer is off line Flashing = Flashes with ALARM light to indicate a fault has been detected ALARM On, SEL light off = paper out Flashing = paper jam Flashing, ... detected an error STATUS Indicate print mode selections. Button Print mode Menu mode LOAD/ EJECT +SEL Forward fine line feed for Top of Form setting (printer deselected) TEAR + Reverse fine line feed for SEL Paper Tear setting TEAR + Forward fine line feed for LF/FF Paper Tear setting Lights panel.jpg...
See "Print Modes" on line Off = Printer is off line Flashing = Flashes with ALARM light to indicate a fault has been detected ALARM On, SEL light off = paper out Flashing = paper jam Flashing, ... detected an error STATUS Indicate print mode selections. Button Print mode Menu mode LOAD/ EJECT +SEL Forward fine line feed for Top of Form setting (printer deselected) TEAR + Reverse fine line feed for SEL Paper Tear setting TEAR + Forward fine line feed for LF/FF Paper Tear setting Lights panel.jpg...
ML1120 User's Guide (English)
Page 10
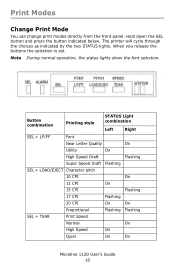
When you release the buttons the selection is set. Nota During normal operation, the status lights show the font selection. The printer will cycle through the choices as indicated by the two STATUS lights. panel.jpg Button combination Printing style STATUS Light combination Left Right SEL + LF/...
When you release the buttons the selection is set. Nota During normal operation, the status lights show the font selection. The printer will cycle through the choices as indicated by the two STATUS lights. panel.jpg Button combination Printing style STATUS Light combination Left Right SEL + LF/...
ML1120 User's Guide (English)
Page 11
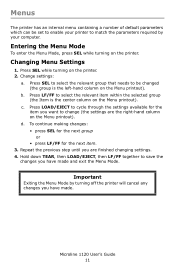
... column on the Menu printout). Microline 1120 User's Guide 11 Entering the Menu Mode To enter the Menu Mode, press SEL while turning on the printer. 2. Change settings: a. Press LF/FF to change (the settings are finished changing settings. 4. To continue making changes: • press SEL for the next ...you want to select the relevant item within the selected group (the Item is the left-hand column on the Menu printout). Menus The printer has an internal menu containing a number of default parameters which can be changed (the group is the center column on the Menu printout).
... column on the Menu printout). Microline 1120 User's Guide 11 Entering the Menu Mode To enter the Menu Mode, press SEL while turning on the printer. 2. Change settings: a. Press LF/FF to change (the settings are finished changing settings. 4. To continue making changes: • press SEL for the next ...you want to select the relevant item within the selected group (the Item is the left-hand column on the Menu printout). Menus The printer has an internal menu containing a number of default parameters which can be changed (the group is the center column on the Menu printout).
ML1120 User's Guide (English)
Page 12
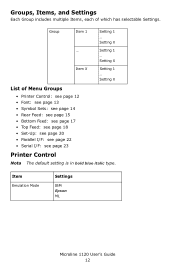
Groups, Items, and Settings Each Group includes multiple Items, each of Menu Groups • Printer Control: see page 12 • Font: see page 13 • Symbol Sets: see page 14 • Rear Feed: see page 15 • Bottom Feed: see ...page 17 • Top Feed: see page 18 • Set-Up: see page 20 • Parallel I/F: see page 22 • Serial I/F: see page 23 Printer Control Nota The default setting is in bold blue italic type. Setting X Item X Setting 1 ... Setting X List of which has selectable Settings. Item Emulation Mode Settings...
Groups, Items, and Settings Each Group includes multiple Items, each of Menu Groups • Printer Control: see page 12 • Font: see page 13 • Symbol Sets: see page 14 • Rear Feed: see page 15 • Bottom Feed: see ...page 17 • Top Feed: see page 18 • Set-Up: see page 20 • Parallel I/F: see page 22 • Serial I/F: see page 23 Printer Control Nota The default setting is in bold blue italic type. Setting X Item X Setting 1 ... Setting X List of which has selectable Settings. Item Emulation Mode Settings...
ML1120 User's Guide (English)
Page 15
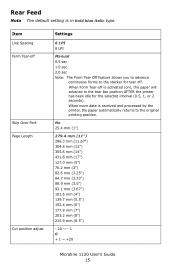
Rear Feed Nota The default setting is received and processed by the printer, the paper automatically returns to the original printing position. Item Line Spacing Form Tear-off . When more data is in bold blue italic type. No ... 6 LPI 8 LPI Manual 0.5 sec 1.0 sec 2.0 sec Note: The Form Tear Off feature allows you to advance continuous forms to the tear bar position AFTER the printer has been idle for tear off Skip Over Perf. When Form Tear-off is activated (on), the paper will advance to the stacker for the...
Rear Feed Nota The default setting is received and processed by the printer, the paper automatically returns to the original printing position. Item Line Spacing Form Tear-off . When more data is in bold blue italic type. No ... 6 LPI 8 LPI Manual 0.5 sec 1.0 sec 2.0 sec Note: The Form Tear Off feature allows you to advance continuous forms to the tear bar position AFTER the printer has been idle for tear off Skip Over Perf. When Form Tear-off is activated (on), the paper will advance to the stacker for the...
ML1120 User's Guide (English)
Page 24
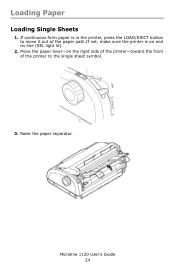
Raise the paper separator. If continuous form paper is on and on the right side of the printer-toward the front of the paper path.If not, make sure the printer is in the printer, press the LOAD/EJECT button to move it out of the printer to the single sheet symbol. Loading Paper Loading Single Sheets 1. F4_13.jpg 3. F2_39.jpg Microline 1120 User's Guide 24 Move the paper lever-on line (SEL light lit). 2.
Raise the paper separator. If continuous form paper is on and on the right side of the printer-toward the front of the paper path.If not, make sure the printer is in the printer, press the LOAD/EJECT button to move it out of the printer to the single sheet symbol. Loading Paper Loading Single Sheets 1. F4_13.jpg 3. F2_39.jpg Microline 1120 User's Guide 24 Move the paper lever-on line (SEL light lit). 2.
ML1120 User's Guide (English)
Page 25
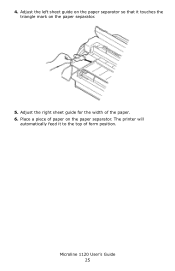
Place a piece of the paper. 6. Adjust the left sheet guide on the paper separator so that it to the top of form position. The printer will automatically feed it touches the triangle mark on the paper separator. Microline 1120 User's Guide 25 F4_01.jpg 5. 4. Adjust the right sheet guide for the width of paper on the paper separator.
Place a piece of the paper. 6. Adjust the left sheet guide on the paper separator so that it to the top of form position. The printer will automatically feed it touches the triangle mark on the paper separator. Microline 1120 User's Guide 25 F4_01.jpg 5. 4. Adjust the right sheet guide for the width of paper on the paper separator.
ML1120 User's Guide (English)
Page 26
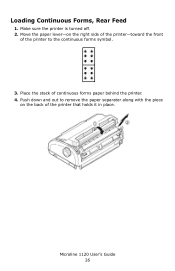
icon_forms.jpg 3. Push down and out to remove the paper separator along with the piece on the right side of the printer-toward the front of the printer to the continuous forms symbol. Place the stack of the printer that holds it in place. Loading Continuous Forms, Rear Feed 1. Make sure the printer is turned off. 2. Move the paper lever-on the back of continuous forms paper behind the printer. 4. F4_65.jpg Microline 1120 User's Guide 26
icon_forms.jpg 3. Push down and out to remove the paper separator along with the piece on the right side of the printer-toward the front of the printer to the continuous forms symbol. Place the stack of the printer that holds it in place. Loading Continuous Forms, Rear Feed 1. Make sure the printer is turned off. 2. Move the paper lever-on the back of continuous forms paper behind the printer. 4. F4_65.jpg Microline 1120 User's Guide 26
ML1120 User's Guide (English)
Page 27
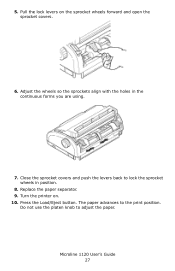
F4-36.jpg 7. Turn the printer on the sprocket wheels forward and open the sprocket covers. F4-35.jpg 6. Adjust the wheels so the sprockets align with the holes in position. 8. Press the Load/Eject button. Replace the paper separator. 9. Microline 1120 User's Guide 27 5. The paper advances to lock the sprocket wheels in the continuous forms you are using. Close the sprocket covers and push the levers back to the print position. Do not use the platen knob to adjust the paper. Pull the lock levers on . 10.
F4-36.jpg 7. Turn the printer on the sprocket wheels forward and open the sprocket covers. F4-35.jpg 6. Adjust the wheels so the sprockets align with the holes in position. 8. Press the Load/Eject button. Replace the paper separator. 9. Microline 1120 User's Guide 27 5. The paper advances to lock the sprocket wheels in the continuous forms you are using. Close the sprocket covers and push the levers back to the print position. Do not use the platen knob to adjust the paper. Pull the lock levers on . 10.
ML1120 User's Guide (English)
Page 28
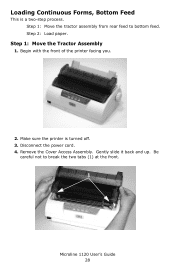
Step 1: Move the Tractor Assembly 1. Disconnect the power cord. 4. Gently slide it back and up. Make sure the printer is a two-step process. Remove the Cover Access Assembly. Be careful not to bottom feed. Loading Continuous Forms, Bottom Feed This is turned off. 3. Step 1: Move the tractor assembly from rear feed to break the two tabs (1) at the front. 1120_bottomfeed_1.jpg 1 Microline 1120 User's Guide 28 Begin with the front of the printer facing you. 1120_cover_shot.jpg 2. Step 2: Load paper.
Step 1: Move the Tractor Assembly 1. Disconnect the power cord. 4. Gently slide it back and up. Make sure the printer is a two-step process. Remove the Cover Access Assembly. Be careful not to bottom feed. Loading Continuous Forms, Bottom Feed This is turned off. 3. Step 1: Move the tractor assembly from rear feed to break the two tabs (1) at the front. 1120_bottomfeed_1.jpg 1 Microline 1120 User's Guide 28 Begin with the front of the printer facing you. 1120_cover_shot.jpg 2. Step 2: Load paper.

ML1120 User's Guide (English)
Page 31
1120_bottomfeed_8.jpg 9. Turn the printer so the back of the printer is facing you. 10. Squeeze the handles (1) to release the clamps [on both sides]. 1120_bottomfeed_11a.jpg 1 1 Microline 1120 User's Guide 31 Remove the tractor assembly.
1120_bottomfeed_8.jpg 9. Turn the printer so the back of the printer is facing you. 10. Squeeze the handles (1) to release the clamps [on both sides]. 1120_bottomfeed_11a.jpg 1 1 Microline 1120 User's Guide 31 Remove the tractor assembly.

ML1120 User's Guide (English)
Page 32
Position the tractor assembly as shown. Turn the printer so the front of the printer. 1120_bottomfeed_12.jpg 11. The gear assembly is facing you. 12. Keep squeezing and lift and rotate the assembly out of the printer is on the right. 1120_bottomfeed_16a.jpg Microline 1120 User's Guide 32
Position the tractor assembly as shown. Turn the printer so the front of the printer. 1120_bottomfeed_12.jpg 11. The gear assembly is facing you. 12. Keep squeezing and lift and rotate the assembly out of the printer is on the right. 1120_bottomfeed_16a.jpg Microline 1120 User's Guide 32

ML1120 User's Guide (English)
Page 36
... paper lever-on the sprocket wheels forward and open the sprocket covers. 6. icon_forms.jpg 4. Pull the lock levers on the right side of the printer-toward the front of the printer to the continuous forms symbol. Bring the paper up through the slot on the bottom of continuous forms paper below the... printer. 17. Adjust the wheels so the sprockets align with the holes in the continuous forms you are using single-part forms, maximum paper weight is ...
... paper lever-on the sprocket wheels forward and open the sprocket covers. 6. icon_forms.jpg 4. Pull the lock levers on the right side of the printer-toward the front of the printer to the continuous forms symbol. Bring the paper up through the slot on the bottom of continuous forms paper below the... printer. 17. Adjust the wheels so the sprockets align with the holes in the continuous forms you are using single-part forms, maximum paper weight is ...
ML1120 User's Guide (English)
Page 37
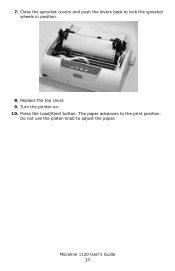
Press the Load/Eject button. Turn the printer on. 10. Do not use the platen knob to lock the sprocket wheels in position. 1120_bottomfeed_26.jpg 8. 7. Microline 1120 User's Guide 37 Close the sprocket covers and push the levers back to adjust the paper. Replace the top cover. 9. The paper advances to the print position.
Press the Load/Eject button. Turn the printer on. 10. Do not use the platen knob to lock the sprocket wheels in position. 1120_bottomfeed_26.jpg 8. 7. Microline 1120 User's Guide 37 Close the sprocket covers and push the levers back to adjust the paper. Replace the top cover. 9. The paper advances to the print position.
ML1120 User's Guide (English)
Page 38
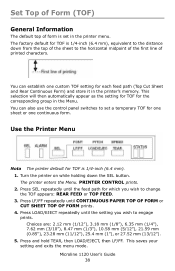
This selection will then automatically appear as the setting for TOF for TOF is 1/4-inch (6.4 mm). 1. Use the Printer Menu panel.jpg Nota The printer default for the corresponding group in the Menu. Press SEL repeatedly until CONTINUOUS PAPER TOP OF FORM or CUT SHEET TOP OF FORM prints. 4. Choices ... TOF setting for which you wish to the distance down the SEL button. Press and hold TEAR, then LOAD/EJECT, then LF/FF. Turn the printer on while holding down from the top of the sheet to the horizontal midpoint of the first line of form is 1/4-inch (6.4 mm), equivalent to...
This selection will then automatically appear as the setting for TOF for TOF is 1/4-inch (6.4 mm). 1. Use the Printer Menu panel.jpg Nota The printer default for the corresponding group in the Menu. Press SEL repeatedly until CONTINUOUS PAPER TOP OF FORM or CUT SHEET TOP OF FORM prints. 4. Choices ... TOF setting for which you wish to the distance down the SEL button. Press and hold TEAR, then LOAD/EJECT, then LF/FF. Turn the printer on while holding down from the top of the sheet to the horizontal midpoint of the first line of form is 1/4-inch (6.4 mm), equivalent to...

ML1120 User's Guide (English)
Page 39
.... 1. In 1/144-inch (0.18 mm) increments: press and hold the LOAD/ EJECT, then press LF/FF. 3. Press SEL to return the printer to the sheet or continuous form loaded into the printer): - In 1/144-inch (0.18 mm) increments: press and hold LOAD/ EJECT, then press LF/FF. - Microline 1120 User's Guide 39... paper retracts further out of printing: a. Send the print job. To move the TOF further up on the page (print paper advances further into the printer when the setting is made. Temporary TOF Use the Control Panel This TOF setting applies only to the on-line state. 4.
.... 1. In 1/144-inch (0.18 mm) increments: press and hold the LOAD/ EJECT, then press LF/FF. 3. Press SEL to return the printer to the sheet or continuous form loaded into the printer): - In 1/144-inch (0.18 mm) increments: press and hold LOAD/ EJECT, then press LF/FF. - Microline 1120 User's Guide 39... paper retracts further out of printing: a. Send the print job. To move the TOF further up on the page (print paper advances further into the printer when the setting is made. Temporary TOF Use the Control Panel This TOF setting applies only to the on-line state. 4.


