
C711WT Safety/Warranty/Regulatory Guide
Page 3
... using an extension cable or power strip ensure that there is 220-240 VAC, 50/60 Hz. (For any covers open , do not touch the fuser unit or print head as directed in accordance with any DC powered product, the figures are read carefully and retained for your product is switched...
... using an extension cable or power strip ensure that there is 220-240 VAC, 50/60 Hz. (For any covers open , do not touch the fuser unit or print head as directed in accordance with any DC powered product, the figures are read carefully and retained for your product is switched...

C711WT Users Guide
Page 5
...Boot menu 55 Maintenance 57 Replacing consumable items 57 Toner cartridge replacement 57 Image drum replacement 60 Replacing the transfer belt unit 63 Fuser replacement 65 Cleaning 67 ...the unit casing 67 ...the LED head 67 ...the paper feed rollers 68 Installing upgrades 69 Memory upgrade... cabinet 73 Troubleshooting 74 Major printer components and paper path 74 Paper sensor error codes 75 Clearing paper jams 76 Specifications 82 Index 83 Oki contact details 84 Contents > 5 Mac OS X 34 Printing multiple pages on one sheet (n-up 35 Windows PostScript 35 Mac OS X...
...Boot menu 55 Maintenance 57 Replacing consumable items 57 Toner cartridge replacement 57 Image drum replacement 60 Replacing the transfer belt unit 63 Fuser replacement 65 Cleaning 67 ...the unit casing 67 ...the LED head 67 ...the paper feed rollers 68 Installing upgrades 69 Memory upgrade... cabinet 73 Troubleshooting 74 Major printer components and paper path 74 Paper sensor error codes 75 Clearing paper jams 76 Specifications 82 Index 83 Oki contact details 84 Contents > 5 Mac OS X 34 Printing multiple pages on one sheet (n-up 35 Windows PostScript 35 Mac OS X...

C711WT Users Guide
Page 10
... OVERVIEW FRONT VIEW 9 1 10 2 11 7 4 6 8 7 12 3 5 1. Holds up to show different languages. (See "Changing the display language" on page 12.) Introduction > 10 Multi purpose tray. Fuser release levers. 11. Paper tray. Also for feeding heavier paper stocks, transparency and transfer media. Standard printed copy delivery point. Menu driven operator controls and...
... OVERVIEW FRONT VIEW 9 1 10 2 11 7 4 6 8 7 12 3 5 1. Holds up to show different languages. (See "Changing the display language" on page 12.) Introduction > 10 Multi purpose tray. Fuser release levers. 11. Paper tray. Also for feeding heavier paper stocks, transparency and transfer media. Standard printed copy delivery point. Menu driven operator controls and...

C711WT Users Guide
Page 44
... > 44 Using the up or down MENU button, identify the parameter as required. 10. Supplies Life Cyan Drum Magenta Drum Yellow Drum White Drum Belt Fuser Cyan Toner Magenta Toner Yellow Toner White Toner Select item to display the total number of the network. Displays the MAC Address of a consumable remaining...
... > 44 Using the up or down MENU button, identify the parameter as required. 10. Supplies Life Cyan Drum Magenta Drum Yellow Drum White Drum Belt Fuser Cyan Toner Magenta Toner Yellow Toner White Toner Select item to display the total number of the network. Displays the MAC Address of a consumable remaining...

C711WT Users Guide
Page 52
... resumes. Are You Sure? Yes/No If No is pressed, the following confirmation message displays. Set LCD panel control at the time of toner, drum, fuser, or belt occurs. Disable: Do not display a near -life warning for your country in Life error is lit when enabled, not lit if disabled. ...Set in Date Format. Display format follows the settings selected in quarter units within the range. From 6 to GMT. Enter the time zone for drum, fuser and belt. Use the Menu up/down buttons to increment/decrement and press the Enter button to set and proceed to enter Admin Setup. Yes...
... resumes. Are You Sure? Yes/No If No is pressed, the following confirmation message displays. Set LCD panel control at the time of toner, drum, fuser, or belt occurs. Disable: Do not display a near -life warning for your country in Life error is lit when enabled, not lit if disabled. ...Set in Date Format. Display format follows the settings selected in quarter units within the range. From 6 to GMT. Enter the time zone for drum, fuser and belt. Use the Menu up/down buttons to increment/decrement and press the Enter button to set and proceed to enter Admin Setup. Yes...

C711WT Users Guide
Page 57
... pack that you have somewhere to place the used in this is a very fine dry powder. WARNING If the printer has been powered on, the fuser will be in four cartridges: one . This area is displayed. To avoid toner wastage and possible toner sensor errors, do spill any residue. CAUTION! Seek...
... pack that you have somewhere to place the used in this is a very fine dry powder. WARNING If the printer has been powered on, the fuser will be in four cartridges: one . This area is displayed. To avoid toner wastage and possible toner sensor errors, do spill any residue. CAUTION! Seek...

C711WT Users Guide
Page 60
Finally, close the top cover and press down firmly at both sides so that the cover latches closed. Press the cover release and open the printer's top cover fully. This area is clearly labelled. IMAGE DRUM REPLACEMENT CAUTION! The printer contains four image drums: white, magenta, yellow and cyan. 1. WARNING! Do not touch. Static sensitive devices, handle with a clean, lint free cloth. 12. If the printer has been powered on, the fuser will be hot. Gently wipe the LED head surface with care. Maintenance > 60 11.
Finally, close the top cover and press down firmly at both sides so that the cover latches closed. Press the cover release and open the printer's top cover fully. This area is clearly labelled. IMAGE DRUM REPLACEMENT CAUTION! The printer contains four image drums: white, magenta, yellow and cyan. 1. WARNING! Do not touch. Static sensitive devices, handle with a clean, lint free cloth. 12. If the printer has been powered on, the fuser will be hot. Gently wipe the LED head surface with care. Maintenance > 60 11.
C711WT Users Guide
Page 63
...The belt unit is essential that the cover latches closed. It is located under the four image drums. Switch off the printer and allow the fuser to cool for any reason, please make sure you remove the image drum unit beforehand and place in the bag provided. Finally, close the top.... This area is to return or transport your printer for about 10 minutes before opening the cover. 1. If the printer has been powered on, the fuser will be hot. This is clearly labelled. a b Maintenance > 63 Note the positions of the printer cavity. 11. WARNING! NOTE: If you need to avoid ...
...The belt unit is essential that the cover latches closed. It is located under the four image drums. Switch off the printer and allow the fuser to cool for any reason, please make sure you remove the image drum unit beforehand and place in the bag provided. Finally, close the top.... This area is to return or transport your printer for about 10 minutes before opening the cover. 1. If the printer has been powered on, the fuser will be hot. This is clearly labelled. a b Maintenance > 63 Note the positions of the printer cavity. 11. WARNING! NOTE: If you need to avoid ...

C711WT Users Guide
Page 65
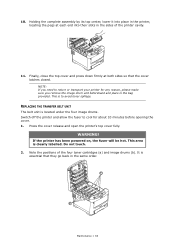
... the top of the unit, and lower the belt unit flat inside the printer. Handle the fuser with the lifting bar at the front and the drive gear towards the rear of the printer... in place. 9. Finally, close the top cover and press down firmly at least 10 minutes for the fuser to the touch. a a 8. This will only be very hot. Locate the drive gear into the gear... inside the printer just behind the four image drum units. 7. FUSER REPLACEMENT The fuser is located inside the printer by its handle, which will secure the belt unit in doubt, switch the...
... the top of the unit, and lower the belt unit flat inside the printer. Handle the fuser with the lifting bar at the front and the drive gear towards the rear of the printer... in place. 9. Finally, close the top cover and press down firmly at least 10 minutes for the fuser to the touch. a a 8. This will only be very hot. Locate the drive gear into the gear... inside the printer just behind the four image drum units. 7. FUSER REPLACEMENT The fuser is located inside the printer by its handle, which will secure the belt unit in doubt, switch the...

C711WT Users Guide
Page 66
...it is still warm, place it on a flat surface which separates the fuser area from its handle (a), lift the fuser straight up and out of the printer so that the cover latches closed. b 9. Maintenance > 66 Holding the fuser by heat. 5. The retaining levers (b) should be fully upright, and the...and remove the transit material. 6. Pull the two fuser retaining levers (b) towards the rear of the printer to lock the fuser in the metal partition which will not be towards you. Remove the new fuser from the image drums. 8. Lower the fuser into the printer, locating the two lugs (c) ...
...it is still warm, place it on a flat surface which separates the fuser area from its handle (a), lift the fuser straight up and out of the printer so that the cover latches closed. b 9. Maintenance > 66 Holding the fuser by heat. 5. The retaining levers (b) should be fully upright, and the...and remove the transit material. 6. Pull the two fuser retaining levers (b) towards the rear of the printer to lock the fuser in the metal partition which will not be towards you. Remove the new fuser from the image drums. 8. Lower the fuser into the printer, locating the two lugs (c) ...

C711WT Users Guide
Page 69
... an additional memory board of 256MB or 512MB, giving a maximum total memory capacity of main memory. If the printer has been powered on recently, the fuser will be upgraded with 256MB of 768MB. 1. This can be hot. Do not touch. 3. Installing upgrades > 69 WARNING! Switch the printer off and disconnect the...
... an additional memory board of 256MB or 512MB, giving a maximum total memory capacity of main memory. If the printer has been powered on recently, the fuser will be upgraded with 256MB of 768MB. 1. This can be hot. Do not touch. 3. Installing upgrades > 69 WARNING! Switch the printer off and disconnect the...

C711WT Users Guide
Page 74
... due to clear them quickly and simply. Face-up stacker. 2. These must also be stopped somewhere along the path. Top cover. 7 8 5. Paper exit. 3. Front cover. 7. Fuser unit 4. TROUBLESHOOTING Provided that , having cleared an obvious sheet, others will not also be removed in order to clear the jam fully and restore normal...
... due to clear them quickly and simply. Face-up stacker. 2. These must also be stopped somewhere along the path. Top cover. 7 8 5. Paper exit. 3. Front cover. 7. Fuser unit 4. TROUBLESHOOTING Provided that , having cleared an obvious sheet, others will not also be removed in order to clear the jam fully and restore normal...

C711WT Users Guide
Page 76
... go back in the same order. Note the positions of the four toner cartridges (a) and image drums (b). If the printer has been powered on, the fuser will be hot. It can be removed from the rear later. 2. Troubleshooting > 76 Do not touch. 3.
... go back in the same order. Note the positions of the four toner cartridges (a) and image drums (b). If the printer has been powered on, the fuser will be hot. It can be removed from the rear later. 2. Troubleshooting > 76 Do not touch. 3.

C711WT Users Guide
Page 78
Do not use any sharp or abrasive objects to release the fuser's grip on any sheets of paper are visible on the sheet, and withdraw the sheet Troubleshooting > 78 This may damage the belt surface. (a) To remove a ... belt (b), carefully separate the sheet from the belt surface and withdraw the sheet. (c) To remove a sheet just entering the fuser (c), separate the trailing edge of the sheet from the belt, push the fuser pressure release lever (d) towards the front and down to separate sheets from the belt and pull it forwards into...
Do not use any sharp or abrasive objects to release the fuser's grip on any sheets of paper are visible on the sheet, and withdraw the sheet Troubleshooting > 78 This may damage the belt surface. (a) To remove a ... belt (b), carefully separate the sheet from the belt surface and withdraw the sheet. (c) To remove a sheet just entering the fuser (c), separate the trailing edge of the sheet from the belt, push the fuser pressure release lever (d) towards the front and down to separate sheets from the belt and pull it forwards into...

C711WT Users Guide
Page 79
g (f) Replace fuser unit into the fuser (only a short length is well advanced into the machine and move locking levers (e) toward the rear of the printer to rise again. e f e (e) Press release lever (g) and pull the trapped paper from the fuser. Withdraw the fuser unit using the handle (f). e Troubleshooting > 79 through the drum cavity area. Then allow the pressure release lever to release the fuser. d NOTE If the sheet is still visible), do not attempt to pull it back. (d) To remove a sheet in the fuser, push the two retaining levers (e) towards the rear of the machine.
g (f) Replace fuser unit into the fuser (only a short length is well advanced into the machine and move locking levers (e) toward the rear of the printer to rise again. e f e (e) Press release lever (g) and pull the trapped paper from the fuser. Withdraw the fuser unit using the handle (f). e Troubleshooting > 79 through the drum cavity area. Then allow the pressure release lever to release the fuser. d NOTE If the sheet is still visible), do not attempt to pull it back. (d) To remove a sheet in the fuser, push the two retaining levers (e) towards the rear of the machine.

C711WT Users Guide
Page 80
Lower the top cover but do not press down on the fuser pressure release lever (d). In this case raise the top cover, reach around and press down to locate them in the correct order. i h > Pull out any ... sides of the printer cavity. 9. Open the rear exit tray (h) and check for jammed sheets. 10. Starting with the white image drum unit nearest the fuser, replace the four image drums into the drum cavity, making sure to latch it into place in the printer, locating the pegs at each end...
Lower the top cover but do not press down on the fuser pressure release lever (d). In this case raise the top cover, reach around and press down to locate them in the correct order. i h > Pull out any ... sides of the printer cavity. 9. Open the rear exit tray (h) and check for jammed sheets. 10. Starting with the white image drum unit nearest the fuser, replace the four image drums into the drum cavity, making sure to latch it into place in the printer, locating the pegs at each end...

C711WT Users Guide
Page 83
... 29 Windows 30 Cover page 31 Cover print different cover page ......... 32 Custom page size general 33 Windows 38 Windows PS 33 E Envelopes loading 18 F Fuser how to replace 65 I Image drum how to replace 60 M Maintenance menu 55 Major printer components and paper path 74 Menu functions 42 Menus factory...
... 29 Windows 30 Cover page 31 Cover print different cover page ......... 32 Custom page size general 33 Windows 38 Windows PS 33 E Envelopes loading 18 F Fuser how to replace 65 I Image drum how to replace 60 M Maintenance menu 55 Major printer components and paper path 74 Menu functions 42 Menus factory...


