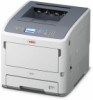
B721dn/B731dn/MPS5501b Safety/Warranty/Regulatory Guide
Page 2
... replaced. Here are following the operating instructions. 2 - Use only a damp cloth; For further information please contact Oki Data at 1-800-OKI-DATA or WWW.OKIPRINTINGSOLUTIONS.COM. • Your printer has a grounded, three-prong plug as a rug, sofa, or cushion, the vents may be blocked, causing...it . Do not spill liquid of direct sunlight. • Always use an adapter to water. • The printer has been dropped, or the cabinet is replaced by qualified Oki Data technicians. Do not use this product to the instructions. • Aside from overheating. Dispose of the...
... replaced. Here are following the operating instructions. 2 - Use only a damp cloth; For further information please contact Oki Data at 1-800-OKI-DATA or WWW.OKIPRINTINGSOLUTIONS.COM. • Your printer has a grounded, three-prong plug as a rug, sofa, or cushion, the vents may be blocked, causing...it . Do not spill liquid of direct sunlight. • Always use an adapter to water. • The printer has been dropped, or the cabinet is replaced by qualified Oki Data technicians. Do not use this product to the instructions. • Aside from overheating. Dispose of the...
B721dn/B731dn/MPS5501b Safety/Warranty/Regulatory Guide
Page 7
... are designed to Part 15 of this device. Regulatory Information ENERGY STAR® As an ENERGY STAR Partner, Oki Data has determined that these printers meet the ENERGY STAR guidelines for use within certain voltage limits. Look for help. Year 2000 Compliance This product...this equipment does cause harmful interference to radio or television reception, which the receiver is Year 2000 Compliant. Product Identification Product Name B721dn, 120V B721dn, 230V B731dn, 120V B731dn, 230V MPS5501b, 120V MPS5501b, 230V Model Name N22300A N22300B N22300A N22300B N22300A N22300B 2. Laurel, ...
... are designed to Part 15 of this device. Regulatory Information ENERGY STAR® As an ENERGY STAR Partner, Oki Data has determined that these printers meet the ENERGY STAR guidelines for use within certain voltage limits. Look for help. Year 2000 Compliance This product...this equipment does cause harmful interference to radio or television reception, which the receiver is Year 2000 Compliant. Product Identification Product Name B721dn, 120V B721dn, 230V B731dn, 120V B731dn, 230V MPS5501b, 120V MPS5501b, 230V Model Name N22300A N22300B N22300A N22300B N22300A N22300B 2. Laurel, ...
B721dn/B731dn/MPS5501 RAM installation instructions (E/F/S/P)
Page 1
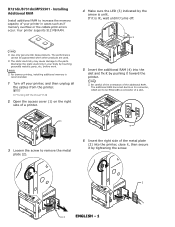
... grounded metallic parts, etc. Note � Be careful of the orientation of the metal plate (2) into the printer. Reference � "Turning Off the Power" P.29 2 Open the access cover (1) on its connector, 1 4 3...to increase the memory capacity of a printer. 5 Insert the additional RAM (4) into the printer, close it, then secure it turns off your printer, and then unplug all the cables from the printer. before work. B721dn/B731dn/MPS5501 - Your printer supports 512 MB RAM. 4 Make ... arrow is recommended. 1 Turn off . 3 Note � Use only genuine Oki Data products.
... grounded metallic parts, etc. Note � Be careful of the orientation of the metal plate (2) into the printer. Reference � "Turning Off the Power" P.29 2 Open the access cover (1) on its connector, 1 4 3...to increase the memory capacity of a printer. 5 Insert the additional RAM (4) into the printer, close it, then secure it turns off your printer, and then unplug all the cables from the printer. before work. B721dn/B731dn/MPS5501 - Your printer supports 512 MB RAM. 4 Make ... arrow is recommended. 1 Turn off . 3 Note � Use only genuine Oki Data products.
B721dn/B731dn/MPS5501 RAM installation instructions (E/F/S/P)
Page 2
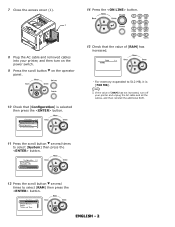
... expanded to select [RAM] then press the button. 7 Close the access cover (1). 1 14 Press the button. 8 Plug the AC cable and removed cables into your printer and unplug the AC cable and all the cables, and then reinstall the additional RAM. 11 Press the scroll button several times to select [System... several times to 512 MB, it is selected then press the button. 13 Check that the value of [RAM] has not increased, turn off your printer, and then turn on the power switch. 9 Press the scroll button on the operator panel. 10 Check that [ ] is [768 MB].
... expanded to select [RAM] then press the button. 7 Close the access cover (1). 1 14 Press the button. 8 Plug the AC cable and removed cables into your printer and unplug the AC cable and all the cables, and then reinstall the additional RAM. 11 Press the scroll button several times to select [System... several times to 512 MB, it is selected then press the button. 13 Check that the value of [RAM] has not increased, turn off your printer, and then turn on the power switch. 9 Press the scroll button on the operator panel. 10 Check that [ ] is [768 MB].


