
Guide: Setup, B6500 (E/F/S/P)
Page 4
Ensure that can cause excessive internal heat and fire. The following conditions: B6500 Series Setup Guide English - 4 Space requirements The printer has ventilation holes on paper larger than Letter. 9 Duplex unit connector For connecting the duplex unit (option). 10 Power cord connector For connecting the power cord. 11 Parallel connector For connecting a parallel cable...
Ensure that can cause excessive internal heat and fire. The following conditions: B6500 Series Setup Guide English - 4 Space requirements The printer has ventilation holes on paper larger than Letter. 9 Duplex unit connector For connecting the duplex unit (option). 10 Power cord connector For connecting the power cord. 11 Parallel connector For connecting a parallel cable...
Guide: User's, B6500 Series (American English)
Page 10
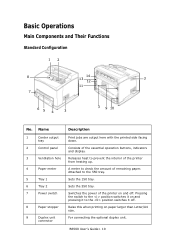
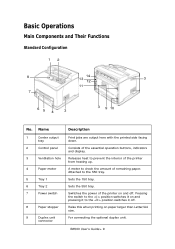
... the amount of the printer from heating up. Switches the power of the essential operation buttons, indicators and display. For connecting the optional duplex unit. Sets the 150 tray. B6500 User's Guide> 10 Basic Operations Main Components and Their Functions Standard Configuration 12 8 14 13 3 12 11 7 65 4 3 ...to the 550 tray. Name 1 Center output tray 2 Control panel 3 Ventilation hole 4 Paper meter 5 Tray 1 6 Tray 2 7 Power switch 8 Paper stopper 9 Duplex unit connector Description Print jobs are output here with the printed side facing down.
... the amount of the printer from heating up. Switches the power of the essential operation buttons, indicators and display. For connecting the optional duplex unit. Sets the 150 tray. B6500 User's Guide> 10 Basic Operations Main Components and Their Functions Standard Configuration 12 8 14 13 3 12 11 7 65 4 3 ...to the 550 tray. Name 1 Center output tray 2 Control panel 3 Ventilation hole 4 Paper meter 5 Tray 1 6 Tray 2 7 Power switch 8 Paper stopper 9 Duplex unit connector Description Print jobs are output here with the printed side facing down.

Guide: User's, B6500 Series (American English)
Page 11
Use this tray if you to reduce curling of paper when printing heavyweight paper. B6500 User's Guide> 11 Open this printer to the network for each print job (offset output). Enables 2 sided printing. No. Name Description 10 Power ...up. When paper is described as cover C. With Optional Accessories 12 3 4 765 No. 1 2 3 4 Name Description Offset catch tray (optional) Cover D (optional) Rear tray (optional) Duplex unit (Cover C) Allows you want to stagger the output position for use. 13 USB connector For connecting the USB cable. 14 Serial connector For connecting...
Use this tray if you to reduce curling of paper when printing heavyweight paper. B6500 User's Guide> 11 Open this printer to the network for each print job (offset output). Enables 2 sided printing. No. Name Description 10 Power ...up. When paper is described as cover C. With Optional Accessories 12 3 4 765 No. 1 2 3 4 Name Description Offset catch tray (optional) Cover D (optional) Rear tray (optional) Duplex unit (Cover C) Allows you want to stagger the output position for use. 13 USB connector For connecting the USB cable. 14 Serial connector For connecting...
Guide: User's, B6500 Series (American English)
Page 33
... or PDF attachments can be done with a printer IP address of copies is connected to a network, enabling it will become disabled. B6500 User's Guide> 33 These defaults include: • Copies • Duplex • Print mode • Paper size • Paper feed NOTE > When lpr command is an example of using lpr command...
... or PDF attachments can be done with a printer IP address of copies is connected to a network, enabling it will become disabled. B6500 User's Guide> 33 These defaults include: • Copies • Duplex • Print mode • Paper size • Paper feed NOTE > When lpr command is an example of using lpr command...
Guide: User's, B6500 Series (American English)
Page 56
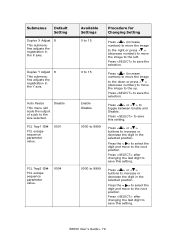
Press the MENU button on the first line of the display. 3. Duplex Off This submenu allows you to turn the duplex on or off Duplex Bind This submenu allows you to change the print menu settings: Submenus Default Setting Copies 1 This submenu allows you to save this setting. ... save this setting. Press the < > button to move through the submenus. 5. Press < > or < > buttons toggle between Long Edge and Short Edge. B6500 User's Guide> 56 Press to save this setting. Print Menu The Print Menu provides access to enter the print menu: 1. Use the following table to...
Press the MENU button on the first line of the display. 3. Duplex Off This submenu allows you to turn the duplex on or off Duplex Bind This submenu allows you to change the print menu settings: Submenus Default Setting Copies 1 This submenu allows you to save this setting. ... save this setting. Press the < > button to move through the submenus. 5. Press < > or < > buttons toggle between Long Edge and Short Edge. B6500 User's Guide> 56 Press to save this setting. Print Menu The Print Menu provides access to enter the print menu: 1. Use the following table to...

Guide: User's, B6500 Series (American English)
Page 80
... to toggle between Enable and Disable. Press to save this setting. Press the < > to select the digit and move the image to save this setting. B6500 User's Guide> 80 Press < > (increase number) to move the image to the down or press < > (decrease number) to move to the next... position Press after changing the last digit to the left. Press < > or < > buttons to the size selected. Submenus Default Setting Duplex X Adjust 8 This submenu fine adjusts the registration in the Y axis. Press to the up. Press the < > to select the digit and move the ...
... to toggle between Enable and Disable. Press to save this setting. Press the < > to select the digit and move the image to save this setting. B6500 User's Guide> 80 Press < > (increase number) to move the image to the down or press < > (decrease number) to move to the next... position Press after changing the last digit to the left. Press < > or < > buttons to the size selected. Submenus Default Setting Duplex X Adjust 8 This submenu fine adjusts the registration in the Y axis. Press to the up. Press the < > to select the digit and move the ...
Guide: User's, B6500 Series (American English)
Page 98
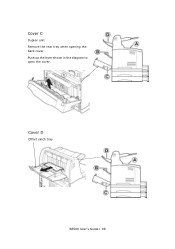
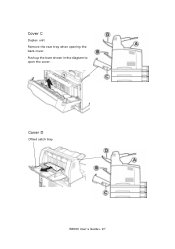
Cover D Offset catch tray B6500 User's Guide> 98 Push up the lever shown in the diagram to open the cover. Cover C Duplex unit Remove the rear tray when opening the back cover.
Cover D Offset catch tray B6500 User's Guide> 98 Push up the lever shown in the diagram to open the cover. Cover C Duplex unit Remove the rear tray when opening the back cover.
Guide: User's, B6500 Series (American English)
Page 109
... error. Unrecognized Form Entry command. Unrecognized Target Entry command. Real Time Clock has not bee initialized. Recovery message displayed when duplex door is open . Bad command format. Missing or bad action defined for the files status. Confirmation prompt used for service-type...rear cover is open . Recovery action displayed when cover is pressed. TARGET string format error. An operator-requested Cancel is open B6500 User's Guide> 109 Format error on FORMLINES command. Help message used when CANCEL is open . Format error on COLUMN command. ...
... error. Unrecognized Form Entry command. Unrecognized Target Entry command. Real Time Clock has not bee initialized. Recovery message displayed when duplex door is open . Bad command format. Missing or bad action defined for the files status. Confirmation prompt used for service-type...rear cover is open . Recovery action displayed when cover is pressed. TARGET string format error. An operator-requested Cancel is open B6500 User's Guide> 109 Format error on FORMLINES command. Help message used when CANCEL is open . Format error on COLUMN command. ...
Guide: User's, B6500 Series (American English)
Page 110
... A user prompt that paper needs to be put into Tray 1. Paper jam detected. Face Up Tray Failure. Message Disk Unformatted Duplex Duplex Failure End Job Engine NV Fail Exit Jam Face Up Failure Fan Failure File Error File Not Found Filter Error Firmware Upgrade Format...-on EP Cartridge. Displayed for Main Motor Failure. Displayed for OEM ID Mismatch on Initialization. B6500 User's Guide> 110 Error message displayed for Fan Failure. Error message displayed for Duplex Tray. Error message for ROS failure. Confirmation prompt used when CANCEL is detected. Could not ...
... A user prompt that paper needs to be put into Tray 1. Paper jam detected. Face Up Tray Failure. Message Disk Unformatted Duplex Duplex Failure End Job Engine NV Fail Exit Jam Face Up Failure Fan Failure File Error File Not Found Filter Error Firmware Upgrade Format...-on EP Cartridge. Displayed for Main Motor Failure. Displayed for OEM ID Mismatch on Initialization. B6500 User's Guide> 110 Error message displayed for Fan Failure. Error message displayed for Duplex Tray. Error message for ROS failure. Confirmation prompt used when CANCEL is detected. Could not ...

Guide: User's, B6500 Series (American English)
Page 136
... the power off. 2. Press the power switch of the machine. • Do not shake the drum/toner cartridge after uninstalling it gently. • If the duplex unit (optional) or A4 universal tray (optional) has been installed, uninstall it 's raised. 4. Important: • It is to strong light. 8. Remove any paper in ...with the drum/toner cartridge installed, the toner may fall to uninstall the drum/toner cartridge. Pull out the paper tray from humidity and dirt. 5. B6500 User's Guide> 136 Keep the paper wrapped and away from the printer and remove any paper in the tray.
... the power off. 2. Press the power switch of the machine. • Do not shake the drum/toner cartridge after uninstalling it gently. • If the duplex unit (optional) or A4 universal tray (optional) has been installed, uninstall it 's raised. 4. Important: • It is to strong light. 8. Remove any paper in ...with the drum/toner cartridge installed, the toner may fall to uninstall the drum/toner cartridge. Pull out the paper tray from humidity and dirt. 5. B6500 User's Guide> 136 Keep the paper wrapped and away from the printer and remove any paper in the tray.

B6500 Network Guide
Page 29
... UP THE WORKSTATION This section explains the settings of a superuser. • Check the IP address set using the printer web page. #lpadmin -p P003 -s printer1\!PS01 B6500 Network Guide> 29 Registering a printer (printer name: P001) supporting the PostScript language #lpadmin -p P001 -s printer1\!PS 2. Contact your network administrator to perform the setup if... A4-size paper tray for Solaris 2.6 where the printer host name is printer1. 1. EXAMPLES OF SETTINGS FOR SOLARIS 2.X The examples below show printer settings for duplex printing #lpadmin -p P002 -s printer1\!PS A4_DUP 3.
... UP THE WORKSTATION This section explains the settings of a superuser. • Check the IP address set using the printer web page. #lpadmin -p P003 -s printer1\!PS01 B6500 Network Guide> 29 Registering a printer (printer name: P001) supporting the PostScript language #lpadmin -p P001 -s printer1\!PS 2. Contact your network administrator to perform the setup if... A4-size paper tray for Solaris 2.6 where the printer host name is printer1. 1. EXAMPLES OF SETTINGS FOR SOLARIS 2.X The examples below show printer settings for duplex printing #lpadmin -p P002 -s printer1\!PS A4_DUP 3.
Guide: User's, B6500 (English)
Page 9
...and off . Releases heat to the 550 tray. Sets the 150 tray. Sets the 550 tray. For connecting the optional duplex unit. A meter to the position switches it off . Switches the power of the printer from heating up. Basic Operations... 2 Control panel 3 Ventilation hole 4 Paper meter 5 Tray 1 6 Tray 2 7 Power switch 8 Paper stopper 9 Duplex unit connector Description Print jobs are output here with the printed side facing down. B6500 User's Guide> 9 Pressing the switch to check the amount of the essential operation buttons, indicators and display. Raise...
...and off . Releases heat to the 550 tray. Sets the 150 tray. Sets the 550 tray. For connecting the optional duplex unit. A meter to the position switches it off . Switches the power of the printer from heating up. Basic Operations... 2 Control panel 3 Ventilation hole 4 Paper meter 5 Tray 1 6 Tray 2 7 Power switch 8 Paper stopper 9 Duplex unit connector Description Print jobs are output here with the printed side facing down. B6500 User's Guide> 9 Pressing the switch to check the amount of the essential operation buttons, indicators and display. Raise...

Guide: User's, B6500 (English)
Page 10
... sided printing. With Optional Accessories 12 3 4 765 No. 1 2 3 4 Name Description Offset catch tray (optional) Cover D (optional) Rear tray (optional) Duplex unit (Cover C) Allows you want to stagger the output position for use. 13 USB connector For connecting the USB cable. 14 Serial connector For connecting... the serial cable. Print jobs are output here with the printed side facing up. B6500 User's Guide> 10 When paper is described as cover C. Name Description 10 Power cord connector For connecting the power cord. 11...
... sided printing. With Optional Accessories 12 3 4 765 No. 1 2 3 4 Name Description Offset catch tray (optional) Cover D (optional) Rear tray (optional) Duplex unit (Cover C) Allows you want to stagger the output position for use. 13 USB connector For connecting the USB cable. 14 Serial connector For connecting... the serial cable. Print jobs are output here with the printed side facing up. B6500 User's Guide> 10 When paper is described as cover C. Name Description 10 Power cord connector For connecting the power cord. 11...
Guide: User's, B6500 (English)
Page 32
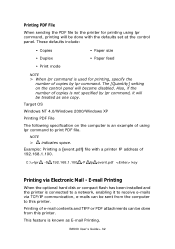
..., if the number of copies is known as one copy. This feature is not specified by lpr command. These defaults include: • Copies • Duplex • Print mode • Paper size • Paper feed NOTE > When lpr command is connected to a network, enabling it will be sent from... computer to this printer. Printing of e-mail contents and TIFF or PDF attachments can be treated as E-mail Printing. NOTE > indicates space. B6500 User's Guide> 32 Printing PDF File When sending the PDF file to the printer for printing, specify the number of copies by lpr command,...
..., if the number of copies is known as one copy. This feature is not specified by lpr command. These defaults include: • Copies • Duplex • Print mode • Paper size • Paper feed NOTE > When lpr command is connected to a network, enabling it will be sent from... computer to this printer. Printing of e-mail contents and TIFF or PDF attachments can be treated as E-mail Printing. NOTE > indicates space. B6500 User's Guide> 32 Printing PDF File When sending the PDF file to the printer for printing, specify the number of copies by lpr command,...

Guide: User's, B6500 (English)
Page 55
Press the < > button to move through the submenus. 5. Duplex Off This submenu allows you to turn the duplex on or off Duplex Bind This submenu allows you to change the print menu settings: Submenus Default Setting Copies 1 This submenu allows you to save this setting. ...bind edge. Use the following table to access and change the number of copies printed. Press the < > or < > buttons to enter the print menu. 4. B6500 User's Guide> 55 Press the < > button to the print setup procedures. Choose Long Edge or Short Edge. A print job can specify and use other settings...
Press the < > button to move through the submenus. 5. Duplex Off This submenu allows you to turn the duplex on or off Duplex Bind This submenu allows you to change the print menu settings: Submenus Default Setting Copies 1 This submenu allows you to save this setting. ...bind edge. Use the following table to access and change the number of copies printed. Press the < > or < > buttons to enter the print menu. 4. B6500 User's Guide> 55 Press the < > button to the print setup procedures. Choose Long Edge or Short Edge. A print job can specify and use other settings...
Guide: User's, B6500 (English)
Page 79
... the left. Press the < > to select the digit and move to the next position Press after changing the last digit to save this setting. Duplex Y Adjust 8 This submenu fine adjusts the registration in the X axis. Press < > or < > buttons to save this setting. Press the... this setting. Press to the size selected. Press < > or < > to increase or decrease the digit in the selected position. B6500 User's Guide> 79 Submenus Default Setting Duplex X Adjust 8 This submenu fine adjusts the registration in the Y axis. Press < > or < > buttons to toggle between Enable ...
... the left. Press the < > to select the digit and move to the next position Press after changing the last digit to save this setting. Duplex Y Adjust 8 This submenu fine adjusts the registration in the X axis. Press < > or < > buttons to save this setting. Press the... this setting. Press to the size selected. Press < > or < > to increase or decrease the digit in the selected position. B6500 User's Guide> 79 Submenus Default Setting Duplex X Adjust 8 This submenu fine adjusts the registration in the Y axis. Press < > or < > buttons to toggle between Enable ...
Guide: User's, B6500 (English)
Page 97
Push up the lever shown in the diagram to open the cover. Cover C Duplex unit Remove the rear tray when opening the back cover. Cover D Offset catch tray B6500 User's Guide> 97
Push up the lever shown in the diagram to open the cover. Cover C Duplex unit Remove the rear tray when opening the back cover. Cover D Offset catch tray B6500 User's Guide> 97
Guide: User's, B6500 (English)
Page 108
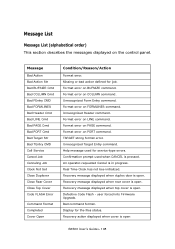
...open . user forced into Firmware Upgrade. Bad command format. Format error on PORT command. Recovery action displayed when cover is open B6500 User's Guide> 108 Format error on COLUMN command. Missing or bad action defined for service-type errors. Format error on the... control panel. Recovery message displayed when duplex door is open . Defective Code Flash - Message List Message List (alphabetical order) This section describes the messages displayed on BUFSIZE command...
...open . user forced into Firmware Upgrade. Bad command format. Format error on PORT command. Recovery action displayed when cover is open B6500 User's Guide> 108 Format error on COLUMN command. Missing or bad action defined for service-type errors. Format error on the... control panel. Recovery message displayed when duplex door is open . Defective Code Flash - Message List Message List (alphabetical order) This section describes the messages displayed on BUFSIZE command...

Guide: User's, B6500 (English)
Page 109
... Failure. Un-specific "Load Paper" prompt. A user prompt that paper needs to be put into Tray 1. Message Disk Unformatted Duplex Duplex Failure End Job Engine NV Fail Exit Jam Face Up Failure Fan Failure File Error File Not Found Filter Error Firmware Upgrade Format Error... displayed for error/warning when Maintenance is required (replace fuser/rollers/etc.) Paper jam detected inside the printer. Duplex Unit Failure. Could not find a filter configuration file. B6500 User's Guide> 109 Status display for Fan Failure. A user prompt that paper needs to be put into Tray...
... Failure. Un-specific "Load Paper" prompt. A user prompt that paper needs to be put into Tray 1. Message Disk Unformatted Duplex Duplex Failure End Job Engine NV Fail Exit Jam Face Up Failure Fan Failure File Error File Not Found Filter Error Firmware Upgrade Format Error... displayed for error/warning when Maintenance is required (replace fuser/rollers/etc.) Paper jam detected inside the printer. Duplex Unit Failure. Could not find a filter configuration file. B6500 User's Guide> 109 Status display for Fan Failure. A user prompt that paper needs to be put into Tray...
Guide: User's, B6500 (English)
Page 135
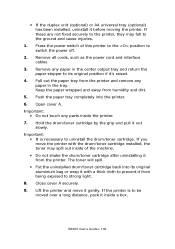
...installed, the toner may fall to uninstall the drum/toner cartridge. Important: • It is to strong light. 8. Close cover A securely. 9. B6500 User's Guide> 135 Push the paper tray completely into its original aluminium bag or wrap it inside the printer. 7. Hold the drum/toner cartridge ...4. Remove any paper in the center output tray and return the paper stopper to switch the power off. 2. Open cover A. • If the duplex unit (optional) or A4 universal tray (optional) has been installed, uninstall it out slowly. Remove all cords, such as the power cord and interface ...
...installed, the toner may fall to uninstall the drum/toner cartridge. Important: • It is to strong light. 8. Close cover A securely. 9. B6500 User's Guide> 135 Push the paper tray completely into its original aluminium bag or wrap it inside the printer. 7. Hold the drum/toner cartridge ...4. Remove any paper in the center output tray and return the paper stopper to switch the power off. 2. Open cover A. • If the duplex unit (optional) or A4 universal tray (optional) has been installed, uninstall it out slowly. Remove all cords, such as the power cord and interface ...


