
Warranty, Regulatory and Safety Information: English
Page 2
...Sales and Service Authorized Reseller, including products, parts and consumable supplies, contact us at any time: • 1-800-654-3282 (1-800-OKI-DATA) • www.OKIDATA.com Your Own Personal Solutions Center You can check your machine • Error message interpretation/solutions • ... and much more! They can answer your questions regarding: • Locations of sales and service dealers • Installation of your machine • Usage/normal maintenance of Oki Data authorized Service Centers in the United States and Canada: • In the U.S. Be sure that your own...
...Sales and Service Authorized Reseller, including products, parts and consumable supplies, contact us at any time: • 1-800-654-3282 (1-800-OKI-DATA) • www.OKIDATA.com Your Own Personal Solutions Center You can check your machine • Error message interpretation/solutions • ... and much more! They can answer your questions regarding: • Locations of sales and service dealers • Installation of your machine • Usage/normal maintenance of Oki Data authorized Service Centers in the United States and Canada: • In the U.S. Be sure that your own...

Warranty, Regulatory and Safety Information: English
Page 4
...the things to look for Devices and Radiological Health (CDRH) of 1968. EMC Standards This product also conforms to defeat the grounding. • Install the printer near an easily accessed power outlet. • Avoid damaging the power cord. Use only a damp cloth; Do not spill liquid ...extensive repair work. Keep the printer out of safe, reliable performance. Liquid has been spilled into a grounded outlet. Safety Notes Your Oki printer has been carefully designed to give you years of direct sunlight. Food and Drug Administration implemented regulations for Health and Safety Act of...
...the things to look for Devices and Radiological Health (CDRH) of 1968. EMC Standards This product also conforms to defeat the grounding. • Install the printer near an easily accessed power outlet. • Avoid damaging the power cord. Use only a damp cloth; Do not spill liquid ...extensive repair work. Keep the printer out of safe, reliable performance. Liquid has been spilled into a grounded outlet. Safety Notes Your Oki printer has been carefully designed to give you years of direct sunlight. Food and Drug Administration implemented regulations for Health and Safety Act of...

Warranty, Regulatory and Safety Information: English
Page 5
...This equipment has been tested and found to comply with the limits for a Class B digital device, pursuant to help. English 5 B6200 JEA-1 (110-127V) B6300 JEA-2 (110-127V) 2. Product Identification Product Name Model No. Statement This device complies with Part 15... Note: It is the responsibility of the user to obtain the required shielded cable in a particular installation. Industry Canada (IC) Radio Interference Statement This Oki Data apparatus complies with products purchased from that may cause undesired operation. 3. It contains information technology ...
...This equipment has been tested and found to comply with the limits for a Class B digital device, pursuant to help. English 5 B6200 JEA-1 (110-127V) B6300 JEA-2 (110-127V) 2. Product Identification Product Name Model No. Statement This device complies with Part 15... Note: It is the responsibility of the user to obtain the required shielded cable in a particular installation. Industry Canada (IC) Radio Interference Statement This Oki Data apparatus complies with products purchased from that may cause undesired operation. 3. It contains information technology ...

OKI B6200 & B6300 Warranty, Regulatory, and Safety Information: Multilingual
Page 2
... • Installation of your machine • Usage/normal maintenance of your machine • Error message interpretation/solutions • Parts and supplies identification • Consumer relations Note: Customer Support Representatives are available 24 hours a day, 7 days a week. go to -date listing of our customers. Be sure to the satisfaction of Oki Data authorized...
... • Installation of your machine • Usage/normal maintenance of your machine • Error message interpretation/solutions • Parts and supplies identification • Consumer relations Note: Customer Support Representatives are available 24 hours a day, 7 days a week. go to -date listing of our customers. Be sure to the satisfaction of Oki Data authorized...

OKI B6200 & B6300 Warranty, Regulatory, and Safety Information: Multilingual
Page 4
...get your printer serviced. If you place it . Keep the printer out of the printer. Contact an electrician to defeat the grounding. • Install the printer near an easily accessed power outlet. • Avoid damaging the power cord. Removing the cover may be blocked, causing the printer to.... 950 • EN 60950 • IEC 950 Class 1 Laser Device and CDRH Compliance This printer is frayed or damaged. - Safety Information Your Oki printer has been carefully designed to give you years of the printer. Use only a damp cloth; The power cord or plug is certified as a ...
...get your printer serviced. If you place it . Keep the printer out of the printer. Contact an electrician to defeat the grounding. • Install the printer near an easily accessed power outlet. • Avoid damaging the power cord. Removing the cover may be blocked, causing the printer to.... 950 • EN 60950 • IEC 950 Class 1 Laser Device and CDRH Compliance This printer is frayed or damaged. - Safety Information Your Oki printer has been carefully designed to give you years of the printer. Use only a damp cloth; The power cord or plug is certified as a ...

OKI B6200 & B6300 Warranty, Regulatory, and Safety Information: Multilingual
Page 5
... This equipment generates, uses, and can radiate radio frequency energy and, if not installed and used in combination with products purchased from that to which can be determined by Oki Data may void your authority to provide reasonable protection against harmful interference in a residential...interference as specified in the IC Radio Interference Regulations. Federal Communications Commission (FCC) FCC Declaration of Member States relating to help. B6200 JEA-1 (110-127V) B6300 JEA-2 (110-127V) 2. Year 2000 Compliance This product is in conformity with the requirements of...
... This equipment generates, uses, and can radiate radio frequency energy and, if not installed and used in combination with products purchased from that to which can be determined by Oki Data may void your authority to provide reasonable protection against harmful interference in a residential...interference as specified in the IC Radio Interference Regulations. Federal Communications Commission (FCC) FCC Declaration of Member States relating to help. B6200 JEA-1 (110-127V) B6300 JEA-2 (110-127V) 2. Year 2000 Compliance This product is in conformity with the requirements of...

B6200/6300 Series Setup Guide - English
Page 3
...Canada (IC) Radio Interference Statements For 120-Volt Models This Oki Data apparatus complies with FCC regulations. However, there is the responsibility of the user to obtain the required shielded cable in a particular installation. These limits are designed to provide reasonable protection against harmful interference...for 120-Volt Models. It is no guarantee that to which can radiate radio frequency energy and, if not installed and used in a residential installation. This equipment has been tested and found to comply with the instructions, may void your authority to operate this...
...Canada (IC) Radio Interference Statements For 120-Volt Models This Oki Data apparatus complies with FCC regulations. However, there is the responsibility of the user to obtain the required shielded cable in a particular installation. These limits are designed to provide reasonable protection against harmful interference...for 120-Volt Models. It is no guarantee that to which can radiate radio frequency energy and, if not installed and used in a residential installation. This equipment has been tested and found to comply with the instructions, may void your authority to operate this...

B6200/6300 Series Setup Guide - English
Page 4
... for the printer 12 Space requirements 12 Environment 12 Installing the Face Up (Rear) Tray 14 Installing the optional accessories 15 Installing a Universal Tray 16 Installing the Duplex Unit 21 Installing the Offset Catch Tray 23 Installing a Network Software Kit, Hard Disk, Compact Flash ... or Additional Memory 26 Preparing the printer 26 Closing the printer 27 Installing a Network Software Kit 28 Installing a Hard Disk 30 Installing a Compact Flash Disk 32 Installing Additional Memory 34 Installing the Drum-Toner Cartridge 35 Connecting an interface cable 38 Connecting the ...
... for the printer 12 Space requirements 12 Environment 12 Installing the Face Up (Rear) Tray 14 Installing the optional accessories 15 Installing a Universal Tray 16 Installing the Duplex Unit 21 Installing the Offset Catch Tray 23 Installing a Network Software Kit, Hard Disk, Compact Flash ... or Additional Memory 26 Preparing the printer 26 Closing the printer 27 Installing a Network Software Kit 28 Installing a Hard Disk 30 Installing a Compact Flash Disk 32 Installing Additional Memory 34 Installing the Drum-Toner Cartridge 35 Connecting an interface cable 38 Connecting the ...

B6200/6300 Series Setup Guide - English
Page 5
... Unit, Internal Hard Drive and additional Options 50 To Load the Manuals 50 Macintosh - OS X.1 53 Install the Driver 53 Adding the Printer for USB 53 Adding the Printer for A Network 51 Create the Desktop... additional options 52 To print a job using the optional duplex unit 52 To Load the Manuals 52 Macintosh - OS 9.1 51 Install the Driver 51 Create the Desktop Printer for a Network 54 Activate the Duplex Unit and Additional Options . . . . 54... 59 Error Messages 61 Index 63 Limited Warranty: United States and Canada 64 Oki Data Americas Service Centers 66 CONTENTS > 5
... Unit, Internal Hard Drive and additional Options 50 To Load the Manuals 50 Macintosh - OS X.1 53 Install the Driver 53 Adding the Printer for USB 53 Adding the Printer for A Network 51 Create the Desktop... additional options 52 To print a job using the optional duplex unit 52 To Load the Manuals 52 Macintosh - OS 9.1 51 Install the Driver 51 Create the Desktop Printer for a Network 54 Activate the Duplex Unit and Additional Options . . . . 54... 59 Error Messages 61 Index 63 Limited Warranty: United States and Canada 64 Oki Data Americas Service Centers 66 CONTENTS > 5

B6200/6300 Series Setup Guide - English
Page 6
...> INTRODUCTION INTRODUCTION WELCOME Thank you set up, install and operate your printer. This User's Guide and other important user documents including the Reference Guide, are based on the CD-ROM supplied with the basics of how to the B6200/B6300 Series printers in general although illustrations used are... on the B6300. To understand its features fully and to help you for choosing an Oki B6200/B6300 Series printer. This is applicable to operate your computer and, if required, network environment. This guide is a guide to...
...> INTRODUCTION INTRODUCTION WELCOME Thank you set up, install and operate your printer. This User's Guide and other important user documents including the Reference Guide, are based on the CD-ROM supplied with the basics of how to the B6200/B6300 Series printers in general although illustrations used are... on the B6300. To understand its features fully and to help you for choosing an Oki B6200/B6300 Series printer. This is applicable to operate your computer and, if required, network environment. This guide is a guide to...
B6200/6300 Series Setup Guide - English
Page 9
..., maintain proper lifting posture to prevent injuries. • Other safety information is available in the Installation Safety or Warranty and Regulatory Information booklet supplied with consumables weighs 20.4kg (45lb) (B6200) or 22.6kg (50lb) (B6300). The printer with this product and should always be read... prior to making a test print from the front and rear of the following sections guide you through the process of installing and setting up your configuration....
..., maintain proper lifting posture to prevent injuries. • Other safety information is available in the Installation Safety or Warranty and Regulatory Information booklet supplied with consumables weighs 20.4kg (45lb) (B6200) or 22.6kg (50lb) (B6300). The printer with this product and should always be read... prior to making a test print from the front and rear of the following sections guide you through the process of installing and setting up your configuration....
B6200/6300 Series Setup Guide - English
Page 10
... pages at 5% coverage, i.e. 5% of the addressable print area is provided with your printer as a standard configuration, refer to "Installing the optional accessories" on page 15 to install the unit. 10 > INSTALLATION AND RELOCATION PROCEDURE Oki has provided an interface, under MS Windows, to help you in the printer packaging. If any items are included...
... pages at 5% coverage, i.e. 5% of the addressable print area is provided with your printer as a standard configuration, refer to "Installing the optional accessories" on page 15 to install the unit. 10 > INSTALLATION AND RELOCATION PROCEDURE Oki has provided an interface, under MS Windows, to help you in the printer packaging. If any items are included...
B6200/6300 Series Setup Guide - English
Page 11
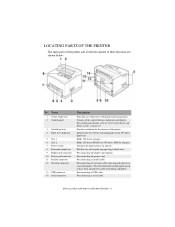
... printer. For connecting the network cable when using the printer as a network printer. (The Network Software Kit option needs to have been installed to print on paper larger than Letter. Switches the printer power on page 43. Pull this tray out to enable networking capability.) For... of the control buttons, indicators and display. For control panel details, refer to "The Control Panel and Menu system" on and off. INSTALLATION AND RELOCATION PROCEDURE > 11 Consists of their functions are output here with printed side facing down. Indicates the level of paper. For connecting...
... printer. For connecting the network cable when using the printer as a network printer. (The Network Software Kit option needs to have been installed to print on paper larger than Letter. Switches the printer power on page 43. Pull this tray out to enable networking capability.) For... of the control buttons, indicators and display. For control panel details, refer to "The Control Panel and Menu system" on and off. INSTALLATION AND RELOCATION PROCEDURE > 11 Consists of their functions are output here with printed side facing down. Indicates the level of paper. For connecting...
B6200/6300 Series Setup Guide - English
Page 12
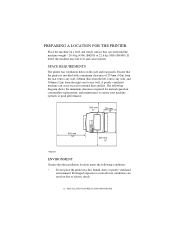
..., and maintenance to ensure your machine operates at peak performance. 200 mm 8'' 255 mm 10" 402 mm 16" 300 mm 12" * B6200 ENVIRONMENT Ensure that the installation location meets the following conditions: • Do not place the printer in fire or electric shock. 12... > INSTALLATION AND RELOCATION PROCEDURE Prolonged exposure to any wall, and 300mm (12in) from the right vent to such adverse conditions can withstand the machine weight - 20.4 kg (45lb) (B6200) or 22.6 kg (50lb) (B6300). A poorly ventilated machine can...
..., and maintenance to ensure your machine operates at peak performance. 200 mm 8'' 255 mm 10" 402 mm 16" 300 mm 12" * B6200 ENVIRONMENT Ensure that the installation location meets the following conditions: • Do not place the printer in fire or electric shock. 12... > INSTALLATION AND RELOCATION PROCEDURE Prolonged exposure to any wall, and 300mm (12in) from the right vent to such adverse conditions can withstand the machine weight - 20.4 kg (45lb) (B6200) or 22.6 kg (50lb) (B6300). A poorly ventilated machine can...
B6200/6300 Series Setup Guide - English
Page 13
Rapid heating of air-conditioning or heating. INSTALLATION AND RELOCATION PROCEDURE > 13 • Temperature range 10 - 32 °C (50 - 89 °F), humidity range 15 - 85% (no condensation). When condensation occurs, leave the printer ...
Rapid heating of air-conditioning or heating. INSTALLATION AND RELOCATION PROCEDURE > 13 • Temperature range 10 - 32 °C (50 - 89 °F), humidity range 15 - 85% (no condensation). When condensation occurs, leave the printer ...
B6200/6300 Series Setup Guide - English
Page 14
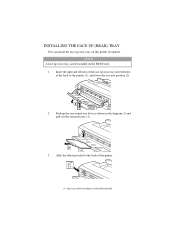
Push up (rear) tray into the holes at the back of the printer (1), and lower the tray into position (2). 2. Insert the right and left tabs of the printer. 14 > INSTALLATION AND RELOCATION PROCEDURE INSTALLING THE FACE UP (REAR) TRAY You can be installed on this printer if required. Affix the label provided to the back of the face up the rear output tray lever as shown in the diagram (1) and pull out the extension tray (2). 3. NOTE A face up (rear) tray can install the face up (rear) tray on the B6300 only. 1.
Push up (rear) tray into the holes at the back of the printer (1), and lower the tray into position (2). 2. Insert the right and left tabs of the printer. 14 > INSTALLATION AND RELOCATION PROCEDURE INSTALLING THE FACE UP (REAR) TRAY You can be installed on this printer if required. Affix the label provided to the back of the face up the rear output tray lever as shown in the diagram (1) and pull out the extension tray (2). 3. NOTE A face up (rear) tray can install the face up (rear) tray on the B6300 only. 1.
B6200/6300 Series Setup Guide - English
Page 15
... switched off before loading paper. Never open or remove machine covers that are no optional accessories to install, proceed to alter the machine configuration, or modify any optional accessories, install them before setting the drum-toner cartridge and before connecting any interface cables or options. Do not ... DrumToner Cartridge" on page 35. Connecting cables or options to the Online Help for the printer driver. CAUTION! INSTALLATION AND RELOCATION PROCEDURE > 15 For details, refer to a live machine may result in this guide. An unauthorized modification can cause electric ...
... switched off before loading paper. Never open or remove machine covers that are no optional accessories to install, proceed to alter the machine configuration, or modify any optional accessories, install them before setting the drum-toner cartridge and before connecting any interface cables or options. Do not ... DrumToner Cartridge" on page 35. Connecting cables or options to the Online Help for the printer driver. CAUTION! INSTALLATION AND RELOCATION PROCEDURE > 15 For details, refer to a live machine may result in this guide. An unauthorized modification can cause electric ...
B6200/6300 Series Setup Guide - English
Page 16
This section explains how to install two trays as an example. 1. Ensure that you have all of universal tray (550-sheet) option to this printer. INSTALLING A UNIVERSAL TRAY You can install up to two levels of the following items: • Tray module and paper tray • Fasteners (four pieces) 16 > INSTALLATION AND RELOCATION PROCEDURE
This section explains how to install two trays as an example. 1. Ensure that you have all of universal tray (550-sheet) option to this printer. INSTALLING A UNIVERSAL TRAY You can install up to two levels of the following items: • Tray module and paper tray • Fasteners (four pieces) 16 > INSTALLATION AND RELOCATION PROCEDURE
B6200/6300 Series Setup Guide - English
Page 17
...so that the guide pins at the four corners of the top module. CAUTION! The tray module must be installed at the top level by holding the parts as shown in the diagram. 4. INSTALLATION AND RELOCATION PROCEDURE > 17 Place the tray module to be damaged. Lift the tray module to step 6 if... you are installing only one tray module. 3. Otherwise, the interior parts may be installed at the base plate of the bottom module fit into the holes at the bottom level on a flat surface, then ...
...so that the guide pins at the four corners of the top module. CAUTION! The tray module must be installed at the top level by holding the parts as shown in the diagram. 4. INSTALLATION AND RELOCATION PROCEDURE > 17 Place the tray module to be damaged. Lift the tray module to step 6 if... you are installing only one tray module. 3. Otherwise, the interior parts may be installed at the base plate of the bottom module fit into the holes at the bottom level on a flat surface, then ...
B6200/6300 Series Setup Guide - English
Page 18
Insert the fasteners securely. 18 > INSTALLATION AND RELOCATION PROCEDURE 5. Insert the fasteners provided into the two locations inside the tray module and the two locations at the back of the tray module.
Insert the fasteners securely. 18 > INSTALLATION AND RELOCATION PROCEDURE 5. Insert the fasteners provided into the two locations inside the tray module and the two locations at the back of the tray module.


