
2nd Paper Tray Installation
Page 1
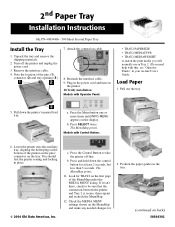
... take the printer off the printer and unplug the power cord. 3. Reattach the interface cable. 9. Press and hold down the printer's manual feed tray. Check the MEDIA MENU settings shown on -line User's Guide. Turn off -line. MENU appears on the first page of the pins (1), connector (2) and tray opening (3). 7. Models with this, see "Operator Panels" in place. © 2004 Oki Data Americas, Inc. The MenuMap prints. 11. Note the location of the MenuMap under the MEDIA MENU listing. Pull out...
... take the printer off the printer and unplug the power cord. 3. Reattach the interface cable. 9. Press and hold down the printer's manual feed tray. Check the MEDIA MENU settings shown on -line User's Guide. Turn off -line. MENU appears on the first page of the pins (1), connector (2) and tray opening (3). 7. Models with this, see "Operator Panels" in place. © 2004 Oki Data Americas, Inc. The MenuMap prints. 11. Note the location of the MenuMap under the MEDIA MENU listing. Pull out...
Guide: Software Installation B4200 (American English)
Page 4
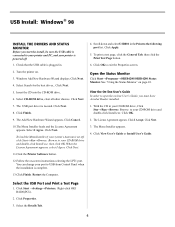
... best driver... Open the Status Monitor Click Start→Programs→OKIB4200/OKIB4200 Status Monitor. The USB port driver is plugged in the Print to exit the Properties screen. Restart the Computer. 4. Click OK to the following port list. Select I Agree. Windows Add New Hardware Wizard displays. Turn the printer on -line User's Guide, you start the install, be sure the USB cable is connected to open the on . 3. Click Cancel. 10.The Menu Installer loads and...
... best driver... Open the Status Monitor Click Start→Programs→OKIB4200/OKIB4200 Status Monitor. The USB port driver is plugged in the Print to exit the Properties screen. Restart the Computer. 4. Click OK to the following port list. Select I Agree. Windows Add New Hardware Wizard displays. Turn the printer on -line User's Guide, you start the install, be sure the USB cable is connected to open the on . 3. Click Cancel. 10.The Menu Installer loads and...
Guide: Software Installation B4200 (American English)
Page 5
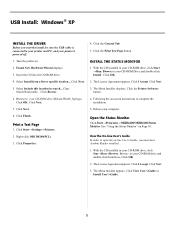
... displays. 3. Click Next. 7. Click Next. 8. Right-click OKI B4200(PCL). 3. Click the Print Test Page button. Browse to your CD-ROM drive and double-click Install.exe. Click OK. 2. Click Next. 3. Following the on -line User's Guide, you must have Acrobat Reader installed. 1. Reboot your CD-ROM drive, click Star→Run→Browse. See "Using the Status Monitor" on . 2. The License Agreement appears. Select Install from a list or specific location... Clear...
... displays. 3. Click Next. 7. Click Next. 8. Right-click OKI B4200(PCL). 3. Click the Print Test Page button. Browse to your CD-ROM drive and double-click Install.exe. Click OK. 2. Click Next. 3. Following the on -line User's Guide, you must have Acrobat Reader installed. 1. Reboot your CD-ROM drive, click Star→Run→Browse. See "Using the Status Monitor" on . 2. The License Agreement appears. Select Install from a list or specific location... Clear...

Guide: Software Installation B4200 (American English)
Page 6
... -line User's Guide, you start the install, be sure the USB cable is connected to open the on . 2. Found New Hardware Wizare displays. Clear other selections. The driver is powered off. 1. Open the Status Monitor Click Start→Programs→OKIB4200/OKIB4200 Status Monitor. Click Star→Run→Browse. The Menu Installer appears. 5. Right-click the OL4200 icon, then click Properties. 2. Click the Print Test Page button. Click I Accept. Click the Printer Software button...
... -line User's Guide, you start the install, be sure the USB cable is connected to open the on . 2. Found New Hardware Wizare displays. Clear other selections. The driver is powered off. 1. Open the Status Monitor Click Start→Programs→OKIB4200/OKIB4200 Status Monitor. Click Star→Run→Browse. The Menu Installer appears. 5. Right-click the OL4200 icon, then click Properties. 2. Click the Print Test Page button. Click I Accept. Click the Printer Software button...

Guide: Software Installation B4200 (American English)
Page 7
... Install.exe. SELECT THE USB PORT AND PRINT A TEST PAGE 1. Insert the CD into your CD-ROM drive. 2. Click Finish. 7. Click the Printer Software button. 4. View the On-line User's Guide In order to your printer and PC, and your CD-ROM drive, click Start →Run. Scroll down and select USB001 in your printer is powered off. 1. Select Removable Media... Click Next. 5. The USB driver is connected to open the on -screen instructions...
... Install.exe. SELECT THE USB PORT AND PRINT A TEST PAGE 1. Insert the CD into your CD-ROM drive. 2. Click Finish. 7. Click the Printer Software button. 4. View the On-line User's Guide In order to your printer and PC, and your CD-ROM drive, click Start →Run. Scroll down and select USB001 in your printer is powered off. 1. Select Removable Media... Click Next. 5. The USB driver is connected to open the on -screen instructions...
Guide: Software Installation B4200 (American English)
Page 9
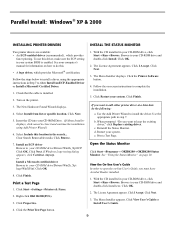
... Print Test Page button. 9 Check that the cable is enabled. Click Next. 5. Clear Search Removable media. Click Next. With the CD installed in the search... Click I Accept. Follow the steps below to install a driver, using Add Printer Wizard.) 6. Click OK. Print a Test Page 1. Click I Accept. Follow the on page 10. See "Using the Status Monitor" on -screen instructions to open the on-line User's Guide, you want to do the following: a. Click OK. 2. Parallel Install: Windows® XP & 2000 INSTALLING PRINTER DRIVERS INSTALL...
... Print Test Page button. 9 Check that the cable is enabled. Click Next. 5. Clear Search Removable media. Click Next. With the CD installed in the search... Click I Accept. Follow the steps below to install a driver, using Add Printer Wizard.) 6. Click OK. Print a Test Page 1. Click I Accept. Follow the on page 10. See "Using the Status Monitor" on -screen instructions to open the on-line User's Guide, you want to do the following: a. Click OK. 2. Parallel Install: Windows® XP & 2000 INSTALLING PRINTER DRIVERS INSTALL...
RAM Memory Expansion Options Installation Instructions
Page 1
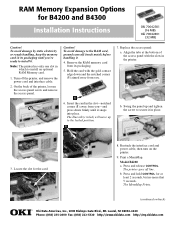
... the printer. 6. Replace the access panel: a. Press and hold CONTROL for at the bottom of the printer, loosen the access panel screw and remove the access panel. RAM Memory Expansion Options for the card: 8. Turn off line. Remove the RAM memory card from you 're ready to the locked position. Align the tabs at least 2 seconds, but no more that 5 seconds. Reattach the interface cord and power cable, then turn on back) Oki Data...
... the printer. 6. Replace the access panel: a. Press and hold CONTROL for at the bottom of the printer, loosen the access panel screw and remove the access panel. RAM Memory Expansion Options for the card: 8. Turn off line. Remove the RAM memory card from you 're ready to the locked position. Align the tabs at least 2 seconds, but no more that 5 seconds. Reattach the interface cord and power cable, then turn on back) Oki Data...
Guide: User's B4200/B4300
Page 17
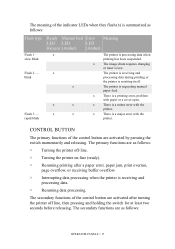
slow blink Flash 2 - x The image drum requires changing or toner is resetting itself. x There is a minor error with paper or a cover open. blink Flash 3 - The printer is receiving and processing data during printing or the printer is low. CONTROL BUTTON The primary functions of the control button are as follows: > Turning the printer off line, then pressing and holding the switch for at least two seconds before releasing. The primary functions are activated by pressing the switch momentarily...
slow blink Flash 2 - x The image drum requires changing or toner is resetting itself. x There is a minor error with paper or a cover open. blink Flash 3 - The printer is receiving and processing data during printing or the printer is low. CONTROL BUTTON The primary functions of the control button are as follows: > Turning the printer off line, then pressing and holding the switch for at least two seconds before releasing. The primary functions are activated by pressing the switch momentarily...
Guide: User's B4200/B4300
Page 18
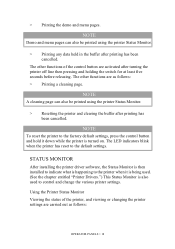
... various printer settings. NOTE To reset the printer to the factory default settings, press the control button and hold it is being used to the default settings. NOTE A cleaning page can also be printed using the printer Status Monitor. > Printing any data held in the buffer after printing has been cancelled. Using the Printer Status Monitor Viewing the status of the control button are as follows: OPERATOR PANELS > 18 NOTE Demo and menu pages can also be printed using the printer Status Monitor. > Resetting the printer and clearing...
... various printer settings. NOTE To reset the printer to the factory default settings, press the control button and hold it is being used to the default settings. NOTE A cleaning page can also be printed using the printer Status Monitor. > Printing any data held in the buffer after printing has been cancelled. Using the Printer Status Monitor Viewing the status of the control button are as follows: OPERATOR PANELS > 18 NOTE Demo and menu pages can also be printed using the printer Status Monitor. > Resetting the printer and clearing...
Guide: User's B4200/B4300
Page 20
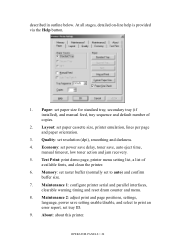
... warning timing and reset drum counter and menu. 8. Paper: set to print an error report, set paper cassette size, printer emulation, lines per page and paper orientation. 3. Memory: set raster buffer (normally set paper size for standard tray, secondary tray (if installed), and manual feed, tray sequence and default number of available fonts, and clean the printer. 6. Test Print: print demo page, printer menu setting list, a list of copies. 2. At all stages, detailed on-line help is provided via the Help button. 1. OPERATOR PANELS > 20 Maintenance 2: adjust print and page...
... warning timing and reset drum counter and menu. 8. Paper: set to print an error report, set paper cassette size, printer emulation, lines per page and paper orientation. 3. Memory: set raster buffer (normally set paper size for standard tray, secondary tray (if installed), and manual feed, tray sequence and default number of available fonts, and clean the printer. 6. Test Print: print demo page, printer menu setting list, a list of copies. 2. At all stages, detailed on-line help is provided via the Help button. 1. OPERATOR PANELS > 20 Maintenance 2: adjust print and page...
Guide: User's B4200/B4300
Page 22
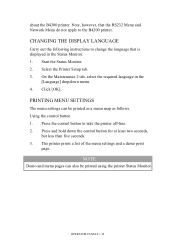
... and menu pages can be printed using the printer Status Monitor. OPERATOR PANELS > 22 PRINTING MENU SETTINGS The menu settings can also be printed as a menu map as follows. Press the control button to the B4200 printer. Press and hold down the control button for at least two seconds, but less than five seconds. 3. The printer prints a list of the menu settings and a demo print page. CHANGING THE DISPLAY LANGUAGE Carry out the following instructions to change the language that the RS232 Menu and Network Menu do...
... and menu pages can be printed using the printer Status Monitor. OPERATOR PANELS > 22 PRINTING MENU SETTINGS The menu settings can also be printed as a menu map as follows. Press the control button to the B4200 printer. Press and hold down the control button for at least two seconds, but less than five seconds. 3. The printer prints a list of the menu settings and a demo print page. CHANGING THE DISPLAY LANGUAGE Carry out the following instructions to change the language that the RS232 Menu and Network Menu do...
Guide: User's B4200/B4300
Page 42
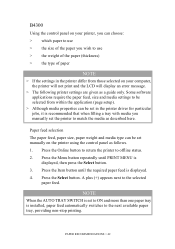
... not print and the LCD will display an error message. > The following printer settings are given as a guide only. A plus (+) appears next to offline status. 2. Press the Online button to return the printer to the selected paper feed. Press the Select button. Some software applications require the paper feed, size and media settings to be selected from those selected on your printer, you manually set to ON and more than one paper tray is installed, paper feed automatically switches to use...
... not print and the LCD will display an error message. > The following printer settings are given as a guide only. A plus (+) appears next to offline status. 2. Press the Online button to return the printer to the selected paper feed. Press the Select button. Some software applications require the paper feed, size and media settings to be selected from those selected on your printer, you manually set to ON and more than one paper tray is installed, paper feed automatically switches to use...
Guide: User's B4200/B4300
Page 73
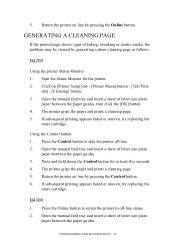
... the Control button to off line. 2. Return the printer on [Printer Setup] tab - [Printer Menu] button - [Test Print tab] - [Cleaning] button. 3. If subsequent printing appears faded or uneven, try replacing the toner cartridge. Open the manual feed tray and insert a sheet of fading, streaking or erratic marks, the problem may be cleared by pressing the Online button. B4200 Using the printer Status Monitor 1. The printer grips the paper and prints a cleaning page. 5. CONSUMABLES AND MAINTENANCE > 73 Click on line by pressing the Control button. 6. Using the Control button...
... the Control button to off line. 2. Return the printer on [Printer Setup] tab - [Printer Menu] button - [Test Print tab] - [Cleaning] button. 3. If subsequent printing appears faded or uneven, try replacing the toner cartridge. Open the manual feed tray and insert a sheet of fading, streaking or erratic marks, the problem may be cleared by pressing the Online button. B4200 Using the printer Status Monitor 1. The printer grips the paper and prints a cleaning page. 5. CONSUMABLES AND MAINTENANCE > 73 Click on line by pressing the Control button. 6. Using the Control button...
Guide: User's B4200/B4300
Page 77
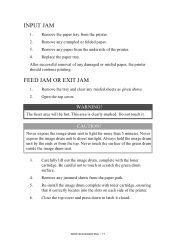
FEED JAM OR EXIT JAM 1. The fuser area will be hot. Never expose the image drum unit to touch or scratch the green drum surface. 4. Re-install the image drum complete with the toner cartridge. Remove any misfed sheets as given above. 2. Replace the paper tray. This area is clearly marked. Be careful not to direct sunlight. Open the top cover. Always hold the image drum unit by the ends or from the paper path. 5. Remove any jammed sheets from...
FEED JAM OR EXIT JAM 1. The fuser area will be hot. Never expose the image drum unit to touch or scratch the green drum surface. 4. Re-install the image drum complete with the toner cartridge. Remove any misfed sheets as given above. 2. Replace the paper tray. This area is clearly marked. Be careful not to direct sunlight. Open the top cover. Always hold the image drum unit by the ends or from the paper path. 5. Remove any jammed sheets from...
Guide: User's B4200/B4300
Page 78
... after switching on each paper exposed to background. Page has repetitive Damaged image drum Generate a cleaning page, repetitive marks marks. check page. humidity. toner level. NOTE If the edge of faint Drop out caused by using Change paper stocks, check paper storage print appears on . Image drum cartridge not Reinstall image drum cartridge. Install new toner cartridge. Hardware problem. Remove the jammed paper from dry environments, causes toner to stick to high environment or use a humidifier. PRINT QUALITY PROBLEMS Before consulting a service representative...
... after switching on each paper exposed to background. Page has repetitive Damaged image drum Generate a cleaning page, repetitive marks marks. check page. humidity. toner level. NOTE If the edge of faint Drop out caused by using Change paper stocks, check paper storage print appears on . Image drum cartridge not Reinstall image drum cartridge. Install new toner cartridge. Hardware problem. Remove the jammed paper from dry environments, causes toner to stick to high environment or use a humidifier. PRINT QUALITY PROBLEMS Before consulting a service representative...

Guide: User's B4200/B4300
Page 79
...problem. paper package). Install paper print side down in paper. Make sure you have selected the right driver TROUBLESHOOTING > 79 LED array is darker than usual. Toner low. Dirty rollers; Recommended operating humidity: 20-80% SOFTWARE PROBLEMS Your software (operating environment, applications and printer drivers) controls the printing process. Hardware problem. Is toner low? Clean LED array. Install new toner cartridge. Store paper in tray. (Note arrow on page. Vertical black lines. Bold characters and dark lines are smeared. toner Replace image drum and toner...
...problem. paper package). Install paper print side down in paper. Make sure you have selected the right driver TROUBLESHOOTING > 79 LED array is darker than usual. Toner low. Dirty rollers; Recommended operating humidity: 20-80% SOFTWARE PROBLEMS Your software (operating environment, applications and printer drivers) controls the printing process. Hardware problem. Is toner low? Clean LED array. Install new toner cartridge. Store paper in tray. (Note arrow on page. Vertical black lines. Bold characters and dark lines are smeared. toner Replace image drum and toner...
Guide: User's B4200/B4300
Page 80
.... Software Problems. Printer freezes or Booting the computer displays error while the printer is on the next. TROUBLESHOOTING > 80 Size of Adjust software accordingly, or set LINES lines per page, but Check cable connection. Sometimes purely text documents will be caused by forms or adhesives passing through the hot fusing unit. partly on message when can withstand heating, and provide adequate ventilation. nothing happens, but your printer. Garbage prints. this image at size, or install more memory...
.... Software Problems. Printer freezes or Booting the computer displays error while the printer is on the next. TROUBLESHOOTING > 80 Size of Adjust software accordingly, or set LINES lines per page, but Check cable connection. Sometimes purely text documents will be caused by forms or adhesives passing through the hot fusing unit. partly on message when can withstand heating, and provide adequate ventilation. nothing happens, but your printer. Garbage prints. this image at size, or install more memory...
Guide: User's B4200/B4300
Page 88
... Maintenance menu 31 Media menu 26 Memory menu 31 Network menu 30 Parallel menu 28 PCL menu 27 PPR menu 27 Print menu 25 RS232C menu 29 System adjustment menu 31 System configuration menu .........26 Usage menu 32 USB menu 30 O operator panel B4200 16 B4300 23 options installing 82 P Page orientation setting in Windows 53, 56 Paper Envelope types 34 Exit jam 77 Feed jam 77 feed sequence 38 Input jam 77 Installing 36 Label types 35 Paper types 34 size setting in Windows 51 Transparencies 35 tray selection in Windows 51 Paper and envelope types 34 paper...
... Maintenance menu 31 Media menu 26 Memory menu 31 Network menu 30 Parallel menu 28 PCL menu 27 PPR menu 27 Print menu 25 RS232C menu 29 System adjustment menu 31 System configuration menu .........26 Usage menu 32 USB menu 30 O operator panel B4200 16 B4300 23 options installing 82 P Page orientation setting in Windows 53, 56 Paper Envelope types 34 Exit jam 77 Feed jam 77 feed sequence 38 Input jam 77 Installing 36 Label types 35 Paper types 34 size setting in Windows 51 Transparencies 35 tray selection in Windows 51 Paper and envelope types 34 paper...
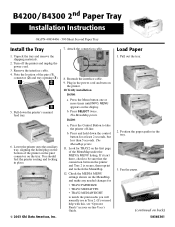
B4200/B4300 2nd Paper Tray Install Instructions
Page 1
... the MEDIA MENU listing. Attach the connection cable. 8. Plug in your on-line User's Guide. Press the Menu button one or more times until INFO. Press the Control Button to be sure that the connection between the printer and Tray 2 is secure, then reprint and recheck the MenuMap. 12. Load Paper 1. B4200/B4300 2nd Paper Tray Installation Instructions Oki PN-40834406 - 500 Sheet Second Paper Tray Install the Tray 1. Press SELECT twice. Press and hold down the printer's manual feed tray. 6. Position the paper guides...
... the MEDIA MENU listing. Attach the connection cable. 8. Plug in your on-line User's Guide. Press the Menu button one or more times until INFO. Press the Control Button to be sure that the connection between the printer and Tray 2 is secure, then reprint and recheck the MenuMap. 12. Load Paper 1. B4200/B4300 2nd Paper Tray Installation Instructions Oki PN-40834406 - 500 Sheet Second Paper Tray Install the Tray 1. Press SELECT twice. Press and hold down the printer's manual feed tray. 6. Position the paper guides...

Network User's Guide for OkiLAN 6020e
Page 7
... User's Guide vii Please be sure that require service • Consumer relations • Interface information • Availability and installation of printer drivers and support for times and availability of commercial software packages. Our customer service representatives are trained on all current Oki Data products They can answer your questions regarding: • Installation • Determination of printer issues that you can describe your software user's manual for the latest network operating...
... User's Guide vii Please be sure that require service • Consumer relations • Interface information • Availability and installation of printer drivers and support for times and availability of commercial software packages. Our customer service representatives are trained on all current Oki Data products They can answer your questions regarding: • Installation • Determination of printer issues that you can describe your software user's manual for the latest network operating...


